 Arawn
Arawn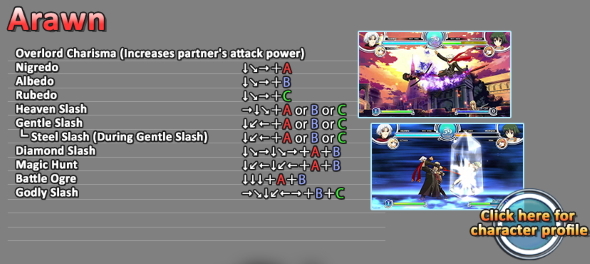 Arawn's Move List
Introduction
Arawn is a Demon King, nice guy, baller, player, and all around badass.
He's also a solid character with a lot of basic special tools such as a fireball, shoryuken, and a rekka. Arawn also has a boatload of range and some special abilities to mess with his opponents meter in addition to some other various fringe benefits. He is strong and well rounded and a good choice for anyone, beginner or advanced player.
Partners
Arawn is a solid character and you can pick your assist for the matchup. One thing to keep in mind is that since a lot of his attacks send the opponent flying back follow types with short range can be hard to use. Assists that only have lighter attacks (such as Satsuki) can also be hard to use because you need heavier assist moves to link together most of his combos and make things safe due to the recovery on specials.
Camyu
The slow startup on her fireball is great for covering Arawn's unsafe specials and normals allowing a more aggressive neutral game. Camyu can be used in combos but the hitconfirms are tight since you need to summon the fireball very early.
Black orb is also universally useful.
Llyr
5D is nothing special but it links together corner combos and super DP combos well for Arawn. 4/6D stab is the perfect speed for comboing from many of Arawn's specials, but you can only follow it up in or near the corner. Can still be used to cover Arawn's approaches well due to the range.
The shield on 4/6D is also pretty useful for anyone.
Mizuki
An older pick for Arawn, probably good for beginners. A couple of the 5D juggles take some getting used to, but all combos with Mizuki in them do a boatload of damage in combination with Arawn's assist damage buff.
Ma-Ryan
5D is good as a poke and 4/6D is pretty good at linking together combos in the corner in addition to respectful damage. I don't think this assist is actually bad for anyone.
Serika
Matchup specific. 4/6D space control is good in combination with Arawn's normal reach. What you can actually make happen with 5D is going to depend on the matchup, though. For most characters the 5D hits quite a few times making it good for pressure strings and making things safe.
Strategy
Shoryu when they jump
Shoryu when you hit them
Shoryu out of blockstrings
Combos
(Note: any damage listed is in Emotion Neutral state)
Solo Combos
2AAA 5B 2C
2A 5B 2B 2C / 623C
JB/JC 5A 5B 623C or any other ender (JB is great for crossing up)
...5C BC
2AAA 5B 214A > 214A/B (even works from max range)
2AA / 2A5B / 5B2B > 236B/C (drain life / meter)
2AA5B / 2A5B2B / 5B2B > 623C (max damage)
- Arawn can use longer strings if needed depending on the character. Best to keep them short anyway so it doesn't matter much.
- If you confirm standing you can add 2B to many meterless confirms, if you so choose.
2AA5B / 2A5B2B 214214+AB
2AA / 2A5B / 5B2B > 236236+AB
2AAA 5B 214A > 63214,6+AB (even works from max range)
- If you are punishing and plan to use assist to combo after 236236+AB, skip the starter entirely and go straight to super for maximum damage.
close BC > 5B/2B > 623B/236B/236C
close BC > 236236AB
midrange (or closer) BC > 623A/B
far (or closer) BC > 63214,6+BC
emotion high or counterhit BC > 623C
forward throw into corner > 5B > 236B/C or 623B or 236236+AB
forward throw into corner from out of corner > 623C / 214214AB
OTGs
214X > 214A > wallbounce from out of corner > 214A/B
back/forward throw > 214B
BC > 214C
Battle Ogre
...5C 214A 214B > 236236+AB / 623C / 236B/C / 63214,6+BC (midscreen)
...5C 214A 214A > 236236+AB / 623C / 236B/C / 63214,6+BC (corner)
...5C BC 623C (max meterless damage)
Assist Combos
Camyu
... 5B~D > dash BC > 623C / 214214+AB / 5B 236B/C (you can also press B&D at the same time)
5D (meterless summon) > 623B > 623C / 214214+AB / 5B 236B/C
5D (meterless summon) > 214X > 214B/C > ?? (what followup works depends on how early the rekka is done)
backthrow (into 4/6D orb) > ?? (what followup works depends on distance from the orb)
midscreen: 236236+AB > 2D > dash BC > 623C
corner: 236236+AB > 5D > dash BC > 623C / 214214+AB / 5B 236B/C
corner: ...5B~D > 236B/C > dash BC > 623C / 214214+AB / 5B 236B/C
midscreen: ...2B~D 214214+AB > dash > 623C / 5B
Llyr
236236+AB > 5D > 623C / 214214+AB / dash 5B 236B/C
623B > 5D > 623C / 214214+AB / dash 5B 236B/C
near corner: 5B 214214D~AB > dash > 623C / 5B 236B/C (works in corner too, but skip the dash)
near corner 5B 236D~B/C > dash > 623C / 5B 236B/C (works in corner too, but skip the dash)
corner: 5B 214214D~AB > 214214+AB (corner 6D combos don't work with Llyr fully in the corner)
corner: 5B 236D~B/C > 214214+AB (corner 6D combos don't work with Llyr fully in the corner)
corner: 623B/C / 214214+AB / 236B/C > 623C / 214214+AB / 5B 236B/C
Ma-Ryan
corner: anything > 6D > anything
Mizuki
236236+AB > 5D > walk 623C
214A > 5D > 214B > walk 623C
632C > 4/6D (5,025)
632B > 4/6D (4,025)
A > B > 5C > 5D > 66 > 632C (7,120) (1 bar)
A > B > 5D > 214X > ~D > 632C (6,395) (1 bar)
in or near corner: 623C / 236B/C / 214214+AB > 6D > 623C
in or near corner: 623C / 236B/C / 214214+AB > 6D > 5B 236B/C
corner: 214214+AB / 236B/C > 5D > 66 BC > 5B 236B/C
corner: 214214+AB / 236B/C > 5D > 66 BC > 214214AB
Serika
...5B 214214D~AB > dash 5B 2B > whatever
...5B 236D~B/C > dash 5B 2B > whatever
...214X > 5D > 214X > ?? (depends on who you are fighting but this usually does something)
Serika 5D versus
...Chizuru
632C > 5D > 66 > 632C (5,275-5,525 depending on timing/space)
632B > 5D > 66 > 632C (5,515-6,190 depending on timing/space)
A > B > 214A > 5D > 214B > 66 > 632C (5,060)
A > B > 5D > C > 66 > 632C (5,350)
A > B > 5D > 2C > 66 > BC > 632C (5,760)
Ulthury
A > B > 5D > 214A > 214B > ~D > 236236AB (6,350) (2 bars) / 632C (5,700) / BC > 214X (5,150) / 236B (4,830 + Life Drain) / 236C (4,250 + Power Drain)
A > B > 5C > 5D > BC > ~D > 66 > BC > 632C (6,930) (1 bar) / 236236 (7,680) (2 bars)
236236AB > D (after first hit of 236236AB) > BC > 632C (7,900) (2 bars)
Move List
5A
|
| Damage
|
Meter
|
Guard
|
Cancel
|
Startup
|
Active
|
Recovery
|
Advantage
|
Hit Stun
|
Guard Stun
|
| 500
|
0/2
|
St/Cr
|
S/!/P
|
4
|
5
|
15
|
-10
|
12
|
10
|
|
Close range jab. Can be used as anti hop and wiffs most crouchers.
|
|
2A
|
| Damage
|
Meter
|
Guard
|
Cancel
|
Startup
|
Active
|
Recovery
|
Advantage
|
Hit Stun
|
Guard Stun
|
| 400
|
0/2
|
Cr
|
N/S/!/P
|
8
|
2
|
9
|
-1
|
12
|
10
|
|
Really good 2A, hits low. Chainable and has a low profile.
|
|
jA
|
| Damage
|
Meter
|
Guard
|
Cancel
|
Startup
|
Active
|
Recovery
|
Advantage
|
Hit Stun
|
Guard Stun
|
| 500
|
0/2
|
St
|
P
|
5
|
15
|
-
|
-
|
16
|
12
|
|
Fast air to air move. Doesn't even hit people crouching. It has quite a few active frames so throw it out early in air to air situations. I would recommend avoiding situations where you need to use this move.
|
|
5B
|
| Damage
|
Meter
|
Guard
|
Cancel
|
Startup
|
Active
|
Recovery
|
Advantage
|
Hit Stun
|
Guard Stun
|
| 1000
|
1/4
|
St/Cr
|
S/!/P
|
9
|
3
|
18
|
-7
|
16
|
14
|
|
Good wiff punisher and goes into most of Arawn's combos. It can wiff certain crouching characters from a further range so be careful if you are fighting one of those characters.
|
|
2B
|
| Damage
|
Meter
|
Guard
|
Cancel
|
Startup
|
Active
|
Recovery
|
Advantage
|
Hit Stun
|
Guard Stun
|
| 1000
|
1/4
|
St/Cr
|
S/!/P
|
9
|
2
|
19
|
-7
|
16
|
14
|
|
Combination of anti air and ground poke. Will hit any character standing easily but wiffs many from a distance if they are crouching, so be careful when using it as a ground poke. As an anti air, this move is pretty solid due to having a low profile. Be careful if they are directly overhead or crossing up as it doesn't cover that area.
|
|
jB
|
| Damage
|
Meter
|
Guard
|
Cancel
|
Startup
|
Active
|
Recovery
|
Advantage
|
Hit Stun
|
Guard Stun
|
| 1000
|
1/4
|
St/J
|
P
|
12
|
3
|
-
|
-
|
18
|
14
|
|
Very good air normal. Arawn's best jumpin and also crosses up. Decent air to air vs opponents directly in front of him when spaced well too.
|
|
5C
|
| Damage
|
Meter
|
Guard
|
Cancel
|
Startup
|
Active
|
Recovery
|
Advantage
|
Hit Stun
|
Guard Stun
|
| 1500
|
2/6
|
St/Cr
|
P
|
16
|
2
|
30
|
-14
|
20
|
18
|
|
Covers a huge area, including all of the area in front of Arawn, as well as the anti air area. Good to use when you know it won't easily be stuffed but be careful because it extends his hurt box quite a lot.
|
|
2C
|
| Damage
|
Meter
|
Guard
|
Cancel
|
Startup
|
Active
|
Recovery
|
Advantage
|
Hit Stun
|
Guard Stun
|
| 1500
|
2/6
|
Cr
|
P
|
14
|
1
|
28
|
-11
|
-
|
18
|
|
Low hitting sweep. Launches on counterhit but not easy to capitalize from. Poor range relative to 5C makes this move not that usable as a ground poke, but it hits low so it can still catch people standing.
|
|
jC
|
| Damage
|
Meter
|
Guard
|
Cancel
|
Startup
|
Active
|
Recovery
|
Advantage
|
Hit Stun
|
Guard Stun
|
| 1500
|
2/6
|
St/Cr
|
P
|
8
|
2
|
-
|
-
|
20
|
16
|
|
Arawn's second best air normal. At the tip it has more range than j.B for air to airs and jump ins at that range, it also does more damage so it's a good choice for preemptive air to airs. Very hard to hit crouchers with this move, the timing is very strict.
|
|
BC
|
| Damage
|
Meter
|
Guard
|
Cancel
|
Startup
|
Active
|
Recovery
|
Advantage
|
Hit Stun
|
Guard Stun
|
| 1600
|
4/6
|
St/Cr
|
P
|
18
|
2
|
37
|
-19
|
-
|
20
|
|
Huge anti air type move, doesn't have much of a problem with hitting crouchers either though the horizontal range on the ground is only average. The speed makes this move risky to overuse, but the sheer size makes it great for telegraphed jumps.
|
|
6C
|
| Damage
|
Meter
|
Guard
|
Cancel
|
Startup
|
Active
|
Recovery
|
Advantage
|
Hit Stun
|
Guard Stun
|
| 1600
|
0/6
|
-
|
P
|
4
|
1
|
21
|
-
|
-
|
-
|
|
Comboable in or near the corner, so use it when in or near the corner, or to put people into the corner.
|
|
4C
|
| Damage
|
Meter
|
Guard
|
Cancel
|
Startup
|
Active
|
Recovery
|
Advantage
|
Hit Stun
|
Guard Stun
|
| 1500
|
0/6
|
-
|
P
|
4
|
1
|
21
|
-
|
-
|
-
|
|
Does more damage but cannot be comboed from except for situational OTG hits. Your go-to grab for when 6C isn't a good choice.
|
|
6BC (while blocking)
|
| Damage
|
Meter
|
Guard
|
Cancel
|
Startup
|
Active
|
Recovery
|
Advantage
|
Hit Stun
|
Guard Stun
|
| 500
|
0/1
|
St/Cr
|
P
|
(10) 15
|
2
|
32
|
-14
|
-
|
20
|
|
Special Actions
Overlord Charisma 「魔王のカリスマ」
- (Description) - Whenever Arawn calls an assist, they get a 25% damage bonus.
|
Special Moves
Nigredo
236A
|
| Damage
|
Meter
|
Guard
|
Cancel
|
Startup
|
Active
|
Recovery
|
Advantage
|
Hit Stun
|
Guard Stun
|
| 1000
|
4/4
|
All
|
-
|
13
|
-
|
39
|
-8
|
16
|
14
|
|
Blackness. Fireball that can be ducked. Still very useful due to the speed and fact that assists cannot run under it. You are only at minor disadvantage on block even when close.
|
|
Albedo
236B
|
| Damage
|
Meter
|
Guard
|
Cancel
|
Startup
|
Active
|
Recovery
|
Advantage
|
Hit Stun
|
Guard Stun
|
| 1360
|
4/1
|
All
|
-
|
12
|
8
|
24
|
-18
|
-
|
14
|
|
Whiteness. Drains 1360 life and gives it to Arawn, damage bonus from Emotion high also increases the amount of life drained. However proration also affects how much life is drained, so it's not very useful unless done near the beginning of a combo. Bad on block but the pushback should make it safe vs most characters.
|
|
Rubedo
236C
|
| Damage
|
Meter
|
Guard
|
Cancel
|
Startup
|
Active
|
Recovery
|
Advantage
|
Hit Stun
|
Guard Stun
|
| 200
|
4/1
|
All
|
-
|
12
|
8
|
24
|
-18
|
-
|
14
|
|
Redness. Similar to Albedo, but it drains meter instead. Meter drain is unaffected by proration and emotion so this is much more useful in combos. Drains approximately 1/3 of a meter so it's good for both denying and building meter. Bad on block but the pushback should make it safe vs most characters.
|
|
Heaven Divider
623 A shoryuken, it goes really high, making it especially good. A shoryuken, it goes really high, making it especially good.
|
| Version
|
Damage
|
Meter
|
Guard
|
Cancel
|
Startup
|
Active
|
Recovery
|
Advantage
|
Hit Stun
|
Guard Stun
|
| A
|
1600
|
4/6
|
St/Cr
|
P
|
8
|
3
|
30+16
|
-
|
-
|
14
|
|
Fast, and invulnerable. Resets opponent to standing on hit.
|
| Version
|
Damage
|
Meter
|
Guard
|
Cancel
|
Startup
|
Active
|
Recovery
|
Advantage
|
Hit Stun
|
Guard Stun
|
| B
|
2000
|
4/8
|
St/Cr
|
P
|
11
|
3
|
39+16
|
-
|
-
|
14
|
|
Medium speed. NOT INVUL. Knocks down on hit, still very good as anti air for the oki.
|
| Version
|
Damage
|
Meter
|
Guard
|
Cancel
|
Startup
|
Active
|
Recovery
|
Advantage
|
Hit Stun
|
Guard Stun
|
| C
|
2000
|
4/8
|
St/Cr
|
P
|
11
|
3
|
39+16
|
-
|
-
|
14
|
|
Slowest. NOT INVUL. Knocks down on hit and does a ton of damage, you can still use it vs obvious jumps for big reward.
|
|
Gentle Slash
214 Rushing mid attack, leads into mixup. Can hit OTG. Rushing mid attack, leads into mixup. Can hit OTG.
|
| Version
|
Damage
|
Meter
|
Guard
|
Cancel
|
Startup
|
Active
|
Recovery
|
Advantage
|
Hit Stun
|
Guard Stun
|
| A
|
1000
|
4/4
|
St/Cr
|
P
|
13
|
2
|
35
|
-
|
20
|
18
|
|
Fast, combos from B attacks. Pretty unsafe on block.
|
| Version
|
Damage
|
Meter
|
Guard
|
Cancel
|
Startup
|
Active
|
Recovery
|
Advantage
|
Hit Stun
|
Guard Stun
|
| B
|
1000
|
4/4
|
St/Cr
|
P
|
18
|
2
|
24
|
-
|
20
|
18
|
|
Medium speed, goes further and will combo from 5C while Battle Ogre is active. Pretty safe on block.
|
| Version
|
Damage
|
Meter
|
Guard
|
Cancel
|
Startup
|
Active
|
Recovery
|
Advantage
|
Hit Stun
|
Guard Stun
|
| C
|
1000
|
4/4
|
St/Cr
|
P
|
25
|
2
|
20
|
-
|
20
|
18
|
|
Slow and you can't easily combo into it, but it goes very far. Very safe on block.
|
|
Steel Cutter
214 (after Gentle Slash) Rekka like followup Rekka like followup
|
| Version
|
Damage
|
Meter
|
Guard
|
Cancel
|
Startup
|
Active
|
Recovery
|
Advantage
|
Hit Stun
|
Guard Stun
|
| A
|
1600
|
2/5
|
St/Cr
|
P
|
15
|
2
|
32
|
-
|
-
|
18
|
|
Mid hit, blows them back on hit. Pretty unsafe on block.
|
| Version
|
Damage
|
Meter
|
Guard
|
Cancel
|
Startup
|
Active
|
Recovery
|
Advantage
|
Hit Stun
|
Guard Stun
|
| B
|
1000
|
2/3
|
Cr
|
P
|
18
|
1
|
35
|
-
|
-
|
14
|
|
Low hit, knocks them down on hit. Fairly safe on block from a distance.
|
| Version
|
Damage
|
Meter
|
Guard
|
Cancel
|
Startup
|
Active
|
Recovery
|
Advantage
|
Hit Stun
|
Guard Stun
|
| C
|
1000
|
2/4
|
St/J
|
P
|
24
|
1
|
15+11
|
-
|
-
|
18
|
|
Overhead, resets them on hit. You have enough time to meaty 2A if you delay it slightly, 5B should be fine too. Not as bad on block as the A version but you don't want to get this blocked.
|
|
Supers
Diamond Cutter
236236AB Not as good as DDP's, but what is? Not as good as DDP's, but what is?
|
| Damage
|
Meter
|
Guard
|
Cancel
|
Startup
|
Active
|
Recovery
|
Advantage
|
Hit Stun
|
Guard Stun
|
| 1400,4000 [1400,1500 × 3]
|
-
|
St/Cr, All
|
P
|
(36)6
|
3 (34) 3 [3 (34) 3,3,3]
|
49 [45]
|
-34 [-33]
|
-
|
20, 18
|
|
A super shoryuken. A very damaging move with a ton of invulnerability making it very good. However, it will not lock the opponent properly for the second hit unless you hit them very close, so keep that in mind when using it as a reversal and combo move.
|
|
Magic Hunter
214214AB
|
| Damage
|
Meter
|
Guard
|
Cancel
|
Startup
|
Active
|
Recovery
|
Advantage
|
Hit Stun
|
Guard Stun
|
| 0,1500
|
1/0
|
St/Cr
|
P
|
(36)15
|
2
|
17
|
-1
|
-
|
18
|
|
Arawn stabs the opponent and destroys 2 of their meter. Doesn't do a whole lot of damage but the meter destroyed makes this move very good. Easy to confirm from ground hits but can be a little trickier to combo into during juggle combos due to the slightly slower speed and hitbox.
|
|
Battle Ogre
222AB The March of the Black Queen The March of the Black Queen
|
| Damage
|
Meter
|
Guard
|
Cancel
|
Startup
|
Active
|
Recovery
|
Advantage
|
Hit Stun
|
Guard Stun
|
| -
|
-
|
-
|
-
|
(50)
|
-
|
42
|
-
|
-
|
-
|
|
Arawn powers up for a period of time. While the buff is active, he's able to cancel his 5C, 2C, BC, Gentle Slash, and Steel Slash into specials and supers. This lets him do stronger combos and blockstrings. If Arawn is in emotion Neutral, this move will automatically put him into emotion High even if his emotion was going down. This moves takes some time to activate so don't do it after any knockdown. The best ways to set it up are either after a BC ender, or a throw. Doing it from fullscreen while a fireball is out could also be a good idea depending on the matchup.
|
|
Splash Arts
God Slayer
632146BC One more god rejected. One more god rejected.
|
| Damage
|
Meter
|
Guard
|
Cancel
|
Startup
|
Active
|
Recovery
|
Advantage
|
Hit Stun
|
Guard Stun
|
| 400, 500 × 3, 600, 100 × 3 , 300 × 3, 800, 6000
|
-
|
St/Cr
|
-
|
(36)12
|
27
|
35
|
-22
|
-
|
-
|
|
NOT INVUL. Arawn rushes in then locks the opponent into a long and damaging sequence. It goes far at a decent speed so it's easy to combo into and punish things with.
|
|
Additional Colors


