AquaPazza/Riannon
Introduction
Riannon got her overall power and frame advantage reduced in revision 1.5, but she can still be quite a strong character. She is slow and a bit awkward, but if you have a really good handle on footsies and spacing, she can still be extremely annoying. She also auto-gains meter. She does a lot of damage from both close up, and far away. The only issue is that her moves which she used to be able to use in a mid-range/close situation have been reduced in utility, so once you get in on a Riannon, she has lots of trouble getting the opponent out.
Partners
Yuki
The snowflakes falling mean that the opponent can't really pressure you or rush you down while they're happening. You can activate Yuki for one bar when the opponent is attacking you, and at the right time, you can use that opportunity to turn it around. In addition, it allows you to chain your normals, and with Ria's range, it's very easy to chain 5B/2B into 5C at half screen. Another positive thing is the ability to cancel out an opponent's assist. If you see them doing an assist and you call out Yuki, the assist will immediately disappear. Yes, Yuki takes a long time to charge, and no, she doesn't offer any sort of instant attack, but Ria doesn't really NEED an assist that does stuff because she can do it all so well on her own already. Therefore, something like Yuki really messes up the opponent. In addition, Riannon can turtle pretty well, making the long charge time for Yuki reasonable.
Octavia
She covers that sweet spot right in front of Ria, as well as having a dashing attack that can hit an opponent trying to get in. Probably not as effective overall as Yuki, but might be better if you're having trouble keeping the opponent out.
Strategy
Game-plan
Obviously, Riannon is a keep away character. Since 5C and 2C as blockstrings are somewhat unsafe (thanks to invulnerable supers), you want to limit the amount you do them. You are sometimes better off just tossing out a 2B, and on occasion, doing 2B 236A (charge) or something. Your first priority is to get the opponent far away and have an “A” ball set up. This makes it hard for the opponent to approach you. Once you’re in that situation, it’s a matter of tossing long range pokes at them, plus more spikes. Use 5A and B+C as anti-air, as well as the balls and spikes. 5A up close for a poke, if it hits, confirm into 2A 5B 5C 236236A+B 236236A+B, set out 623A, and do 2B on wakeup or something. If timed correctly, the 2B will make the opponent have to block, or do an invulnerable super. If they do the super, you can block thanks to 2B’s somewhat quick recovery. If you let go of an A ball, you want to set another one out while it’s shooting spikes. Using 236A/B is also a good option to keep the opponent from doing stuff. Your defense has to be good with Riannon, as getting the opponent out when they’re in, and surviving their offense is a huge part of her game play.
Match-up
Aside from throw and 5A, she doesn't have much to get out of pressure. She can't jump because her jump is so slow. Her backdash is the only other option she has, and if you play well enough, you can avoid that easily, too. Depending on her assist, that offers another defensive option, at a 1 meter cost. Of course, there’s always the alpha counter (6B+C in blockstun), but Riannon’s is pretty slow and easy to bait out, and heavily punishable. Other things that do well against her are invulnerable specials/supers that hit mid to full screen. For example, Morgan's arrow super, or Touka's rush super. Granted, you have to predict when the Riannon player will do something, but if you play well, you can do devastating things. Specials that hit long range, or hit behind her are good too, such as Haku's wolf from behind, or satsuki assist. Riannon also lacks a really good anti air, so moves that beat her current anti airs, like Karalau’s JC or Morgan’s JC crossup will do very well against Riannon.
Combos
Target Combos
- 5A 2A 2B 5C B+C
- Meterless, used for pushing the opponent away and setting up stuff.
- 2A 2B 2C 236236A+B
- 5A 2A 5B 5C 236236A+B
- The timing is a bit strict after the 5C, but because it’s not OTG, the damage is pretty high. Very easy to hit confirm if you get a counter hit 5A.
- B+C 236236A+B
- Anti Air heavy smash. Both hits of the meteor will get the opponent if its in the right spot, or against a wall.
- B+C 236236A+B B+C 236236A+B B+C level 3
- 100% assist-less combo
Assist Combos
Yuki
- 5A 5B 5C 5B 5C 5B 5C 2C
- Yuki allows you to chain your normals into each other reverse beat style for a bit, so you can combo 5B or 2B into 5C until it's time to end it with a 2C. Quite decent damage for very little work. Proration is quite heavy near the end so the super does very little damage, but gives really good wakeups.
- [66] JA JB JA (land) 2A 5B 5C 5B 2C (236A/B or 623A/B to setup)
- Since her dash puts her in the air, you can do air attacks, and with Yuki's ability to chain moves, she can do JABA for an instant overhead, and then do a few attacks into a setup. You can also do dash JA (use Yuki assist) JBA. So even if you don’t have Yuki activated, you can activate her post JA.
Rina
- 5A>2A>5D>delay>66A>2A>delay>66A>5A>2B>5C>5BC>63214C>236236AB>2C
Mizuki
- 5A/+2A>5D>5B>5C>63214C>236236AB>2C/623B oki 236B
- 5A/+2A>5B>5C>5D>BC>236236AB>2C/623B oki 236B
Move List
Normal Moves
| 5A
Anti air move. Quick poke and combos into 2A. The range is quite deceptive; While short, the hitbox is rather strong for what it is, making it a decent anti air. |
| 5B
An upward arc attack. Not too bad from certain ranges, good for the opponent 1-2 characters away from you, and for hitting in the arc that the move goes, but like the rest of her B and C moves, if it whiffs and the opponent gets in (and you have nothing to protect you), you’re in trouble. |
| 5C
Very long range poke that goes almost full screen. It’s pretty quick and does good damage. This is important to use as you will sometimes not be able to use your “A” and “B” buttons because you’re holding them from her specials. From the right distance, this move is amazing and can stop people running in very well. However, the recovery is somewhat long if it whiffs, and even on block, many players can use an invulnerable super and beat any option that comes after it including doing nothing and just blocking. |
| 2A
Fast low with good range. It chains into 5A, 2B, 5B. It doesn’t chain into itself, but it’s still quite a good poke. |
| 2B
Long range poke that recovers somewhat quickly. It an sometimes be used as an anti-air attack, but for the most part, it’s fairly safe on block. Against smaller characters though, at mid range it’ll whiff right over them. In that case, 5B would be the better option. |
| 2C
She slams her wand into the ground and creates a shockwave that goes 80% of the screen. This move combos into her 236236A+B meteor super. It knocks the opponent down giving amazing wakeup. It hits otg, but the move is quite unsafe if blocked. Even if you cancel into the meteor super, many characters can do an invulnerable super and hit her before the meteor comes out. You have to be careful using this move, as using it at the wrong time could kill you. |
| B+C
A big energy blast right in front of her. It hits in a strange spot above her, but comes out somewhat slowly. It combos into her meteor, and if you hit them in the right spot, both hits of the meteor will combo for big damage. Slow recovery and 236236A+B being the only followup makes this move have the same problem as 5C, where invulnerable supers will beat it. |
| JA
This is good when you set up something and then do either dash forward JA or dash back JA for a quick overhead. Otherwise it’s not that great in a regular jump. If you’re using Yuki assist, you can combo from it, otherwise it’s mainly just useful after a dash. |
| JB
This move is a downward arc. It doesn't work during her dashes because it just hits the ground and dissipates. It hit behind her as well so you can hit cross up with this. You can also do a regular jump and then do JB right away for an instant overhead, but if you don’t have an assist to cover you, this can be quite unsafe. |
| JC
This move comes from above and goes almost full screen. With dashes, you can use it to hit an opponent really far away with an overhead. It’s a pretty good and decently safe option for pressure from far when you’re restricted on using your “A” and “B” buttons. |
| 4 or 6+C
Ria, for some reason, has amazing range on her throw. The priority is insane, as she can just mash out throws when the opponent is even a little close by, and you can get them with a throw very easily. Near the wall, her back throw wall bounces, allowing you to combo after it. |
Special Actions
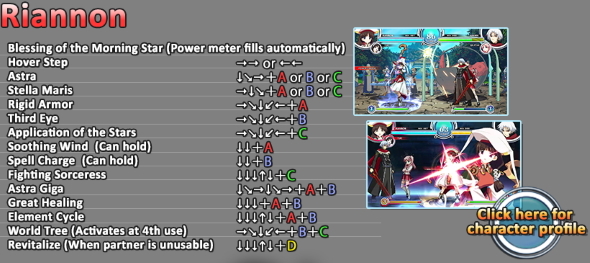
Blessing of the Morning Star 「明星さまの加護」
|
Hover Step 「ホバーステップ」 - 66 or 44
|
Special Moves
Astra 「アストラ」 - 236+[Attack]
|
Stella Maris 「ステラ・マリス」 - 623+[Attack]
|
Rigid Armor 「堅き鎧」 - 63214+A
|
Third Eye 「第三の目」 - 63214+B
|
Application of the Stars 「星辰の活用」 - 63214+C
|
Soothing Wind 「癒しの風」 - 22+A [Hold]
|
Spell Charge 「スペルチャージ」 - 22+B [Hold]
|
Fighting Sorceress 「戦う魔法使い」 - 22282+C
|
Super Moves
Astra Giga 「アストラ・ギガ」 - 236236+AB
|
Great Healing 「大いなる癒し」 - 222+AB
|
Element Cycle 「エレメント・サイクル」 - 22282+AB
|
Splash Arts
World Tree 「世界樹」 - 63214+BC [Input it 4 times]
|
Revitalize 「活性」 - 22282+D [When your partner is inactive]
|


