AquaPazza/Tamaki
Introduction
Tamaki is Aquapazza's grappler. She is furnished with damaging throws and interesting properties on a bunch of moves, making having her close a mixup in itself. You would think of a grappler as being sluggish, but not Tamaki, she has great tools for getting around the stage and in your face. In exchange, she has almost no ranged moves and her normals are short in reach. It's hard for her to do much when away from her opponent, giving you that "well how do I get in" feeling at times. With that said, she has the power to really maker her opponents hurt when she's in, a great pick for people that like to present their opponent with many guesses.
Partners
Satsuki
Satsuki's cover fire is great for getting close to your opponent. You can also use her single shot to keep you safe after a blocked Iron Claw of Fear.
Mizuki
You mostly use Mizuki (or Rathty for that matter) for combos. Mizuki can and a good bit of damage but she is kind of slow. You could make use of that slowness for mixups though. Call her out, then get an SPD in while your opponent is expecting Mizuki's hit.
Octavia
Octavia's neutral assist is good for okizeme and spacing. You can use her other assist for reseting neutral. Her neutral assist is great because it's hard to stop or get away from. It seeks out the opponent and generates a lot of stun.
Strategy
Spacing and Neutral Game
With this character you always want to be on the offensive; Try to limit actions that would result in low spirits. Tamaki gets big bonuses to her moves when in High Tension. High Tension time also last a fair amount of time for her. However due to the type of character she is, low spirits can really work against you. Make sure you avoid being pressured in the corner as much as possible.
Tamaki has a lot of options for moving around. Make sure you take full advantage of her dash and jumps to get in on your opponent. Just having something blocked is enough to start up Tamaki's guessing game. Having a 2A blocked means you can use delays to beat mashes or command throw them when you've trained them to stand still. If they try to jump away, you can tag them with A Iron Claw. If they try to back dash, you can use B Iron Claw or Iron Claw of Fear to punish them.
Throw Theory
These are the approximate Ranges to keep in mind when playing Tamaki. Using Normal throw as the basis, the list goes from the least range to the most range.
- Normal Throw
- Full Course, C Swing
- B Swing
- A Swing
- A Suplex
- 2A
- B Suplex
- 5A
- C Suplex
Combos
Target Combos
- 2A>2B>2C
- 2A>5A>2B>2C
- 5A>2B>623B
- 5A>2B>5C>623C
- Standing only
- (air to air)JC>land[66]>5C>623A or 2363214+AB
- Off a counter hit JC
- 2A>2B>B+C>5B>623A
- corner combo
Assist Combos
Serika
- 2A>2B>6D>B+C dash 5C>623C
- 2A>2B>6D>B+C dash 214A>720A+B
- 2A>2B>4D>5C>623C (assist hits) 2C>5C>623C
- Standing only
- 41236X>4D dash 214C>720+AB
Octavia
- 5D>5A>2C>5C>623A
- 5D>5A>2C>2363214+AB
- 2A>2B>2363214A+B>5D>2363214A+B
Yu
- 4C/6C/2C/623X>5D>5C>623A
- 360X>4/6D>5B>5C>623A
- Near a corner
- 2363214+AB>4/6D>5B>5C>623A
- 2A>2B>2363214A+B>5D>2363214A+B
- 2A>2B>2363214A+B>4/6D>2363214A+B(easier than 5D but less damage)
- 41236x>5D>2363214A+B
- 2A>2B>2C>5D>623A
Mizuki
- 2/5A>2/5B>D>5C>623A (5C whiffs standing)
- 2/5A>2/5B>D>5C>2363214A+B
- 2/5A>2/5B>B+C>6D>run>623A(may not work if you are too far away from corner, but corner carries from mid screen)
Camyu
- 360A>5D>max spin>Camyu hits>623A
Move List
Normal Moves
| 5A
Tamaki does a low kick to this shins. This move cannot cancel into itself, but its very fast and hits low. It has a decent bit of reach as well so its it great for okizeme. |
| 5B
A big diagonal slap right in front. This move hits crouchers but the reach is somewhat short. If you use too many A's before this move, it tends to end up whiffing. However the start up are recovery are pretty good and the duration is great. When in High Tension, you can link back to A moves. |
| 5C
Tamaki let's a horizontal punch rip. Unlike most other characters, she can cancel this move into special moves. The hitbox is pretty good but it won't hit crouching opponents at all. But what you can do is let is whiff purposely and go for a command throw after that. |
| 2A
A crouching flick. While slower and having less range than 5A, it does cancel into itself. You can use to hitconfim into combos or self up something with your command throws or assist. |
| 2B
A swipe at the knees. A bit more reach than 5B, but still relatively short. This move is usually just used for combos. |
| 2C
Tamaki goes for a big chop at the ankles. This is of Tamaki's longest reaching normal. Unlike 5A it is not special cancellable. However it will down the opponent on hit. On counter hit it will float the opponent, allowing you to go for a follow up. |
| B+C
A strong, haymaker-looking slap. This will blow the opponent a way on hit and will wall slam if they are close enough to the corner. It can combo from her B moves. |
| JA
Flying knee press. This move has SNK worthy levels of active frames. This is a good air-to-air against characters that don't have big JCs and the like the swat you away with. You can also use this as a crossup, Ken's Jump light style. |
| JB
A horizontal chop in front of Tamaki. The hitbox on this is fairly strong, so you can use this as a preemptive air-to-air move. Try to hit the opponent with it as they jump up towards you. |
| JC
Tamaki does a powerful downward chop. This is your main force for jump ins. If you score a mid-air counter hit with this, it will ground bounce the opponent. |
| 4 or 6+C
Tamaki becomes E. Honda for a moment for a throw. This throw results in an untechable down; from here you can move into okizeme. During the forward throw, you can mash buttons and spin the stick for more damage. |
Special Actions
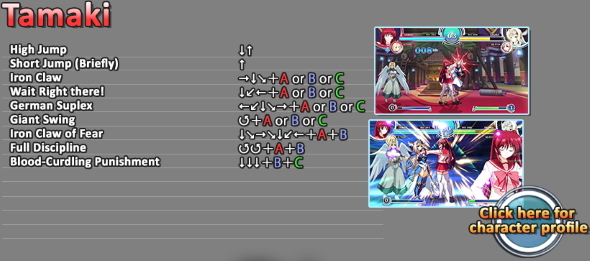
Short Jump 「小ジャンプ」 - Tap 7 or 8 or 9
|
High Jump 「大ジャンプ」 - Tap 2 Then 7/8/9
|
Dash - Hold 66
|
Special Moves
Iron Claw 「アイアンクロー」 - 623+[Attack]
|
Wait Right There! 「そこで待ってなさいッ!」 - 214+[Attack]
|
German Suplex 「ジャーマンスープレックス」 - 41236+[Attack]
|
Giant Swing 「ジャイアントスイング」 - 360+[Attack]
|
Super Moves
Iron Claw of Fear「恐怖のアイアンクロー」 - 2363214+AB
|
Full Discipline 「折檻フルコース」 - 720+AB
|
Splash Arts
Blood-Curdling Punishment 「戦慄のお仕置きタイム」 - 222+BC
|


