Chaos Code/NSC/Bravo

From Mizuumi Wiki
< Chaos Code‎ | NSC(Redirected from Chaos Code/Bravo)
Jump to navigation Jump to search
Profile-bravo.png

Story

Bravo
『ブラボー』

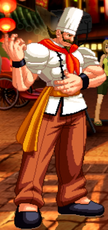
Bravo is a master Italian chef who moved to china to pursue his true dream of cooking Chinese food. He needs the unlimited power of the Chaos Code so he can save his restaurant from going under and show his teacher once and for all that Chinese cooking is superior to Italian cooking.

Playstyle

Health: 33000
Stun:
130

Bravo is a grappler in an anime game, but unlike many other anime grapplers he has okay mobility and surprisingly good ranged options. He also has access to some of the best reversals in the game which, along with his high health and stun, help him stay alive in matches when he's lost momentum. Good neutral and defensive tools coupled with high damage and high stun combos make bravo a very scary character to fight. He has some issues with zoning characters since his mobility, while good for his archetype, is on the underwhelming side for Chaos Code, but a well placed EX table and a dream is really all it takes for Bravo to win any matchup.

Mobility (Run vs. Step)

Run: Better neutral, since being able to run and block is very helpful for slowly closing distances, giving better control over your positioning.

Step: Better Tick Throws. 5C dash cancel 632146C can be really tricky and can catch a lot of players off guard. The shortened meter gauge also means that you will always have meter for EX table after command throw.

Extra Move Selection

Specials

  • ’’’Flying Wrapped Dumpling 623 B/D (air okay):’’’

On the ground, it’s a jumping anti-air grab to catch backdashers, off the ground, it’s an air throw in a game where you normally can’t do that, good move overall.

  • ’’’Explosive Soup Dumpling 22 B/D:’’’

If you want to land a command grab on a grounded opponent up close, but don’t want a side switch, use this. Also, it pops the opponent up in the air, which lets you combo right into one of your anti-air extra moves if you time it right.

Supers

  • ’’’Kneel! Three Sacred Treasures 236236 B/D:’’’

Anti-air grab super, use it if, for some weird reason, your opponent is trying to avoid being grabbed by you.

  • ’’’Shock! Crisis in the Restaurant 6321463214 B/D:’’’

A fast running command grab super, you might have noticed a pattern here, brings both characters to the middle of the stage and effectively brings you back to neutral.

Recommended Sets

Describe specific combinations of extra moves here

Move List

Click on a header to expand that section of the movelist

Normal Moves

Normal Moves

5A
5A
CC BR 5A.png
Damage Stun Guard Startup Active Recovery Frame Advantage (block) Cancelable Counterhit Properties
- - High/Low - - - - Yes -

Hits fairly far and is pretty fast. Will whiff on crouchers

cl.A
cl.A
CC BR clA.png
Damage Stun Guard Startup Active Recovery Frame Advantage (block) Cancelable Counterhit Properties
- - High/Low - - - - Yes -

Doesn't hit quite as far but still a quick jab. Will whiff on crouchers

2A
2A
CC BR 2A.png
Damage Stun Guard Startup Active Recovery Frame Advantage (block) Cancelable Counterhit Properties
- - High/Low - - - - Yes -

Description.

cl.B
cl.B
Damage Stun Guard Startup Active Recovery Frame Advantage (block) Cancelable Counterhit Properties
- - Low - - - - Yes -

Description.

5B
5B
Damage Stun Guard Startup Active Recovery Frame Advantage (block) Cancelable Counterhit Properties
- - High/Low - - - - Yes -

Description.

2B
2B
Damage Stun Guard Startup Active Recovery Frame Advantage (block) Cancelable Counterhit Properties
- - Low - - - - Yes -

Description.

cl.C
cl.C
Damage Stun Guard Startup Active Recovery Frame Advantage (block) Cancelable Counterhit Properties
- - High/Low - - - - Yes -

Description.

5C
5C
Damage Stun Guard Startup Active Recovery Frame Advantage (block) Cancelable Counterhit Properties
- - High/Low - - - - First hit only -

Description.

2C
2C
Damage Stun Guard Startup Active Recovery Frame Advantage (block) Cancelable Counterhit Properties
- - Low - - - - Yes -

Description.

cl.D
cl.D
Damage Stun Guard Startup Active Recovery Frame Advantage (block) Cancelable Counterhit Properties
- - High/Low - - - - Yes -

Description.

5D
5D
Damage Stun Guard Startup Active Recovery Frame Advantage (block) Cancelable Counterhit Properties
- - High/Low - - - - No -

Description.

2D
2D
Damage Stun Guard Startup Active Recovery Frame Advantage (block) Cancelable Counterhit Properties
- - Low - - - - No -

Description.

j.A
j.A
CC BR jA.png
Damage Stun Guard Startup Active Recovery Frame Advantage (block) Cancelable Counterhit Properties
- - High - - - - Yes -

Description.

j.B
j.B
Damage Stun Guard Startup Active Recovery Frame Advantage (block) Cancelable Counterhit Properties
- - High - - - - Yes -

Description.

j.C
j.C
Damage Stun Guard Startup Active Recovery Frame Advantage (block) Cancelable Counterhit Properties
- - High - - - - Yes -

Description.

j.D
j.D
Damage Stun Guard Startup Active Recovery Frame Advantage (block) Cancelable Counterhit Properties
- - High - - - - Yes -

Description.

Command Moves

Command Moves

6A
Bear's Paw
6A
Damage Stun Guard Startup Active Recovery Frame Advantage (block) Cancelable Counterhit Properties
- - High/Low - - - - Yes -

Slow overhead punch that can be comboed into. Similar to command normals in King of Fighters, it has different properties when cancelled into. A raw Bear's Paw imparts massive hitstun and okay dizzy.

j.2C
Noodle Press
j.2C
Damage Stun Guard Startup Active Recovery Frame Advantage (block) Cancelable Counterhit Properties
- - High/Low - - - - - -

The essential grappler body splash. Good crossup material, can be hard to combo from unless you hit it very deep or get a counterhit.

Universal Mechanics

Universal Mechanics

Throw
Throw
5/6AC
Damage Stun Guard Startup Active Recovery Frame Advantage (block) Cancelable Counterhit Properties
- - Throw 5f - - - No -

Ground throw

Guard Break
Guard Break
6CD
Damage Stun Guard Startup Active Recovery Frame Advantage (block) Cancelable Counterhit Properties
- - Guard Break - - - - No -

Guard Break

C+D
Tactical Guard
CD
Damage Stun Guard Startup Active Recovery Frame Advantage (block) Cancelable Counterhit Properties
- - High/Low - - - - No -

Parry

A+B
Roll
CD
Damage Stun Guard Startup Active Recovery Frame Advantage (block) Cancelable Counterhit Properties
- - High/Low - - - - No -

Roll

Special Moves

Special Moves

22P
Welcome Spin
22P
Version Damage Stun Guard Startup Active Recovery Frame Advantage (block) Cancelable Counterhit Properties
A - - High/Low - - - - No -

Every Street Fighter player should be familiar with this move, the infamous Zangief lariat. The A version is shorter and has very little startup.

Version Damage Stun Guard Startup Active Recovery Frame Advantage (block) Cancelable Counterhit Properties
C - - High/Low - - - - - -

Has a bit of startup, lasts a bit longer and moves slightly forward.

Version Damage Stun Guard Startup Active Recovery Frame Advantage (block) Cancelable Counterhit Properties
EX - - High/Low - - - - - -

Bravo creates a tornado around himself as he spins around for about 3 seconds. Has a large amount of invuln and is safe on block, keep this in mind as a reversal option.

632146P
Subliminating Frying Pan
632146P
Damage Stun Guard Startup Active Recovery Frame Advantage (block) Cancelable Counterhit Properties
- - Throw - - - - No -

Comboable command grab with solid range and relatively fast startup when close and okay-ish range. Does not cause a hard knockdown. EX version does give a hard knockdown.

214K
Passionate Thunderous Soup
214K
Version Damage Stun Guard Startup Active Recovery Frame Advantage (block) Cancelable Counterhit Properties
B - - Throw - - - - No -

Traveling command grab similar to Zangief's powerbomb/suplex. This version has Bravo travel a fairly short distance.

Version Damage Stun Guard Startup Active Recovery Frame Advantage (block) Cancelable Counterhit Properties
D - - Throw - - - - - -

Identical to the above, except Bravo travels a longer distance.

Version Damage Stun Guard Startup Active Recovery Frame Advantage (block) Cancelable Counterhit Properties
EX - - Throw - - - - - -

Bravo travels about half the screen's distance to grab his opponent. Becomes a hitgrab, and thus is combo-able. It allows for easier followups midscreen as well.

[4]6P
Tornado Sausage
[4]6P
Version Damage Stun Guard Startup Active Recovery Frame Advantage (block) Cancelable Counterhit Properties
A - - High/Low - - - - No -

Bravo slides forward a bit and smacks his opponent with a salami sausage. Does not knock down. Relatively safe on block, and whiffs on crouchers.

Version Damage Stun Guard Startup Active Recovery Frame Advantage (block) Cancelable Counterhit Properties
C - - High/Low - - - - - -

Same as the above, but Bravo slides forward for a much greater distance and hits twice. Less safe on block. Does not give a hard knockdown, so they are able to tech after a hit.

Version Damage Stun Guard Startup Active Recovery Frame Advantage (block) Cancelable Counterhit Properties
EX - - High/Low - - - - - -

Identical to the C version, except it gives a hard knockdown. Able to combo after in the corner.

214P
Inviting Dining Table
214P
Version Damage Stun Guard Startup Active Recovery Frame Advantage (block) Cancelable Counterhit Properties
A - - High/Low - - - - No -

Bravo lays out a dining table directly in front of him that knocks the opponent away from him. Comes out surprisingly fast.

Version Damage Stun Guard Startup Active Recovery Frame Advantage (block) Cancelable Counterhit Properties
C - - High/Low - - - - - -

After a bit of delay, Bravo lays a dining table out from underneath his opponent. This is a solid anti zoning tool, but beware of the slightly lengthy startup.

Version Damage Stun Guard Startup Active Recovery Frame Advantage (block) Cancelable Counterhit Properties
EX - - High/Low - - - - - -

Similar to C but goes the full screen. Very strong anti zoning tool, also allows for followups depending on screen position, otherwise is just a hard knockdown.

Extra Special Moves

Extra Special Moves

623K
Flying Wrapped Dumpling
623K
Version Damage Stun Guard Startup Active Recovery Frame Advantage (block) Cancelable Counterhit Properties
B - - Throw - - - - No -

Anti air grab that has Bravo jump slightly upwards above him and slam the opponent down in a gigantic dumpling. Good to use if they are close to you attempting a jump in.

Version Damage Stun Guard Startup Active Recovery Frame Advantage (block) Cancelable Counterhit Properties
D - - Throw - - - - - -

Bravo jumps a large diagonal distance to grab the opponent. This version of the move has shocking range and can potentially catch people from half screen away! Make them scared to air dash with this.

22K
Explosive Soup Dumpling
22K
Damage Stun Guard Startup Active Recovery Frame Advantage (block) Cancelable Counterhit Properties
- - Throw - - - - No -

Bravo hops forward and attempts a grab. If it connects, it sends the opponent into a falling state that allows you to combo afterwards. He is completely invuln while in the air so it can catch people trying to mash out against you. Also B version is combo-able if close enough from cl.C.

Ultimate Chaos Moves

Ultimate Chaos Moves

236236P
Get Rage! Evil Ways Fast Food!
236236P
Damage Stun Guard Startup Active Recovery Frame Advantage (block) Cancelable Counterhit Properties
- - High/Low - - - - No -

Infuriated by the soulless corporate processed meals of McDonalds, Bravo FLIPS a fucking table at his opponent. This can super cancel from his command grab or his 214+A/C, or juggle from 22+B/D. Does pretty respectable damage.

6321463214P
To The Sky! Subliminating Frying Pan
6321463214P
Damage Stun Guard Startup Active Recovery Frame Advantage (block) Cancelable Counterhit Properties
- - Throw - - - - No -

Super command grab that does very large damage. Can be successfully super cancelled from 214+A/C on grounded opponents.

Extra Ultimate Chaos Moves

Extra Ultimate Chaos Moves

236236K
Kneel! Three Sacred Treasures
236236K
Damage Stun Guard Startup Active Recovery Frame Advantage (block) Cancelable Counterhit Properties
- - Throw - - - - No -

Anti air command grab without much range. If Bravo connects with it he will beat his victim with various meats (get your mind out of the gutter). Unfortunately, does not successfully super cancel off his basic command grab, however you can combo into it from other juggles.

6321463214K
Shock! Crisis in the Restaurant
6321463214K
Damage Stun Guard Startup Active Recovery Frame Advantage (block) Cancelable Counterhit Properties
- - High/Low - - - - No -

Terrifyingly fast traveling command grab that goes the entire screen's distance and does solid damage. Can be comboed with a super cancel for ever MORE damage! Since it also has full armor, it is very useful even as an anti-zoning tool.

Destruction Chaos

Destruction Chaos

2363214PP
Extreme Astonishment! First-Class Price
2363214PP
Damage Stun Guard Startup Active Recovery Frame Advantage (block) Cancelable Counterhit Properties
- - High/Low - - - - No -

Bravo stomps forward and brings his fist down. If this connects, his hapless opponent will be bombarded by a swarm of customers. Mysteriously, it doesn't seem to successfully super cancel out of much and it's both blockable and short ranged, but I guess it makes a decent reversal?

Strategy

Neutral

Combos

Easy Stuff

get this down first!

cl.B > cl.C > 632146C > microdash > 214AC > run up > cl.B > cl.C > sjc > j.C > j.D > j.623D

This is your very basic BNB. You'll want to be sure to get this down. His command grab does a lot of stun damage and hurts, but doesn't give hard knockdown. It gives enough meter for EX table to followup and get the hard knockdown however. This works both in the corner and midscreen, but recognize if you do it in the corner you are effectively tossing them out. This combo also works with f.B f.C rather than cl.B cl.C in both spots.

cl.B > cl.C > 214BD > 5B > 5C > j.C > j.D > j.623D

Costs half a bar and is a good replacement to the combo above it. It will also keep them in the corner rather than tossing them out! Just as above, this will also work with f.B f.C as the starter.

cl.B > cl.C > 22B > microdash > cl.B > cl.C > j.C > j.D > j.623D

This must be done extremely close to the opponent but is a good meterless way to get the opponent in the air for juggle combos. Please note the "extremely close" part. This is a bit easier in the corner where you don't have to worry about pushback as much, giving you more time to confirm it with an additional cl.B or two.

Rejump

In any of the above combos where cl.B and cl.C will work from a juggle opportunity, it is possible to get a rejump combo off of it. You generally want to dash up as close as possible and wait for them to drop right to about where the tip of his toes would hit for cl.B. The spacing for starting it is the hardest part and will require some practice to get it down. Rejump combos are very important for getting meterless corner carry as well as opening up a bit more routes to increase stun and overall damage.

As you get used to the spacing you will recognize where you mess it up and can adjust it accordingly, mostly just using dumpling press earlier.

cl.B > cl.C > 632146C > microdash > 214AC > run up > cl.B > cl.C > sjc > j.C > (delay) > j.D > cl.A > 5C > sjc > j.C > j.D > j.623D

The rejump version of the first combo above. Can be done both midscreen and in the corner. The 'cl.A f.C' part is generally what you will get in mid screen, however it is possible to get f.A f.C depending on initial spacing, and in the corner you will get cl.A cl.C.

cl.B > cl.C > 632146C > microdash > 214AC > run up > cl.B > cl.C > sjc > j.C > (delay) > j.D > 5A > sjc > j.A > j.C > j.623D

Sometimes you may notice you started the combo just a bit too high up, which would make cl.C/f.C whiff. You can replace this with just super jump canceling the close A/far A and using j.A j.C instead of j.C j.D

Midscreen

far from corner

cl.B > cl.C > 632146C > microdash > 214AC > run up > cl.B > cl.C > sjc > j.C > delay > j.D > cl.A > [4]6AC > 214AC > run up > cl.B > cl.C > sjc > j.C > delay > j.D > cl.A > 5C > sjc > j.C > j.D > j.623D

EX Sausage is a great way to extend a combo and squeeze out more stun and damage. When you are too far away for a wall splat, you will need to spend more meter for an EX Table, which can make it seem not quite as worth it, but the extra stun damage definitely goes a long way.

cl.B > cl.C > 632146C > microdash > 214AC > run up > 214BD > 5B > 5C > sjc > j.C > delay > j.D > cl.A > sjc > j.C > j.D > j.623D

This combo is a bit easier to guarantee you get the rejump height and gives you just a tad bit more stun and damage. Not exactly worth spending an extra EX move for but something to keep in mind exists

For the most part midscreen, the standard command throw into rejump combo is all you need to put them into the corner and get oki. Using EX Sausage to extend the combo can generally be worth the meter depending on screen position.

Midscreen into corner

A major key to combos bringing the opponent into the corner is understanding how EX Sausage and its wallsplat can work to your advantage.

cl.A > cl.B > cl.C > [4]6AC > dash > 6A > microdash > cl.B > cl.C > sjc > j.C > delay > j.D > cl.A > cl.C > 6A > sjc > j.C > j.D > j.623D

At just bit closer to the corner from round start, ex sausage will hit them high enough and cause a wall splat in a way that a raw 6A will hit and cause a ground bounce. As you get closer and closer to the corner you'll need to forgo the 6A and just settle with cl.B into rejump combo.

Corner

6A > sjc > j.C > cl.B > cl.C > [4]6A > 5B > 2C > [4]6A > 5B > 5C > 6A > 22C > 5A > 5C > sjc > j.C > j.D > j.623D

This combo only works on standing opponents (light sausage will whiff on crouchers). 6A will force standing and is an overhead, which can be replaced with the cl.B low attack to help make sure the opponent is standing.

cl.B > cl.C > 214BD > microdash > cl.B < cl.C > sjc > j.C > j.D > cl.A > cl.C > 6A > 22C > j.B > j.C > double jump > j.C > j.D > j.623D

Best damage you can get if you land a hit on a crouching opponent. Fair warning the link to cl.B from 214BD is VERY tight. It will take some practice to get down. If you don't trust yourself with it, feel free to replace it with something more basic with 5B directly after.

Exceed Combo Pieces

  • 632146A, BC, 214+C, 236236+B/D By far one of the most reliable exceed combo starters.
  • 236236B (2 hits) 6AB 6A 22+C (4 hits) 236236+B/D

The raw 6A is there to maximize stun damage

  • 236236B (2 hits) 6AB cl.C [4]6C 6321463214C

A good way to end an exceed combo since his command grab super has a very long animation and does significant damage.

  • 236236B (Max 2 hits) 6AB 6A SJC j.C cl.B cl.B cl.C [4]6A ....

When ending exceed with Bravo's anti air super, it is a good idea to just go directly into his standard ground combo with a shift, even if you don't land any hits at all. This will maximize your stun as well as help get out of meter overload as safely as possible.

  • 22A 236236A/C 6AB 22A

It is possible to loop 22A with his table super. This loop will more than likely maximize your damage while you are in exceed if you can get it started correctly.

Sausage Slap Loop

  • 6+A SJC j.C c.B c.C [4]6A f.B 2C [4]6A f.B f.C [4]6C(1) BC (5B 5C 5D [4]6A)xN 6321463214C

This is corner only. Not exactly the most optimal damage but good to know is available. Since it doesn't use meter outside of the ender, you can really maximize your life gain out of exceed. It will also more than likely cause stun letting you do any of the other exceed pieces from there if you wish.

Colors

  • Console Versions: You can hold R1 button while selecting a character to get an alternative color.
  • Arcade Version: You can hold START button while selecting a character to get an alternative color.
A Button
B Button
C Button
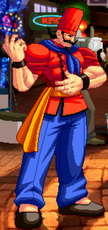
D Button Mario/Rario (Mario Bros/Super Cosplay Wars Ultra))
R1 + A Button Alex Louis Armstrong (Full Metal Alchemist)
R1 + B Button
R1 + C Button
R1 + D Button


General
Controls
FAQ
System
HUD
Characters
Hikaru
MG Hikaru
Kagari
Cerberus
Kudlak-Sin
Celia
Vein
Celia II Kai
Hermes
Catherine
Cthylla
Bravo
Cait & Sith
Rui
Ray
Lupinus