 |
Outdated Version
- This page is for an outdated version of the game (DFC). To see Mikoto Misaka's character page for the latest version (DFCI), click here.
|
Introduction
Originally from the light novel Toaru Majutsu no Index.
Gameplay
Mikoto specializes both in zoning and close-range combat. her aim is to harass her opponents with long range pokes and projectiles until she can get an occasion to safely get in. her moves are fast, but hit very specific areas (best example being j[C]) so you'll have to properly space all the time. This is complimented by her airdash and 214x series, which allow her to get in or get away depending on the situation.
Mikoto is also great at getting knockdowns from almost every confirms, allowing her to set good okizemes, especially when the right assists are chosen.
Mikoto can have a hard time setting her game because of her overall lackluster mid-range game, lack of reliable anti-air and bad AB moves. All of this makes it hard for her to get out when she is in a pinch, especially against character with fast and high priority normals. You always need to be one step ahead of the opponent to avoid finding yourself in that position
Pros
- Strong zoning game
- Higher than average mobility
- Having an airdash and consistently getting knockdown gives her a good rushdown game.
Cons
- Lower than average damage
- Suffers from her moves' dead angles
- Huge whiff recovery on most of her zoning moves, making mistakes costly.
- Poor anti-air and AB moves makes it hard to get out of pressure
Recommended Assists
Ryuuji Takasu - One of the best assists to play Mikoto in a more aggressive way : Ryuuji doesn't improve her zoning game, but Mikoto's ability to get knockdowns from almost every move allows her to safely set Ryuuji most of the time. You can also summon Ryuuji on neutral and punish them for trying to hit him with your moveset and mobility. Once he managed to travel safely thanks to Mikoto's cover, Ryuuji is one of the best pressure assists, as he is hard to push away and gives Mikoto many opportunities to attempt high/low mixups with 2B and 4AB, and easily confirm from them. He can also be situationally used as a counter-zoning move, as he can trigger a specific attack when he clashes with a projectile upon arriving. To sum it up, a somewhat hard to use, but incredibly beneficial and versatile assist for Mikoto.
Accelerator - The other favorite Mikoto assist. This one allows you to play a more well-rounded game : 6D is great for covering space and compliments Mikoto's neutral well. The huge hitsun coupled with her moves allows her to get great hit-confirms from this assist. It is also vastly useful for hitconfirms from up close or from a distance, as it allows you to easily get purple blast or combos out of almost every starter when timed right. 5D's very long active frame makes it a good shield on neutral to set your zoning game or get your way in when it is triggered. It also shines when coupled with her okizeme game, as it seals most of your opponent's defensive options and allow you to set your mixups without fearing a possible AB move or random Ranbu
Dokuro - A classic choice that goes well with Mikoto. the synergy is simple but efficient : abuse the various ranges 5D and 6D cover to restrict their movement and use the fast recharge rate of both moves to harass them in any situation. You also get damaging confirms whenever the assist hits thanks to Mikoto's 41236B+C. Hit them and hit them, that's all there is to it.
Potentials
Universal Potential: Increases damage dealt by 10% for 20 seconds when health falls under 30%. If behind in rounds won, increases damage dealt by 20% instead.
Character Potential: Hit with attacks 10 times to increase damage dealt by 10% for 10 seconds. Can be activated twice a round.
Move List
L = Low, H = High, A = Air
JC = Jump Cancel, SC = Support Cancel, EX = EX Cancel
ISC = Impact Skill Cancel, TCC = Trump Card Cancel, CAC = Climax Art Cancel
Startup includes the first active frame.
Normal Moves
| 5A
|
| Damage
|
Startup
|
Active
|
Recovery
|
Frame Adv
|
Cancels
|
Guard
|
Hitbox
|
| 300
|
6
|
2
|
16
|
-5
+8 (JC)
|
JC, SC, EX, ISC, TCC, CAC
|
HLA
|
-
|
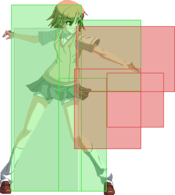
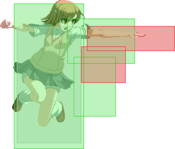
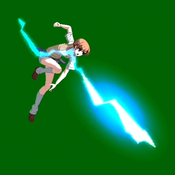
Slighty downward-angled electric thrust. Decent range and quick startup.
|
|
| 2A
|
| Damage
|
Startup
|
Active
|
Recovery
|
Frame Adv
|
Cancels
|
Guard
|
Hitbox
|
| 250
|
6
|
3
|
16
|
-6
|
SC, EX, ISC, TCC, CAC
|
LA
|
-
|
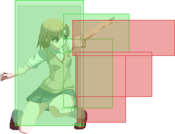
Crouching electric punch. Hits low. Chainable into itself and has very fast start up, so it’s good to use as a poke out.
|
|
| 5B
|
| Damage
|
Startup
|
Active
|
Recovery
|
Frame Adv
|
Cancels
|
Guard
|
Hitbox
|
| 500
|
9
|
3
|
19
|
-7
+10 (JC)
|
JC, SC, EX, ISC, TCC, CAC
|
HL
|
-
|
Angled electric shock that hits the ground. Range is similar to 5A but will also hit grounded opponents. Rather long recovery, so it’s susceptible to armor from Impact Skills. Jump cancellable and will combo into a rising j.C on standing opponents
|
|
| 2B
|
| Damage
|
Startup
|
Active
|
Recovery
|
Frame Adv
|
Cancels
|
Guard
|
Hitbox
|
| 450
|
10
|
3
|
18
|
-6
|
SC, EX, ISC, TCC, CAC
|
HL
|
-
|
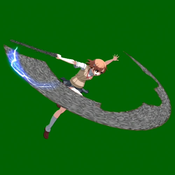
Slash with iron sand sword. Does not hit low, nor is it jump cancelable. Long reach, but has some blind spots.
|
|
| 5C
|
| Damage
|
Startup
|
Active
|
Recovery
|
Frame Adv
|
Cancels
|
Guard
|
Hitbox
|
| 700
|
10
|
3
|
21
|
-7
|
SC, EX, ISC, TCC, CAC
|
HLA
|
-
|
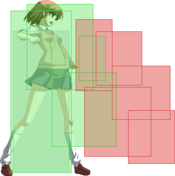
Parabolic electric shock starting at her head. Good range and hits above her, so it can be useful to catch jump outs. Very bad on block, can be punished by some Climax Arts.
|
|
| 5[C]
|
| Damage
|
Startup
|
Active
|
Recovery
|
Frame Adv
|
Cancels
|
Guard
|
Hitbox
|
| 900
|
18
|
2
|
37
|
-22
|
SC, EX, ISC, TCC, CAC
|
HLA
|
-
|
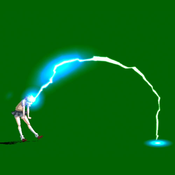
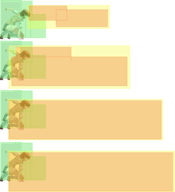
Longer range (2/3 screen) and a higher arc. Big blind spot below the arc.
|
|
| 2C
|
| Damage
|
Startup
|
Active
|
Recovery
|
Frame Adv
|
Cancels
|
Guard
|
Hitbox
|
| 920
|
11
|
10
|
17
|
-2
|
SC, EX, ISC, TCC, CAC
|
HL
|
-
|
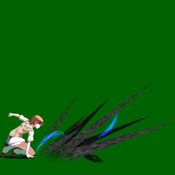
Attacks with many iron sand spikes. Does not knock down, but has multiple hits. Good for okizeme as it will beat out the armor from Impact Skills. Air unblockable. Very safe for a 2C move.
|
|
| 2[C]
|
| Damage
|
Startup
|
Active
|
Recovery
|
Frame Adv
|
Cancels
|
Guard
|
Hitbox
|
| 1310
|
19
|
12
|
23
|
-3
|
SC, EX, ISC, TCC, CAC
|
HLA
|
-
|
Longer range (2/3 screen), but has a much longer startup, so the timing must be later for use in okizeme or the opponent can jump out. Higher hitbox and will wall bound in the corner. Does not hit low.
|
|
| j.A
|
| Damage
|
Startup
|
Active
|
Recovery
|
Frame Adv
|
Cancels
|
Guard
|
Hitbox
|
| 250
|
7
|
2
|
X+2
|
Varies
|
JC, SC, EX
|
HA
|
-
|
Horizontal electric punch. Decent enough range to be a good air-to-air, but has a weak lower hitbox. Jump cancellable.
|
|
| j.B
|
| Damage
|
Startup
|
Active
|
Recovery
|
Frame Adv
|
Cancels
|
Guard
|
Hitbox
|
| 450
|
10
|
3
|
X+3
|
Varies
|
JC, SC, EX
|
HA
|
-
|
Slash with iron sand sword. Very long reach and possibly her best jump in. Can cross up and works well from low air dashes. Jump cancellable
|
|
| j.C
|
| Damage
|
Startup
|
Active
|
Recovery
|
Frame Adv
|
Cancels
|
Guard
|
Hitbox
|
| 715
|
12
|
4
|
X+4
|
Varies
|
JC, SC, EX
|
HA
|
-
|
Downward slanting electric attack. Reaches lower than j.B, can be used for okizeme. Jump cancellable.
|
|
| j.[C]
|
| Damage
|
Startup
|
Active
|
Recovery
|
Frame Adv
|
Cancels
|
Guard
|
Hitbox
|
| 900
|
18
|
3
|
X+4
|
-11 to -19
(no cancel)
|
JC, SC, EX
|
HLA
|
-
|
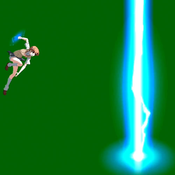
Sends a bolt of lightning down about 2/3 of the screen in front of her. Long start up and and quite narrow, but great for controlling space. Stops her air momentum. Knocks down and is cancellable on hit or block.
|
|
Special Moves
Electro Shock
「電撃の槍-エレクトロショック-」
236X
|
| Version
|
Damage
|
Startup
|
Active
|
Recovery
|
Frame Adv
|
Cancels
|
Guard
|
Hitbox
|
| A
|
850
|
14
|
2
|
26
|
-6
|
SC, EX, TCC, CAC
|
HLA
|
-
|
Straight electric attack, reaches about 2 character lengths.
- Wall bounds in the corner, letting her combo into 5B > Air Combo
- Only knocks down midscreen, but launches quite far
- Good at covering the blind spot of 5C
|
| Version
|
Damage
|
Startup
|
Active
|
Recovery
|
Frame Adv
|
Cancels
|
Guard
|
Hitbox
|
| B
|
925
|
15
|
2
|
27
|
-7
|
SC, EX, TCC, CAC
|
HLA
|
-
|
Distance reaches the opponent at round start
|
| Version
|
Damage
|
Startup
|
Active
|
Recovery
|
Frame Adv
|
Cancels
|
Guard
|
Hitbox
|
| C
|
1000
|
16
|
2
|
28
|
-8
|
SC, EX, TCC, CAC
|
HLA
|
-
|
Distance reaches around 2/3 of the screen
|
| Version
|
Damage
|
Startup
|
Active
|
Recovery
|
Frame Adv
|
Cancels
|
Guard
|
Hitbox
|
| EX
|
Close: 1163
Far: 1057
|
13
|
8
|
12
|
-1
|
SC, TCC, CAC
|
HLA
|
-
|
Goes roughly fullscreen and does slightly more damage if done point blank.
|
|
Magnetic Move
「電磁機動-マグネティックブムーブ-」
214X
Air O.K.
|
| Version
|
Damage
|
Startup
|
Active
|
Recovery
|
Frame Adv
|
Cancels
|
Guard
|
Hitbox
|
| A
|
N/A
There!: 950
Frontal: 720
|
~12
There!: 12
Frontal: 15
|
N/A
There!: 6 to 12* (Varies)
Frontal: 18* (Varies)
|
X+6
There!: X+6
Frontal: X+20
|
N/A
There!: -38
(no cancel)
Frontal: +8 to +5
|
N/A
There!: SC
Frontal: SC
|
N/A
There!: HLA
Frontal: HLA
|
-
|
Mikoto levitates into the air at about 70 degrees behind her. At that point, you can cancel into multiple actions:
- Air Movement 「空中移動」: Press forward or back to shift from one piece of rubble to another in the direction specified. Can be done a maximum of two times per 214X in any order. You can then follow into "Cancel," "Attack over there," or "Frontal Attack."
- Cancel 「解除」: Press down to immediately cancel 214X or a preceding follow-up. This option is always available unless you used "Frontal Attack." Roughly 6 frames of landing lag.
- Attack over there! 「その場で攻撃」: Pressing A/B/C will shoot out a boulder roughly 45 to 60 degrees below and in front of Mikoto. The trajectory depends on what button you pressed. You can then follow into "Air Movement," "Cancel," another "Attack over there," or even "Frontal Attack."
- Frontal Attack 「前方に攻撃」: Holding forward and pressing A/B/C will lunge Mikoto forward while she throws a pillar at the opponent. The steepness of the pillar's trajectory depends on what button you press. This follow-up will cause you to leave the levitation state.
- The air versions operate identically to their grounded counterparts.
|
| Version
|
Damage
|
Startup
|
Active
|
Recovery
|
Frame Adv
|
Cancels
|
Guard
|
Hitbox
|
| B
|
Same as 214A
|
Same as 214A
|
Same as 214A
|
Same as 214A
|
Same as 214A
|
Same as 214A
|
Same as 214A
|
-
|
Identical to 214A except Mikoto goes a little further back.
|
| Version
|
Damage
|
Startup
|
Active
|
Recovery
|
Frame Adv
|
Cancels
|
Guard
|
Hitbox
|
| C
|
Same as 214A
|
Same as 214A
|
Same as 214A
|
Same as 214A
|
Same as 214A
|
Same as 214A
|
Same as 214A
|
-
|
Identical except Mikoto goes roughly two character lengths back.
|
| Version
|
Damage
|
Startup
|
Active
|
Recovery
|
Frame Adv
|
Cancels
|
Guard
|
Hitbox
|
| EX
|
N/A
There!: 1100
Frontal: 950
|
~12
There!: 11
Frontal: 13
|
N/A
There!: 5 to 11* (Varies)
Frontal: 21* (Varies)
|
0
There!: X
Frontal: X+15
|
N/A
There!: -9
(no cancel)
Frontal: +9 to +3
|
N/A
There!: SC
Frontal: SC
|
N/A
There!: HLA
Frontal: HLA
|
-
|
A faster, more powerful version of the normal Magnetic Move. The follow-up commands and restrictions are identical, but your "Air Movement" follow-ups are now faster. "Attack over there!" throws larger boulders that go faster and do more damage. Likewise, "Frontal Attack" will cause you to leave the levitation state but with a stronger, larger pillar in hand.
- It is worth noting that the timer before levitation ends is slightly shorter in the EX version.
- If you do not prematurely end the levitation with "Cancel" or "Frontal Attack," Mikoto goes into a free air state, where you can air dash, jump, and use jump normals. However, you cannot use any j.214X move.
- Frame data note: The recovery on all follow-ups and the move itself have been decreased. The move itself essentially has 0 recovery. "Attack over there!" has as much recovery as your air time afterward.
|
|
Universal Mechanics
Throw
6C or 4C
|
| Damage
|
Startup
|
Active
|
Recovery
|
Frame Adv
|
Cancels
|
Guard
|
Hitbox
|
| 1100
|
4
|
1
|
84
|
+52 (hit)
|
SC, EX, TCC, CAC
|
N/A
|
-
|
Grabs and shocks her opponent. Sends opponent flying away, with lots of time to position for okizeme. Cancellable into Blast, Trump Card and anything that uses the Climax Gauge.
|
|
Impact Skill
Electro Fencer
「砂鉄剣-エレクトロフェンサー-」
5A+B
|
| Damage
|
Startup
|
Active
|
Recovery
|
Frame Adv
|
Cancels
|
Guard
|
Hitbox
|
| 1130
|
12
|
9
|
45
|
-20
|
SC, EX, CAC (hit only)
TCC
|
HLA
|
-
|
Rushing attack with an iron sand sword.
- High damage and easy to combo after.
- Very minus on block
|
|
Impact Skill
Biri-Biri Earth
「電震脚打-ビリビリアース-」
2A+B
|
| Damage
|
Startup
|
Active
|
Recovery
|
Frame Adv
|
Cancels
|
Guard
|
Hitbox
|
| 1000
|
15
|
3
|
36
|
-22
|
SC, EX, CAC (hit only)
TCC
|
HL
|
-
|
Overhead stomp that then sends a blast of electricity along the ground.
- The electricity can reach from one end of the screen to the other and hits low.
- On close hit, will knock down, but will not knock down from far distances.
- Slow startup but will combo from B or C attacks.
- Can hit any support that is grounded
|
|
Impact Break
4A+B
|
| Damage
|
Startup
|
Active
|
Recovery
|
Frame Adv
|
Cancels
|
Guard
|
Hitbox
|
First Hit: 900
Launcher: 800
|
First Hit: 22
Launcher: 9
|
First Hit: 8
Launcher:2
|
First Hit: 14
|
First Hit: -2
Launcher: -37
|
First Hit: N/A
Launcher: SC, EX, TCC, CAC
(on hit)
|
First Hit: HA
Launcher: HLA
|
-
|
Overhead launching kick, can go over lows.
|
|
Trump Card
Chaser!
「ちぇいさー!」
5A+C
|
| Damage
|
Startup
|
Active
|
Recovery
|
Frame Adv
|
Cancels
|
Guard
|
Hitbox
|
| 3000
|
25
|
4
|
25
|
-14
|
N/A
|
H
|
-
|
Kicks a Vending Machine and her opponent.
- Fast startup, hits overhead, is air unblockable, does lots of damage, launches opponent away and is fully invulnerable.
- Still fairly easy to see coming and will lose to throws, projectile and armored moves.
- Knocks far back on block, making it hard to punish. Also does lots of chip damage.
- Makes all her ground normals jump cancellable
|
|
Climax Arts
Railgun
「超電磁砲-レールガン-」
41236B+C
|
| Damage
|
Startup
|
Active
|
Recovery
|
Frame Adv
|
Cancels
|
Guard
|
Hitbox
|
| 3500
|
12
|
3
|
65
|
-37
|
N/A
|
HLA
|
-
|
Full screen beam attack.
- Very fast startup and a big hitbox.
- High damage in combos as well
- Has no invincibility and has some post flash startup, so it’s possible to be hit out of
- Goes through regular projectiles
|
|
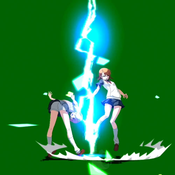
Mikoto Special
「電装乱舞-ミコトスペシャル-」
63214B+C
|
| Damage
|
Startup
|
Active
|
Recovery
|
Frame Adv
|
Cancels
|
Guard
|
Hitbox
|
| 2781
|
7
|
23
|
20
|
-28
|
N/A
|
HLA
|
-
|
Rushing Ranbu. Invincible during the dash.
|
|
Combos
Midscreen
5A Starter
- 5A > 5B > 5C > etc
- Notes about this particular combo
4A+B Starter
- 4A+B > B > j.A > etc
- Notes about this particular combo
Corner
5A Starter
- 5A > 5B > 5C > etc
- Notes about this particular combo
4A+B Starter
- 4A+B > B > j.A > etc
- Notes about this particular combo
Assists
Assist Character 1
- 5A > 5B > 5C > 5D > etc
- Notes about this particular combo
Assist Character 2
- 5A > 5B > 5C > 6D > etc
- Notes about this particular combo
Colors
| Color 1
|
Color 2
|
Color 3
|
Color 4
|
|
|
|
|
|
| Color 5
|
Color 6
|
Color 7
|
Color 8
|
|
|
|
|
|
| Color 9
|
Color 10
|
Color 11
|
Color 12
|
|
|
|
|
|
| Color 13
|
Color 14
|
|
|
|

