Unlike many other games where combos often require fast paced flowing inputs, EFZ revolves more around free form timing and height management.
This guide acts as a goal oriented self-paced learning exercise introducing common combo pieces to help ease you into EFZ's unique and rewarding combo system.
Every combo here is viable in matches, and does decent damage too!
For now, this page only covers a few characters. Even if the character you want to play has no introductory guide on this page, you can still learn a lot by trying out some of the characters and combos here already. In time, we will hopefully have a guide for every character.
How do combos work in EFZ? A quick primer
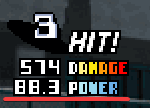
Power
How many hits you can fit into a combo is determined by Power.
Power is shown underneath the damage counter.
Power will start at 100 and decrease with every hit you do.
As Power decreases, you will have less and less time to juggle.
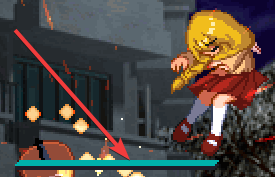
Juggle meter, also known as the juggle gauge
The juggle meter is a useful way to see how long you have left to juggle. The longer it is, the more time you have before the next hit must connect.
Blue Reinforce Gauge (can use Blue Instant Charge)
If you use Instant Charge (22C) when your Reinforce Meter (shown above) is light blue, you will be able to perform longer combos. This is due to Power being added depending on how much Blue Reinforce meter you have - up to +50 Power at 100% Blue RF. Every combo on this page uses 100% Blue Instant Charge.
Using Instant Charge with Red Reinforce Meter will not add any Power, only acting as a cancel.
Every combo here is designed to be simple and match viable, but still challenging.
Start with the first combo for the character you want to learn and slowly work your way through the list.
Stick to one combo until you feel confident with it, as all the combos build on top of the last.
Pay close attention to the timing of hits.
Useful hotkeys for practicing:
F5 - Press this once to get full health and max meter.
Keyboard G - Press this once to create a save state.
Keyboard B - Press this once to load the saved state.
Important note about Blue Instant Charge
While these combos are designed to be lenient, they may not work at lower levels of Blue RF. If you are looking for combos with Red Instant Charge, please refer to the character's Bread and Butter combos on their respective page.
Doppel
Overall Difficulty - Hard
c5B Loops
2AA 2B 5C 6C IC [c5B]x7 41236B
Aim for 7 repetitions of c5B, but if you are having trouble you can do less and enter 41236B early.
Make sure you can do 7 repetitions consistently before moving on.
66C is used frequently in Doppel's Bread and Butter combos for its high damage value.
662A(whiff) is used to cancel your dash animation early, so you can recover in time to turn around and c5B.
Pay close attention to the dash length on 662A in the video. The dash is held slightly for more distance travelled before cancelling into the dash normal.
Every combo ends with jBC djAB dj236B(tech trap). This ender makes it so that if the opponent techs after the combo ends, they will get hit by dj236B and get knocked down.
Overall Difficulty - Easy
Every combo ends with dj214214A super for a knockdown. In most cases, Nayuki will build enough meter for this super during the combo, but in the rare cases she doesn't you can use 66B jB djB .. djB(tech trap) as an ender.
Grounded only
2AA 2B 2C IC [c5B]x5 5C 9jBC djBC dj214214A
Aim for 5 repetitions of c5B, you can walk forward between c5Bs to correct your spacing if you IC'd too early.
Juggle introduction that goes into Nayuki's go-to ender.
Every combo ends with jABC dj6C(tech trap). This ender makes it so that if the opponent techs after the combo ends, they will either be grabbed or hit by jC, punishing them for teching.
 Power
Power
 Juggle meter, also known as the juggle gauge
 Blue Reinforce Gauge (can use Blue Instant Charge)