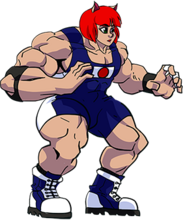
Billy
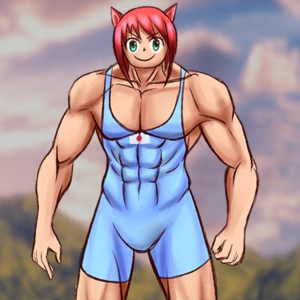
Big Billy
|
| Playstyle
|
Grappler
|
| HP
|
1600
|
| Unique Traits
|
Iron Will of the Otaku
Armored attacks power through trades.
Shouri no Kamae
Better knockdowns and frame advantage.
Large and In Charge
Slower, more damaging ground attacks. Shorter jumps.
Juggernaut
Resistant to side switch effects on block.
|
|
Introduction
Big Billy is the game's grappler. While he lacks in speed, he has a devastating command throw and hard-hitting armored attacks.
Billy is a moving tank. Slowly makes his way in, with very threatening mixups once he gets in, making your opponent guess for their life, Being all brawn has its downsides, though. His normals are slow, and while they do have armor, it just makes them as good as faster normals while he's plus. If you like anime and hard reads, Billy might just be the character for you.
Gameplan
Billy's goals are straightforward: to get in close enough to threaten a Big Billy Buster, and to get knockdowns to set up dangerous oki scenarios. Because of his slow attack speed, he will likely need to be patient and make good use of blocking to get close enough to make things happen. Taking advantage of his big threats, Billy can play carefully and then commit to big reads at the perfect time. Focus on trying to end the round off of one hit!
| "If I win the Mega Knockdown tournament, I will make anime real!" |
| Lore: | Billy was raised to hate grapplers, but ever since he started reading the wrestling manga Bobo no Obo, he has been training hard to become one. Maybe his dad will finally understand him if he brings home the trophy... |
Pros and Cons
| Strengths |
Weaknesses
|
- Billy Buster - The single scariest and strongest grab in the game, doing around 30% of the opponent's health bar.
- Very High Damage - Provided Billy actually gets a hit, his damage is some of the highest in the game.
- Highest Health In The Game - Billy has the highest health in the game, which allows him to tank more hits than anyone else.
- Scary Oki/Pressure - Billy gets more advantage than usual on block and wakeup, and he can keep the corner better than others. If he does get a knockdown, he can take the opponent for a ride.
|
- Slow Normals - Billy's normals may have armor, but they're slower to compensate. This can be annoying both on offense and defense alike, and he also lacks a 10f normal.
- Bad At Approaching - Billy has a difficult time getting in due to his slow normals, so he has to walk forward block and jump more than everyone else in the cast.
|
Normal Moves
Billy A
[4A/5A/6A]
|
| Version
|
Damage
|
Startup
|
Ground/Air Range
|
Guard
|
Block Advantage
|
On Hit
|
Push
|
Chip Damage
|
Attributes
|
| Normal
|
150
|
20
|
1/1
|
All
|
20
|
Combo A
|
1
|
-
|
Armor
|
Extremely plus to compensate for its slow speed. While slow for a jab, but the ensuing combo can chew up a chunk of the opponents' life bar on hit. On trade, armor lets you ignore pushback/KD and finish your combo. Okay abare. Prone to trading, which is a good thing for Billy since it triggers armor.
|
| Combo A
|
300
|
-
|
-
|
-
|
-
|
-
|
1
|
-
|
-
|
Three-hit follow up combo. Automatically triggers on a clean A hit.
|
|
Billy B
[4B/5B/6B]
|
| Version
|
Damage
|
Startup
|
Ground/Air Range
|
Guard
|
Block Advantage
|
On Hit
|
Push
|
Chip Damage
|
Attributes
|
| Normal
|
150
|
30
|
2/2
|
All
|
Unsafe (close) -> -20 (far)
|
Combo B
|
1
|
-
|
Armor
|
B is a powerful space control option that covers both the air and the ground. B normals are only unsafe at point blank range and cannot be whiff punished, so they have the least risk at range 2. Billy's B attack is slower than other characters', but on a trade, his armor lets you finish your combo. Doing 4B on the opponent's wakeup is safe on block (although minus) and beats most wakeup options, like Paulcano, mash, throw, and jump, however, be aware of what it trades with and loses to.
|
| Combo B
|
200
|
-
|
-
|
-
|
-
|
-
|
-
|
-
|
-
|
Two-hit follow up combo. Automatically triggers on a clean B hit.
|
|
Billy C
[4C/6C]
|
| Damage
|
Startup
|
Ground/Air Range
|
Guard
|
Block Advantage
|
On Hit
|
Push
|
Chip Damage
|
Attributes
|
| 250
|
30
|
2/0
|
Low
|
Unsafe
|
KD
|
-
|
-
|
Armor
|
Punishable unless done meaty, but can't be blocked while moving. This sweep is used to call out grounded "walk+block" approaches. Loses to jump-ins, forming a 2-part strategy with B normals. Slow, but you can fish for a whiff punish with it and set up a dangerous situation on KD. Armor keeps you from being pushed back/KD'd if you trade with this. Technically not slower than other sweeps, but you can't use it standing still. Prone to trading, which is a good thing for Billy since it triggers armor.
|
|
j.A
[8A]
|
| Version
|
Damage
|
Startup
|
Ground/Air Range
|
Guard
|
Block Advantage
|
On Hit
|
Push
|
Chip Damage
|
Attributes
|
| Normal
|
200
|
30
|
0/1
|
All
|
-
|
Combo A
|
1
|
-
|
-
|
Dedicated air-to-air. Jump forward up to 1 space and punch a jumping opponent. Whiffs grounded opponents. Easier to land than an air throw, but doesn't knock down.
|
| Combo A
|
300
|
-
|
-
|
-
|
-
|
-
|
1
|
-
|
-
|
Three-hit follow up combo. Automatically triggers on a clean j.A hit.
|
|
j.B
[8B]
|
| Version
|
Damage
|
Startup
|
Ground/Air Range
|
Guard
|
Block Advantage
|
On Hit
|
Push
|
Chip Damage
|
Attributes
|
| Normal
|
200
|
40
|
2/2
|
All
|
10~20
|
Combo B
|
1
|
-
|
-
|
Reliable jump-in option. Jump forward up to one space and do a drop kick. Gains some ground and has a long reach, but will be interrupted by most ground attacks. It's plus on block, and okay for challenging zoning, sweeps, or punishing throw attempts. +20 when used meaty.
|
| Combo B
|
200
|
-
|
-
|
-
|
-
|
-
|
-
|
-
|
-
|
Two-hit follow up combo. Automatically triggers on a clean j.B hit.
|
|
Universal Mechanics
Throw
[4T/6T/8T]
|
| Version
|
Damage
|
Startup
|
Ground/Air Range
|
Guard
|
Block Advantage
|
On Hit
|
Push
|
Chip Damage
|
Attributes
|
| Forward Throw (6T)
|
400
|
-
|
1/0
|
Unblockable
|
-
|
KD
|
-
|
-
|
-
|
Step forward and throw. Opens up a blocking opponent, but loses to attacks. Use this if you're confident they will block. More damaging than other characters' normal throws, and a better oki situation than the Big Billy Buster.
|
| Back Throw (4T)
|
400
|
-
|
1/0
|
Unblockable
|
-
|
KD, Side Switch
|
-
|
-
|
-
|
Stand still and throw an opponent behind you. Opens up a blocking opponent, but loses to attacks. A risky way to switch sides. Good damage and oki.
|
| Air Throw (8T)
|
500
|
-
|
0/1
|
-
|
-
|
KD
|
-
|
-
|
-
|
Jump forward up to one space and attempt to throw an opponent. Can only connect if players started their jumps fairly close to one another (distance or ~3 squares or less). If it does connect, beats any air attack. Flashy hard read option to call out jumping. This is the only way Billy can KD a jumping opponent and leads to good oki.
|
|
Block
[Any+G]
|
| Version
|
Damage
|
Startup
|
Ground/Air Range
|
Guard
|
Block Advantage
|
On Hit
|
Push
|
Chip Damage
|
Attributes
|
| Neutral Block (5G)
|
-
|
-
|
-
|
-
|
-
|
-
|
-
|
-
|
-
|
Stand still and autoguard high or low, if attacked. A passive option that defends against everything but throws.
|
| Walk and Block (4G/6G)
|
-
|
-
|
-
|
-
|
-
|
-
|
-
|
-
|
-
|
Walk and then block high, if attacked. Lows will still hit you. Generally the safest way to gain ground and put yourself back into close range. You're going to be doing a lot of walk forward block as Billy.
|
| Backflip (8G)
|
-
|
-
|
-
|
-
|
-
|
-
|
-
|
-
|
-
|
Quickly jump back up to 2 squares. Doesn't actually "block" anything, but evades most attacks. You probably shouldn't do this as Billy most of the time, since it will take you at least 2 turns to make up the ground you just lost.
|
|
Special Moves
Shiko Slam
[5C]
|
| Damage
|
Startup
|
Ground/Air Range
|
Guard
|
Block Advantage
|
On Hit
|
Push
|
Chip Damage
|
Attributes
|
| 350-400
|
40
|
2/0 [3/0 vs Late-Moving]
|
Low
|
10~20
|
KD
|
-
|
200
|
Armor
|
Explosive stomp move. It's plus, which makes it the only safe low in the game. Poor poke as it is very slow, but is a useful pressure tool against a cautious opponent. Deals a sizeable amount of chip. Can catch late-moving attacks more easily than his other buttons. Deals more damage point blank, since the foot connects. Decent oki option, and it can set up a frightening oki situation if it connects. +20 when used meaty. Prone to trading, which is usually a good thing for Billy since it usually triggers armor, but if you don't have enough health to take the trade, you're in for a world of hurt.
|
|
Big Billy Buster
[5T]
|
| Damage
|
Startup
|
Ground/Air Range
|
Guard
|
Block Advantage
|
On Hit
|
Push
|
Chip Damage
|
Attributes
|
| 500
|
-
|
1/0
|
Unblockable
|
-
|
KD
|
1
|
-
|
-
|
Billy's signature move. Launch the opponent into the stratosphere and then dunk them back down into the ground. Strong mixup or reversal tool, because on contact, this beats attacks, blocks and throws. The opponent's only options are to jump, walk out out range or just stay as far away as possible. Useful as a close range punish, too. Make your opponent fear this move so they get hit by your other options, then make them fear your other options and hit them with it. Billy can actually tech this move with his own Billy Buster, but only if they come out at the same time. Otherwise the faster Buster wins.
|
|
j.C
[8C]
|
| Damage
|
Startup
|
Ground/Air Range
|
Guard
|
Block Advantage
|
On Hit
|
Push
|
Chip Damage
|
Attributes
|
| 300
|
50
|
1/1
|
All
|
-20
|
KD, Side Switch (if close)
|
-
|
100
|
-
|
Jump forward an extra space (the same distance most characters jump) and do an exaggerated elbow drop that can KD on hit, and side switch on hit or block. Slower air attack with shorter range but it can beat j.B when at major advantage. A risky way to gain space that sets up a close knockdown and threaten some command throw shenanigans.
|
|
Unique Traits
Iron Will of the Otaku
When a trade occurs (attacks hit at the same time), Billy's willpower kicks in and allows him to continue a combo. Billy takes the initial damage; at 500 health or lower, his Grappler Guts kick in and he takes 50% less damage on trades.
Shouri no Kamae
Better frame advantage on knockdowns (+20 instead of +10) and most attacks. Allows Billy to have similar okizeme options as other characters by effectively speeding up his ground normals.
Large and In Charge
Ground attacks and throws do extra damage. Jump distance is 1 instead of 2 spaces.
Juggernaut
To force a side switch, attacks like j.C must hit.
Strategy
Walk forward and block with 6G. Opponents may try to foolishly sweep you or walk forward and throw you. Do not let them dissuade you, you are Big Billy. It is good to threaten jump attacks, which will destroy both throws and sweeps. Usually 8C is your go to option because the knockdown allows for okizeme potential but if you are at major advantage, you may want to switch to 8B as that will trade with an attempted 5B anti-air.
Okizeme
If you have them knocked down at range 1 you can threaten Big Billy Buster (5T). Remember that this throw will always win against other throws, and because they are knocked down any grounded move they use will also lose because they can't move backwards. This allows for some truly filthy 50/50s. You have a few different options for what to cover.
- Big. Billy. Buster. - This should be your first line of thought. They must jump out to escape.
- 5A - will catch any jump attempts as well as beat any attacks, but lose to 5T.
- 8T - will catch jump attempts and repeat the situation but it loses to most attacks and if they 8T they tech away.
- 4B - is relatively safe as it covers both air and ground but you don't get much reward and it ends your turn.
At range 2 you open up Shiko Slam (5C) as a very strong and repeatable threat
- 5B. - Safe option that forces them to block. Low risk but decent reward.
- 5C - They can jump this but on hit or block you get excellent reward. Thanks to your passives you will armor or outrange any standard answer.
- 6T - If you think they will block, forward throw does big damage and puts you into Big Billy Buster okizeme.
Matchups
Paul
(Slight Disadvantage)
|
| Good pokes and a fireball make it tough to get in. To make matters worse, his Paulcano (5A) is one of the few ways to stop Big Billy Buster (5T). However, because he lacks a 6C you can walk and block into a threatening range while sacrificing some health.
|
Billy
(Even)
|
| Getting close and slower frame data are no longer problems. Big Billy Buster (5T) will tech another Big Billy Buster if the advantage is even, otherwise the fastest grappler wins. Armor does not apply on trades in the mirror.
|
Lewis
(Slight Advantage)
|
| Lewis can't afford to take many hits here and he has to come to you. He can get out of Big Billy Buster (5T) oki by moving backwards with his specials but your Shiko Slam (5C) can catch his late moving specials, forcing him to take knockdowns a little more seriously.
|
Marv
(Even)
|
| So many pokes to keep you out, however catching Blazing Ent (6B) with your 8C jumping elbow will quickly switch positions. Forcing Marv to respect your jumps will significantly weaken his zoning, he will need to start mixing up options to keep you out. 6B or 6C can catch him out of Vapor Strike (5A). You want to hunt for a knockdown in this matchup to prevent Marv from retreating with Gravity Spike (8A), though if he walks himself into the corner that is fine too.
|
Noel
(Slight Disadvantage)
|
| She has many pokes to keep you at bay; play too passively and she can use Unusual Botanical (6C) to threaten big damage and space control. Watch for when she wants to use vines, your big body damage will ignore the vine armor. If she does get vines up, alternate between walking in and using 8C to prevent her from getting guaranteed damage.
|
Nick
(Slight Disadvantage)
|
| You have the same ranges, but he does chip every time you have to block. It can effectively feel like he has more health but outside of the corner you do more damage. If Billy gets a life lead on Nick you can make him chase you, somewhat negating his chip damage.
|
Colors
