Melty Blood/MBAA/Shiki Ryougi
 |
Outdated Version
|

Voiced by: Maaya Sakamoto (坂本真綾) — Type: Human, Demon Hunter — Gender: Female
Birthday: October 3rd — Sizes: ? / ? / ? — Height: 160cm — Weight: 47kg
Eye Color: Grey — Hair Color: Brown
Introduction
Shiki is brand new for the console version of Melty Blood: Actress Again. As the main protagonist from Kara no Kyoukai, the other characters don't seem to know why she's involved in the events surrounding Wallachia, but it appears she's has been summoned by the Counter Force for a specific task...
This character boasts long-ranged attacks with very good hitboxes and lengthy dashes that help close distance. Ryougi is a great choice for people that prefer a more basic approach, while utilizing a passive-aggressive style with their zoning and pressure game. Her charged unblockables are a great asset in a pinch, and her Arc Drive, Another Arc Drive, and Last Arc Finish are considered the best in the game.
Stage: ...and nothing heart

BGM: Kara No Kyoukai
Crescent Moon
Carries the most unblockables out of all the moons. Crescent normals have a little less range than the other two moons, but makes up for it in excellent meter management, solid air-to-ground pokes, and a unique "custom combo" super that allows five distinct attacks that can mix up the opponent and deliver lethal damage. Out of the three moons, this Ryougi is aimed more towards beginners with simple combos that are capable of dealing out high damage. Overall, Crescent moon can deal the highest damage out of all the moons.
Normal Moves
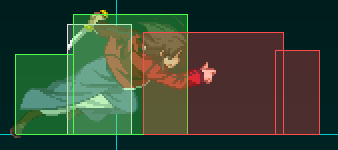
5A (Mid)
350 Damage 200 red damage 75% Proration +3.5% Circuit
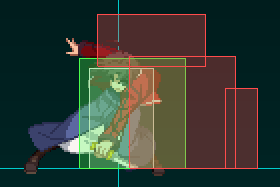
Standing elbow thrust for whiff cancels, combos, and tick throws. Using this in neutral is a bad idea. Comes out in 5 frames. Hitbox
2A (Low)
300 Damage 150 red damage 75% Proration +3.0% Circuit
A quick low kick which is her fastest low poke with decent range. Good poke coming out in 5 frames. Hitbox
5B (Mid)
500 Damage 250 Red Damage 80% Proration +5.0% Circuit
A quick horizontal slash used for just about everything. Good for meaty, anti-air, pokes, and relaunching off air counter-hits. Has clash frames. Comes out in 9 frames. Hitbox
5BB (Mid)
600 Damage 350 Red Damage 70% Proration +6.0% Circuit
An upwards slash to follow up 5B. Knocks them higher, but in combos, it will push grounded enemies back, so be wary of spacing. Has clash frames. Comes out in 5 frames after 5B. Hitbox
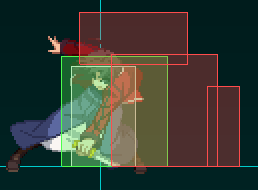
2B (Low)
550 Damage 400 Red Damage 90% Proration +5.5% Circuit
Nothing too special here. Highest damage combos usually start with this move. Has clash frames above the knife. Comes out in 11 frames. Hitbox
5C (Mid)
850 Damage 400 Red Damage 80% Proration +8.5% Circuit
Ryougi spins and does a vertical slash downwards. Has clash frames. Can be used as an anti air and moves Ryougi forward. Comes out in 10 frames. Hitbox
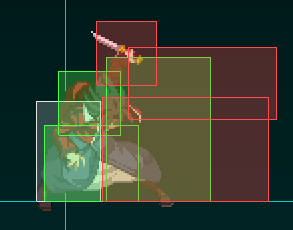
5[C] (Unblockable)
1500 Damage 3000 Red Damage 65% Proration +15.0% Circuit
Same as 5C, but more damage and unblockable. Opponent can tech in the air afterwards. Comes out in 29 frames. Hitbox
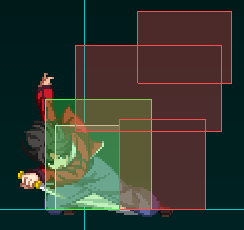
2C (Low)
900 Damage 500 Red Damage 60% Proration +9.0% Circuit
Low sweeping slash that moves Ryougi forward. Has hitboxes behind which can be utilized for combos. Knocks enemy down to an untechable state. Comes out in 14 frames. Hitbox
6C (Low)
850 Damage 600 Red Damage 85% Proration +8.5% Circuit
Ryougi spins around and slashes the opponent horizontally. It can be used a launcher for enemies already in the air. Against grounded opponents, Ryougi will switch sides with them afterwards. Grounded hits can only be followed up by a special 214C. Can be charged to be unblockable. Comes out in 11 frames. Hitbox
6[C] (Unblockable)
1500 Damage 3000 Red Damage 50% Proration +15.0% Circuit
Ryougi spins around, charging a horizontal slash. The hitboxes are larger than 6C. Cannot be followed up with anything. Opponents hit by this can tech after touching the ground. Comes out in 33 frames. Hitbox
j.A (Mid)
300 Damage 150 Red Damage 75% Proration +3.0% Circuit
A downwards stab. Not too good of an air move. Surprisingly enough, this move is the same speed as j.B. Comes out in 7 frames. Hitbox
j.B (High)
550 Damage 300 Red Damage 80% Proration +5.5% Circuit
A fast horizontal swipe forward. Great for air footsies and tagging people. Can hit behind for crossups. Comes out in 7 frames. Hitbox
j.C (High)
850 Damage 400 Red Damage 90% Proration +8.5% Circuit
And upwards slash with a long hit box. It's mostly used in combos, but you can try to play air footsies with it for more damage. Comes out in 8 frames. Hitbox
Throw
1500 Damage 1000 Red Damage 100% Proration +15.0% Circuit
Ryougi grabs the enemy, throws them down, and stabs them. Afterwards she backs off, but you have good oki off of it, allowing for dash meaty grab which is unique to Ryougi, or a blockstring, creating an 50-50.
Air Throw
1000 Damage 800 Red Damage 100% Proration +10.0% Circuit
Ryougi grabs the enemy in the air, throws them to the floor, lands on them with a stab and then backs off. There is less time to act than the ground grab. Leaving the enemy more options to escape afterwards.
Special Moves
214C Follow up to 6C
2000 Damage 1700 Red Damage 50% Proration -100% Circuit
Ryougi goes behind the enemy and stabs them in the back. They fall to the ground in an untechable state, which can be useful when you're staggering hits in a blockstrings and want to end in oki.
Flow chart for how the rekkas work:
  (1)236A/236B
      |
      |
      |
  (2) |---> 236A/B/C
      |      |
      |      |
      |      |---> 236A
      |      |
      |      |---> 236B
      |  (3) |
      |      |---> 214A/B/C
      |      |
      |      |---> 236C
      |
      |
  (2) |---> 214A/B/C
             |
             |
             |
             |---> 236A
             |
             |---> 236B
         (3) |
             |---> 214A/B/C
             |
             |---> 236C
(1)236A/B Rekka (Mid)
750 Damage 550 Red Damage 80% Proration +7.5% Circuit
Short dashing slash slash forward. Comes out in 10 frames. hitbox
(2)236A/B/C (Mid)
900 Damage 750 Red Damage 80% Proration +9.0% Circuit
Ryougi slashing in front of her again. Comes out in 5 frames. hitbox
(2)214A/B/C (High) 1200 Damage 900 Red Damage 75% Proration +12.0% Circuit
Ryougi flips and slashes from above. Comes out in 24 frames. hitbox
(3)236A (Mid)
700 Damage 400 Red Damage 50% Proration +7.0% Circuit
Ryougi slashes the enemy, knocking them to the ground. Comes out in 5 frames. hitbox
(3)236B (Mid)
1200 Damage 800 Red Damage 40% Proration +12.0% Circuit
Launches the enemy upwards with a slash. Comes out in 10 frames. hitbox
(3)236C (Mid)
1500 Damage 1000 Red Damage 100% Proration +15.0% Circuit
Ryougi thrusts forwards. Goes through the enemy. On counter hit, this launches the enemy up very high into the air, allowing you to relaunch for an air combo. Not safe on block though. Comes out in 17 frames. hitbox
(3)214A/B/C (Low)
450 Damage 350 Red Damage 50% Proration +4.5% Circuit
Low sweeping kick. comes out in 6 frames. hitbox
236C (Mid)
3000 Damage 2500 Red Damage 100% Proration -100% Circuit
Ryougi dashes through the enemy. On hit, Ryougi hits the enemy with a late slash knocking the enemy into the air in a dead body state. On block, she just goes through the enemy. This attack is great for setting up midscreen and corner wakeup mixups. Comes out in 11 frames. Starts with 5 frames of invulnerability.
214A (High)
1000 Damage 950 Red Damage 85% Proration +10.0% Circuit
Ryougi runs towards the enemy and jumps at them with a horizontal slash. Wallslams. Even though this attack is an overhead, it whiffs on crouching opponents. Don't use outside of combos. Comes out in 25 frames. hitbox
214B (High)
1200 Damage 1000 Red Damage 50% Proration +12.0% Circuit
Ryougi runs towards the enemy and jumps at them with a downwards slash and can hit crouching opponents. Can be used on opponents who mash 2A, but other than that, not too much use. Comes out in 27 frames. hitbox
214C (Mid)
1400 Damage 1000 Red Damage 50% Proration -100% Circuit
Looks the same as 214A, except it has a larger hitbox. Still whiffs on smaller crouching hitboxes. You can perform aerial moves after the attack before hitting the ground. Comes out in 22 frames after super flash. hitbox
421A/B (High)
1200 Damage 1000 Red Damage 85% Proration +12.0% Circuit
Ryougi runs at the enemy and jumps behind them, throwing out a slash to the enemy's back. Very situational, and not safe to use on block. A very high-risk, low reward move. 421A comes out in 22+running frames, 421B comes out in 23+running frames. hitbox
421C (High)
??? Damage ??? Red Damage ??% Proration -100% Circuit
Ryougi runs at the enemy and jumps behind them, throwing out a slash to the enemy's back. You can move or do moves after the hit unlike the B version, but it's still very situational. Pretty easy to block due to super flash.
623A (Low)
1200 Damage 1100 Red Damage 55% Proration +9.8% Circuit
Ryougi dashes at the opponent and throws out a low-hitting slash which knocks the enemy down. Can be charged to run further or make unblockable. Comes out in 12 to 35 frames. hitbox
623[A] (Unblockable)
1500 Damage 3500 Red Damage 50% Proration +15.0% Circuit
Ryougi dashes at the opponent and throws out a low-hitting slash which knocks the enemy down. Comes out in 38 frames. hitbox
623B (Low)
1200 Damage 1100 Red Damage 80% Proration +9.8% Circuit
Ryougi dashes at the opponent and throws out a low-hitting slash which launches the enemy into the air. This attack is good for catching backdashes and you can relaunch the enemy after hitting. Can be charged to run further or unblockable. Comes out in 18 to 41 frames. hitbox
623[B] (Unblockable)
1500 Damage 3500 Red Damage 50% Proration +15.0% Circuit
Ryougi dashes at the opponent and throws out a low-hitting slash which knocks the enemy down. Comes out in 44 frames. hitbox
623C (Low)
1200 Damage 1100 Red Damage 60% Proration -100% Circuit
Ryougi dashes at the opponent and throws out a low-hitting slash which launches the enemy into the air. This attack is good for catching backdashes and you can relaunch the enemy after hitting. There's pretty much no point into using this with no extra damage, and worse proration. Can be charged to run further or unblockable. Comes out in 19 to 42 frames. hitbox
623[C] (Unblockable)
1900 Damage 4500 Red Damage 50% Proration -100% Circuit
Ryougi dashes at the opponent and throws out a low-hitting slash which knocks the enemy down. Comes out in 44 frames. hitbox
j.236A (High)
1500 Damage 1400 Red Damage 75% Proration +15.0% Circuit
Ryougi does a slow crescent slash in the air. wallslams the enemy. Comes out in 18 frames. hitbox
j.236B (Mid)
1600 Damage 1500 Red Damage 75% Proration +16.0% Circuit
Ryougi does a crescent slash in the air. wallslams the enemy. This move is one of your air combo enders which can give you time to pick your knife up. Can also be used in the middle of your combo. Comes out in 11 frames. hitbox
j.236C (High)
2200 Damage 2000 Red Damage 40% Proration -100% Circuit
Ryougi does a crescent slash in the air. wallslams the enemy. This move should only be used as a combo ender due to the terrible proration on it. Comes out in 11 frames. hitbox
63214C -150% Circuit
Your custom combo. Ryougi starts dashing at the enemy and you can do a combination of attacks at the enemy. You can cancel it by whiffing a move and pressing no buttons afterwards. You have 6 different options during the custom combo. Custom combo loops will be your highest sources of damage.
5A/B/C during 63214C (Mid)
500 Damage 400 Red Damage 90% Proration
The same animation as (1)236A/B. Short dashing slash slash forward. Comes out in 9 frames. hitbox
6A/B/C during 63214C (High)
1100 Damage 800 Red Damage 75% Proration
The same animation as (2)214A/B/C. Ryougi flips and slashes from above. Comes out in 24 frames. hitbox
2A/B/C during 63214C (Low)
200 Damage 100 Red Damage 50% Proration
The same animation as (3)214A/B/C. Low sweeping kick. comes out in 5 frames. hitbox
8A/B/C during 63214C (Mid)
700 Damage 400 Red Damage 70% Proration
The same animation as (3)236B. Launches the enemy upwards with a slash. Comes out in 6 frames. hitbox
4A/B/C during 63214C (Mid)
400 Damage 200 Red Damage 90% Proration
The same animation as (3)236A. Ryougi slashes the enemy, knocking them to the ground. Comes out in 8 frames. hitbox
D during 63214C
Ryougi performs a forward roll. Can go behind enemy.
22A (Mid)
950 Damage 750 Red Damage 60% Proration +9.5% Circuit
Ryougi throws her knife at a low angle. Good for pressure strings.
22[A] (Unblockable)
1000 Damage 2000 Red Damage 90% Proration +10.0% Circuit
Ryougi throws her knife at a low angle. Use this if you think your enemy is afraid of you and will respect your pressure.
22B (Mid)
950 Damage 750 Red Damage 60% Proration +9.5% Circuit
Ryougi throws her knife at a mid-low angle. Good for pressure strings.
22[B] (Unblockable)
1000 Damage 2000 Red Damage 90% Proration +10.0% Circuit
Ryougi throws her knife at a mid-low angle. Use this if you think your enemy is afraid of you and will respect your pressure.
22C (Mid)
1700 Damage 1400 Red Damage 60% Proration -100% Circuit
EX knife is thrown horizontally, can be used to extend combos and is the best one to use for pressure strings to let you run in and restart your string. Easy to guard break if you include one of these in your blockstring. It also wallslams.
j.22A (Mid)
950 Damage 750 Red Damage 60% Proration +9.5% Circuit
Full screen throwing knives? Lets go! But seriously, not too much of a good idea unless you need a way to run in, but really not a good idea. She throws the knife at a low angle.
j.22B (Mid)
950 Damage 750 Red Damage 60% Proration +9.5% Circuit
Ryougi throws the knife at a low angle. Not all too useful
j.22C (Mid)
1700 Damage 1400 Red Damage 60% Proration -100% Circuit
Ryougi throws her knife for big damage. Thrown horizontally, not too useful.
22A/B/C Over knife on ground
Picks your knife up. This can be special canceled into, but it's usually best if you pick you knife up after a j.236B combo ender.
44A/B 22A/B 66A/B Command Air Tech (Mid)
1100 Damage 750 Red Damage 50% Proration +11.0% Circuit
When air teching, Ryougi is a special character who can do a command air tech. When you air tech with the commands, you tech and do a crescent slash. Wallslams. Not too useful, but a funny surprise. A version comes out on frame 18. B version comes out on frame 11. hitbox
44C 22C 66C Command Air Tech (Mid)
1800 Damage 1200 Red Damage 75% Proration -100% Circuit
EX Command tech, just does more damage and has some invulnerability than the previous version. Comes out on frame 10. hitbox
214D (Mid)
500 Damage 300 Red Damage 100% Proration -50% Circuit out of blockstun. +10.0% Circuit on hit
Your shield bunker. Has clash frames in the start, and Ryougi performs a short slash. It's all-right, but isn't all too useful. It will still do it's job of stopping combos in the middle of enemy blockstrings though. hitbox
41236C Arc Drive [Mid/Unblockable]
3500 Damage 6000 Red Damage 100% Proration
If the enemy is close to you, not in blockstun, wake up frames, or in the air, they are frozen in place and slashed. Very useful and can be set up in a combo easily, or even a tick setup. If the enemy isn't frozen, they can still be hit normally, but have the ability to block.
41236C Another Arc Drive [Mid/Unblockable]
5000 Damage 10000 Red Damage 100% Proration
If the enemy is close to you, not in blockstun, wake up frames, or in the air, they are frozen in place and slashed. Very useful and can be set up in a combo easily, or even a tick setup. If the enemy isn't frozen, they can still be hit normally, but have the ability to block. Comes out a lot faster than the normal arc drive.
ex 5D Last Arc
7000 Damage 14400 Red Damage
The entire background changes to cherry blossoms. Ryougi is seen holding a sword and in her kimono. She dashes towards the enemy doing a single slash. Arguably the best last arc, doing 7,000 damage to every character and taking out all of their red HP. If the enemy is in heat during the last arc, it is an instant kill.
Combos and Strategies
Basic BnB:
2A 5BB 2B 5C 2C 6C j.BC air dash j.C sdj.BC air throw/j.236B/j.236C
- Your basic combo, very easy to do and nets good damage for how easy it is. You can omit the airdash j.C if it's too hard.
Knife BnB:
2A 5BB 2B 5C 2C 6C 22B 2A 5BB j.BC dj.BC air throw/j.236B/j.236C
- The window to connect 2A after 22B is huge, don't drop this combo.
- Uses your knife which is unfavorable unless you REALLY need the extra damage.
Advanced midscreen Knife BnB:
2A 5BB 2B 5C 2C 6C 22B 2A 2C 623B 2C 6C j.BC airdash j.C dj.BC j.236B
- The 2nd 6C has to be delayed slightly to keep the enemy's height down for the airdash j.C.
- Only does around 200-400 more than the basic BnB but nets you 48.8 more meter.
- You land on your knife after the j.236B
Fullscreen Knife BnB:
2A 5BB 2B 5C 2C 6C 22A 5BB 214A sj.BC dj.BC air throw
- Combos from one corner to the other!
- The 22A 5BB link is a little hard, just get the timing down.
EX Knife Combo:
2A 5BB 2B 5C 2C 6C > 22C > 2C 5BB j.BC dj.BC air throw/236B/236C
- Generally you want to hit the 2C after 22C as early as possible.
Basic Custom Combo loop:
2A 5BB 2B 5C 63214C (8X 6X 8X 6X 8X 4X) 5BB j.BC dj.BC > air throw/236B/236C
- X = A, B, or C.
- Works midscreen and corner. At midscreen, you need to watch for proper spacing before attempting.
- the 4 in the custom combo needs to whiff, so delay it.
- 5BB in the later half of the combo can be substituted for 5A 5C for more damage, but is VERY height dependant.
Advanced Custom Combo loop:
2A 5BB 2B 5C 63214C (8X 6X 8X 6X 8X 4X) 5A 2C 623B 5C 2369B j.BC dj.BC Air Throw
- Corner Only
- X = A, B, or C.
- 5A 2C is tough because you have to delay the 8Xs and the ending 4X in your custom combo as much as possible to keep them floating low.
Triple Custom Combo loop:
2B 5BB 5C (63214C (8X 6X 8X 6X 8X 4X) 5A)x3 5C j.BC dj.BC Air Throw
- Corner only
- X = A, B, or C.
- Be aware that gravity increases throughout the combo so you need to speed your inputs up for each rep.
- You have to start this when you first start at Max so you can get 3 reps.
- Deals around 7k+ to just about everyone
midscreen Air CH pickup combo
2B 5C j.BC dj.BC air throw/j.236B/j.236C
- It's not hard to land this. Counter hit them, then just wait for the enemy to be at the right height. If this is too hard, you can just do 5BB air combo.
Corner Air CH pickup combo
5BB 214A 2C 5C j.BC airdash j.C dj.BC air throw/j.236B/j.236C
- delay the 5BB as much as you can to make 2C 5C easier, you may also delay the 5C to get the height lower for the air combo.
- You can go for whatever you'd like after the 214A really. even 623B 236C for knockdown, 2C 63214C, etc.
Strategies
Ryougi is a good spacing character in all of her moons. C-Ryougi specializes in damage, rushdown, and corner mixups. Her BnB does around 4.3k to VSion.
You have little to no mixups in neutral game. Ryougi is a block string and stagger character. You can chain all of your normals into a block string and with a 22C you can continue with a new block string. She has ridiculous guard bar damage and really doesn't need the mixups. Her main mixup for block strings are 5[C] and 6[C] which are unblockables. 5[C] allows air techs, while 6[C] only allows ground techs, making tech chasing a viable option. Half charged moves can scare your opponent, but the disadvantage to using 5[C] and 6[C] is that they can be shielded on reaction. Since they are charged, Ryougi isn't allowed to have any follow ups making them almost unsafe. Hence why Ryougi has little to no mixups in neutral. As a block string and stagger character, she shines.
One strategy while you're spacing is to rely on your 5B. 5B is your best normal by far. It's your anti-air, best meaty, and has a long hitbox with clash frames at the top. The only issue with this move is the fact that 5B's recovery is long and punishable, making it terrible to whiff. But if you catch and air counterhit with 5B, you can wait, and relaunch with another 5BB into an air combo. If an opponent is trying to come in from a dead angle from above, you can use tkj.236B to try to keep them off of you. The hitbox for her air crescents are huge and almost all red (meaning her hitbox isn't attached to it), you want to use the B version because it has normal landing recovery making it not punishable on block.
You can literally do almost any block string you want with Ryougi. She can chain into her other normals fairly well and at a great distance. The easiest way to chain your normals so they will hit are 2Axn 5BB 2B 2C 5C 5A(whiff). 5C has a short range, so if you want to put it before 2C to make chaining easier, you have to make sure you are close enough to use 5C, or omitting the 2nd B in 5BB will help keep you close to your opponent. The best way (with most guard bar damage) to reset into another block string is 2A 5BB 2B 5C 2C 6C 236B 236B 214X 22C. After this if your opponent was hit, you can easily hit confirm into a 5BB launcher and just air combo, if they're still blocking, just dash 5B and start your string all over again. If done correctly, dash 5B will catch jump outs. Also, if your knife is on the ground and you have your enemy in block string while you are over it, cancel your block string with 22X to pick it up. There is little recovery on picking up your knife. This will reset your block string and let you continue pressure. If people are used to fighting your Ryougi which has long block strings, then you can start to mix it up. You can do something like 2A 5B 2B 5A and dash right back in or IAD at them and j.B to continue your block string. This is when you can be as creative as you like with Ryougi's block strings.
One special thing about Ryougi is her Arc Drive. You can think of it as an extended throw. Allowing some nasty ticks. One of the best ways to do it with C-Ryougi is to 5C delay 41236C. You can be creative and do things like 2AAA 41236C, 5B 2B delay 41236C, or whatever you like. Just be weary that it can be mashed or jumped out of BEFORE the super flash. The unblockable grab portion will not work if your opponent is in wake up or block stun animation, so delay carefully.
On the defensive, Ryougi doesn't have much. She can only zone with her normals. Random knife throws don't help since you can't catch them like H. Defensive options while you're in block are also hard to come by. She has no DP, no reversals, a bad bunker, and only a standing dodge which can be 2A mashed. You will have to learn how to sit still and block because Ryougi cannot afford to take hits seeing as she has some of the worst defense in the game. EX shield is always good no matter what character you're against. For anti air, use 5A after an ex shield. on the ground, 2A or 5B depending on distance. Hopefully you won't be put in blockstun much since Ryougi is a very offense oriented character, but if you are on the defensive, you NEED to block. Don't just try to push buttons out of it constantly. You can eat 5k damage+ easily from basic combos.
Half Moon
This moon has a combination of range, speed, and flexibility for a more aggressive style of play. Except for her Arc Drive, there are no unblockables whatsoever in this moon. Has the unique ability to knife catch in the air. A successful knife catch will cancel air dash lag. Also has the ability to ground roll by inputting 6A+B. Can only be done while running forward.
Normal Moves
5A > 6AA [Mid, Mid, Mid]
Close-standing knife swing tilted about 30 degrees up. The first hit is duckable, which works great as a standing whiff into Arc Drive. Can be used for anti-air, but not recommended. The second and third attacks maintain their angle, but the range is notably increased on each additional swing. Unique in the fact that Ryougi remains stationary during the entire animation. The second and third hits are duckable for some members of the cast. The first hit does 350 damage, the second does 600 damage, and the last does 1000 damage (without proration).
5B [Mid]
Mid-range knife swipe with excellent horizontal range and clash frames. Moves forward very slightly. Her second best combo starter and best overall standing poke; can be repeated into another delayable 5B. Use this if 2A won't reach. Be careful though, as it has terrible lag on whiff, and is prone to backdash cancelling and dodges. First hit does 500 damage, and the second does 600 damage.
5C [Mid]
Long-range horizontal knife swipe; slow. Identical to Full Moon's 5C, but without the charged unblockable. Moves forward slightly, and gives a lot of pushback on block. At max range, opponents can crouch under it. Safe option after a ground throw, as it will connect if the opponent attempts to jump out. Extremely useful for keeping opponents on the ground since it hits from a very long distance at chest height while moving you forward.
4C [High]
Extremely close ranged overhead kick. Must be blocked high, and gives an untechable knockdown. On hit it can be cancelled into any special move, however it's recommended to combo into 22A knife throw into sweep loop on hit or 236A series if you don't have the knife available. Cannot jump cancel or continue reverse beat strings after this move.
3C [Low]
Fairly quick low sweep with decent range. On block, it adds +3 frame advantage, so use it in stagger / pressure strings into 5B for corner pressure. Gives untechable knockdown. Primary move in sweep loops. Safe on block, as it adds pushout.
2A [Low]
Close ranged crouching low kick. Her fastest ground move. Best combo starter. Best whiff cancel move for pressure and stagger strings. Can be used for off-the-ground pick ups.
2B [Low]
Mid-range crouching horizontal knife swipe with clash frames. Good range, but slower with slightly less lag on whiff than 5B.
2C [Low]
Slow, long-range crouching low slash that also moves Ryougi forward. Gives an untechable knockdown and hits at a very large arc in front, behind, and a little bit above her. Great option after a ground throw, as it will hit exactly on wakeup. Very useful in blockstrings and staggering combos as it propels Ryougi forward, allowing her to catch any backdash cancels.
j.A [Mid]
Horizontal knife slash with good range. Identical to j.B in the fact that they are both 7 frames and 350 damage; however her hitbox covers the attacking box, making it an easy target for counterhits. Not useful for air-to-ground, as it will whiff on crouching opponents. Stick to j.B or j.6B for aerial encounters.
j.B [High]
Similar to the first part of Full Moon's j.B; semi-quick knife slash tilted downwards with amazing range. This is her best air-to-air move for discouraging aggressive players attempting to approach from the ground. It has a tendency to whiff on crouching opponents up close, but overall much more reliable than j.A for air-to-ground.
j.6B [High]
Identical to the second part of Full Moon's j.B. Semi-quick knife slash tilted slightly upwards with slightly more range than j.B, with a smaller hitbox to boot. This is the safer option for aerial footsies, as the attacking animation extends significantly farther.
j.C [High]
Best air-to-ground attack. Large vertical knife swing that hits in a large arc from below to very high above her. The attack box extends very high outside of her hitbox, making this an excellent air tech punisher. By far her most damaging air normal, sitting at 900 damage. Not good for air footsies, as her horizontal reach is weaker. This is her only crossup attack, and by comparative standards it is much weaker than the rest of the cast.
Ground Throw
Ryougi grabs the opponent, throws them onto the ground, then stabs them in the chest. Does 1500 damage, and Ryougi stands just barely in range for 5C and 2C. Ryougi recovers slightly quicker as well.
Air Throw
Ryougi grabs the opponent out of the air, throws them onto the ground, then lands on top of them stabbing them in the chest. Does 1000 damage, but Ryougi ends up a little farther away than her ground throw version. Also, she recovers only slightly quicker, therefore the opponent can get away fairly easy. Best used after a wall combo ender near the corner.
Special Moves
Kasane Shouro 「双ね鐘楼」
236 + Button [Starts Ground Rekka]
Ryougi dashes forward a bit and starts her rekka combo. Extremely useful after bread and butter strings on the ground. Also does chunks of damage to the guard bar if blocked. Not too useful of a move on it's own, but safe on block if completed all the way through. Just don't end with 236C if they block the first two parts.
- A version [Mid] First part of her rekka series. Horizontal slash that moves forward. Quick.
- B version [Mid] Identical to 236A but with greater range, but slightly slower startup. Use this in combos instead.
- C version [Mid] EX move. Ryougi winds up and slashes forward multiple times. Good startup time -- one of her quickest EX moves. Also good for chip damage. Not invincible on startup. Safe on block. Upon hit, it is air techable but not ground techable. If they air tech, you can punish the air tech with 5A or 5B into air combo.
The A and B versions continue into:
- 236A [Mid] Generic downward horizontal slash. Combos from 236A and 236B.
- 236B [Mid] Generic downward horizontal slash but moves farther. Combos from 236A and 236B. Use this in combos instead.
- 214A_B [High] Jumping overhead. Goes over low moves. Does not combo from 236A or 236B.
Which then continues into:
- 236A [Mid] Generic upward horizontal slash. Ends in untechable knockdown. Does not launch. Safe on block. Can be comboed from 236A, 236B, or 214A.
- 236B [Mid] Upward vertical slash that launches, but tends to whiff if done after everything except 236B. Non techable. Can be comboed from 236A, 236B, or 214A. On hit, can be cancelled into 22C into 2C, 3C, 623B for a semi loop combo. Can also be canceled into a simple 5BB string into air combo.
- 236C [Mid] Forward moving knife thrust. Air techable. Good ender for rushdown and air 50/50 mixups. Not always guaranteed if rekka was performed from a distance, but it's always guaranteed up close. The air tech is punishable, however it's recommended to try to punish it near the corner. Needless to say, there are better options instead. Unsafe on block.
- 214A_B [Low] Sweeping low kick. Can be canceled into an Ex-special on hit or block. On hit, it has untechable knockdown. Safe on block. Can be comboed from 236A, 236B, or 214A. Recommended ender for guard break strings, as you can Ex-cancel into 22C for massive guard damage into another blocked string.
Here's a handy-dandy flow chart for how it works:
  (1)236A_236B
      |
      |
      |
  (2) |---> 236A_B
      |      |
      |      |
      |      |---> 236A
      |      |
      |      |---> 236B
      |  (3) |
      |      |---> 236C
      |      |
      |      |---> 214A_B
      |
      |
  (2) |---> 214A_B
             |
             |
             |---> 236A
             |
             |---> 236B
         (3) |
             |---> 236C
             |
             |---> 214A_B
Hari no Tsuki 「玻璃の月」
236 + Button [Air Only]
All-purpose air move with a very wide hitbox. Sadly it's not air unblockable like the 214 series, but it makes up for it with much more vertical and horizontal range. Not quite safe on block (especially on grounded people), but works well as a surprise overhead every once in a while after a few safe jump in attempts. Also works well as an aerial counter against people who like to approach from the above, although it's risky if they approach on the ground due to the fact that it can be beaten out early from ground meaty attacks since it requires a tk input (2369). An excellent all-around aerial attack.
- A version [High] Wide, crescent-shaped slash with a large hitbox. Can hit a crouching opponent if tk'd up close. Wall slams.
- B version [Mid] Same as j.236A, but more damaging with an even larger hitbox. Best combo ender midscreen and used in corner combos. Wall slams. Useful move for controlling space above and in front, however it is unsafe if blocked on the ground. Extremely useful in corner combos.
- C version [High] Extremely large hitbox, now with start up invincibility. Hits overhead on the ground, but oddly enough is liable to completely whiff on characters in a crouched state. Air techable only if performed far from the wall; otherwise it's ground techable only. Wall slams on hit. Can be hit-confirmed after a successful 214B on hit into wall combo.
Mogaribue 「虎落笛」
623 + Button
Very quick, far reaching ground slash that hits low. Gives untechable knockdown. Works really good as a surprise attack or long range punish for moves that have slow start up. Can beat out fireball moves that hit at above head height (e.g. F Aoko's 236A_B fireball), as it will travel underneath it. 623B is even better (albeit slower) since it can link into a regular air combo or 2C, 3C, 623B. This turns into a bad move if blocked from a distance however, so use it sparingly.
- A version [Low] Dashing horizontal knife slash. Very fast and gives untechable knockdown. Can OTG afterwards. Long ranged punisher; kills most air moves that are not air-to-ground attacks if timed correctly. Chargeable version can combo into 2C>5BB afterward or into sweep loop variations. Charged version is non-techable. Safe on block, but the opponent recovers faster.
- B version [Low] Dashing horizontal knife slash. Slightly slower startup. Air techable. Charged version is untechable and comboable into 2C>5BB or sweep loop variations. Safe on block, but the opponent recovers faster.
- C version [Low] Dashing horizontal knife slash; only hits once. Not invincible on start up. Good range, but slow (due to super flash) and easily seeable. Untechable on hit, and comboable. Overall fairly useless outside of combos.
Mumyou no Tsuki 「無明の月」
214 + Button
Ryougi jumps, spins, and swipes at head height. A great air unblockable special when used correctly, although if blocked (or at worst ducked, it in some cases) on the ground it becomes unsafe. Just like the 623 series, use it sparingly as it telegraphs itself very easily. Don't use this like normal dps, as it's slow and not invincible on startup. Save this primarily for corner combos.
- A version [High] Horizontal jumping slash. Air unblockable. Wall slams. Does not hit crouching. Useful as a preemptive anti-air from a distance, as the move covers a nice horizontal swath at head height. Beware though, as it telegraphs itself very well and is fairly unsafe if whiffed, but risky if blocked on the ground. Can tick into 63214C on whiff or block. EX cancelable.
- B version [High] Downward horizontal jumping slash. Hits overhead. Air unblockable. Can be hit confirmed into j.236C into air combo. Liable to whiff up close. Safe on block, however it will cancel any built up momentum as the opponent recovers before you do. Can tick into 63214C on whiff or block. EX cancelable.
- C version [High] Horizontal jumping slash with a WIDE ARC. Air unblockable. On hit, can be air cancelled into an air dash or any jumping attack move to a combo. This will still whiff on crouchers however, so all the negative penalties still apply.
Onyou Raden 「陰陽螺鈿」
421 + Button
Ryougi's command parry. Ryougi crosses her arms goes into a parry state. If an active frame of an attack (normals, projectiles, summons, etc.) comes into contact with Ryougi while she is her parry state, she will parry it and take no damage. If the opponent is within approximately 1 character length from her, Ryougi's parry will also catch the opponent and toss them behind her. While this all sounds great, all of Ryougi's parries do have start up and generally should not be thrown out frequently, as you will get counter hit all day. One of the best uses of these counters is to punish Half Moon shield counters (if you're good at it, you can do it on reaction).
- A version [High/Mid Parry] Ryougi goes into her standing parry state. The A version of Ryougi's command parry covers attacks that hit the upper part of her body. From a successful command parry, Ryougi will toss the opponent up in the air behind her, and you can follow up with a combo (leading from 5B, 2C, 5C, or 623B).
- B version [Mid/Low Parry] Ryougi crouches down and goes into her low parry state. The B version of Ryougi's command parry covers attacks that hit the lower part of her body. From a successful command parry, Ryougi will toss the opponent up in the air behind her, and you can follow up with a combo (leading from 5B, 2C, 5C, or 623B).
- C version [Mid/Low Parry] Ryougi crouches down and goes into her low parry state. Faster start up and recovery than the B version. On a successful parry Ryougi will throw them over her and onto the ground roughly 2 character lengths away. You can't really land a combo from this version, outside of throwing your opponent into the corner and performing your Arc Drive when they hit the ground. Since this move does not last very long, and has a quick recovery, you can utilize it as a cancel in your block strings.
Kakushi Naifu 「隠しナイフ」
22 + Button [Can be done while grounded or airborne]
Ryougi's lone projectile. Half moon carries the best version, since the knife can be caught again in the air -- eliminating the need to walk over to pick it up. The A version is +9 on block, making it extremely useful for blockstring pressure.
- A version [Mid] Horizontal knife throw. Hits most crouching characters except for Neco Arc and Neco Arc Chaos. The air version jumps forward a bit and throws the knife at a downward angle. Can Combo after a successful close-ranged ground hit. Air catch with the knife is possible only in a neutral state. A successful knife catch will also cancel air dash lag, allowing some creative offensive options. It's also possible to throw it again after it's been caught in the air for a quick surprise attack. The ground version will always ricochet, however the air version will not if it hits the floor and nothing else. The richochet trajectory also serves as a useful sandoori mixup on wake up.
- B version [Low] Downward angled knife throw. Hits low. Air version jumps back a bit and throws the knife at a downward angle. Cannot combo after successful hit, due to significant lag. Air catch is possible, however the knife will not richochet if it doesn't hit the wall. Cancels air dash if caught in the air. Useful as a sandoori mixup on wake up.
- C version [Mid] Horizontal knife throw that hits multiple times. Each blocked hit gives +3 frame advantage. The knife will always richohet no matter where it's thrown. Excellent lockdown projectile super. If used in the air, the knife travels horizontally and hits multiple times. One of her best EX moves, as it is extremely fast -- fast enough to trade on wakeup into a quick combo.
Naifu Hiroi 「ナイフ拾い」
22 + Button [While standing on top of your knife]
Picks up your knife if you are on top of it. Ryougi slightly crouches down, minimizing her hitbox. You can use this move like a cancel during block strings if you are close enough to your knife to reset blockstring pressure. No difference in the move based on the button pressed.
Hari no Tsuki Tobi 「玻璃の月鳶」
63214 + Button
Half moon exclusive move that jumps over lows while tossing her knife. A little impractical in neutral situations, but on okizeme it offers an alternative over 22A for IAD knife mixups in the corner.
- A version [Mid] Ryougi jumps forward a bit and throws her knife at a downward angle. Knife will not richochet if it doesn't hit the wall. Very useful near the corner, as it richochets the knife right above the opponent allowing a really quick air-dash-cancel-knife-catch-overhead which in turn can be utilized as a sandoori mixup. Can be ticked into arc drive.
- B version [Mid] Ryougi runs forward, then jumps behind the opponent and throws her knife at a downward angle in the opposite direction. Somewhat useful in the corner if the opponent tries to run in with a low move, as it will hop over the low. Can be used to regain momentum in the corner but beware, this move is very slow to activate and can be knocked out of. Useless.
- C version [Mid] Ryougi jumps around and behind the opponent and throws her knife at a downward angle. Hits once, but on hit it does a great amount of stun, allowing for a follow up combo. Still semi-useless; only applicable in combos.
Tenpyo 「転貓」
22_66_44 + Button [During Air Tech Only]
A move performed during an aerial tech. Ryougi tech recovers in the air and performs a downward slashing arc. It can catch people by surprise, and all versions are relatively safe on block. After performing the slash, you will not be able to perform any jumps, air dashes, or attacks until you land. On hit it will send the opponent flying across the screen until they wall slam. The 22 version moves back just slightly, and the 44_66 versions move in the direction pressed accordingly. To most consistently get this move when you want it, it is best to buffer the directional input for this move before air teching, and then hit the according button during or after the tech.
- A version [Mid] The A version takes longer to start up and has less active frames than the B version.
- B version [Mid] Faster start up and more active frames than the A version.
- C version [Mid] The EX version of the move. Has invulnerability frames on start up.
Chokushi no Magan Gokei Houraku 「直死の魔眼 五景崩落」
41236C [In HEAT]
Ryougi hunches down and activates her Mystic Eyes of Death Perception, then rushes forward cutting two lines. Has 8 frames of start up with no invincibility frames. It is unblockable if the opponent is grounded and not in block stun. You can occasionally catch someone during the startup jump lag frames. This move can be be performed from approximately 3 character lengths away (think of it as an extended grab). If the opponent is not caught by the unblockable hit, the arc drive can then be blocked or shielded.
Combos and Strategies
Midscreen
Basic Staple
2A 5BB 2B 5C 2C x 6AA(A) > j.BC > dj.BC > j.236B
- Basic midscreen combo.
- Wallslams them to the corner.
- Most characters do not need delay before a full 6AAA, but some (such as Ryougi) require it.
- Learn the combo below ASAP since it is better in every way.
2A 5BB 2B 5C 2C x 6AAA xx 214A > sj.6B j.C > dj.BC > airthrow or j.236B
- Best midscreen combo without knife.
- Puts them into the corner with an airthrow (see below for options after corner airthrow).
- Most characters do not need delay before the 6AAA, but some (such as Ryougi) require it.
- The delay before 214A is optional but allows you to connect the aircombo easier.
- In the corner do a neutral jump and omit the first j.6B.
Advanced Staples
(WIP will merge with the existing combos)
High Damage Combos (requires knife)
- 2A 5BB 2B 5C 2C (5A) 22A > 2C 3C x 623B > 2C 3C 5C 5BB > j.BC > sdj.ABC > j.236B land knife pickup
- 2A 5B 2B 5C 3C 623B > 2C 3C xx 5BB x 22A > 2C 3C x 623B > 2C 3C 5C 5BB > j.BC > sdj.ABC > j.236B land knife pickup
- These two combos are very similar, except the second one requires a close range starter (omit moves when necessary) and has stricter timing due to higher gravity.
- If you end up too close to the corner to do the last 2C 3C 5C 5BB, just do 5BB instead which should still allow you to pickup your knife.
- These both build massive amounts of meter and are great for auto-heat since j.236B gives you space.
Oki Combos (requires knife)
- 2A 5BB 2B 5C 2C 22A > 3C x 623B > 2C 3C x 623B > 2C 3C knife pickup
- 2A 5B 2B 5C 3C 623B > 2C 3C 22A > 3C x 623B > 2C 3C x 623B > 2C 3C knife pickup
- These combos do less damage than the equivalent high damage variants, have trickier timing, but give you an ambiguous crossup.
- By delaying the knife pickup or omitting the last 3C, you can crossup up or not with a forward jump land 2A.
- Of course if you delay it too much, the crossup won't be meaty and will lose to wakeup throw or even mash.
- Experiment with other oki setups.
2A 5BB 2B 5C 2C 22A > 2C 3C 5C 5BB > j.B j.C > dj.B j.C > 236b
(5023 damage to V.Sion)
2A 5BB 2B 5C 2C 22A 3C 623B > 2C 3C 5C 5BB > j.B j.C > dj.B j.C > 236B
(5,035 damage to V.Sion)
- High damage with knife pickup
- If you're too far into the corner you might accidentally cross up with 2c. Should land you on the knife.
2A 5BB 2B 3C 623B > 2C 3C 22A > 2C 3C 623B > 2C 3C 5C 5BB > j.B j.C > sdj.A j.B j.C > 236B
(5,143 damage to V.Sion)
- High damage with knife pickup
- If you did the super double jump, you should land right on the knife after j.236B.
2A 5BB 2B 3C 623B > 2C 3C 22A > 2C 3C 623B > 2C 3C 623A
(4,588 damage to V.Sion)
- High damage with knife pickup
- Should put you right on the knife, with just enough time to pick it up and IAD j.C at them on wakeup.
2A 5BB 2B 5C 2C 22A > 2C 3C 623B > 2C 3C 5C 5BB > j.B j.C > sdj.A j.B j.C > 236B
(5,245 damage to V.Sion)
- From full-screen to mid-screen
- Gives knife pickup
- If you did the super double jump, you should land right on the knife after j.236B.
2A 5BB 2B 5C 2C 22A > 2C 3C 623B > 2C 3C 623A
(4,462 damage to V.Sion)
- Gives knife pickup and okizeme
- Should put you right on the knife, with just enough time to pick it up and IAD j.c at them on wakeup.
623B Loop
2A 2B 5B 5C 3C > 623B > 2C > 623B > 2C > 623B > 2C delay 3C 5BB > jB jC jc jB jC > throw
Corner
Advanced Staples
2A 5BB 2B 5C 2C TK236B > 5BB 214A > 22A j.C AD(catch) j.C > dj.A j.B j.C > 236B
(5,176 damage to V.Sion)
- The knife catch cancels your air dash so you can hit the second j.c.
2A 5BB 2B 5C 2C 22A > 3C 5BB 214A > 3C 236A 236A 214A
(4,556 damage to V.Sion)
- Gives knife pickup and okizeme
- Use 214A instead of 236A at the end because you'll be on the other side of them. Lands you right on the knife.
2A 5BB 2B 5C 2C 22A > 3C 5BB 214A > 2C 22A
(4,050 damage to V.Sion)
- Gives knife pickup and okizeme
- Cancels the untechable 2C with knife pickup. This version keeps them in the corner. Can follow up with dash 6a+b roll crossup.
2A 5BB 2B 5C 2C TK236B > 5BB 214A > 2C (delay)5C 22A > 2C 3C 623B > 236A 236A 236A
(5,503 damage to V.Sion)
- Gives knife pickup and okizeme
- Nice damage, keeps them in the corner, gives you time to pick up the knife and still have advantage on oki.
2A 5BB 2B 5C 2C TK236B > 5A 22A 2C 3C 22A 2A 5A 22A > 2C 3C xx 6AAA x 214A > 2C 22A
(5,502 damage to V.Sion)
- New combo from Fuusui in CC, tested and works in MBAA PS2
- Gives meaty cross-up oki in the corner
Sweep Loop
2A 2B 5BB 5C 2C 22A > 2C 3C (delay 2A 2C delay 3C)x3 (2A 2C 3C)x4 5A 6AA > 214A > land > j.B j.C > dj.B j.C > throw
- H-Ryougi's damaging corner combo, nets about 5k damage
- Works midscreen too but you'll have to deal with 2C crossing under the opponent, adjust your inputs accordingly.
2A 2B 5BB 5C 2C 22A > 5C > j.C > IAD > j.C j.236C > land > j.B j.C > dj.B j.C > 236B_throw
- About 5k damage
- Works midscreen
- Requires meter
Additional Half Moon Combo Movies
- Advanced combos and knife catch setups: http://www.youtube.com/watch?v=-zNEgWsyMsY
- More combos and knife throw catch wake up setups: http://www.youtube.com/watch?v=wdgLfnwjjEQ
- Sweep loop combos: http://www.youtube.com/watch?v=fC5d__Kg_oQ
- Half Moon combos with Crescent and Full mixed in: http://www.youtube.com/watch?v=a4it40115Lc&feature=related
Post Corner Airthrow Options
If you airthrow out of the corner you are close enough to get a meaty 2A (can't be jumped, but will counter hit mash attempts). Of course that close you can do any number of other things, such as overhead, but only 2A will be meaty.
If you airthrow into the corner you have these pseudo meaty options:
- Rekkas starting with 236A, this beats mash and jump out (2nd rekka might whiff, but the 3rd will connect).
- Dash 6AA, catches jump outs, 2nd 6A will hit crouching and beats late mash, but loses to early mash. Also it doesn't work on VAkiha (needs more testing).
- Walk forward slightly 5B, beats mash, catches jump out but is hard to confirm off, however you can go into 2C for better pressure.
- Immediately 5C, confirm if they jumped and go into an air combo.
- But if they grounded, do 2C 2369B for an OS: if they block, 2369B turns into a 236B (which you need to confirm and continue the rekkas), otherwise you can confirm into the TK corner combo.
Also since Ryougi's airthrow leaves a tiny gap in the corner, you can do dash up command roll for a crossup.
Strategies
Since half moon doesn't have any unblockables, you have to focus on solid ground games and mixups to deal damage. Half moon has an advantage over crescent by way of having longer reach and more flexibility with knives, extending her maximum range. It also has an advantage over full with reverse beat combos and equal range, allowing her to stay aggressive rather easily. The reach helps her combo game as you'll rarely miss a combo (unless you're aiming for the much more difficult sweep loop combos).
Ryougi excels in corner pressure. Her normals are top class in the range department, so use them to your advantage. Stick with 2A for whiff cancels and stagger string resets. 3C into 5B works wonders as a frame trap, so use it as often as you can. Do it enough times and your opponent will start freezing up, allowing you to lay on even more pressure by dashing in with a throw or IAD mixup. 22A gives the most frame advantage outside of using EX moves, so keep that in mind. Use it appropriately with your own judgement.
A sample blockstring looks like this:
- 5B, 2B, 3C > 5B...
- 5B, 5C, 2C, 3C > 5B...
- 5B, 5C, 2C, 3C, 22A >IAD knife catch j.C_dash in 5B...
If you wind up too far away, you can use this string to get close again:
- 5B, 2C, 2A
From there you can move into these alternative options:
- 2A - Doing another 2A will beat out any potential 2B or 2C attacks that would otherwise interrupt 5B (like Satsuki's 2C). You can continue with 2A right back into sample blockstring #2. This is a great stagger string option.
- 3C - 3C leaves you with plus frames, so this is the safest option if you want to play it by ear.
- 4C - Use this for people who freeze up. Cancelling 2C into 2A early gives you just enough room to stick in 4C point-blank for an overhead mixup game.
- Throw - You'll have to walk forward a bit, which makes this a risky but valid option.
- 41236C - Arc Drive attempt. You can beat jump outs by sticking in 5A before going into the Arc Drive as well.
Keep in mind the opponent's guard meter, as once you deplete 1/2 of it you can move into her guard crush string (provided you have your knife and at least 100% meter).
Her guard crush string is:
5BB, 2B, 5B, 2C, 3C > 236A, 236A, 214A > 22C > 5BB, 2B, 5B, 2C, 3C, 236A, 236A, 236C
Air throws work well as corner combo enders because they force the opponent to stay put. 5C and 2C will catch them on wakeup, keeping them honest and defensive. There's also enough space to IAD behind the opponent, although the timing is very strict. 22A will also force them to stay put, allowing you to rush in with 2A or 5B into your preferred block string.
Ground throws are very good with Ryougi. Ryougi's ground dash is quick enough to close the distance and perform another ground throw. After a midscreen groundthrow, you can dash 6AB to their back allowing you another instant throw on wake up. Mix in 5C, 2C, 5BB; dash in 2A_5B; 22A > IAD j.A_j.C, or just run up throw again to keep them guessing. There's a lot of options here.
Catching knives in the air is very important to Half Moon. The simplest method for knife catching is to jump back and IAD forward. If you catch a knife while dashing backwards in the air, you'll travel farther than a normal air backdash (which is great for spacing). You can also air dodge (2A+B) after a knife catch to dodge any counter attacks, and then j.C to hit them after the invincibility frames have passed.
Stick to using 22A on the ground, as this version will always richochet against the wall while giving +9 frames on block. Also, try not to throw them needlessly, as the trajectory is very predictable and easily counterable. Ryougi is much stronger with her knife than without.
You can sacrifice a knife throw for increased pressure. Since Ryougi's normals do hefty guard bar damage, throwing the knife will enable you to guardcrush them rather easily.
Ryougi only has a few options to defend against aerial attacks. Her main weakness stems from a lack of a wakeup dp. 5A (and to an extent 5B) can be used for IAD and close jump ins. j.236B_C also works as a pseudo dp for aerial and ground encounters, however the execution is very tight. A well timed 623A or 623B can also hit someone out of the air due to it's low crouching state, unless they use an air-to-ground normal.
Ryougi's worst position is in the corner, so try to avoid that as much as possible.
All of half moon's normals (except 2A) are slow on startup. Case in point, 5B starts at 8 frames -- much too slow to counter the rest of the cast on rush down. Save meter for shield bunkers if they opponent begins to overwhelm you. If they tend to whiff cancel a lot in front of you, stick in 5B for a quick combo and regain your offensive composure. Ryougi doesn't have access to an invinciple DP, so that limits her options on defense when pressured.
Using her shield is risky, but if you have the reflexes to react to pressure then by all means -- abuse it.
Ryougi also suffers against characters with excellent ground-to-air normals, so stick to the ground when planning out your offense. Use her aerial attacks only when the opponent takes to the air, and avoid being above them (except after a confirmed knockdown). Ryougi has one of the worst stamina ratings in the game, so make too many mistakes and you'll get punished deeply for them.
It is possible to tick into Ryougi's arc drive a number of different ways. Some setups include:
- After a blocked knife throw (if the opponent is within jumping distance)
- 22A, IAD knife catch (land), arc drive
- 214A_B on whiff or block (can be mashed out, be careful)
- 2C, 2A (very quick)
- 2A, 5B (make sure they are in neutral state, as they can still jump out in block stun)
- 2A, 5B, 5A (5A will whiff)
Full Moon
The strongest defensive moon. This moon carries two distinct unblockables, and lacks the regular 623 dash attack that Crescent and Half have. What she gains instead are six unique command parries that can toss around the opponent like a rag doll into heavy damage. Combined with excellent long ranged normals, this moon relies a bit more on specials and a patient zoning game to fish for hits as her mixup game is nearly non existant.
Normal Moves
"Long range" is roughly 1/2 (unzoomed) screen length, "mid range" is roughly 1/3, and "close range" is closer than that (generally close enough to be in range of all of their non-grabs).
5A [Mid]
(Very) short range elbow. Hits crouchers; only mashable poke. Might be useful as a panic anti-air if they're up close, but otherwise not terribly useful.
5B [Mid]
Long range upward slash. Main anti-air and useful poke against standing enemies, but gets crouched under at anything farther than mid-range. Can be hit-confirmed into aircombos.
5C [Mid]
Very long ranged mid slash. Gets crouched under at long range. If your opponent tries to poke you from longer range with a move that keeps them standing, use this to stuff them. On hit, cancel into 214C or 22C and combo.
5[C] [Unblockable]
Same as 5C, but unblockable. Fast charge rate for an unblockable with excellent range for one as well. Useful when your opponent insists on blocking and won't fall to your mixups, as it has to be jumped out of quite early to escape it. Opponent cannot be comboed after hit by this.
4C [High]
Slow, close ranged overhead kick. Combos well into 22c or 22a in the corner. Pretty straightforward. Doesn't cancel into any normals or into a jump.
3C [Low]
Fast long ranged slide. Trips. Very good for moving forward during pressure, but isn't that safe unless done from half-screen or farther. If you need to move closer in from mid range or closer, slide into 22A is really your only option. Unlike Nanaya and Tohno's slides, this isn't a gigantic wall of offensive hitbox and will actually lose to a lot of moves. This should be obvious, but don't try to Nanaya-style anti-air with it either.
2A [Mid]
Mid-range slash. Main close range poke. Does not hit low.
2B [Low]
Long range low slash. Main ground poke and all around solid move. Hits low.
2C [Low]
Long range low mid slash. Trips (untechable knockdown), hits low, moves you forward, but a little slow. Mainly useful in combos or staggered from 2B in a blockstring.
j.A [High]
Fast horizontal poke at head level. Good anti-air or for air-to-air if they are already above you. Unmashable, but cancels into j.B and j.C.
j.B [High, High]
Double slashes. All around most useful air move. Long range, fast, stuffs a lot of stuff, and easy to hit-confirm with. Loses a lot of the range when trying to hit crouchers with this, however. Cancels into j.C. Looks like good crossup potential, but actually it can't really cross up at all.
j.C [High]
Short range upward slash. Great for anti-air against anyone directly above you. A little more reliable than j.B for air-to-ground but kind of slow. Hits very high so it almost always hits in an air combo.
Ground Throw
Ryougi grabs the opponent, throws them onto the ground, then stabs them in the chest. Does 1500 damage, and Ryougi stands just barely in range for 5C and 2C. Ryougi recovers slightly quicker as well.
Air Throw
Ryougi grabs the opponent out of the air, throws them onto the ground, then lands on top of them stabbing them in the chest. Does 1000 damage, but Ryougi ends up a little farther away than her ground throw version. Also, she recovers only slightly quicker, therefore the opponent can get away fairly easy. Best used after a wall combo ender near the corner.
Special Moves
Aside from the 236/214/22 staples, full moon specials focus on multiple variations of her command parry. Also has an exclusive charged second hit for her rekka chain.
(1)236A [Mid]
First part of her rekka series. Horizontal slash that moves forward. Quick.
(1)236B [Mid]
Identical to (1)236A but with greater range, but slightly slower startup.
Continues into:
(2)236A or 236B - [Mid]
Generic downward horizontal slash. Combos from 236A and 236B.
(2)236[A] or 236[B] - [Mid]
Unique to Full Moon. Holding the button delays the attack. When fully charged, does not combo from 236A or 236B, but causes extra damage if it hits or extra guard damage if the opponent continues to block.
(2)214A - [High]
Jumping overhead. Goes over low moves. Does not combo from 236A or 236B.
Continues into:
(3)236A - [Mid]
Generic upward horizontal slash. Ends in untechable knockdown. Does not launch. Safe on block. Can be comboed from (2)236A/B, (2)236[A]/[B], or (2)214A.
(3)214A - [Low]
Sweeping low kick. Ends in untechable knockdown. Safe on block. Can be comboed from (2)236A/B, (2)236[A]/[B], or (2)214A. Useful rekka ender during a guard crush string, as it is the only rekka that can be cancelled into Initiative Heat.
(3)236B - [Mid]
Upward vertical slash that launches. Can be used for air launch. Techable. Can be comboed from (2)236A/B, (2)236[A]/[B], or (2)214A. Default mid-screen launcher for Full Moon combos. Can link 2a, 2b, or 5b afterwards.
(3)236C - [Mid]
Forward moving knife thrust. Air techable. Good ender for rushdown and air 50/50 mixups. Not always guaranteed if rekka was performed from a distance. Unsafe on block.
(3)236[C] - [Unblockable]
Decent speed unblockable with great range. Afterwards, she dashes away quite far, so this is actually a really safe option if you're facing away from the closest corner. This can be abused quite a bit as long as you don't end up whiffing this into the corner (which results in eating the fattest possible corner combo)
Here's a handy-dandy flow chart for how it works:
  (1)236A/236B
      |
      |
      |
  (2) |---> 236A/B
      |      |
      |      |
      |      |---> 236A
      |      |
      |      |---> 236B
      |  (3) |
      |      |---> 214A/B
      |      |
      |      |---> 236C
      |
      |
      |---> 236[A]/[B]
      |      |
      |      |
      |      |---> 236A
      |      |
      |      |---> 236B
      |  (3) |
      |      |---> 214A/B
      |      |
      |      |---> 236C
      |
      |
  (2) |---> 214A/B
             |
             |
             |
             |---> 236A
             |
             |---> 236B
         (3) |
             |---> 214A/B
             |
             |---> 236C
             |
             |---> 236[C]
236C [Mid]
Same as Half-Moon. Ryougi charges forward similar to her 236B and follows up with a series of quick slashes. Fairly quick EX move with some invincibility on startup, although it wears off before the move hits, so it will lose as a reversal against multi-hit moves. Safe on block, decent damage into NO knockdown on hit. Opponent can air tech, although doing so will put them in F-Ryougi's effective anti-air range. Weak damage and guard bar damage, really not the best use of meter.
214A [High]
Horizontal jumping slash. Air unblockable. Wall slams. Does not hit crouching. Useful as anti-air from a distance, as the move covers a nice horizontal swath at head height. Beware though, as it telegraphs itself very well and is fairly unsafe if whiffed, but risky if blocked on the ground. EX cancelable.
214B [High]
Downward horizontal jumping slash. Hits overhead. Air unblockable. Can be hit confirmed into j.236C into air combo. Liable to whiff up close. Safe on block, however it will cancel any built up momentum as the opponent recovers before you do. EX cancelable.
214C [High]
Horizontal jumping slash with a WIDE ARC. Air unblockable. Wallslams. Invincible on startup. On hit, can be air cancelled into an air dash or any jumping attack move for an overhead mixup. Will whiff if crouched, however the recovery is fairly good.
623A [High/Mid Parry]
Ryougi crosses her arms, countering an incoming attack. Cannot counter lows. If successful, she grabs the opponent and swings them to the other side. Ryougi can combo afterward, although the followup must be quick to hit while the enemy's back is still turned. 623-series parries can be cancelled into like any other special move, even on block or shield. Recommended to do so when the enemy successfully shields your attack especially against H-moon auto-shield-counters.
623B [Mid/Low Parry]
Same as 623A, but counters lows/mids and cannot counter highs. Probably the best option to form a habit of cancelling into when a grounded opponent successfully shields your attack.
623C [High/Mid Parry]
Similar speed to 623A, also vulnerable to lows, but has a different followup, shared with 412C. Ryougi throws the enemy into the air behind her. Comboable into 2C.
412A [High/Mid Parry]
Ryougi crosses her arms, countering an incoming attack. Cannot counter lows. Compared to 623A, this version comes out faster (although still not instant) and ends faster, and on a successful parry, Ryougi tosses the opponent a far distance behind her into an untechable knockdown. Unlike other variations, this parry actually does damage and cannot be comboed out of unless the opponent is tossed into the corner. All 412-series parries cannot be canceled into from other moves.
412B [Mid/Low Parry]
The same as 412A except it counters lows/mids and is vulnerable to highs. Cannot be canceled into.
412C [Mid/Low Parry]
The same speed and followup as 623C, but is vulnerable to highs instead of lows. Unlike 623C, it cannot be canceled into from other moves.
22A [Mid]
Horizontal knife throw. Unduckable. Positive frames on block. Air version jumps forward a bit and throws the knife at a downward angle. Can combo after successful hit. If used in the air, the knife travels at a downward trajectory but will always ricochet.
22B [Low]
Downward angled knife throw. Hits low. Slightly negative, but safe on block. Whiffs if thrown at full screen distance. Air version jumps back a bit and throws the knife at a downward angle, hitting mid. Cannot combo after successful hit. If used in the air, the knife travels at a similar downward trajectory as 22A, and will always ricochet.
22[B] [Unblockable]
Charged knife throw at a downward angle. Cannot be blocked. Range is significantly less than a normal 22B.
22C [Low]
EX knife. Hits low. The trajectory is based on the horizontal distance to the opponent when thrown - it will connect even full screen against a standing opponent, but a jump will avoid it from most ranges. Ricochets only if it hits the wall. If used in the air, the knife travels horizontally. Unlike in other moons, 22C is punishable on block at point blank range, so it's not as useful in pressure. However, it hits from any range against a grounded opponent and has enormous hitstun, especially on counterhit, allowing fairly easy punishes from long range.
j.236A [High]
Wide, crescent-shaped slash with a large hitbox. Can hit a crouching opponent if tk'd up close. Wall slams. Punishable on block.
j.236B [Mid]
Same as j.236A, but more damaging with an even larger hitbox. Wall slams. Good air-to-air but somewhat redundant with full moon air normals. Good combo ender, giving you space to charge meter. Negative on block but may be safe against certain characters when TK'ed.
j.236C [High]
Extremely large hitbox, now with start up invincibility. Hits overhead on the ground. Wall slams on hit. If TK'd in a midscreen combo, you can follow up with 214C (provided you have meter) into air juggle. Can be hit-confirmed after a successful 214B on hit into wall combo. Punishable on block against most characters when TK'ed at point blank, may be safe against some if it hits at its maximum range.
[After getting hit in the air] 22/66/44 + A/B [High]
Ryougi tech recovers in the air and performs what looks like a downward version of her j.C slash. Wall slams. Has startup invicibility frames. Remember to perform this before air teching, because if you do it afterwards Ryougi will throw her knife instead (22A and 22B version). 44A/66A versions move in the direction pressed accordingly.
[After getting hit in the air] 22/66/44 + C [High]
The EX version of 22/66/44 + A/B. Carries the same properties with more invulnerability.
41236C - Arc Drive
Ryougi hunches down and activates her Mystic Eyes of Death Perception, then rushes forward cutting two lines. Unblockable, with 8 frames of startup animation. Think of it as an extended grab on activation. Very useful tick move; can be performed roughly one jump away (assuming you are standing right next to them). Can catch the opponent while in hit animation or in neutral state, provided they do not hit you during the initial startup frames. Can occasionally catch jumpers if they are close enough to the ground.
41236C - Another Arc Drive
The arc drive when activated in Blood Heat. Serves the same purpose, but comes out much faster and does more damage. Extremely dangerous when used in tick setups, as the faster speed makes it that much harder to react to.
Last Arc
Upon a successful ground shield with EX shield timing, Ryougi's Last Arc activates, no matter where the opponent was standing at the time. Ryougi and her opponent are now standing in a flower field, Ryougi in her kimono and carrying a sword. One slice with the sword and a flurry of cherry blossoms, and the opponent takes 7000 damage and loses any red life. It's an instant kill if the enemy is in Heat or Blood Heat at the time.
Combos and Strategies
Midscreen
2A 5B 2B 5C > 236Bx3 > 2B 5C j.B(1) j.C > dj.B(1) dj.C airthrow
- BnB. Must be fairly close for the rekka launcher to connect. Meterless; works on everyone and crouchers, does great damage. 236B > 2B link is a bit tight but if you must, use 2A 5B instead of 2B 5C. 4246 on V.Sion.
2B 2C 3C > 22A, 2B 5C > j.B(1) j.C > dj.B(1) dj.C airthrow
- Main works-everywhere-everyone combo. At farther ranges where the last rekka hit would miss, choose between this combo and the below combo on whether you want to use your knife or use 100% meter. Alternatively, you can use neither by doing 3C > 236B > 236[B] > 236A (input as 214A), or doing the above combo but having the third rekka hit be 236C instead for much less damage and no knockdown.
(2A) 5B 2B 5C > 214C > j.C, land, j.B(1) j.C > dj.B(1) dj.C airthrow
- 100% meter combos from max range where you miss the last hit of rekka.
ground normals/launch > j.B(2) j.C dj.B(2) j.C 236b charge meter
- Often done off of random hits or midscreen, this lets you charge meter instead of getting a weak knockdown (which is more useful in the corner). A BnB into the full aircombo and meter charging can net upwards of 120% meter, more against characters who are slow to get back in.
Corner
2A 5B 2B 2C 3C > 22A, 2C 3C > TK j.236B, land, j.B(2) j.C > sdj.B(2) dj.C airthrow
- Corner BnB. Works at all range (except if you hit crouchers with the very tip of 2A, just omit 5B in this case). Very lenient in term of distance to corner. Replace 2C with 5C for more damage but you need to be fairly close. Bolded part can be omitted.
2A 5B 2B 2C 3C > 22A, 2C 3C > TK j.236B, land, 5B > 214C > j.B(whiff), land 2C 3C > 236B > 236[B] > 236A
- Alternate corner BnB which exchange 100% meter for a much better knockdown. Bolded part can be omitted.
2A 5B 2B 2C 3C > 22A, 2C 3C > TK j.236B, land, (neutral jump) j.B(2) j.C > j.236C, land, (neutral jump) j.B (2) j.C > sdj.B(2) dj.C > j.236B
- Highest damage combo. Walk forward a bit to pick up the knife. Notice that after j.236C, you actually switch sides. Bolded part can be omitted.
Useful combos off of certain useful pokes or pressure moves:
5B_C > 214C > slightly late j.C, land, j.B(1) j.C > dj.B(1) dj.C airthrow
- Use j.B at far ranges. Huge hitbox on 214C allows this to be done off of 5B_C air hits/AA which makes it so useful.
22A > 5C > j.B(1) j.C > dj.B(1) dj.C airthrow
- Nearly screen punish of almost anything. If you're good at punishing with this on reaction, you can outrange even Mech-Hisui.
Deep TK j.236B > land, 5B > aircombo (4k damage)
- Alternate combo string that only works in the corner but has little practicality.
4C 22C > 5C > aircombo
- Can use 22A in corner. This is the only way to combo well from her ground overhead.
Strategies
Her normal dash is a bit longer than usual but she's able to control a lot of space, despite a relatively weak rushdown game. Her j.B and 214A help dictate air dominance, but her ground-to-air tools are poor.
When played correctly her main threat is that, when spaced correctly and doing things safely, she can make the opponent on defense afraid to do anything: counter-shielding gets command parried; pokes get stuffed by pokes that are farther ranged; and long range unblockables, high guard bar damage, and BHAD setups (along with ways to easily get meter) make the opponent afraid to block. The knife allows her to extend blockstrings and pressure. It also allows you to land a combo off of a far slide in, land crossup setups, or punish things from almost full screen into an air combo. However, keep in mind she still almost completely lacks a high/low and her crossup game is nonexistent other than one fairly weak and basic setup.
Zoning
Don't leave the ground with F-Ryougi unless it's for an IAD j.B or unless they're in the air too. It's not a good thing for your opponent to be below you because she has really no answer to that situation. Most of your zoning will be done with j.B if your opponent is in the air because it's that good of a move, but remember that 214A is air unblockable and the slash is huge, so use it to establish air control. If your opponent is fairly obvious with their air approach and you're on the ground your only answer is 5B, however 5B is not necessarily the best anti-air option so don't expect it to win all the time. It has nice range for an upward slash but it's slow, so use it as a pre-emptive attack when you think they will jump after completing your blockstrings.
You'll realize that after you throw out your knife the zoning game may occassionally revolve around it, and your opponent will literally sit on your knife to prevent you from picking it up. Let them, because it's much easier for them to come to you than the other way around. You can use this opportunity to charge your meter to provoke them to come toward you. Ryougi's offense becomes very strong in blood heat.
Charging your meter is always a good thing for F-Ryougi, so do it if you get a safe chance. Use it to provoke your opponent to come at you whenever you're both far away. Once in Blood Heat, F-Ryougi has many BHAD setups that will instantly cut down roughly 5k HP, with an extra option to land her Last Arc Finish that rewards you with a flat 7k damage (which can often means a win for the round, depending on the situation) with an instant kill glitch bonus on top of that.
Pressure
Know your safe blockstring enders. Rekkas are safe (except the first hit and 236c for the third hit), 22A knife gives frame advantage, and an occasional parry ender on the end of blockstrings can be safe (although not recommended). Your blockstrings should go into these most of the time. 214A_B_C is also an alternative, but there's risk in using them: 214A completely whiffs on crouchers but is blockable high making it useless in blockstrings; 214B is a long-ranged overhead but unsafe on block; and 214C is safe provided they block it standing since it allows you to cancel into air normals. Just keep in mind that it can be completely crouched under and punished like 214A.
It's very important to stagger your moves in your blockstring, and it's also very important to be very liberal with unblockables, especially 5[C]. Resetting pressure to get more than one blockstring can be done two ways: 1)inputting 22A to continue the blockstring (making it airtight), or 2)going into 236[A]_[B] as the second rekka hit, which gives frame advantage.
Once you have Blood Heat, things get interesting. You have a lot of ways to set up your BHAD since the range is quite good. There are a few methods as mentioned above, but in simplest terms stopping a block string within poke range can guarantee a BHAD. Doing a really late supercancel can land an unexpected BHAD for a lot of damage as well.
Note that you have to be very careful if you have them in the corner, because if you guess wrong and F-Ryougi flies into the corner from a whiff she becomes completely punishable, whereas opposed to a midscreen BHAD she will fly away to safety. The "mixup" in this is that since you're in poke range, you can standing shield their early attempt to stuff your BHAD (depending on what poke they use), and land a Last Arc instead for even more damage than an attempted BHAD. These are important to know because they're F-Ryougi's only way to force/land such a large chunk of damage, and doing so often means winning the round.
Tech punishing
Full moon is unique in the fact that there some simple setups where she can tech punish an air recovery attempt. One example is her 236C ender on hit. The third part of the 236C rekka string carries the same property as a normal 236C EX special -- it can only escaped via air recovery (it's non techable if they land). You can use 5B to catch them as they recover into an air combo of your choice.
Frame Data
Crescent-Moon Normals:
| Motion | Startup | Active | Recovery | Advantage | Hitstun | Damage | VS Damage | Meter Gain | Guard Crush | Guard Level | Cancel | Proration | Notes** |
| 5A | 5 | 4 | 6 | -1 | 11 | 350 | 200 | 3.5 | 50 | H, L | C,J,S,E | 75% fixed | - |
| 5B | 9 | 3 | 18 | -6 | 14 | 500 | 250 | 5.0 | 200 | H, L | R,J,S,E | 80% fixed | - |
| 5C | 11 | 4 | 17 | -4 | 16 | 850 | 400 | 8.5 | 300 | H, L | R,J,S,E | 80% fixed | - |
| 5[C] | 29 | 4 | 28 | -(Launcher) | - | 1500 | 3000 | 15.0 | 300 | Unblockable | - | 65% fixed | - |
| 2A | 5 | 4 | 9 | -1 | 11 | 300 | 150 | 3.0 | 50 | L | C,J,S,E | 75% fixed | - |
| 2B | 11 | 3 | 15 | -1 | 16 | 550 | 400 | 5.5 | 200 | L | R,J,S,E | 90% fixed | - |
| 2C | 14 | 4 | 24 | -10(Down) | 17 | 900 | 500 | 9.0 | 300 | L | R,J,S,E | 60% fixed | - |
| j.A | 7 | 4 | 10 | - | 11 | 300 | 150 | 3.0 | 50 | All | C,J,S,E | 75% fixed | - |
| j.B | 7 | 4 | Land 2 | - | 14 | 550 | 300 | 5.5 | 200 | H, A | R,J,S,E | 80% fixed | - |
| j.C | 8 | 4 | Land 2 | - | 17 | 850 | 400 | 8.5 | 300 | H, A | R,J,S,E | 90% fixed | - |
| Throw | 3 | - | - | - | - | 1500 | 1000 | 15 | 0 | Throw | - | - | - |
| Airthrow | 2 | - | - | - | - | 1000 | 800 | 10 | 0 | Throw | - | - | - |
| Bunker | 22/4 | 6 | 21 | -9 (Launcher) | 17 | 500 | 300 | 10.0 | 200 | All | - | - | - |
| GC Bunker | 22/4 | 6 | 21 | -9 (Launcher) | 17 | 500 | 300 | 10.0 | 200 | All | - | - | - |
| 5B->B | 5 | 3 | 16 | -4 | 16 | 600 | 350 | 6.0 | 200 | H,L | R,J,S,E | 70% fixed | - |
| 6C | 15 | 3 | 24 | -9 | 17 | 850 | 600 | 8.5 | 200 | L | J,S,E | 85% relative | - |
| 6[C] | 33 | 3 | 29 | -(Launcher) | - | 1500 | 3000 | 15.0 | 300 | Unblockable | - | 50% fixed | - |
Win Quotes
Colors

No. 1 Default
No. 18 Lio
No. 20 Remillia Scarlet
No. 28 Majikina Mina
No. 30 Kill Bill