Overview
Playstyle
|
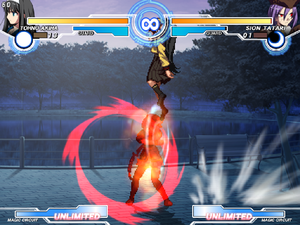
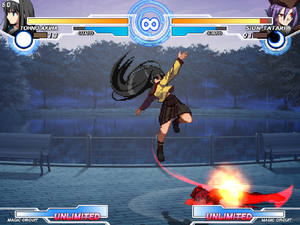
F-Seifuku is an oki monster with good buttons, tricky mixups, and simple combos. |
| Pros |
Cons |
- Good general mobility: Her grounded dash speed is fast. Combined with good grounded buttons she can take control of the ground if opponent is in the air.
- Extremely good meter gain: Extreme meter gain with 22B loops, but sacrifices the damage when compared to 22A loops that she has.
- Extremely tough oki to break: Very few characters have a chance at having a go at F-Seifuku's ring oki, and even then they take significant risk
- Simple and strong corner pressure: Has variety of tricks to keep opponent in the corner. With good buttons, anti-air specials and command grab, you can almost demand opponent to open up.
- Strong normals: F-Seifuku's normals are hard to deal with. Her j.B has a big disjoint below her, and both j.B and j.C can hit crossup. Her grounded buttons are very good too.
|
- Low to Medium damage: F-Seifuku doesn't have damaging combos from her usual starters. Though she has few unusual starts that can dish out big damage, with execution.
- Poor air to air neutral: While her air normals have a place in neutral air to ground scenario, it is hard to use them in air to air situations. Her j.A, while has good range - is slow.
- Character specific problem: She has issues with 22X loops being character specific. They are pretty much required for her to flourish, but dealing with character specific timings will cause problems.
|
Move Descriptions
| Frame Data Help
|
| Header
|
Tooltip
|
| Move Box Colors
|
Light gray = Collision Box (A move lacking one means it can go through the opponent's own collision box).
Green: Hurt Boxes.
Red: Hit(/Grab) Boxes.
Yellow: Clash Boxes (When an active hitbox strikes a clash box, the active hitbox stops being active. Multi-hit attacks can beat clash since they will still progress to the next hitbox.)
Magenta: Projectile-reflecting boxes OR Non-hit attack trigger boxes (usually).
Blue: Reflectable Projectile Boxes.
|
| Damage
|
Base damage done by this attack.
(X) denotes combined and scaled damage tested against standing V. Sion.
|
| Red Damage
|
Damage done to the recoverable red health bar by this attack. The values are inherently scaled and tested against standing V. Sion.
(X) denotes combined damage.
|
| Proration
|
The correction value set by this attack and the way it modifies the scaling during a string. See this page for more details.
X% (O) means X% Overrides the previous correction value in a combo if X is of a lower percentage.
X% (M) means the current correction value in a combo will be Multiplied by X%. This can also be referred to as relative proration.
|
| Circuit
|
Meter gained by this attack on hit.
(X%) denotes combined meter gain.
-X% denotes a meter cost.
|
| Cancel
|
Actions this move can be cancelled into.
SE = Self cancelable.
N = Normal cancelable.
SP = Special cancelable.
CH = Cancelable into the next part of the same attack (Chain in case of specials).
EX = EX cancelable.
J = Jump cancelable.
(X) = Cancelable only on hit.
-X- = Cancelable on whiff.
|
| Guard
|
The way this move must be blocked.
L = Can block crouching
H = Can block standing.
A = Can block in the air.
U = Unblockable.
|
| Startup
|
Amount of frames that must pass prior to reaching the active frames. Also referred to as "True Startup".
|
| Active
|
The amount of frames that this move will have a hitbox.
(x) denotes frame gaps where there are no hitboxes is present. Due to varied blockstuns, (x) frames are difficult to use to determine punish windows. Generally the larger the numbers, the more time you have to punish.
X denotes active frames with a duration separate from its origin move's frame data, such as projectile attacks. In this case, the total length of the move is startup+recovery only.
|
| Recovery
|
Frames that this move has after the active frames if not canceled. The character goes into one frame where they can block but not act afterwards, which is not counted here.
|
| Advantage
|
The difference in frames where you can act before your opponent when this move is blocked (assuming the move isn't canceled and the first active frame is blocked).
If the opponent uses a move with startup that is at least 2 frames less than this move's negative advantage, it will result in the opponent hitting that move.
±x~±y denotes a range of possible advantages.
|
| Invul
|
Lists any defensive properties this move has.
X y~z denotes X property happening between the y to z frames of the animations. If no frames are noted, it means the invincibility lasts through the entire move.
Invicibility:
- Strike = Strike invincible.
- Throw = Throw invincible.
Hurtbox-Based Properties:
- Full = No hurtboxes are present.
- High = Upper body lacks a hurtbox.
- Low = Lower body lacks a hurtbox.
Miscellaneous Properties
- Clash = Frames in which clash boxes are active.
- Reflect = Frames in which projectile-reflecting boxes are active.
- Super Armor = Frames in which the character can take hits without going into hit stun.
|
Normal Moves
Standing Normals
|
|
| Damage
|
Red Damage
|
Proration
|
Cancel
|
Guard
|
| 350
|
202
|
75% (O)
|
-SE-, -N-, -SP-, -EX-, (J)
|
LH
|
| First Active
|
Active
|
Recovery
|
Frame Adv
|
Circuit
|
Invuln
|
| 5
|
4
|
8
|
0
|
3.15%
|
-
|
|
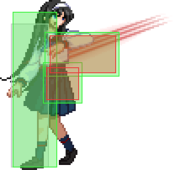
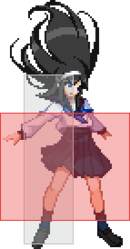
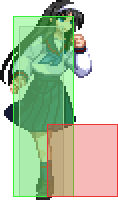
Mainly used for antiairing against IAD attempts and catching jumpouts. Not very useful as an antiair in general however. When catching jumpout attempts, can confirm into 3C fairly easily.
|
|
5B 5B 5[B] 5[B] ~3C ~3C
|
| 5B
|
Damage
|
Red Damage
|
Proration
|
Cancel
|
Guard
|
| 600
|
335
|
70% (O)
|
N, SP, -CH-, EX, (J)
|
LH
|
| First Active
|
Active
|
Recovery
|
Frame Adv
|
Circuit
|
Invuln
|
| 8
|
4
|
12
|
-1
|
5.4%
|
-
|
|
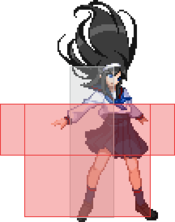
Very strong button in blockstrings as it moves you slightly forward. Useful to use as a reset point especially vs chars that do not have an access to a 4f normal, so 5B > 2A in blockstrings will trade at worst.
|
| 5[B]
|
Damage
|
Red Damage
|
Proration
|
Cancel
|
Guard
|
| 650*3 (1516)
|
(941)
|
70% (O)
|
N, SP, -CH-, EX, (J)
|
LH
|
| First Active
|
Active
|
Recovery
|
Frame Adv
|
Circuit
|
Invuln
|
| 26
|
7
|
10
|
4
|
5.4%*3 (16.2%)
|
-
|
|
Hits 3 times and offers the most blockstun out of all her normals. Has slightly longer reach than the uncharged version. Possible to reset pressure with IAD j.B or dash 2A or dash cmd grab. Natural frame trap for 2[C].
|
| ~3C
|
Damage
|
Red Damage
|
Proration
|
Cancel
|
Guard
|
| 1000
|
555
|
65% (O)
|
SP, EX, (J)
|
LH
|
| First Active
|
Active
|
Recovery
|
Frame Adv
|
Circuit
|
Invuln
|
| 5
|
4
|
17
|
-3
|
9.0%
|
Clash 5-8
|
|
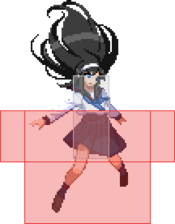
5B has the unique property of being whiff-cancelable into a quicker version of 3C. The whiff cancel on 5B can be useful in very specific situations, for example versus a dodge attempt on the 5B.
|
|
|
|
| Damage
|
Red Damage
|
Proration
|
Cancel
|
Guard
|
| 900
|
505
|
100%
|
N, SP, EX, (J)
|
LH
|
| First Active
|
Active
|
Recovery
|
Frame Adv
|
Circuit
|
Invuln
|
| 12
|
4
|
19
|
-5
|
8.1%
|
-
|
|
Used as optimisation for 5C > 3C instead of 2C > 3C in combos. Also used in the optimal corner only BnB.
|
|
Crouching Normals
|
|
| Damage
|
Red Damage
|
Proration
|
Cancel
|
Guard
|
| 300
|
151
|
75% (O)
|
-SE-, -N-, -SP-, -EX-, (J)
|
L
|
| First Active
|
Active
|
Recovery
|
Frame Adv
|
Circuit
|
Invuln
|
| 4
|
4
|
5
|
3
|
2.1%
|
-
|
|
Most frequently used normal on the ground. Has good reach and is easy to hit confirm from. Gives a lot of frame advantage on block and after 2AAA block confirm can reset with IAD j.B or dash 2A or dash command grab.
|
|
|
|
| Damage
|
Red Damage
|
Proration
|
Cancel
|
Guard
|
| 600
|
353
|
80%
|
N, SP, EX, (J)
|
L
|
| First Active
|
Active
|
Recovery
|
Frame Adv
|
Circuit
|
Invuln
|
| 7
|
4
|
15
|
-4
|
5.4%
|
-
|
|
Has a long reach and is easy to use. Useful button when they are outside of 2A range. Commonly used as a frametrap after 5B. Very strong as meaty after corner air throw, it can avoid some DPs and even heat attempts.
|
|
|
|
| 2C
|
Damage
|
Red Damage
|
Proration
|
Cancel
|
Guard
|
| 900
|
505
|
60% (O)
|
N, SP, EX, (J)
|
L
|
| First Active
|
Active
|
Recovery
|
Frame Adv
|
Circuit
|
Invuln
|
| 12
|
3
|
20
|
-5
|
8.1%
|
-
|
|
Has very long reach. Does not move her forward. Useful to catch people attempting to jump out.
|
| 2[C]
|
Damage
|
Red Damage
|
Proration
|
Cancel
|
Guard
|
| 1300
|
1010
|
65% (O)
|
N, SP, EX, (J)
|
L
|
| First Active
|
Active
|
Recovery
|
Frame Adv
|
Circuit
|
Invuln
|
| 21
|
3
|
16
|
-1
|
11.7%
|
-
|
|
Doesn't have much uses due to the pushback on block and lack of frame advantage, can frametrap with 22B or 5[B] however.
|
|
Aerial Normals
|
|
| Damage
|
Red Damage
|
Proration
|
Cancel
|
Guard
|
| 300
|
202
|
75% (O)
|
SE, N, SP, EX, J
|
LHA
|
| First Active
|
Active
|
Recovery
|
Frame Adv
|
Circuit
|
Invuln
|
| 6
|
4
|
9
|
-
|
2.1%
|
-
|
|
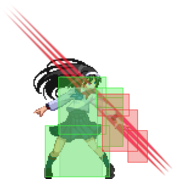
Her fastest air normal. Useful for air to airs. Retains your air options on whiff. Hitbox is not well suited for air to ground. One of the two full moon character's j.A that is not an overhead (Other one being F-Nero).
|
|
|
|
| Damage
|
Red Damage
|
Proration
|
Cancel
|
Guard
|
| 600
|
323
|
90% (O)
|
N, SP, EX, J
|
HA
|
| First Active
|
Active
|
Recovery
|
Frame Adv
|
Circuit
|
Invuln
|
| 9
|
4
|
-
|
-
|
5.4%
|
-
|
|
Horizontal range is pretty short so be careful of using this in the neutral after a jump attack. Useful button for IAD pressure however. Hits behind slightly. Good hitbox downwards, should win over most, if not all normal anti-air attempts.
|
|
|
|
| Damage
|
Red Damage
|
Proration
|
Cancel
|
Guard
|
| 900
|
606
|
85% (O)
|
SP, EX, J
|
HA
|
| First Active
|
Active
|
Recovery
|
Frame Adv
|
Circuit
|
Invuln
|
| 10
|
4
|
-
|
-
|
8.1%
|
-
|
|
Has a much longer reach than j.B and can hit behind slightly. Strong jump attack.
|
|
Command Normals
|
|
| Damage
|
Red Damage
|
Proration
|
Cancel
|
Guard
|
| 1000
|
555
|
65% (O)
|
SP, EX, (J)
|
LH
|
| First Active
|
Active
|
Recovery
|
Frame Adv
|
Circuit
|
Invuln
|
| 10
|
4
|
17
|
-3
|
9.0%
|
Clash 10-13
|
|
Strong preemptive antiair normal. Useful for catching people that are stuck air blocking a 236 ring. Pressing 8 on hit gives you a super jump.
Note that on clash, this normal does not allow you to jump cancel.
|
|
Universal Mechanics
|
|
| Damage
|
Red Damage
|
Proration
|
Cancel
|
Guard
|
| 1300
|
505
|
100%
|
-
|
U
|
| First Active
|
Active
|
Recovery
|
Frame Adv
|
Circuit
|
Invuln
|
| 3
|
1
|
20
|
-
|
9.0%
|
-
|
|
Akiha grabs the opponent by the neck and explodes them. Untechable knockdown.
|
|
|
|
| Damage
|
Red Damage
|
Proration
|
Cancel
|
Guard
|
1600 (Raw)
1300
|
1212
|
100%
|
-
|
U
|
| First Active
|
Active
|
Recovery
|
Frame Adv
|
Circuit
|
Invuln
|
| 2
|
1
|
12
|
-
|
9.0%
|
-
|
|
Aerial version of Seifuku's throw. Untechable knockdown as a combo ender. One of the few air throws that build meter.
|
|
|
|
| Ground
|
Damage
|
Red Damage
|
Proration
|
Cancel
|
Guard
|
| 500 (345)
|
202
|
50%
|
(SP), (EX), (J)
|
LHA
|
| First Active
|
Active
|
Recovery
|
Frame Adv
|
Circuit
|
Invuln
|
| 9
|
4
|
18
|
-4
|
4.5%
|
-
|
|
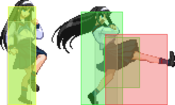
Same animation as 3C.
|
| Air
|
Damage
|
Red Damage
|
Proration
|
Cancel
|
Guard
|
| 500 (345)
|
202
|
50%
|
-
|
HA
|
| First Active
|
Active
|
Recovery
|
Frame Adv
|
Circuit
|
Invuln
|
| 9
|
4
|
-
|
-
|
4.5%
|
Full 1-3
|
|
Same animation as j.C.
|
|
|
|
| Bunker
|
Damage
|
Red Damage
|
Proration
|
Cancel
|
Guard
|
| 500
|
202
|
100%
|
-
|
LHA
|
| First Active
|
Active
|
Recovery
|
Frame Adv
|
Circuit
|
Invuln
|
| 26
|
4
|
19
|
-5
|
0.0%
(-50.0% in blockstun)
|
Clash 1-10
|
| (Clash)
|
Damage
|
Red Damage
|
Proration
|
Cancel
|
Guard
|
| 500
|
202
|
100%
|
-
|
LHA
|
| First Active
|
Active
|
Recovery
|
Frame Adv
|
Circuit
|
Invuln
|
| 8
|
4
|
19
|
-5
|
0.0%/-50.0%
|
Strike 1-7
|
|
A version of C-Moon 6C with a bigger hitbox.
|
|
|
|
| Damage
|
Red Damage
|
Proration
|
Cancel
|
Guard
|
| 100
|
0
|
100%
|
-
|
U
|
| First Active
|
Active
|
Recovery
|
Frame Adv
|
Circuit
|
Invuln
|
| 17
|
7
|
25
|
-
|
uses all
|
Full 1-24
|
|
Wide heat activation hitbox.
|
|
|
|
| Ground
|
Damage
|
Red Damage
|
Proration
|
Cancel
|
Guard
|
| 100
|
0
|
100%
|
-
|
U
|
| First Active
|
Active
|
Recovery
|
Frame Adv
|
Circuit
|
Invuln
|
| 11
|
10
|
20
|
-
|
removes all
|
Full 1-39
|
| Air
|
Damage
|
Red Damage
|
Proration
|
Cancel
|
Guard
|
| 100
|
0
|
100%
|
-
|
U
|
| First Active
|
Active
|
Recovery
|
Frame Adv
|
Circuit
|
Invuln
|
| 12
|
10
|
15
|
-
|
removes all
|
Strike 1-30
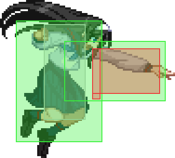
|
|
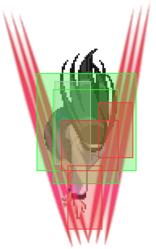
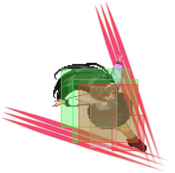
Universal burst mechanic. Unlike Crescent/Full Heat activation, the hitbox and frame data doesn't vary between characters. However, you can be thrown out of this move if you input it in the air.
|
|
Special Moves
Special Movement
|
|
| (Crossup)
|
Damage
|
Red Damage
|
Proration
|
Cancel
|
Guard
|
| -
|
-
|
-
|
-
|
-
|
| First Active
|
Active
|
Recovery
|
Frame Adv
|
Circuit
|
Invuln
|
| 12 (min)
|
19
|
0
|
-
|
-
|
Full (On Active)
|
|
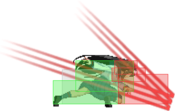
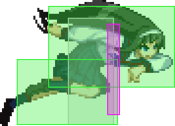
Exclusive to F-Moon, Seifuku's forward dash will automatically make her hop behind the opponent on contact. Will not crossup if the opponent is fully corner-backed.
|
|
Grounded Specials
|
|
|
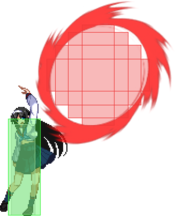
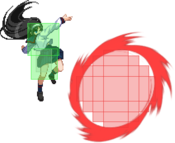
Throw a ring of fire that does multiple hits. You can only have one ring up at a time.
Rings have no hitbox until they're fully set. Slow start up. Great tool for meaties and space control.
|
| A
|
Damage
|
Red Damage
|
Proration
|
Cancel
|
Guard
|
| 300*4 (930)
|
(626)
|
75%
|
-EX-
|
LHA
|
| First Active
|
Active
|
Recovery
|
Frame Adv
|
Circuit
|
Invuln
|
| 49
|
40
|
43
|
Plus
|
2.7%*4 (10.8%)
|
-
|
|
Throws a ring of fire in front of F-Seifuku that does 4 hits.
- Sets up F-Seifuku's usual oki.
- EX cancelling into 623C can lock opponent in the corner or hit them jumping out.
|
| B
|
Damage
|
Red Damage
|
Proration
|
Cancel
|
Guard
|
| 300*4 (930)
|
(626)
|
75%
|
-EX-
|
LHA
|
| First Active
|
Active
|
Recovery
|
Frame Adv
|
Circuit
|
Invuln
|
| 49
|
40
|
43
|
Plus
|
2.7%*4 (10.8%)
|
-
|
|
Throws a ring of diagonally above F-Seifuku. Same damage and meter gain as the A version.
- Can be used to do throw/command grab crouching opponents with some extra damage. Although normal oki is probably preferable to this.
|
| EX
|
Damage
|
Red Damage
|
Proration
|
Cancel
|
Guard
|
| 300*7 (1497)
|
(1008)
|
75% (O)
|
-
|
LHA
|
| First Active
|
Active
|
Recovery
|
Frame Adv
|
Circuit
|
Invuln
|
| 8+33
|
70
|
8+29
|
Plus
|
-100.0%
|
-
|
|
Throws a large ring of fire in front of F-Seifuku that lasts longer and does 7 hits.
|
|
|
|
|
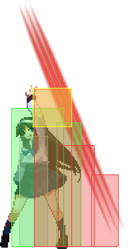
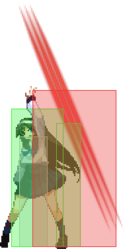
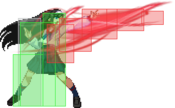
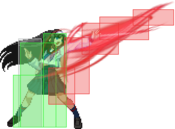
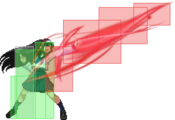
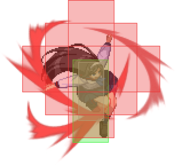
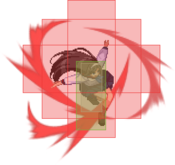
F-Seifuku extends her reach with flames at an upward angle. Air unblockable.
|
| A
|
Damage
|
Red Damage
|
Proration
|
Cancel
|
Guard
|
| 700
|
505
|
45% (O)
|
-EX-
|
LH
|
| First Active
|
Active
|
Recovery
|
Frame Adv
|
Circuit
|
Invuln
|
| 14
|
5
|
28
|
-9
|
6.3%
|
-
|
|
The fastest version with 1 hit.
EX cancelling into 214C can make this safe, and allow combo on hit.
|
| B
|
Damage
|
Red Damage
|
Proration
|
Cancel
|
Guard
|
| 750*2 (1260)
|
(678)
|
80% (O)
|
-EX-
|
LH
|
| First Active
|
Active
|
Recovery
|
Frame Adv
|
Circuit
|
Invuln
|
| 28
|
6
|
19
|
2
|
6.75%*2 (13.5%)
|
-
|
|
Slower start up. Has a slightly higher angle than the A version. 2 hits. Plus on block.
|
| EX
|
Damage
|
Red Damage
|
Proration
|
Cancel
|
Guard
|
| 400*6 (1802)
|
(907)
|
96% (M)*6
|
-
|
LH
|
| First Active
|
Active
|
Recovery
|
Frame Adv
|
Circuit
|
Invuln
|
| 5+5
|
18
|
38
|
-20
|
-100.0%
|
Full 1-5
Strike 6-21
|
|
Same angle as B version. Covers a larger area. Can be used as a reversal or anti-air. Note that it can be thrown on reaction to the flash.
F-Seifuku can OS a lot of left/right mixups because of this move and 214C, if you do 4214C or 6236C.
|
|
A/B A/B EX EX
|
|
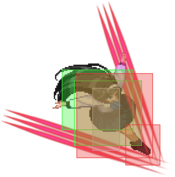
F-Seifuku jumps forward and attacks with flames. Very nice hitboxes.
|
| A
|
Damage
|
Red Damage
|
Proration
|
Cancel
|
Guard
|
| 500*4 (1412)
|
(995)
|
65% (O)
|
-EX-
|
LHA
|
| First Active
|
Active
|
Recovery
|
Frame Adv
|
Circuit
|
Invuln
|
| 32
|
8
|
12
|
3
|
4.5%*4 (18.0%)
|
-
|
|
Jumps a short distance. 4 hits. Plus on block, but very reactable and thus easily shieldable. Pretty useless, but can be used as a knowledge check.
Can be used in neutral vs opponents that send a lot of time in the air.
|
| B
|
Damage
|
Red Damage
|
Proration
|
Cancel
|
Guard
|
| 600*4 (1694)
|
(1140)
|
65% (O)
|
-EX-
|
HA
|
| First Active
|
Active
|
Recovery
|
Frame Adv
|
Circuit
|
Invuln
|
| 33
|
8
|
13
|
-3
|
5.4%*4 (21.6%)
|
-
|
|
Jumps a longer distance. 4 hits. Not plus but safe. Is an overhead. Can go through the opponent but it never actually crosses up, opponent can always block either way. Generally useless.
Can also be used in neutral vs opponents that send a lot of time in the air.
|
| EX
|
Damage
|
Red Damage
|
Proration
|
Cancel
|
Guard
|
| 700*4 (2095)
|
(1208)
|
40% (M)
|
-
|
HA
|
| First Active
|
Active
|
Recovery
|
Frame Adv
|
Circuit
|
Invuln
|
| 1+14
|
8
|
13
|
3
|
-100.0%
|
Full 1
|
|
Same distance as B version. Covers a larger area. 4 hits. Plus on block, combo-able on hit. Overhead.
This move technically has only 1 frame of invincibility. However, there is an odd thing about this move, it moves F-Seifuku during screen freeze. So even though this move has 1 frame of invincibility, its very evasive.
Because of how much it moves you forward, it's especially good at disrespecting some blockstrings and meaties.
However, it is still not a true reversal, so if you jump into active frames, you will get counter hit.
Any B or C button into 214C is not shieldable or DP'able, they can't act, but they can get hit. 5B > 214C forces opponent to not switch block direction.
|
|
A/B A/B EX EX
|
|
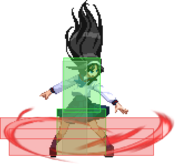
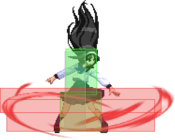
F-Seifuku creates a ring of fire around her feet.
|
| A
|
Damage
|
Red Damage
|
Proration
|
Cancel
|
Guard
|
| 1300
|
1010
|
75% (O)
|
-EX-
|
L
|
| First Active
|
Active
|
Recovery
|
Frame Adv
|
Circuit
|
Invuln
|
| 13
|
14
|
18
|
-4
|
11.7%
|
-
|
|
This version is your oki setup tool. Can also be used in 22A loops, those are hard but give damage and meter.
|
| B
|
Damage
|
Red Damage
|
Proration
|
Cancel
|
Guard
|
| 1100
|
808
|
80% (M)
|
-
|
L
|
| First Active
|
Active
|
Recovery
|
Frame Adv
|
Circuit
|
Invuln
|
| 19
|
14
|
8
|
6
|
9.9%
|
-
|
|
Does less damage than A version and has more startup. However, it's the one used for the loop to generate meter and get oki at the end.
|
| EX
|
Damage
|
Red Damage
|
Proration
|
Cancel
|
Guard
|
| 1800
|
1212
|
75% (O)
|
-
|
L
|
| First Active
|
Active
|
Recovery
|
Frame Adv
|
Circuit
|
Invuln
|
| 4+10
|
14
|
19
|
-5
|
-100.0%
|
-
|
|
This move can be used to force ring oki or guaranteed to catch tech in the corner. Video.
Another good quality of this move is that it does a lot of guard damage. 22A also does a lot, so you can do 22A > 22C to do alot of guard damage.
|
|
|
|
| Damage
|
Red Damage
|
Proration
|
Cancel
|
Guard
|
| 700
|
505
|
35%
|
-
|
U
(Whiffs vs Air.)
|
| First Active
|
Active
|
Recovery
|
Frame Adv
|
Circuit
|
Invuln
|
| 6
|
1
|
29
|
-
|
0.0%
|
-
|
|
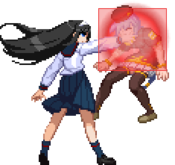
F-Seifuku grabs and jumps over the opponent. Deals a small amount of damage and puts you on the other side of the enemy. Position shifts slightly. Leads into a combo so this will gain you a good amount of meter using this.
|
|
Aerial Specials
(Akiha's position here is from before air momentum takes place.) (Akiha's position here is from before air momentum takes place.)
|
|
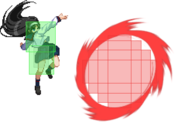
Air version of 236X. Recovers in mid-air before the ring becomes active, letting you use air movements or an air normal.
|
| A
|
Damage
|
Red Damage
|
Proration
|
Cancel
|
Guard
|
| 300*4 (930)
|
(626)
|
75%
|
-EX-
|
LHA
|
| First Active
|
Active
|
Recovery
|
Frame Adv
|
Circuit
|
Invuln
|
| 49
|
40
|
43
|
-
|
2.7%*4 (10.8%)
|
-
|
|
Throws a ring of fire diagonally downward from F-Seifuku that does 4 hits.
|
| B
|
Damage
|
Red Damage
|
Proration
|
Cancel
|
Guard
|
| 300*4 (930)
|
(626)
|
75%
|
-EX-
|
LHA
|
| First Active
|
Active
|
Recovery
|
Frame Adv
|
Circuit
|
Invuln
|
| 49
|
40
|
43
|
-
|
2.7%*4 (10.8%)
|
-
|
|
Throws a ring of fire at a position slightly further and less downward compared to A ring.
|
| EX
|
Damage
|
Red Damage
|
Proration
|
Cancel
|
Guard
|
| 300*7 (1497)
|
(1008)
|
75% (O)
|
-
|
LHA
|
| First Active
|
Active
|
Recovery
|
Frame Adv
|
Circuit
|
Invuln
|
| 6+38
|
70
|
6+35
|
-
|
-100.0%
|
-
|
|
Throws a large ring of fire in front of F-Seifuku that lasts longer and does 7 hits. Launches F-Seifuku forward unlike the other versions.
|
|
Arc Drive
Throw Throw Strike Strike
|
Throw
Strike
|
Damage
|
Red Damage
|
Proration
|
Cancel
|
Guard
|
10800 (3568)
1500
|
(2390)
1212
|
50% (O)
100%
|
-
|
A
LHA
|
| First Active
|
Active
|
Recovery
|
Frame Adv
|
Circuit
|
Invuln
|
| 3+1
|
1 (26)
2
|
42
|
-
-16
|
removes all
|
Full 1-58
|
|
F-Seifuku grabs the opponent and summons a torrent of flames. This AD only connects if F-Seifuku is right next to the opponent, otherwise it will whiff and do no significant damage.
There is a way to set this up. When you get oki with 236A, dash in close, 236A again and cancel it into AD immediately. This setup is not bulletproof, heat for example beats it pretty clean. You can try to RPS this setup with 236A > 623C/214C.
|
|
Another Arc Drive
Throw Throw Strike Strike
|
Throw
Strike
|
Damage
|
Red Damage
|
Proration
|
Cancel
|
Guard
|
19800 (4583)
1500
|
(2841)
1176
|
50% (O)
100%
|
-
|
A
LHA
|
| First Active
|
Active
|
Recovery
|
Frame Adv
|
Circuit
|
Invuln
|
| 2+1
|
1 (26)
2
|
42
|
-
-16
|
removes all
|
Full 1-57
|
|
Same move than the Arc Drive, but does more damage. Has same gimmicky setup as AD.
|
|
Last Arc
|
|
| Damage
|
Red Damage
|
Proration
|
Cancel
|
Guard
|
| 9250 (3420~5679)
|
(2699~4481)
|
50% + 50% * remaining BH time
|
-
|
U
|
| First Active
|
Active
|
Recovery
|
Frame Adv
|
Circuit
|
Invuln
|
| 4+7
|
2
|
22
|
-
|
removes all
|
Full
|
|
F-Seifuku lifts the opponent up into the air and summons a pillar of flames.
|
|
General Gameplan
Neutral
First you gotta know how to play neutral with this character. It's the hardest part.
Aim to turn any hit on the grounded opponent into oki, unless it kills or if you feel like you need to balance HP or if it's in a corner.
In the air, it is extremely important to know and use your good j.A hitbox. It is slow, but if you use it pre-emptively, it is a strong and safe air button.
Hitconfirm j.A into j.C.
On the ground, you have to make good use of your dash. It can cover whole ground in one dash, and gradually gains speed.
Dash 2A > 2C can catch a lot of people trying to backdash when they see you dashing in.
Dash 5A is a strong way to poke opponent out of air, especially when you get behind them. You can hit confirm it into 3C and do an air combo.
Use rings to control space. You keep rest of your air options once it's out, so it can be safe. Watch out for people super jumping to you though, if you get hit the ring gets cancelled.
When far away from the opponent you can do grounded 236B (upwards ring), then jump into the ring and j.236B, then airdash. This allows you to more of less safely "crawl" to the enemy.
Okizeme
Midscreen:
So you did your oki string or a throw. What now?
Do 236A! Then dash towards the opponent and quickly jump directly up.
This will make you drift toward the opponent.
At this point, if you do nothing, you will land on the other side of the opponent.
Here are your options to mix people up from the image:
- Empty jump into 2A.
- Empty jump into command grab.
- j.BC double overhead into 2A.
- j.BC double overhead into fuzzy j.B.
- j.BC double overhead into ground dash back to noclip through. Only works vs Akiha/V.Akiha.
- j.B tiny delay j.C whiff into 2A.
- j.B tiny delay j.C whiff into command grab.
- Air backdash j.B or j.C. sideswitch feint.
You can also do a gimmick where you AD/AAD opponent from 236A/236C.
236A > dash in > 236A insta-cancel into AD/AAD. This can be beaten by mashing heat or a good DP.
You can break shield attempts by throwing the opponent, and doing 236A again.
Alternative oki:
Some characters will be able to backdash out of the ring after your 2A starter into oki string.
To deal with those options, either use less 2A's in that string, or use TK j.236B as an alternative oki:
This will push you away from the opponent, so you should super air-jump diagonally upwards toward the opponent when they are in blockstun during j.236B.
Your options are pretty identical to the above image. But it's harder to do j.BC double overhead. It becomes dependent on your super double jump timing.
Also, you technically lose air backdash j.B/j.C option, since they can mash 5A to beat it. But you can still do it, as nobody really mashes there.
Tech punish setup:
After getting 22A oki, F-Seifuku has a way to catch forward/back techs. However, it requires 100% meter.
To do that, do another 22A as an OTG combo, and instantly cancel it into 236C.
If they tech back, 236C ring will hit them, and they will be in a combo for a while. But if they tech forward then you can catch them with 2A.
Because of how long they will be hit for (if they tech back), you dont need to react to that at all. Have full focus on if they forward tech, you can even just mash 2A pre-emptively and see if they tech other ways.
If opponent doesnt tech, or tech's neutral, then they will be forced to block the 236C ring, which takes a while, and you can run your oki from above.
This is a very strong tool to force ring oki onto opponent, if you don't want to deal with wakeup DP/mash complications.
Corner:
Tech punish OR oki:
After 22A, instead of doing a ring, you can go for an OTG combo 2AAAAA 5B 2B 3C 22B.
This will add about 500 damage to the oki. If they stop teching, you can risk with 236A instead of 22B which will just put a ring on them.
Note that you should do exactly five 2A in the OTG, as shown above. It is important, as that is the number that works on all characters. There should be no delays.
Tech punish AND oki:
You can guarantee tech punish AND get oki if you spend 100%.
To do that, do this OTG: 2AAAA 5B 2B 236A insta cancel 22C.
If they tech forward (escaping the corner), then they will be hit by 22C, and you can do 3C to get a combo on them.
If they dont tech or tech any other way, they will be in a ring oki and you can safely jump in at them.
The oki:
When the opponent is in the corner, and you get 236A oki, it's less ambiguous for the opponent to block.
That's because they don't need to care about left/right mixups.
So once you do the ring, you have the following options to pick from:
- j.BC double overhead into 2A.
- j.B single overhead into 2A.
- j.B IAD j.BC triple overhead into 2A. Corner only, this also avoids shield/bunker attempts.
- j.BC double overhead into fuzzy j.B. This one is easy to do in the corner.
- High hit j.B into command grab. One of the strongest options.
- Empty jump into 2A.
- Empty jump into command grab.
Because we are in the corner, it is preferable to start air pressure strings with a superjump.
This has the benefit of avoiding a lot of DP attempts. As well as making your empty jump 2A look a bit more ambiguous.
Beating opponent options:
Once they realise how annoying F-Seifuku oki is, the opponent will try to break it.
To be a good F-Seifuku player, you need to know how to deal with each response.
- Backdash.
This won't work because the ring will hit. However, midscreen, when you do standing ring oki vs characters with long backdash, be sure to gauge the distance. If too far, then TK ring oki is better, as it throws ring further and that can catch all backdashes.
- Shield.
This is typically the first option they try to attempt. This is easy to beat, all you need to do is not auto-pilot button pressing during for a bit.
To beat shield, all you need to do is jump at them without pressing a button and grab them. Note, for the best effect, this should be a command grab.
You do not need to worry about counters, shield cancels into jump or DP, because ring oki forces 4 shields to come out first before they can do anything. They are locked shielding the ring.
- Bunker.
More annoying option to deal with, especially midscreen.
In the corner you can do a double jump to delay j.C to beat this. You get a very good starter with this and have high damage potential.
Midscreen, this option is annoying because bunker usually moves them forward. The simplest way to beat this option midscreen is to go for the alternative oki, with TK ring. Then when you do air backdash j.C, you will hit them from behind, avoiding bunker and get j.C starter.
Note, bunker costs 50% meter for C/F moons, and 100% for H moon. The punishes above only work vs C/F moons. To punish H moon, you have to have a hard read and grab(better command grab) them during bunker startup.
- DP.
Some DPs just get stuffed by the ring, some that are good, are a good option vs this oki.
I would say the most problematic one is Nanaya DP, because if he hits you with a DP, he can go into throw animation, and the ring will not hit him at all.
To beat an annoying DP, your best bet is to go for an alternative TK ring oki version, because it pulls you backwards. Their DP then will whiff and you should get a clean punish.
- Mashing after blocking the ring.
While this is a dumb choice, it also has its point. The point is to never get grabbed.
To beat this just don't command grab for a while, and press buttons instead.
Opponents will try to RPS this with DPs, but they take a bigger risk than you. You can condition them to stop and start applying brain if you go for damage enders.
Pressure
- When you have enemy blocking mid-screen, you can push them into corner but doing B or C button into 214C. It leaves your plus to do another string. There is no gap, so they can't shield it.
- Note that when you do 5B 214C they have to block it the same way they blocked 5B or it will hit. Because of that bunkering it is also weird, normally its towards the same direction e.g. 4 > 214D. But because seifuku is on the other side it's 4 > 236D. And you have to input this very quickly, otherwise multihit will get you.
- In the corner, you can start mashing 2A 5B loop. This is extremely oppressive vs characters who don't have fast 2A/5A. If opponent's fastest normal is active on 5f, then this loop will at worst trade. If you feel like they are about to mash out, stagger 5B with 2B, then 2C.
- You can dash 2A delay command grab if you feel opponent will not mash out.
- If you feel cheeky, you can also dash through opponent for a cross-up. It's slow, but if opponent get hits by it, it's their fault for sleeping.
- In the corner you can prevent people from jumping out by doing 236A insta-cancel into 623C. Even if they shield 623C, 236A will keep you safe. 236A > 214C is also ok to catch jumpouts, you will be able to guard crush with 3C.
- You can also feint 236A > 623C by doing 236A > 236C. They can dash in and 2A you though.
- If in the corner you hit opponent with 2C but was outside of range of 3C to pickup the combo, you can do OTG string 2AAA 5B 3C tiny delay 22B. This will catch them teching neutral or forward.
- You can do 2C into 236A. This is very fake, but you can make people be scared of jumping with methods above.
- After ending a combo with an air throw in the corner, you can meaty 2B. It's a fairly safe meaty, but red hitbox outwards, good distance away. Some DPs might whiff.
- 22A and 22C both do a lot of guard damage! And because each is a single hit, it's not easy to ex-guard like 236C. Another thing to note is that 22A is EX cancellable. This means F-Seifuku can have a burst guard damage by doing 22A > 22C.
Defense
- Shielding is very rewarding for F-Seifuku, because you can go into your loops and gain a lot of meter.
- 214C is very evasive, it will avoid/punish a lot of 2B and 2C frame traps.
- F-Seifuku can OS left/right mixups by inputting either 6236C or 4214C. Either 623C or 214C will come out.
- You have an option to shield > command grab. This is good vs F-Moon characters, as shield counter is usually slow to punish their air buttons if they do it low enough, they would just land and block it, and you will be at a disadvantage.
Matchup knowledge
22B loop information
The table below shows difficulty of 22B loops on each character. Note that difficulty in general is subjective, and you might find them easier or harder, however it is good to know if particular character is easier or harder relative to another character.
- Easy means loops should go without problem, and you can use 2AA 2C in them to put opponent a little higher.
- Easy+ is same as easy, but the timing of the first 2A should be when the opponent is a little bit higher than usual.
- Medium means you should not go for 2AA 2C extender, and just try to get as many 2A 2C in there. Also hitboxes vary, but timing/opponent height when you do the first 2A is character specific.
- Hard means medium, but with a stricter timing.
- V.Hard and VV.Hard are Very Hard and Very-Very Hard. It's very hard. You should either give up on doing 22B loops and go for AT ender, or get used to doing 2A <delay> 2C in your loops.
The corner column means if 22B loops can be done when opponent is in the corner, and you are very close to them. Example scenario is GAT towards corner.
- No means not possible, go for AT ender route.
- Yes means possible. Note that you should always try to do micro walk backwards before first 2A though some characters do not need it. Walking back a little gets more space between you and opponent so that 2C's highest hitting point is more aligned to the opponent.
- Short only means 2AA 2C extender won't work.
- Hard means you need to do 2A <delay> 2C.
- Very Hard means you need to do 2A <delay> 2C and be extra precise with the first 2A.
| Character |
Difficulty |
Corner
|
| Aoko |
Ok |
No
|
| Tohno |
Hard |
No
|
| Hime |
Medium |
No
|
| Nanaya |
Hard |
Yes
|
| Kouma |
Easy |
No
|
| Miyako |
Easy |
Yes
|
| Ciel |
Medium |
Yes
|
| Sion |
Easy |
No
|
| Ries |
Easy |
No
|
| VSion |
Easy |
Yes
|
| Wara |
Medium |
No
|
| Roa |
Easy+ |
No
|
| Akiha |
Easy+ |
Hard
|
| Arc |
Easy |
Yes
|
| PCiel |
Easy+ |
Short only
|
| WArc |
Easy |
Yes
|
| VAkiha |
Easy |
Hard
|
| Mech |
Easy+ |
No
|
| Seifuku |
Easy |
Yes
|
| Satsuki |
Easy |
Yes
|
| Len |
Medium |
Yes
|
| Ryougi |
VV.Hard |
No
|
| WLen |
Medium |
Yes
|
| Nero |
Medium |
Yes
|
| NAC |
Hard |
Short only
|
| Hisui |
V.Hard |
V.Hard
|
| Kohaku |
Easy |
Yes
|
5A vs crouching opponents
F-Seifuku 5A is great. Hitbox is pretty high, and its relatively fast. It deals more damage than 2A, so for more optimal damage, you should try to put some 5A's into your combo.
The problem is that 5A will very quickly start whiffing on crouching opponents.
This issue is char specific. 5A will hit its full length on following characters when they are crouching:
CF-W.Len, Nanaya, Tohno, Hime, Warachia, Nero
Against these characters, your 5A is as good, if not better, as C-Kouma's.
Character knowledge
vs Nanaya
After finishing your air combo in the corner, F-Seifuku can safely meaty Nanaya with 2B.
If Nanaya DP whiffs, and you get punish. Nanaya cant jump because you should buffer with 3C to confirm into air combo.
vs C-Seifuku
You can do 214C to break their usual 22 oki.
vs Nero
You can punish his 4C with 214C. Not at max range though.
C-Nero can backdash out of the oki. Recommended to use TK oki version, as super jump forward can allow you do catch it.
F-Nero can dash out of oki in any direction. Best if probably to do standing ring oki, and not jump. Maybe dash > sides switch is good.
vs Akiha/V.Akiha
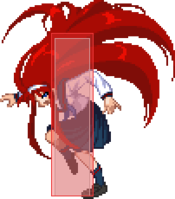
You can noclip them like so: Clip of the noclip.
It's very easy to do, the only ingredients are 236 hitting them, them blocking, and you jump over hitting them with late j.C.
You can also dash through 5B, to crush low shields, or weird 214C (who knows which way you even have to block now).
vs Hisui/Ryougi
Loops don't work very well on these. Can only be done with specific starters to set them up, but the timing window is strict. Starters and routes are seen here.
2A <delay> 2C is the answer.
Combos
| Combo Notation Help
|
Disclaimer: Combos are written by various writers, so the actual notation used in pages can differ from the standard one.
For more information, see Glossary and Controls.
|
| X > Y
|
X input is cancelled into Y.
|
| X > delay Y
|
Must wait for a short period before cancelling X input into Y.
|
| X, Y
|
X input is linked into Y, meaning Y is done after X's recovery period.
|
| X+Y
|
Buttons X and Y must be input simultaneously.
|
| X/Y
|
Either the X or Y input can be used.
|
| X~Y
|
This notation has two meanings.
- Use attack X with Y follow-up input.
- Input X then within a few frames, input Y. Usually used for option selects.
|
| X(w)
|
X input must not hit the opponent (Whiff).
|
| j.X
|
X input is done in the air, implies a jump/jump cancel if the previous move was done from the ground.
Applies to all air chain sections:
- Assume a forward jump cancel if no direction is given.
- Air chains such as j.A > j.B > j.C can be shortened to j.ABC.
|
| sj.X
|
X input is done after a super jump. Notated as sj8.X and sj9.X for neutral and forward super jumps respectively.
|
| dj.X
|
X input is done after a double jump.
|
| sdj.X
|
X input is done after a double super jump.
|
| tk.X
|
Stands for Tiger Knee. X motion must be buffered before jumping, inputting the move as close to the ground as possible. (ex. tk.236A)
|
| (X)
|
X is optional. Typically the combo will be easier if omitted.
|
| [X]
|
Input X is held down. Also referred to as Blowback Edge (BE). Depending on the character, this can indicate that this button is held down and not released until indicated by the release notation.
|
| ]X[
|
Input X is released. Will only appear if a button is previously held down. This type of input is referred to as Negative Edge.
|
| {X}
|
Button X should only be held down briefly to get a partially charged version instead of the fully charged one.
|
| X(N)
|
Attack "X" should only hit N times.
|
| (XYZ)xN
|
XYZ string must be performed N times. Combos using this notation are usually referred to as loops.
|
| (XYZ^)
|
A pre-existing combo labelled XYZ is inserted here for shortening purposes.
|
| CH
|
The first attack must be a Counter Hit.
|
| Air CH
|
The first attack must be a Counter Hit on an airborne opponent.
|
| 66
|
Performs a ground forward dash.
|
| j.66
|
Performs an aerial forward dash, used as a cancel for certain characters' air strings.
|
| IAD/IABD
|
Performs an Instant AirDash.
|
| AT
|
Performs an Air Throw. (j.6/4A+D)
|
| IH
|
Performs an Initiative Heat.
|
| AD
|
Performs an Arc Drive.
|
| AAD
|
Performs an Another Arc Drive.
|
Normal Combos
| Condition
|
Notation
|
Damage
vs V.Sion
|
Notes
|
|
| Normal starter, grounded opponent
|
- 2AAAA > 5B > 2B > 2C > 22A
|
2723
|
| |
| Meter Gained: ??? |
Meter Given (vs C-Moon): ??? |
| Okizeme Combo. You will be using this combo the most, especially after a command grab due to it's high proration. |
|
|
| Normal starter, grounded opponent
|
- 2AAAA > 5B > 2B > 2C > 3C > sj8.ABC > dj.BC > AT
|
4109
|
| |
| Meter Gained: ??? |
Meter Given (vs C-Moon): ??? |
| Basic BnB. Hold 8 during 3C to superjump. j.A can be omitted depending on spacing. If j.A is omitted, j.B will require a slight delay, otherwise you will end up too high to AT. |
|
|
| Normal starter, grounded opponent
|
- 2AAAA > 5B > 2B > 5C > 3C > sj8.ABC > dj.BC > AT
|
4319
|
| |
| Meter Gained: ??? |
Meter Given (vs C-Moon): ??? |
| Slightly optimised BnB. This requires better spacing, otherwise 3C whiffs. You have to add some delay to your dj.BC. You can fit j.A in there too, if you feel confident airthrow will also hit. |
|
|
| Normal starter, grounded opponent
|
- 2AAAA > 5B > 2B > 5C > 3C > IAD > j.C > land > j.AC > dj.BC > AT
|
4492
|
| |
| Meter Gained: ??? |
Meter Given (vs C-Moon): ??? |
| Optimised midscreen BnB. Corner carries slightly and deals more damage than basic BnB. Easier with higher hitcounts. |
|
|
| Corner, grounded opponent
|
- 2AAAA > 5B > 2B > 5C > 3C > 623B > j.AC > sdj.BC > AT
|
4599
|
| |
| Meter Gained: ??? |
Meter Given (vs C-Moon): ??? |
| Optimised corner BnB. Deals more damage than basic combos. The more 2A you do the easier it is, and more damage! |
|
|
| Corner, grounded opponent
|
- j.BC > j.BC > 2A > 5B > 2B > 5C > 3C > 623B > j.AC > sdj.BC > AT
|
6121
|
| |
| Meter Gained: 104.4 |
Meter Given (vs C-Moon): 34.8 |
| Fuzzy starter. Getting 2nd j.C to hit is not hard, but requires some training. Can be done out of the corner too. |
|
|
| Shield Counter
|
- 236D > 22A > {2A > 2C > 22B}x3 > 2A > 2C > 22A > 236A
|
2647
|
| |
| Meter Gained: 103.3% |
Meter Given (vs C-Moon): 33.6% |
| Easy 22B loops. 22B scales damage, so go for oki instead of air ender. Unless you want to get into MAX and heat during the air combo. Gives you a lot of meter. You don't have to use 22A at all, but using it as a first 22 and especially the last is not very hard. Very fun to practice and very strong way to gain meter if you can do these loops consistently. |
|
|
| Shield Counter
|
- 236D > 22A > {2A > 2C > 22A}x1-3 > 2A > 2C > 3C > j.BC > j.BC > AT
|
3217(1 rep)
3650(2 rep)
3977(3 rep)
|
| |
| Meter Gained: 244.7% |
Meter Given (vs C-Moon): 47.3% |
| Harder 22A loops. Need delays before 2A, input 22A asap after 2C. Always go for air ender if you do these, otherwise go for 22B loops into oki. If towards corner, then 2nd rep should start with 2AA to allow easier 3rd rep. Not really fun to do these loops as timings are char specific... just do 22B loops instead. |
|
|
| Air throw start
|
- AT > 5C > 3C > j.BC > j.BC > AT
|
3053
|
| |
| Meter Gained: ??? |
Meter Given (vs C-Moon): ??? |
| Simple air throw combo that works everywhere. You can use 5B 3C instead of 5C 3C, but you will lose like 70dmg. |
|
|
| Air throw start
|
- AT > {2A > 2C > 22B}x1-3 > 2A > 2C > 22A
|
3034
|
| |
| Meter Gained: 93.6% |
Meter Given (vs C-Moon): 31.2% |
| 22B loops into oki. Note that positioning is better if you do super jump > throw start instead of normal jump > throw. |
|
|
| Air throw start, Corner
|
- AT > {2A > 2C > 22B}x3 > {2AA > 2C > 22B}x2 > 2AA > 2C > 3C > j.ABC > j.ABC > AT
|
3268
|
| |
| Meter Gained: 181.8% |
Meter Given (vs C-Moon): 90.7% |
| Max 22B loops with meter gain. |
|
|
| Air throw start
|
- micro walk > {2A > 2C > 22A}x1-3 > 2A > 2C > 3C > j.BC > j.BC > AT
|
3467(1 rep)
3809(2 rep)
4066(3 rep corner)
|
| |
| Meter Gained: 135% |
Meter Given (vs C-Moon): 45% |
| Harder 22A loops. Need delays before 2A, input 22A asap after 2C. Always go for air ender if you do these, otherwise go for 22B loops into oki. If towards corner, then 2nd rep should start with 2AA to allow easy 3rd rep. Easier to do than shield 22A loops. |
|
|
| OTG, Corner
|
- 2AAA > 5B > 2B > 2C > 22A > dash > 2AAAAA > 5B > 2B > 3C > 22B
|
3297+
|
|
| Meter Gained: 84.6% |
Meter Given (vs C-Moon): 28.2% |
(Video) |
22B catches all tech directions. Note that this combo is very exact. You cannot deviate in 2A count in the OTG part. Can go into loop if 22B hits with 2A 2C.
If opponent doesn't tech, you will just hit them with an invalid 22B. They can then tech out again. If you do 22A after the invalid 22B it catches all tech's again! BUT if they don't tech the 2nd time, you will be punished. Therefore it's recommended to just try to time 2A, as your 2A can reach all tech directions opponent chooses. |
|
|
| j.B/j.C Air CH
|
- j.C CH > walk > {2A > 2C > 22A}x1-3 > 2A > 2C > 3C > j.BC > j.BC > AT
|
5929
|
| |
| Meter Gained: ??? |
Meter Given (vs C-Moon): ??? |
| You wish you would land these all the time! Used j.C CH starter for this one. Easier when in corner as usual because of spacing and possibility of 2AA in 2nd rep. |
|
|
Metered Combos
| Condition
|
Notation
|
Damage
vs V.Sion
|
Notes
|
|
| Normal starter, grounded opponent, 100% meter
|
- 2AAAA > 5B > 2B > 2C > 22C > 3C > sj8.BC > dj.AC > AT
|
4564
|
| |
| Meter Gained: ??? |
Meter Given (vs C-Moon): ??? |
| Metered version of the damage BnB combo if you don't wanna deal with execution of 3C > IAD > j.C > land. Use it when you have meter to burn. |
|
|
Normal starter, grounded opponent
Works On: Hime, Ciel, Ries, Wara, Roa, Arc, Nero, NAC, Neco
|
- 2AAA > 5B > 2B > 5C > 22C > 3C > sj8.BC > sdj.BC > AT
|
5161
vs Hime
|
| |
| Meter Gained: 27% - 100% + 24.4% |
Meter Given (vs C-Moon): 25.1% |
Character specific route that deals great damage off of 2A for 100%.
To get 2nd j.BC > AT, you need to do three 2A at the start, otherwise do j.AC. |
|
|
| Normal starter, grounded opponent, 100% meter
|
- 2AAAA > 5B > 2B > 5C > 214C > {2A > 2C > 22B}x2 > 2AA > 2C > 22B > 2A > 2C > 22A
|
3999
|
| |
| Meter Gained: ??? |
Meter Given (vs C-Moon): ??? |
| Metered version of the oki combo. Use it when you have meter to burn. |
|
|
| Normal starter, grounded opponent, MAX
|
- 2AAA > 5B > 2B > 2C > 22A > IH > walk > 2A > 2C > delay > 3C > AD
|
4991
|
| |
| Meter Gained: ??? |
Meter Given (vs C-Moon): ??? |
| IH Combo into AD. |
|
|
| Normal starter, grounded opponent, MAX
|
- 2AAA > 5B > 2B > 2C > 22A > IH > walk > 2A > 2C > delay > 22C > 3C > sj8.BC > dj.AC > AT
|
5120
|
| |
| Meter Gained: ??? |
Meter Given (vs C-Moon): ??? |
|
|
| Normal starter, grounded opponent, MAX
|
- 2AAA > 5B > 2B > 2C > 22A > IH > walk > 2A > 2C > 22A > 2A > 2C > 3C > sj8.BC > dj.BC > AT
|
5283
|
| |
| Meter Gained: ??? |
Meter Given (vs C-Moon): ??? |
| IH Combo into AD. |
|
|
| Normal starter, grounded opponent, Corner, MAX
|
- 2AAA > 5B > 2B > 2C > 22A > IH > walk > 2AA > 2C > 22A > 2A > 2C > delay > 3C > 623B > j.AC > sdj.BC > AT
|
5432
|
| |
| Meter Gained: ??? |
Meter Given (vs C-Moon): ??? |
|
|
| Normal starter, grounded opponent, MAX
|
- 2AAA > 5B > 2B > 2C > 22A > IH > walk > 2A > 2C > 22A > 2A > 2C > 22C > 3C > sj8.C > dj.BC > AT
|
5634
|
| |
| Meter Gained: ??? |
Meter Given (vs C-Moon): ??? |
Can also do sj8.BC > dj.AC if you delay 22C enough. Only adds 26dmg though.
Hard to do out of the corner, walk has to be longer there for 3C to hit. |
|
|
| Normal starter, grounded opponent, Corner, MAX
|
- 2AAA > 5B > 2B > 2C > 22A > IH > walk > 2A > 2C > 22A > 2AA > 2C > 22A > 2A > 2C > 22C > 3C > sj8.BC > dj.BC > AT
|
5990
|
| |
| Meter Gained: ??? |
Meter Given (vs C-Moon): ??? |
| VERY hard. |
|
|
| OTG, Corner
|
- 2AAA > 5B > 2B > 2C > 22A > dash > 2AAA > 2AAA > 5B > 2B > 236A > 22C
|
3055+
|
| |
| Meter Gained: ??? |
Meter Given (vs C-Moon): ??? |
22C catches their tech out of the corner(front tech) or into the corner (back tech), you can then follow up with 3C into an air combo. This catch nets around 4k. With full combo, OTG and catch result is around 7k of damage.
While this combo is not very strict with hit count. You must cancel 236A into 22C as soon as possible.
If opponent neutral techs or doesn't tech, then you will get + frames and can re-jump. |
|
|
Additional Resources
F-Seifuku Match Video Database
XxTexasTimxX guide on F-Seifuku
Notable Players
MBAACC Navigation
