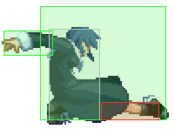
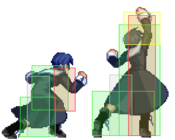
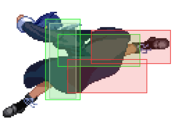
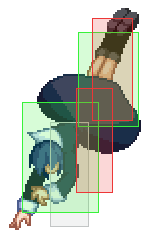
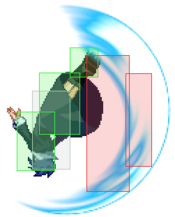
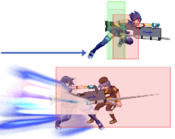
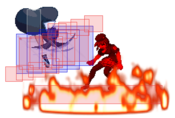
Character Page Progress
This page is mostly complete, consider joining as an editor to help finish it up. Please update this character's roadmap page when one of the editing goals have been reached. When no main goals are left, please remove this section from this page.
| In Progress
|
- Move Descriptions:
- Add AD armor frames and complete LA data.
|
Additional Resources
C-Ciel Match Video Database
ForgoneMoose’s Ciel Guide
HFBlade’s Ciel combo video
Notable Players
| Name |
Color
|
Region |
Common Venues |
Status |
Details
|
| Hatharo |

|
North America |
Netplay |
Active |
The top NA CCiel. Good footsies and strong pressure make for a very stable gameplan. Definitely the best person to watch when learning the character. Loves j.B.
|
| COPKILLER4FUN |

|
North America |
Toledo Locals, Netplay |
Active |
Singlehandedly changed an entire region's opinion on 236A~X~C, which should tell you more or less all you need to know about his playstyle. Strong player, though he plays pretty wild.
|
Opinions may differ between players and not all may agree on the same topic.
| Name |
Discord username |
Languages |
Servers
|
| gaku |
ukonoe_taishou |
English, Japanese |
Meltycord, MBCS, Melty Sud, JPcord
|
Overview
Strengths / Weaknesses
| Strengths
|
- Fullscreen invincible punish.
- Doesn’t have to deal with opponent’s projectiles.
- Low Profile Dash.
- Lots of Defensive Options.
- j.B
- Great projectiles.
- Can trade meter for massive damage.
|
| Weaknesses
|
- Awkward crouch confirms.
- Average pressure.
- Stubby A/B normals.
- Several ‘useless’ or extremely situational specials and command normals.
- Significantly weaker without 100 meter.
- Very weak okizeme/mixups.
|
Ciel is a very versatile character which has a decent set of options for most defensive and neutral situations. Between her dash, knives and her incredible c, it isn’t difficult to think of something productive to do in neutral; while her 236C can make it difficult for the opponent to do the same. She has a wide array of reversals between 22C, 214C, 236C, 22B alongside Heat activation and EX Shield. Her stagger pressure is relatively weak, so be prepared to take some risks if you want to stop someone from blocking. While she has quite a bit of tools, not all are multipurposed. If your melty fundamentals are strong and with the power of her low profile dash, you can clearly see how this character can shine.
General Gameplan
Ciel has a very wide variety of options available, she has relevant options at every range, you can chuck knives at mid-full screen, she can jump around with j.B, she can approach relatively easy with her dash. Generally, if the opponent’s character has something which they’re bad at dealing with, Ciel most likely has the tools to exploit it (bad anti air, bad against zoning, relies on projectiles/summons, etc.). Ciel also forces most characters to play a simple game against her as well, as most shenanigans will just get deleted by her 236C.
Neutral
Ciel’s most matchup-warping move is 236C, this move almost universally prevents anything an opponent would want to do at full screen (summons, projectiles, heat activation). This allows for Ciel to be the only player allowed to play fireballs in any matchup as long as she has 100 meter.
On top of 236C, Ciel’s 214B allows her to harass the opponent at mid to fullscreen, the 214B~4A follow up is very powerful, the knife hits very high, and with proper timing is likely to CH an opponent in the air, which you can confirm into a full combo. Be very careful throwing knives against someone who is already in the air; it -can- work out, but you should have a very clear idea of the interaction you’re looking for when you do it; the knives have a lot of recovery, so if someone airdashes over your 214B~4A, you’re likely eating a massive combo.
Next up is Ciel’s j.B. This move does everything, it’s a decent air to air, it’s a decent air to ground, it’s fast, it has a lot of active frames, the hitbox is massive, and it hits behind you. Her other air normals both have uses, but if you’re not confident in what the situation will be, j.B will pretty much always be a reasonable decision.
Ciel has one of the best dashes in the game, it will low profile many projectiles, it will force opponents to push their falling air normals closer to the ground than they’d normally like to making them easier to anti-air, lets you approach while blocking (It’s a really long scoot dash rather than a run, so she’ll dash the full distance even if you input 6AB[1]), makes it easy to dash under opponents in the air and has some cursed low profile interactions with some grounded moves (stuff like Wara 5B/5C or F-Ries 5B). When it comes to low profiling the opponent’s grounded moves or projectiles, those will all be very matchup specific, however it is almost universal that opponents will need to delay their air normal to hit your dash, allowing you to reasonably attempt anti-air options such as 4C or rising j.A. Honestly Ciel’s dash is insane, and I would heavily consider doing it in a very wide variety of neutral situations. It would be difficult for me to look at an out of context screenshot of a neutral situation and say: “Dash is a bad idea here.”
Pressure
Ciel’s pressure revolves around playing the strike/throw game, but you need to move forward in order to throw someone, and Ciel has a very hard time moving forward without giving the opponent an opportunity to challenge.
When you force someone to block, your goal is to get into throw range without being challenged, or to hit an opponent when they try to challenge.
I’m only going to list a couple of examples for each section as I feel like the concepts behind Ciel blockstrings are more important, but in general almost all of your normals can be staggered into almost all of your other normals, allowing you to make up blockstrings as you make decisions about what options you’re trying to beat from your opponent.
There are 3 major options that you need to evaluate when running Ciel pressure:
- 1. You need to beat mashing.
This is the easiest one to deal with, when the opponent is blocking one of your buttons, just delay the cancel into your next button, if the opponent mashes then you’ll counter-hit them. You’ll want to mix up standing vs. crouching normal for your frametraps to play around shield. A couple examples of strings you could run to beat mashing would be:
- 2A > 2A > (delay) 5B > 3B > (delay) 5C > (delay) 5C
- 2A > 2A > (delay) 2B > 3B > (delay) 5B > (delay) 5C > (delay) 5C
Each point where a normal is delayed, it will beat an opponent who mashes out of the blockstun of the previous move, in general you want to do a couple hits in-between delays to allow yourself to confirm if the opponent mashed, but it can also be alright to not do this as well to make your pressure more varied, but only counter-hits will be confirmable on single hit staggers.
- 2. You need to beat blocking.
So, your opponent has demonstrated that they’re better than 75% of lfg-na and are physically capable of holding [1] for more than 2 seconds at a time. What you need to do now is find opportunities to move into throw range. To pick out an opportunity to move forward we need a couple things, we need our opportunity to be a situation in which we -can- instead perform a frametrap; if we want our forward movement to go unchallenged, we need our opponent to have a reason to block, and we need our opportunity to not be minus infinity on block before we start (don’t try for a dash after the opponent blocks something like 2B, that button is simply too minus to try any funny business). My recommended candidates for this are when these moves are blocked:
- 5A, 2A, 5B, 3B, 5CC
- Any button cancelled into a whiffed 5A or 2A.
In any of the situations where one of these have been blocked, you can stagger into another attack, which means that if the opponent also knows this, they’ll have a strong incentive to block, allowing you to potentially dash, IAD, or just walk at them.
A couple examples of strings you can run involving this concept are:
- 2A > 2A > (delay) 5B > 3B (> dash/IAD)
- 2A > 2A (walk forward)
- 2A > 2A > (delay) 2B > 3B > (delay) 5B > (delay) 5C > 5A(w) (> dash/IAD)
- 3. You need to beat delayed mashing.
This is the most unintuitive part, but this is necessary to structure a robust pressure game that can open up strong players. When you’re playing against players with decent defense, you may notice that they block all your frametraps, and then challenge all your resets. When you notice this happening, you need to recognize what situation your opponent is reacting to in order to hit buttons. For example, let’s say you try running the string:
- 2A > 2A > (delay) 2B > 5B > (delay) 5C
And the opponent blocks your 5C. You recognize this and then you try running the string:
- 2A > 2A > (delay) 2B > 5B (> dash)
And the opponent mashes it; and you mix these 2 strings up a couple times and each time the 5C gets blocked, and the dash gets hit.
What the opponent is doing here is either delaying their mash so that their mash would normally be during the blockstun of the 5C or they’re reacting to the later frames of 5B and then mashing. This gives the opponent a challenge that beats our dash and, we never see the challenge if we frametrap into 5C.
The way we deal with this is we let our 5B fully recover, and then we just press 5B again. This will create a longer gap that will counter hit our opponent who is either just late mashing or reacting to the later frames of the first 5B. If we take our string from earlier and modify it using this concept, we end up with:
- 2A > 2A > (delay) 2B > 5B, (fully recover) 5B
The reason that this is separate from part 1, is because the string 5B (fully recover) 5B does not actually frametrap and will lose to someone just mashing buttons out of blockstun. I’ve been using 5B as an example to demonstrate this concept; but it applies to any situation where you have the option of performing a frametrap or pressure reset.
Okizeme
Ciel usually doesn’t get a whole lot in the Okizeme department.
The relevant situations are post AT in the corner, post 4B 236B, post Throw, and post 236C midscreen.
- AT in the Corner
There’s a bit to unpack here, and there’s a bunch of ways to make an opponent block, and not a lot of ways to punish someone for blocking.
5CC – This will hit meaty, will blow up some shields, and a number of other reversals as the hurtbox of the first 5C will retract itself when you start the followup, this will make a number of reversals or shield counters whiff, on top of that, you can cancel the 5C followup into specials/supers as soon as the projectile exists. This means you can do a 5CC meaty, see a superflash, and just 236C on reaction to blow up several slower ex reversals (Stuff like FRies 236C, or Nero 63214C).
This is probably the most executionally demanding part of playing C-Ciel, if you time your Dash and your 2A as quickly as possible after AT’ing someone in the corner, you can hit the opponent on frame 3 of their wakeup (for fast wakeup characters), which means you can catch their jump startup or their 2A mash. If you’re a single frame late, you don’t catch their jump startup anymore, and any more than 2F late then your dash 2A can start getting mashed out by the opponent. You can reserve this option for slow wakeups only if you’re not comfortable with the timing, it is awkward, and missing it feels very bad when you get blown up for making the correct decision. I wouldn’t recommend trying for this against Seifuku as the third frame of her jump startup withdraws a bit so the 2A whiffs unless you execute your air combo in such a way that it ends at the minimum possible height (delay the j.22B/delay the AT if you want to try it).
This can be strong against slow wakeup characters when you’re expecting wakeup stand shield.
This is for if you expect a wakeup jump but aren’t confident in your dash 2A meaty. You still need to be on point with the timing for this if you want it to also beat wakeup mash from the opponent though.
This will be + on block, hits meaty, and is confirmable into j.623C; generally best against H moon as they can’t ex guard, against C or F moon you can get pushed out by EX guard as the time between hits is long enough for them to react to.
This will lose to various types of movement like jump/dash depending on the character, but it’ll beat a lot of reversals, and is + infinity on block. On hit use 5C to convert into a combo.
- 4B~236B
This can lead to a safejump setup, but it’s character specific based on wakeup timings, and hitcount specific as more gravity will cause the opponent to land faster off the 236B followup.
The safejump is just SJ29 j.C after recovering from the followup. You’ll need to delay the super jump against characters with slow wakeups. Below is something you can use to make the safe jump more threatening
- 4B~236B, sj9.C, land j8.C > j.236B (do combo)
This will fuzzy against medium height characters, the timing on the second j.C is very strict, the timing on the j.236B is a bit awkward, you need to make sure you do the j.236B as quickly as possible for it to combo. This fuzzy doesn’t work if the opponent ex guards the first j.C, so it -really- should be reserved for vs. HMoon only (At least off of this setup, you can attempt this fuzzy with IAD j.B j.C as a pressure reset, and I think that it would be less likely to be ex guarded by the opponent).
- Midscreen 236C Air Hit
If you 236C someone midscreen, you can try to be cute by forward jumping at them as they’re waking up for a Left/Right mixup, I don’t have a whole lot of faith in it, but I’ve hit people with it before so it may be something to mess around with.
Corner 236C Air Hit I recommend just doing the OTG string.
236C grounded hit I just do 2C 4B 236B, or 2c air combo if I think it’ll kill.
Defense
Ciel has a wide array of defensive options:
C moon universal reversal.
This is a 3f reversal, due to the nature of landing recovery, C and H moon characters cannot safejump this move unless they make the first hit whiff. This move hits on the same frame as the superflash, so opponents cannot whiff cancel their A normal into shield upon seeing the superflash. Also being a 22 input makes this reversal very relevant against left/right mixups, this move can invalidate some mixups due to the nature of the 22 input alongside C/H characters not being able to safejump against it.
This is Ciel’s meterless reversal, it is programmed to whiff crouchers even if the hitboxes line up making it relatively easy to bait. It can be useful against H-moon heat though as it will avoid the H-moon autoburst, and Ciel will be + in the resulting situation.
This reversal is safe on block, but loses to the opponent jumping on reaction to the superflash, this is my reversal of choice to buffer out of blockstun to beat frametraps as the 214 input doesn’t require letting go of block for very long.
This move is a reversal, it basically beats everything but block or an A normal, however it a relatively slow startup compared to the other listed moves. I generally won’t use it on defense unless I’m reacting to the startup of something slow, or after blocking something significantly minus. A couple examples of uses for 236C are against F-Akiha/F-VAkiha’s 4C, Nero’s 4C, Satsuki’s 3C and FHime 236A/B, any of these moves can be punished on block by 236C, the opponent will need to cancel into a move which jails if they can, in which case the 236C won’t come out due to blockstun.
Having these options available will require that the opponent must play around them to some degree, which will provide opportunities for challenges such as 2A or Jump, or just allow you to block longer to try and gain an understanding of your opponent’s pressure tendencies.
- Other defensive non-reversal options:
- 2A: You press this button if you predict the opponent is going to move into throw range of you.
- 5A > 4C: This is a call out for an IAD reset, if the opponent goes for resets higher than 5A height, then raw 4C is possible, but you need some serious confidence for it, and I’d likely rather just dash or jump at that point.
- 5B/5C: These buttons are for if you need a challenge at ranges where 2A would whiff, if you challenge with 5C make sure you release the button quickly to avoid charging it.
- Dash – Very matchup dependent, but you can dash under fireballs, or some buttons such as CWara 5B/5C.
These are options to try if you predict the opponent will not perform a frametrap. Lastly, the most common defensive option you should be using is block. Blocking in most matchups is great, and you need to do it for the opponent to start making opportunities for your other options available.
Combos
| Combo Notation Help
|
Disclaimer: Combos are written by various writers, so the actual notation used in pages can differ from the standard one.
For more information, see Glossary and Controls.
|
| X > Y
|
X input is cancelled into Y.
|
| X > delay Y
|
Must wait for a short period before cancelling X input into Y.
|
| X, Y
|
X input is linked into Y, meaning Y is done after X's recovery period.
|
| X+Y
|
Buttons X and Y must be input simultaneously.
|
| X/Y
|
Either the X or Y input can be used.
|
| X~Y
|
This notation has two meanings.
- Use attack X with Y follow-up input.
- Input X then within a few frames, input Y. Usually used for option selects.
|
| X(w)
|
X input must not hit the opponent (Whiff).
|
| j.X
|
X input is done in the air, implies a jump/jump cancel if the previous move was done from the ground.
Applies to all air chain sections:
- Assume a forward jump cancel if no direction is given.
- Air chains such as j.A > j.B > j.C can be shortened to j.ABC.
|
| sj.X
|
X input is done after a super jump. Notated as sj8.X and sj9.X for neutral and forward super jumps respectively.
|
| dj.X
|
X input is done after a double jump.
|
| sdj.X
|
X input is done after a double super jump.
|
| tk.X
|
Stands for Tiger Knee. X motion must be buffered before jumping, inputting the move as close to the ground as possible. (ex. tk.236A)
|
| (X)
|
X is optional. Typically the combo will be easier if omitted.
|
| [X]
|
Input X is held down. Also referred to as Blowback Edge (BE). Depending on the character, this can indicate that this button is held down and not released until indicated by the release notation.
|
| ]X[
|
Input X is released. Will only appear if a button is previously held down. This type of input is referred to as Negative Edge.
|
| {X}
|
Button X should only be held down briefly to get a partially charged version instead of the fully charged one.
|
| X(N)
|
Attack "X" should only hit N times.
|
| (XYZ)xN
|
XYZ string must be performed N times. Combos using this notation are usually referred to as loops.
|
| (XYZ^)
|
A pre-existing combo labelled XYZ is inserted here for shortening purposes.
|
| CH
|
The first attack must be a Counter Hit.
|
| Air CH
|
The first attack must be a Counter Hit on an airborne opponent.
|
| 66
|
Performs a ground forward dash.
|
| j.66
|
Performs an aerial forward dash, used as a cancel for certain characters' air strings.
|
| IAD/IABD
|
Performs an Instant AirDash.
|
| AT
|
Performs an Air Throw. (j.6/4A+D)
|
| IH
|
Performs an Initiative Heat.
|
| AD
|
Performs an Arc Drive.
|
| AAD
|
Performs an Another Arc Drive.
|
Refer to HFBlade’s video for more varied/situational/more optimized combos.
Starters
| Condition
|
Notation
|
Damage
vs V.Sion
|
Notes
|
|
| Normal starter, grounded opponent
|
- 2AA > 2B > 3B > 5C~C, 2C > 5C
|
3394
|
| |
| Meter Gained: 60% |
Meter Given (vs C-Moon): 18% |
| Very common starter sequence. Depending on the circumstances or difficulties you have you can use 2AA > 2B > 3B > 2C > 5C for either easier combo routing or whenever you catch someone with a staggered 2C. |
|
|
| Normal starter, grounded opponent
|
- 2AA > 2B(1) > 3B > 5C~C, 2C > 5C
|
3051
|
| |
| Meter Gained: 55% |
Meter Given (vs C-Moon): 16.5% |
| More guaranteed combo due to having less risk of whiffing 2B(2). Still possible to whiff 2C if the opponent is far enough. |
|
|
| Normal starter, grounded opponent
|
- 2AA > 2B(1) > 3B > 5C~C > 214[A], 2C > 5C
|
3168
|
| |
| Meter Gained: 62% |
Meter Given (vs C-Moon): 18.6% |
| For distances where 2C will whiff. While the damage looks good on first view, the total damage including aerials will deal less damage than omitting 214[A] due to combo proration. |
|
|
| Normal starter, grounded opponent
|
- 2AA > 2B(1) > 3B(1) > 5C~C > 214[A], (sj9)
|
2430
|
| |
| Meter Gained: 40% |
Meter Given (vs C-Moon): 12% |
| For when 5C hits at the very tip. You will have to delay the super jump input in order for it to properly come out. |
|
|
| Normal starter, grounded opponent
|
- 2A > 2B(1) > 3B > 5C~C, 2C > delay 5C > 2B
|
3503
|
| |
| Meter Gained: 62% |
Meter Given (vs C-Moon): 18.6% |
| High damage, will only work if you are right next to the opponent. Instead of delaying, you can partially charge 5C. You can also add the 2B to the 214[A] route if you realize that you are close enough to them for extra damage. Make sure to hit 2 hits with the final 2B before going into Aerials. |
|
|
Enders
| Condition
|
Notation
|
Damage
vs V.Sion
|
Notes
|
|
| Normal starter, grounded opponent
|
|
???
|
| |
| Meter Gained: ??? |
Meter Given (vs C-Moon): ??? |
| Standard airthrow ender that is done after j.22B. |
|
|
OTG Pick ups
| Condition
|
Notation
|
Damage
vs V.Sion
|
Notes
|
|
| Normal starter, grounded opponent
|
- 2A > 2B > 5AAA > 5B > 4B~236B
|
???
|
| |
| Meter Gained: ??? |
Meter Given (vs C-Moon): ??? |
| If you’re in a situation where your opponent doesn’t ground tech, this OTG string works and gives a bit of damage/meter and decent oki. |
|
|
Normal Combos
| Condition
|
Notation
|
Damage
vs V.Sion
|
Notes
|
|
| Normal starter, grounded opponent
|
- 2A > 2B > 3B > 2C > 5C > j.BC > dj.BC > j.66 > j.B > j.22B > AT
|
4372
|
| |
| Meter Gained: 87% |
Meter Given (vs C-Moon): 26.1% |
| A basic combo to start with for C-Ciel, where (starter) represents any type of jump in and ground string in front of it, it’ll work as long as the 2C is in range and 5C hasn’t been used yet, you can also replace the 5C with almost any other button and the combo will still function. I would recommend practicing this combo until you can land it 10x in a row both sides with no drops as almost every combo is going to make use of this one. This is also the confirm you should use against Lens when they're standing, as 214[A], 2C > 5C will whiff on them. |
|
|
| Normal starter, grounded opponent
|
- 2A > 2B > 3B > 5CC > 214[A], 2C > 5C > j.BC > dj.BC > j.66 > j.B > j.22B > AT
|
4633
|
| |
| Meter Gained: 110% |
Meter Given (vs C-Moon): 33% |
| The 5CC combo, this confirm is relatively easy, and is what you should go for if you have 5C available and the opponent is standing and isn’t too far away. What qualifies as too far away depends on both the character and the distance to the corner, I would recommend you mess around with different ground strings prior to the 5CC on a few different characters to get a feel for when the 2C will connect and when it will whiff. |
|
|
| Normal starter, grounded opponent
|
- 2A > 2B > 3B > 5CC > 214[A], 2C > delay 5C > 2B > j.BC > dj.BC > j.66 > j.B > j.22B > AT
|
4770
|
| |
| Meter Gained: 120% |
Meter Given (vs C-Moon): 36% |
| An optimized version of the previous combo, adding a bit of damage and corner carry. The delay required on the 5C is dependent on hitcount and character, but the window is relatively large and not difficult to eyeball with some practice. You want it to connect as late as possible without letting them touch the ground. |
|
|
| Normal starter, crouching opponent
|
- 2A > 2B > 3B > 5CC, 2C > 5C > j.BC > dj.BC > j.66 > j.B > j.22B > AT
|
4920
|
| |
| Meter Gained: 103% |
Meter Given (vs C-Moon): 30.9% |
| An alternate 5CC combo that does not use 214[A]. Because of the proration from the ground string before 5CC, it actually ends up doing more damage than the 214[A] combos. Against standing oopponents, they'll usually be pushed too far away, but since 5C trips crouching opponents, it's consistent on them. |
|
|
| Normal starter, crouching opponent
|
- 2A > 2B > 3B > 5CC, 2C > delay 5C > 2B > j.BC > dj.BC > j.66 > j.B > j.22B > AT
|
5102
|
| |
| Meter Gained: 113% |
Meter Given (vs C-Moon): 33.9% |
| The optimized version of the above combo. |
|
|
| Normal starter, grounded opponent
|
- 2A > 2B > 3B > 5CC > 214[A], sj9.BC > dj.BC > j.66 > j.A > j.22B > AT
|
4210
|
| |
| Meter Gained: 89% |
Meter Given (vs C-Moon): 26.7% |
| The combo you do if the 2C would whiff after 214[A]; does less damage, practice the combo on VSion, Ryougi, and Len in both midscreen and in the corner to get a feel for where the 214[A] can place the opponent. Generally, it’ll work out if you’re close to the opponent, but be aware that if you put a string like 2A 2B 3B in front of the 5C then the 2C may whiff on some characters. The first j.C must be omitted on some characters. |
|
|
| Normal starter, grounded opponent
|
- 2A > 2B > 3B > 5C > tk.623C, (sj9), j.BC > j.66 > j.A > dj.BC > j.22B > AT
|
5563
|
| |
| Meter Gained: -51.2%(-100%, +48.8%) |
Meter Given (vs C-Moon): 25.5% |
| Spends 100 meter for a significant chunk of damage, requires the opponent to be at roughly 1/3 screen away from the corner when you do the tk j.623C. Replace 5C with 2B/3B/4C for a crouching opponent. |
|
|
| Normal starter, grounded opponent, facing away from the corner
|
- 2A > 2B > 3B > 5C > tk.623C, 623C, j.AC > sdj.BC > j.66 > j.B > j.22B > AT
|
5636
|
| |
| Meter Gained: -51.2%(-200%, +48.8%) |
Meter Given (vs C-Moon): 27.7% |
| Full screen corner carry combo, if you have meter to burn. If you end up behind them after the 623C, omit the airdash j.B so you can still get corner oki. |
|
|
| 214B starter, grounded opponent, 100% meter
|
- 214B~4A~4B > 623C > j8.A > dj.BC > j.66 > j.A > j.22B > AT
|
4521
|
| |
| Meter Gained: -70.8%(-100%, +29.2%) |
Meter Given (vs C-Moon): 17.4% |
| Spends 100 meter to convert from knives, works at roughly 3/4 screen away from the opponent |
|
|
| 214B starter, grounded opponent, 100% meter
|
|
3613
|
| |
| Meter Gained: -84% (-100%, +16%) |
Meter Given (vs C-Moon): 28.1% |
| Spends 100 meter to convert from knives, gives better oki than the previous combo, less damage, works at any range. |
|
|
| Raw airthrow starter
|
- Raw AT, 2C > 5C > j.BC > dj.BC > j.22B > AT
|
3132
|
| |
| Meter Gained: 60% |
Meter Given (vs C-Moon): 18% |
| Simple raw airthrow conversion. |
|
|
| Raw airthrow starter
|
|
2225
|
| |
| Meter Gained: 15% |
Meter Given (vs C-Moon): 6.7% |
| Less damage in exchange for safejump okizeme. |
|
|
Corner Combos
| Condition
|
Notation
|
Damage
vs V.Sion
|
Notes
|
|
| Normal starter, grounded opponent, 100% meter
|
- 2A > 2B > 3B > 5C > tk.623C > j.BC > dj.BC > j.66 > j.B > j.22B > AT
|
5650
|
| |
| Meter Gained: -49.1%(-100%, +50.1%) |
Meter Given (vs C-Moon): 26.4% |
| If you have over 200% meter, it’s very likely correct to spend the meter on this, the tk j.623C adds a significant amount of damage to your combos. This combo requires an adjustment for crouchers, either cut the first j.C, or use 2B/3B/4C instead of 5C. |
|
|
| Normal starter, grounded opponent, 200% meter
|
- 2A > 2B > 3B > 5C > tk.623C, (delay) tk.623C > j.B > sdj.BC > j.66 > j.B > j.22B > AT
|
6369
|
| |
| Meter Gained: -154.2%(-200%, +45.8%) |
Meter Given (vs C-Moon): 26.7% |
| This combo hurts. The timing for the second tk.623C is a little awkward and is probably the most difficult combo you’ll want to learn for practical uses. For the j.B you want to jump out of the corner and hit them with the crossup hitbox, then jump toward the corner for the sdj. Replace 5C with 2B/3B/4C for crouching opponents. |
|
|
Move Descriptions
| Frame Data Help
|
| Header
|
Tooltip
|
| Move Box Colors
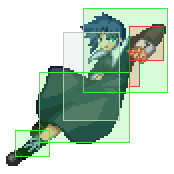
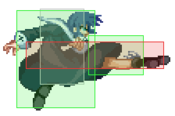
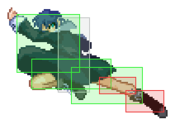
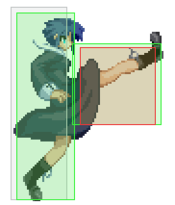
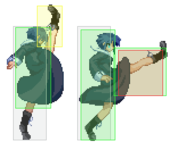
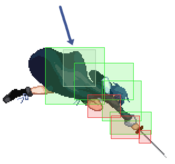
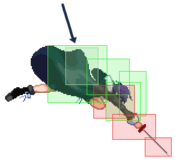
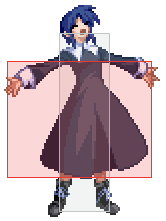
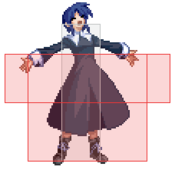
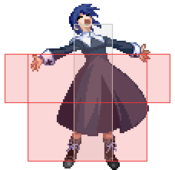
|
Light gray = Collision Box (A move lacking one means it can go through the opponent's own collision box).
Green: Hurt Boxes.
Red: Hit(/Grab) Boxes.
Yellow: Clash Boxes (When an active hitbox strikes a clash box, the active hitbox stops being active. Multi-hit attacks can beat clash since they will still progress to the next hitbox.)
Magenta: Projectile-reflecting boxes OR Non-hit attack trigger boxes (usually).
Blue: Reflectable Projectile Boxes.
|
| Damage
|
Base damage done by this attack.
(X) denotes combined and scaled damage tested against standing V. Sion.
|
| Red Damage
|
Damage done to the recoverable red health bar by this attack. The values are inherently scaled and tested against standing V. Sion.
(X) denotes combined damage.
|
| Proration
|
The correction value set by this attack and the way it modifies the scaling during a string. See this page for more details.
X% (O) means X% Overrides the previous correction value in a combo if X is of a lower percentage.
X% (M) means the current correction value in a combo will be Multiplied by X%. This can also be referred to as relative proration.
|
| Circuit
|
Meter gained by this attack on hit.
(X%) denotes combined meter gain.
-X% denotes a meter cost.
|
| Cancel
|
Actions this move can be cancelled into.
SE = Self cancelable.
N = Normal cancelable.
SP = Special cancelable.
CH = Cancelable into the next part of the same attack (Chain in case of specials).
EX = EX cancelable.
J = Jump cancelable.
(X) = Cancelable only on hit.
-X- = Cancelable on whiff.
|
| Guard
|
The way this move must be blocked.
L = Can block crouching
H = Can block standing.
A = Can block in the air.
U = Unblockable.
|
| Startup
|
Amount of frames that must pass prior to reaching the active frames. Also referred to as "True Startup".
|
| Active
|
The amount of frames that this move will have a hitbox.
(x) denotes frame gaps where there are no hitboxes is present. Due to varied blockstuns, (x) frames are difficult to use to determine punish windows. Generally the larger the numbers, the more time you have to punish.
X denotes active frames with a duration separate from its origin move's frame data, such as projectile attacks. In this case, the total length of the move is startup+recovery only.
|
| Recovery
|
Frames that this move has after the active frames if not canceled. The character goes into one frame where they can block but not act afterwards, which is not counted here.
|
| Advantage
|
The difference in frames where you can act before your opponent when this move is blocked (assuming the move isn't canceled and the first active frame is blocked).
If the opponent uses a move with startup that is at least 2 frames less than this move's negative advantage, it will result in the opponent hitting that move.
±x~±y denotes a range of possible advantages.
|
| Invul
|
Lists any defensive properties this move has.
X y~z denotes X property happening between the y to z frames of the animations. If no frames are noted, it means the invincibility lasts through the entire move.
Invicibility:
- Strike = Strike invincible.
- Throw = Throw invincible.
Hurtbox-Based Properties:
- Full = No hurtboxes are present.
- High = Upper body lacks a hurtbox.
- Low = Lower body lacks a hurtbox.
Miscellaneous Properties
- Clash = Frames in which clash boxes are active.
- Reflect = Frames in which projectile-reflecting boxes are active.
- Super Armor = Frames in which the character can take hits without going into hit stun.
|
Normal Moves
Standing Normals
|
|
| Damage
|
Red Damage
|
Proration
|
Cancel
|
Guard
|
| 350
|
196
|
75% (O)
|
-SE-, -N-, -SP-, -EX-, (J)
|
LH
|
| First Active
|
Active
|
Recovery
|
Frame Adv
|
Circuit
|
Invuln
|
| 5
|
4
|
8
|
0
|
3.5%
|
-
|
|
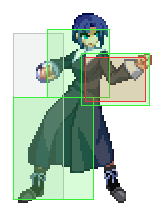
Mid-hitting punch to the opponent's mid-section. Since it hits mid, it hits crouchers reliably. 5A 4C works well as an anti jump string. Good option out of EX Shield. Doesn't have the best priority compared to other 5A's but chances are you'll be using it a lot as a whiff cancel attack and a combo filler.
|
|
|
|
| Damage
|
Red Damage
|
Proration
|
Cancel
|
Guard
|
| 500
|
294
|
90% (O)
|
N, SP, EX, (J)
|
L
|
| First Active
|
Active
|
Recovery
|
Frame Adv
|
Circuit
|
Invuln
|
| 6
|
4
|
15
|
-4
|
5.0%
|
-
|
|
A standing kick to the opponent's shins. Decent for staggers since it's only -4. If you hit the opponent while they're crouching, it will trip them. If you're looking to hitconfirm from it, 5B 5C is a good option that will let you go into aircombo on crouch and 5CC on stand. In spite of the fact that this attack must be blocked low, it must be shielded HIGH.
|
|
|
|
| 5C
|
Damage
|
Red Damage
|
Proration
|
Cancel
|
Guard
|
| 800
|
490
|
90% (O)
|
N, SP, -CH-, EX, (J)
|
LH
|
| First Active
|
Active
|
Recovery
|
Frame Adv
|
Circuit
|
Invuln
|
| 10
|
4
|
20
|
-6
|
8.0%
|
-
|
| 5[C]
|
Damage
|
Red Damage
|
Proration
|
Cancel
|
Guard
|
| 1600
|
1372
|
80% (O)
|
N, SP, -CH-, EX, (J)
|
LH
|
| First Active
|
Active
|
Recovery
|
Frame Adv
|
Circuit
|
Invuln
|
| 24
|
4
|
20
|
-6
|
14.0%
|
-
|
|
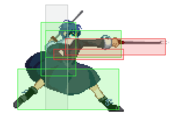
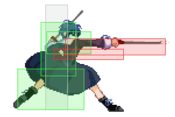
A quick sword stab that does a fair bit of damage. If it hits a crouching opponent, it will knock them down in place and make converting from long range easier. It can also be delayed and eventually charged. Take special note that this CAN be canceled by a reverse beat.
|
| ~C
|
Damage
|
Red Damage
|
Proration
|
Cancel
|
Guard
|
| 1000
|
686
|
80% (M)
|
-SP-, -EX-
|
LHA
|
| First Active
|
Active
|
Recovery
|
Frame Adv
|
Circuit
|
Invuln
|
| 11
|
X
|
33
|
0
|
8.0%
|
-
|
|
The initial 5C followed by a second command that will throw a sword at the opponent. This move can be used to set up her more damaging combos. It's a decent way to end blockstrings since it's plus and can be special cancelled on whiff. However, the special cancel options are all somewhat gimmicky and you don't have the frames to catch jumpouts from far away with 5CC dash 5A/4C, so don't expect to be able to reset pressure for free with this.
|
|
Crouching Normals
|
|
| Damage
|
Red Damage
|
Proration
|
Cancel
|
Guard
|
| 300
|
147
|
72% (O)
|
-SE-, -N-, -SP-, -EX-, (J)
|
L (whiffs vs air)
|
| First Active
|
Active
|
Recovery
|
Frame Adv
|
Circuit
|
Invuln
|
| 4
|
3
|
10
|
-1
|
4.0%
|
-
|
|
A toe kick that hits low. Range is average. You'll be using this a lot to start either a combo, ground blockstring, or tick throw attempt. You can also use it in whiff cancel strings. Is coded to whiff against airborne opponents.
|
|
|
|
| 2B
|
Damage
|
Red Damage
|
Proration
|
Cancel
|
Guard
|
| 400, 700 (942)
|
(538)
|
80% (O)
|
N, SP, -CH-, EX, (J)
|
LH
|
| First Active
|
Active
|
Recovery
|
Frame Adv
|
Circuit
|
Invuln
|
| 8
|
3 (2) 5
|
19
|
-9
|
5.0%*2 (10.0%)
|
Clash 13-17
|
|
A crouching uppercut that moves her forward a little bit. This attack hits twice which makes it great for hitconfirming in combos. The downside? If you do this while not very close to the opponent while they're crouching, it will only hit once and you will be left WAY vulnerable if you don't reverse beat the first hit or cancel into another attack.
|
| ~2B
|
Damage
|
Red Damage
|
Proration
|
Cancel
|
Guard
|
| 700
|
490
|
100%
|
SP, EX, (J)
|
LHA
|
| First Active
|
Active
|
Recovery
|
Frame Adv
|
Circuit
|
Invuln
|
| 11
|
4
|
19
|
-11
|
6.0%
|
-
|
|
The second hit is a hopping backwards hit that launches the opponent upward. Has some niche applications in pressure, which are examined in detail here. As stated earlier, since it launches the opponent upward you can follow up with an air combo though you may have to shorten it due to height issues. It can also be used to put Ciel in aerial state if she's already used her jump cancel, but this isn't very relevant outside of combo video material.
|
|
|
|
| 2C
|
Damage
|
Red Damage
|
Proration
|
Cancel
|
Guard
|
| 1000
|
490
|
60% (O)
|
N, SP, -CH-, EX, (J)
|
L
|
| First Active
|
Active
|
Recovery
|
Frame Adv
|
Circuit
|
Invuln
|
| 8
|
7
|
25
|
-14
|
10.0%
|
-
|
|
A sweep using both her feet and the second hit is a handstand kick. 2C will most often be used in the easier BnBs much like the other characters. However it's not a move that should be constantly thrown out by itself since it is fairly slow on both the startup and recovery.
|
| ~2C
|
Damage
|
Red Damage
|
Proration
|
Cancel
|
Guard
|
| 700
|
343
|
60% (O)
|
N, SP, EX, J
|
LH
|
| First Active
|
Active
|
Recovery
|
Frame Adv
|
Circuit
|
Invuln
|
| 9
|
8
|
23
|
-13
|
5.0%
|
-
|
|
The initial 2C followed by handstand kick. The second hit will launch the opponent up on hit allowing you to pursue them with an air combo. Do not use this second hit as a combo starter for BnBs because damage output is much lower than what you could get doing a standard BnB. If you meaty with 2C(w)C, on block you can go into j.C for a gimmicky overhead, j.214A to potentially set up a fuzzy guard break if they block standing out of fear of the j.C, or j.236A throw. Not often seen nowadays. This move is jump cancellable on block, which is practically impossible to achieve without something to negate 2C's pushback.
|
|
Aerial Normals
|
|
| Damage
|
Red Damage
|
Proration
|
Cancel
|
Guard
|
| 300
|
117
|
75% (O)
|
SE, N, SP, EX, J
|
LHA
|
| First Active
|
Active
|
Recovery
|
Frame Adv
|
Circuit
|
Invuln
|
| 5
|
4
|
10
|
-
|
2.0%
|
-
|
|
A jumping elbow attack. Range is pretty short. Not the most amazing j.A air to air as a result but it does its job and can still find counterhits. Can be used to keep a blocking opponent pinned in the air to set up for a possible guard break situation if you land before they do. It can also be used as a filler in air combos if you're not positioned correctly to get a j.B or j.C.
|
|
|
|
| Damage
|
Red Damage
|
Proration
|
Cancel
|
Guard
|
| 600
|
274
|
90% (O)
|
N, SP, EX, J
|
HA
|
| First Active
|
Active
|
Recovery
|
Frame Adv
|
Circuit
|
Invuln
|
| 7
|
6
|
-
|
-
|
5.0%
|
-
|
|
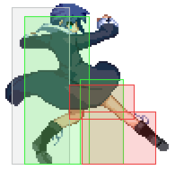
A jumping kick with her foot extended in front of her. This move has an ABSURDLY huge hitbox. Great as an air-to-air, jump-in, and most importantly it's a crossup. Use this often when you're in the air but don't get too predictable with it. You'll also be starting a lot of the air combo portions of BnB's with this move.
|
|
|
|
| Damage
|
Red Damage
|
Proration
|
Cancel
|
Guard
|
| 1000
|
490
|
90% (M) / 50% (O)
|
N, SP, EX, J
|
HA
|
| First Active
|
Active
|
Recovery
|
Frame Adv
|
Circuit
|
Invuln
|
| 8
|
4
|
-
|
-
|
10.0%
|
-
|
|
A downward angled kick. Hits pretty hard and it's great as a jump in. It also works well when the opponent is below you in air-to-air situations. You'll definitely be using this in air combos as well. Mix this up with j.B in your air game.
|
|
Command Normals
|
|
| Damage
|
Red Damage
|
Proration
|
Cancel
|
Guard
|
| 400*2 (709)
|
(445)
|
80% (O)
|
N, SP, EX, (J)
|
LH
|
| First Active
|
Active
|
Recovery
|
Frame Adv
|
Circuit
|
Invuln
|
| 11
|
2 (8) 8
|
12
|
-5
|
4.0%*2 (8.0%)
|
-
|
|
This is a 2-hit handstand kick. It moves further than 2B and can be canceled into pretty much anything. This attack works very well in combos and staggers so use this move often.
|
|
4B4[B]
(On Hit) 4B/[B]~236B
|
| 4B
|
Damage
|
Red Damage
|
Proration
|
Cancel
|
Guard
|
| 600
|
392
|
100%
|
SP, (CH), EX
|
LH
|
| First Active
|
Active
|
Recovery
|
Frame Adv
|
Circuit
|
Invuln
|
| 11
|
2
|
15
|
-2 (vs Stand.)
1 (vs Crouch.)
|
6.0%
|
Clash 4
Low 6-10
|
|
The first hit is an axe kick that can be followed up with the 236B command throw if it hits the opponent. The 4B is now special cancelable even if it is blocked.
|
| 4[B]
|
Damage
|
Red Damage
|
Proration
|
Cancel
|
Guard
|
| 900
|
686
|
100%
|
SP, (CH), EX
|
H
|
| First Active
|
Active
|
Recovery
|
Frame Adv
|
Circuit
|
Invuln
|
| 26
|
2
|
15
|
-2
|
6.0%
|
Clash 2-17
Low 8-25
|
|
The charged 4B gains overhead properties with some lower body invincibility. Not a great overhead, but it can still hit unprepared opponents. Confirm into 623[A] if you want to be safe on block, or 214B for better reward.
|
| ~236B
|
Damage
|
Red Damage
|
Proration
|
Cancel
|
Guard
|
| 800 (1375/1675)
|
(1911/2205)
|
100%
|
-
|
U
|
| First Active
|
Active
|
Recovery
|
Frame Adv
|
Circuit
|
Invuln
|
| 0
|
1
|
14
|
-
|
0.0%
|
-
|
|
If they block the 4B, then the 236B won't work. If the 236B connects, it will knock them down. Sometimes used as an ender to set up safejump okizeme.
|
|
|
|
| Damage
|
Red Damage
|
Proration
|
Cancel
|
Guard
|
| 400, 500 (738)
|
(492)
|
70% (O)
|
N, SP, EX, (J)
|
LH
|
| First Active
|
Active
|
Recovery
|
Frame Adv
|
Circuit
|
Invuln
|
| 10
|
7
|
23
|
-10
|
6.0%*2 (12.0%)
|
Clash 12-16
|
|
An upward slash with her knife. Primarily used to catch jumps out of pressure, which can be hitconfirmed into j.A (or 236C if they're too high and you're desperate for hard knockdown.) The clash hitbox is somewhat useful for OSing defensive options and will clash immediate shield counters if the first hit is shielded. Also useful as a filler normal on crouch confirms, since unlike 5C, it doesn't trip.
|
|
|
|
| j.2C
|
Damage
|
Red Damage
|
Proration
|
Cancel
|
Guard
|
| 1000
|
490
|
70% (O)
|
-
|
LHA
|
| First Active
|
Active
|
Recovery
|
Frame Adv
|
Circuit
|
Invuln
|
| 15
|
10
|
8
|
8 (TK)
|
10.0%
|
-
|
|
A downward lunging stab from the air. It can not be canceled into anything else and it has poor recovery upon landing and not to mention there's a bit of startup to it as well, but is still somewhat useful for mixing up your landing options. Dash tk.2C is useful in pressure to beat both throw tech and low abare while remaining plus on block. This move can be used in midscreen okizeme situations when the opponent thinks you're going to land behind them after a knockdown. Use wisely though as wakeup dps might tag you if you use it too much. You would think this move hits as an overhead but unfortunately it doesn't.
|
| j.2[C]
|
Damage
|
Red Damage
|
Proration
|
Cancel
|
Guard
|
| 1300
|
980
|
50% (O)
|
SP, EX
|
HA
|
| First Active
|
Active
|
Recovery
|
Frame Adv
|
Circuit
|
Invuln
|
| 26
|
10
|
6
|
10 (TK)
|
15.0%
|
-
|
|
The charged j.2C has more startup, but it hits overhead, has less landing recovery, and is special cancellable. Mix this in with air dash pressure strings in the corner to keep the opponent guessing.
|
|
Universal Mechanics
|
|
| Damage
|
Red Damage
|
Proration
|
Cancel
|
Guard
|
| 1500
|
784
|
50%
|
-
|
U
|
| First Active
|
Active
|
Recovery
|
Frame Adv
|
Circuit
|
Invuln
|
| 3
|
1
|
20
|
-
|
0.0%
|
-
|
|
Standard ground throw. Untechable knockdown.
|
|
|
|
| Damage
|
Red Damage
|
Proration
|
Cancel
|
Guard
|
| 1600 (Raw)/1300
|
522
|
30%
|
(Any if Raw)
|
U
|
| First Active
|
Active
|
Recovery
|
Frame Adv
|
Circuit
|
Invuln
|
| 2
|
1
|
12
|
-
|
0.0%
|
-
|
|
Front-flip air throw. Ground bounces the opponent when done raw, causes an untechable knockdown and leaves you at a far distance as a combo ender.
|
|
|
|
| Bunker
|
Damage
|
Red Damage
|
Proration
|
Cancel
|
Guard
|
| 500
|
196
|
50%
|
-
|
LHA
|
| First Active
|
Active
|
Recovery
|
Frame Adv
|
Circuit
|
Invuln
|
| 26
|
2
|
21
|
-5
|
0.0%
(-50.0% in blockstun)
|
Clash 1-10
|
| (Clash)
|
Damage
|
Red Damage
|
Proration
|
Cancel
|
Guard
|
| 500
|
196
|
50%
|
-
|
LHA
|
| First Active
|
Active
|
Recovery
|
Frame Adv
|
Circuit
|
Invuln
|
| 8
|
2
|
21
|
-5
|
0.0%/-50.0%
|
Strike 1-7
|
|
A Shield Bunker with some good reach, similar to F-Moon's 236X.
|
|
|
|
| Damage
|
Red Damage
|
Proration
|
Cancel
|
Guard
|
| 100
|
0
|
100%
|
-
|
U
|
| First Active
|
Active
|
Recovery
|
Frame Adv
|
Circuit
|
Invuln
|
| 16
|
2
|
25
|
-
|
-100.0% (min)
|
Full 1-17
|
|
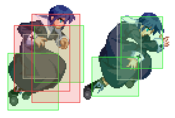
Wide hitbox that doesn't cover all of Ciel's height.
|
|
|
|
| Ground
|
Damage
|
Red Damage
|
Proration
|
Cancel
|
Guard
|
| 100
|
0
|
100%
|
-
|
U
|
| First Active
|
Active
|
Recovery
|
Frame Adv
|
Circuit
|
Invuln
|
| 11
|
10
|
20
|
-
|
removes all
|
Full 1-39
|
| Air
|
Damage
|
Red Damage
|
Proration
|
Cancel
|
Guard
|
| 100
|
0
|
100%
|
-
|
U
|
| First Active
|
Active
|
Recovery
|
Frame Adv
|
Circuit
|
Invuln
|
| 12
|
10
|
15
|
-
|
removes all
|
Strike 1-30
|
|
Universal burst mechanic. Unlike Crescent/Full Heat activation, the hitbox and frame data doesn't vary between characters. However, you can be thrown out of this move if you input it in the air.
|
|
Special Moves
Grounded Specials
Halo
(EX: Seventh Heaven)236A/B/[B]/C
A Follow-ups:
~236X
~X (goes into B version)
~214X~214X
~214X~A (same as ~236X)
B Follow-ups:
~[4]/[6]
~A/B
~214A/B
~C A Follow-ups A Follow-ups B(/A~X) Follow-ups B(/A~X) Follow-ups
|
| A
|
Damage
|
Red Damage
|
Proration
|
Cancel
|
Guard
|
| -
|
-
|
-
|
-CH-
|
-
|
| First Active
|
Active
|
Recovery
|
Frame Adv
|
Circuit
|
Invuln
|
| 26 ~ 27
|
39
|
14 ~ 23
|
-
|
-
|
-
|
| ~X
|
Damage
|
Red Damage
|
Proration
|
Cancel
|
Guard
|
| -
|
-
|
-
|
-CH-
|
-
|
| First Active
|
Active
|
Recovery
|
Frame Adv
|
Circuit
|
Invuln
|
| 5
|
27 ~ 33
|
24
|
-
|
-
|
-
|
~236X /
~214X~A
|
Damage
|
Red Damage
|
Proration
|
Cancel
|
Guard
|
| -
|
-
|
-
|
-
|
-
|
| First Active
|
Active
|
Recovery
|
Frame Adv
|
Circuit
|
Invuln
|
| 9
|
24 ~ 34
|
-
|
-
|
-
|
Full 6-8
|
| ~214X
|
Damage
|
Red Damage
|
Proration
|
Cancel
|
Guard
|
| 700
|
490
|
70%
|
-CH-, -J-
|
LHA
|
| First Active
|
Active
|
Recovery
|
Frame Adv
|
Circuit
|
Invuln
|
| 11
|
X
|
12
|
18
|
7.0%
|
-
|
| ~214X (2)
|
Damage
|
Red Damage
|
Proration
|
Cancel
|
Guard
|
| 450
|
343
|
100%
|
-SP-, -EX-, -J-
|
LHA
|
| First Active
|
Active
|
Recovery
|
Frame Adv
|
Circuit
|
Invuln
|
| 16
|
X
|
16
|
9
|
4.5%
|
Full 5-12
|
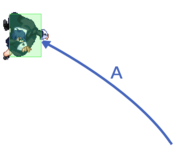
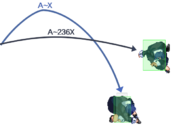
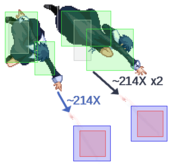
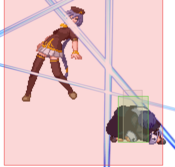
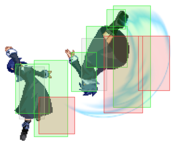
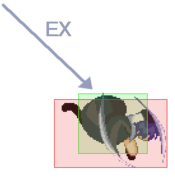
- Ciel leaps into the air and can perform several different moves depending on the button pressed.
Ciel clings to the nearest wall. Not pressing any other button will cause her to fall to the ground. You can do several moves from this position:
~X: This goes into the B version of this move, see below for the followups from it.
~236X/~214X~A: Ciel clings to the opposite wall. Not really used even in matchplay so it's not recommended.
~214X~214X: Ciel throws a knife nearest to the ground below her and then throws another one further away from her position. Not particularly useful since it takes a while before she starts throwing the knives and they don't cover a lot of space.
Performing none of the above followups will cause Ciel to enter a lengthy state of CH landing recovery.
|
| B
|
Damage
|
Red Damage
|
Proration
|
Cancel
|
Guard
|
| -
|
-
|
-
|
-CH-
|
-
|
| First Active
|
Active
|
Recovery
|
Frame Adv
|
Circuit
|
Invuln
|
| 13
|
50
|
14
|
-
|
-
|
-
|
| [B]
|
Damage
|
Red Damage
|
Proration
|
Cancel
|
Guard
|
| -
|
-
|
-
|
-CH-
|
-
|
| First Active
|
Active
|
Recovery
|
Frame Adv
|
Circuit
|
Invuln
|
| 27
|
47
|
14
|
-
|
-
|
-
|
| ~A
|
Damage
|
Red Damage
|
Proration
|
Cancel
|
Guard
|
| -
|
-
|
-
|
-CH-
|
-
|
| First Active
|
Active
|
Recovery
|
Frame Adv
|
Circuit
|
Invuln
|
| 12
|
X
|
10
|
-
|
-
|
High
(Recovery 1-10)
|
| ~B
|
Damage
|
Red Damage
|
Proration
|
Cancel
|
Guard
|
| 400*3 (932)
|
(684)
|
70%
|
(N), SP, EX, (J)
|
LH
(Whiff vs. Air)
|
| First Active
|
Active
|
Recovery
|
Frame Adv
|
Circuit
|
Invuln
|
| 5 ~ X
|
3
|
16
|
-1 ~ 1
|
3.0%*3 (9.0%)
|
High
(Startup 7-X)
|
| ~C
|
Damage
|
Red Damage
|
Proration
|
Cancel
|
Guard
|
| 0, 1600 (1550)
|
(505)
|
30%
|
(J)
|
U
|
| First Active
|
Active
|
Recovery
|
Frame Adv
|
Circuit
|
Invuln
|
| 0
|
3
|
12
|
-
|
0.0%
|
-
|
| ~214A/B
|
Damage
|
Red Damage
|
Proration
|
Cancel
|
Guard
|
| 450*3 (1306)
|
(996)
|
100%
|
-
|
LHA
|
| First Active
|
Active
|
Recovery
|
Frame Adv
|
Circuit
|
Invuln
|
| 8
|
X
|
8
|
4
|
4.5%*3 (13.0%)
|
-
|
|
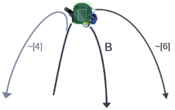
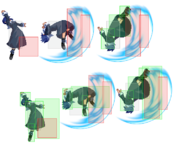
Ciel curls into a ball and leaps into the air. This move can be held to make Ciel hop higher. Holding 4 or 6 while in the air will cause her to move either towards or away from the opponent. This move has almost the same followups as the one above, the main difference is that she does not cling to a wall. She can do the following after leaving the ground:
~A: Ciel dives downward at a 30 degree angle. Those move does no damage but it recovers fairly quickly and can be used to return to the ground or set up a throw.
~B: Ciel dives downward at a 50 degree angle and hits up to three times. This move carries some very interesting properties in that it can chain into her ground normals and specials if it connects. If it's blocked, she can only cancel it into her ground specials. Has more landing recovery than the one above.
~C: Ciel performs an air throw. If it does not reach the opponent, then she will perform a whiffed throw animation. Very useful move.
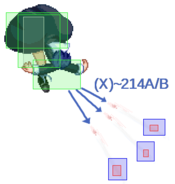
~214A/B: Ciel throws 3 Black Keys at a downward angle in a spread formation. If it hits the opponent they will be set aflame and knocked down. Pretty useful as it covers quite a bit of space and can keep the opponent from advancing towards you on the ground.
|
| EX
|
Damage
|
Red Damage
|
Proration
|
Cancel
|
Guard
|
| 380*20, 300 (2902)
|
(2245)
|
50% (O)
|
-
|
LHA
|
| First Active
|
Active
|
Recovery
|
Frame Adv
|
Circuit
|
Invuln
|
| 4+5/4+4
|
120
|
12
|
-20
|
-100.0%
|
Full 1-122
|
|
Ok, this is quite possibly one of the best moves in the game hands down. It comes out reasonably fast and it hits the ENTIRE screen. This almost feels like an attack that is only given to SNK bosses. You can literally use this to punish A LOT of moves in this game because of this. If they even do so much as any kind of special that doesn't recover instantly, they WILL get hit. This attack is also great for punishing HEAT activations and ground techs. Hell, if you land a stray air CH and the opponent has barely any visible life left, throw this move out. It will kill them regardless of whether they tech or not. So what exactly keeps this move from being completely overpowered? Well, if the opponent is close to the ground and this attack gets blocked, you are in counter hit 2 state and you WILL probably be eating the opponent's most damaging combo. This attack is untechable so long as it doesn't hit the opponent in otg state. Also, do not rely on this move as a wakeup unless it's clear as day that the opponent is doing something with a lot of recovery. But overall this is an EXTREMELY good move and it is meant to be used as a reactionary punisher or a round finisher.
Startup depends on whether Ciel has priority. If Ciel has priority, it's active on f9, and if the other character has priority, it's active on f8. Whenever a character blocks or gets hit, they lose priority. P1 begins the round with priority.
|
|
|
|
| A
|
Damage
|
Red Damage
|
Proration
|
Cancel
|
Guard
|
| 500
|
392
|
100%
|
-EX-
|
LH
|
| First Active
|
Active
|
Recovery
|
Frame Adv
|
Circuit
|
Invuln
|
| 6
|
10
|
14
|
-6
|
5.0%
|
-
|
| [A]
|
Damage
|
Red Damage
|
Proration
|
Cancel
|
Guard
|
| 500*2 (984)
|
(771)
|
100%
|
-EX-
|
LH
|
| First Active
|
Active
|
Recovery
|
Frame Adv
|
Circuit
|
Invuln
|
| 15
|
10
|
15
|
-7 ~ -6
|
5.0%*2 (10.0%)
|
-
|
- Ciel dashes towards her opponent while holding out several Black Keys in her hand. These attacks can also be performed in the air.
The non held version hits once and is super cancellable. Only really used as a punish against certain typically safe moves due to its good range for its speed.
The held version is only really used to hitconfirm from 4[B] safely.
|
| B
|
Damage
|
Red Damage
|
Proration
|
Cancel
|
Guard
|
| 500*3 (1336)
|
(1179)
|
100%
|
-EX-
|
LH
|
| First Active
|
Active
|
Recovery
|
Frame Adv
|
Circuit
|
Invuln
|
| 20
|
12
|
10
|
-2
|
6.0%*3 (18.0%)
|
High 9-17
|
|
This version covers more distance than the one above, hits up to 3 times, and launches the opponent straight up. Can also be super cancelled and used in the same manner as well. This move is air unblockable and can tag people who try to jump out of your blockstrings.
|
| EX
|
Damage
|
Red Damage
|
Proration
|
Cancel
|
Guard
|
| 1200*2, 1000 (2249)
|
(1821)
|
50% (O)
|
-
|
LH
|
| First Active
|
Active
|
Recovery
|
Frame Adv
|
Circuit
|
Invuln
|
| 1+7
|
9
|
26
|
-4
|
-100.0%
|
Full 1
|
|
This move comes out RIDICULOUSLY fast and it's safe on block. You can use this super to get out of the corner, but this can be caught by a meaty attack since you become vulnerable as soon as superflash ends. Can be used in a similar way to 236C to combo from projectiles for higher reward. Also can be used in OTG strings for good damage and a relaunch.
|
|
(B variation tree) (B variation tree)
|
| A
|
Damage
|
Red Damage
|
Proration
|
Cancel
|
Guard
|
| 600
|
490
|
80% (O)
|
-
|
LHA
|
| First Active
|
Active
|
Recovery
|
Frame Adv
|
Circuit
|
Invuln
|
| 12
|
X
|
31
|
-6
|
5.0%
|
-
|
| [A]
|
Damage
|
Red Damage
|
Proration
|
Cancel
|
Guard
|
| 350*2 (658)
|
(460)
|
100%, 85%
|
-
|
LHA
|
| First Active
|
Active
|
Recovery
|
Frame Adv
|
Circuit
|
Invuln
|
| 29
|
X
|
29
|
1
|
3.5%*2 (7.0%)
|
-
|
- Ciel's knife throwing series. Properties will vary depending on the button pressed.
Ciel throws a Black Key that will explode on hit, allowing an airtech. This helps it win projectile wars better than 214B. Since it has less recovery than 214B, it's a better option if you only plan on throwing a single key. Can be used to end blockstrings that push the opponent too far away for you to resume pressure.
[A]: Ciel throws a charged up version of her 214A. On hit, this version locks the opponent in place momentarily and they proceed to get hit by an explosion that launches them up into the air. Useful in combos, especially at a distance, but it's sometimes better to omit for scaling reasons. Very plus on block, especially at a distance, but you can't go into it gaplessly in pressure and it can be shielded on reaction.
|
| B
|
Damage
|
Red Damage
|
Proration
|
Cancel
|
Guard
|
| 500
|
343
|
100%
|
-CH-
|
LHA
|
| First Active
|
Active
|
Recovery
|
Frame Adv
|
Circuit
|
Invuln
|
| 12
|
X
|
33
|
-11
|
5.0%
|
-
|
| ~4A
|
Damage
|
Red Damage
|
Proration
|
Cancel
|
Guard
|
| 500*2 (984)
|
(675)
|
100%
|
-CH-
|
LHA
|
| First Active
|
Active
|
Recovery
|
Frame Adv
|
Circuit
|
Invuln
|
| 14
|
X
|
36
|
-12
|
5.0%*2 (10.0%)
|
-
|
| ~4B/C
|
Damage
|
Red Damage
|
Proration
|
Cancel
|
Guard
|
| 500*2 (984)
|
(675)
|
100%
|
-CH-
|
LHA
|
| First Active
|
Active
|
Recovery
|
Frame Adv
|
Circuit
|
Invuln
|
| 18
|
X
|
44
|
-22
|
5.0%*2 (10.0%)
|
-
|
| ~4X~4A
|
Damage
|
Red Damage
|
Proration
|
Cancel
|
Guard
|
| 500*4 (1905)
|
(1306)
|
100%
|
-CH-
|
LHA
|
| First Active
|
Active
|
Recovery
|
Frame Adv
|
Circuit
|
Invuln
|
| 38
|
X
|
38
|
-13
|
5.0%*4 (20.0%)
|
-
|
| ~4X~4B/C
|
Damage
|
Red Damage
|
Proration
|
Cancel
|
Guard
|
| 500*3 (802)
|
(523)
|
100%
|
-
|
LHA
|
| First Active
|
Active
|
Recovery
|
Frame Adv
|
Circuit
|
Invuln
|
| 15
|
X
|
40
|
-18
|
2.0%*3 (6.0%)
|
-
|
| ~4X~4A~4B/C (Kick)
|
Damage
|
Red Damage
|
Proration
|
Cancel
|
Guard
|
| 350
|
-
|
100%
|
-
|
LHA
|
| First Active
|
Active
|
Recovery
|
Frame Adv
|
Circuit
|
Invuln
|
| 20
|
2
|
12
|
4
|
0.0%
|
-
|
| ~4X~4A~4B/C (Projectile)
|
Damage
|
Red Damage
|
Proration
|
Cancel
|
Guard
|
| 450
|
-
|
100%
|
-
|
LHA
|
| First Active
|
Active
|
Recovery
|
Frame Adv
|
Circuit
|
Invuln
|
| 20
|
14
|
0
|
11
|
4.5%
|
-
|
|
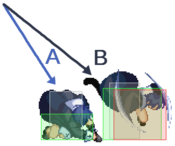
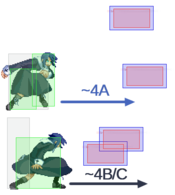
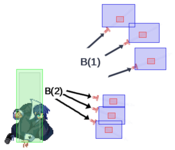
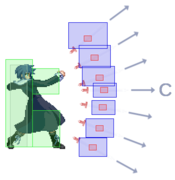
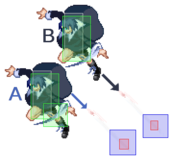
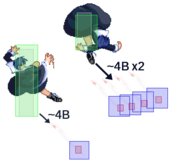
Ciel throws a Black Key that does not knock the opponent down, but it has several followups to it which are listed on the first image.
Variation (1) - The basic series which ends in a knockdown.
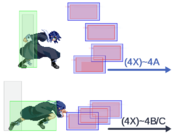
Variation (2) - The starter followed by a double knife throw, third input throws 4 knives and the last input throws another knife angled downward which will knock the opponent down.
Variation (3) - The starter followed by a second input that throws two knives simultaneously, one which is close to the ground and the other slightly above her head. The third input is the same ender as series (1).
Variation (4) - The starter followed by the 2nd input of series (3) and the last two inputs of series (2).
The most useful variation is 214B~4A, since the high knife helps to cover air approaches. 214B~4X~4A~4B/C is plus, but extremely gimmicky because of how slow the quadruple knife throw is. 214B~4B~4B/C does more damage than the 214B~4A variation, so it's used to convert off of 4[B], but is inferior in neutral.
NEVER finish any one of the series variations if the opponent is high above the ground because you are in counter-hit state and if you get hit, you will NOT like the results. The safest time to finish a series is if your opponent is full screen distance away and they haven't left the ground yet.
If the opponent gets hit by a series that has a total of 3 inputs ending with the 4B command from a distance, you can link a 236C or 623C after it for additional damage. If they're closer, you can also techtrap with 236C. In general, use these if the opponent is trying to keep you away or camp the other side of the screen. You can also use the shortened versions to force the opponent to rush in so that you can recover in time to punish any incoming aerial assaults. It is possible for each input to come out even if you delay it.
|
| EX
|
Damage
|
Red Damage
|
Proration
|
Cancel
|
Guard
|
| 230*22, 400 (3431)
|
(2765)
|
100%
|
-
|
LHA
|
| First Active
|
Active
|
Recovery
|
Frame Adv
|
Circuit
|
Invuln
|
| 1+8
|
X
|
207
|
-12
|
-100.0%
|
Full 1-10
|
|
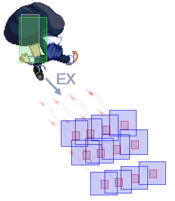
This is the super variation of her Black Keys. Ciel will perform her backdash and throw a volley of knives. This move has full invuln and is completely safe to use on block, but since it doesn't connect properly on airborne opponents, it can be jumped on reaction, airteched, and hard punished. You can use it to prolong a combo after the opponent has activated HEAT, or you can use it to chip away at their lifebar while they are regenerating health. Similarly, it can be used in pressure for a timeout, as it's gapless from 5CC, takes a long time, and does a bit of chip.
|
|
|
|
| A
|
Damage
|
Red Damage
|
Proration
|
Cancel
|
Guard
|
| 1000/1200
|
392/490
|
70% (O)
|
-EX-
|
LH
|
| First Active
|
Active
|
Recovery
|
Frame Adv
|
Circuit
|
Invuln
|
| 4
|
2 (2) 3
|
35
|
-27/-23
|
10.0%
|
High 1-3
|
- Ciel performs a somersault. Button pressed determines the height and number of hits.
Hits once, super cancellable, and cannot be air blocked. Has high invuln on startup, but loses it as soon as it's active, so it will trade often.
|
| B
|
Damage
|
Red Damage
|
Proration
|
Cancel
|
Guard
|
| 1000, 800 (1682)
|
(921)
|
70% (O)
|
-
|
H
(Whiffs vs Crouch.)
|
| First Active
|
Active
|
Recovery
|
Frame Adv
|
Circuit
|
Invuln
|
| 8
|
5
|
41
|
-30
|
8.0%, 6.0% (14.0%)
|
Full 1-8
|
|
Hits twice, full invuln, does more damage, cannot be air blocked, and goes higher. Take note that it will NOT hit crouching opponents so be careful when using this version on wakeup.
|
| EX
|
Damage
|
Red Damage
|
Proration
|
Cancel
|
Guard
|
| 800, 500*2, 500, 600*2 (3112)
|
(2041)
|
100%
|
-
|
LH
|
| First Active
|
Active
|
Recovery
|
Frame Adv
|
Circuit
|
Invuln
|
| 2+0
|
2 (2) 2 (12) 2 (2) 2
|
44
|
-30
|
-100.0%
|
Full 1-7
|
|
Ciel performs the A version followed by the B version for a total of 6 hits. This attack is a better reversal than 236C since it comes out faster and it will hit crouchers unlike 22B. Notably, being active on frame 3 means it will beat C/H moon safejumps, since they have 2 frames of landing recovery after an air normal.
|
|
|
|
| A
|
Damage
|
Red Damage
|
Proration
|
Cancel
|
Guard
|
| 450*6 (2485)
|
(1895)
|
100%
|
-
|
LHA
|
| First Active
|
Active
|
Recovery
|
Frame Adv
|
Circuit
|
Invuln
|
| 37
|
X
|
41
|
-1
|
4.5%*6 (27.0%)
|
-
|
- These can only be performed during her backdash which makes them fairly useful since you have a ranged attack while backdashing.
Ciel throws 2 sets of 3 knives horizontally. Not a bad attack and can be used to zone characters that are very far away. Her 214 knife series is better though.
|
| B
|
Damage
|
Red Damage
|
Proration
|
Cancel
|
Guard
|
| 450*6
|
343*6
|
100% (O)
|
-
|
LHA
|
| First Active
|
Active
|
Recovery
|
Frame Adv
|
Circuit
|
Invuln
|
| 41
|
X
|
53
|
-8
|
4.5%*6
|
-
|
|
Ciel throws 3 knives upwards at a 45 degree angle and then another 3 knives downward at a 45 degree angle. This looks pretty much identical to her 214B > 214C series in Full Moon. The first part is very useful against opponents who are super jumping at you to catch your backdash. The 2nd wave of knives can be used if they block the first and try to dash in at you immediately. It is possible for the knives to hit your opponent after they have bounced off the floor.
|
| C
|
Damage
|
Red Damage
|
Proration
|
Cancel
|
Guard
|
| 450*7
|
343*7
|
100%
|
-
|
LHA
|
| First Active
|
Active
|
Recovery
|
Frame Adv
|
Circuit
|
Invuln
|
| 49
|
X
|
43
|
-18
|
4.5%*7
|
-
|
|
Ciel throws 7 knives in spread formation. This version has the most startup of the 3 but it covers a lot of space. Pretty good move to use once in a while to temporarily keep your opponent from advancing.
|
|
Aerial Special
|
|
| A
|
Damage
|
Red Damage
|
Proration
|
Cancel
|
Guard
|
| -
|
-
|
-
|
-EX-
|
-
|
| First Active
|
Active
|
Recovery
|
Frame Adv
|
Circuit
|
Invuln
|
| 12
|
X
|
10
|
-
|
-
|
High
(Recovery 1-10)
|
- Ciel performs her Halo followups while in the air.
Ciel dives downward at a 30 degree angle. Those move does no damage but it recovers fairly quickly and can be used to return to the ground or set up a throw.
|
| B
|
Damage
|
Red Damage
|
Proration
|
Cancel
|
Guard
|
| 400*3 (1162)
|
(761)
|
100%
|
(N), (SP), (EX), (J)
|
LHA
|
| First Active
|
Active
|
Recovery
|
Frame Adv
|
Circuit
|
Invuln
|
| 10 ~ X
|
6
|
17
|
-5 ~ -1
|
3.0%*3 (9.0%)
|
-
|
|
Ciel dives downward at a 50 degree angle and hits up to three times. This move carries some very interesting properties in that it can chain into her ground normals and specials if it connects. Has more landing recovery than the one above. Same as the above version.
|
| EX
|
Damage
|
Red Damage
|
Proration
|
Cancel
|
Guard
|
| 500*3 (1452)
|
(1045)
|
100% (2), 50% (O)
|
(SP), (EX), (J)
|
LHA
|
| First Active
|
Active
|
Recovery
|
Frame Adv
|
Circuit
|
Invuln
|
| 3+4 ~ 3+X
|
6
|
17
|
-4
|
-100.0%
|
Full 1-6
|
|
Ciel performs a powered up version of her dive that hits several times. When this connects, you can jump cancel the last hit and go into an air combo. This attack is not meant to be used on its own but rather for her fuzzy guard.
|
|
|
|
| A
|
Damage
|
Red Damage
|
Proration
|
Cancel
|
Guard
|
| 700*2 (1117)
|
(645)
|
70% (O)
|
-EX-
|
LHA
|
| First Active
|
Active
|
Recovery
|
Frame Adv
|
Circuit
|
Invuln
|
| 9
|
12
|
9
|
-3 (TK)
|
7.0%*2 (14.0%)
|
-
|
- Air version of her 623 series
|
| B
|
Damage
|
Red Damage
|
Proration
|
Cancel
|
Guard
|
| 700*3 (1633)
|
(913)
|
70% (O)
|
-EX-
|
LHA
|
| First Active
|
Active
|
Recovery
|
Frame Adv
|
Circuit
|
Invuln
|
| 11
|
12
|
9
|
-4 ~ 4 (TK)
|
7.0%*3 (21.0%)
|
-
|
|
Goes a little bit farther, the third hit isn't omitted.
|
| EX
|
Damage
|
Red Damage
|
Proration
|
Cancel
|
Guard
|
| 1000*2, 1200 (2464)
|
(1792)
|
70% (O)
|
-
|
LHA
|
| First Active
|
Active
|
Recovery
|
Frame Adv
|
Circuit
|
Invuln
|
| 1+6
|
12
|
7
|
6 (TK)
|
-100.0%
|
-
|
|
The air version of this super causes wall bounce and is very useful when TK'ed in combos when approaching the corner.
|
|
|
|
| A
|
Damage
|
Red Damage
|
Proration
|
Cancel
|
Guard
|
| 500
|
343
|
70%
|
-EX-
|
LHA
|
| First Active
|
Active
|
Recovery
|
Frame Adv
|
Circuit
|
Invuln
|
| 11
|
X
|
12
|
-7 (TK)
|
5.0%
|
-
|
- Ciel performs her knife throwing series in the air. These travel downward at a 45 degree angle and have fewer variations.
Ciel throws a Black Key that sets the opponent aflame and knocks them down. Useful for zoning and can be used to help you get in on the opponent depending on the followup you choose. Ciel retains her air momentum, so if you perform this move while jumping forward, backward, or straight up, she will continue to travel in that direction on the way down. As a result, there is a minimum height requirement for this attack in order for it to come out. If you do this too close to the ground, the knife won't even come out at all.
|
| B
|
Damage
|
Red Damage
|
Proration
|
Cancel
|
Guard
|
| 500
|
343
|
100%
|
-CH-
|
LHA
|
| First Active
|
Active
|
Recovery
|
Frame Adv
|
Circuit
|
Invuln
|
| 15
|
X
|
15
|
-8 (TK)
|
5.0%
|
-
|
| ~4B
|
Damage
|
Red Damage
|
Proration
|
Cancel
|
Guard
|
| 500
|
343
|
100%
|
-CH-
|
LHA
|
| First Active
|
Active
|
Recovery
|
Frame Adv
|
Circuit
|
Invuln
|
| 4
|
X
|
15
|
-
|
5.0%
|
-
|
| ~4B (2)
|
Damage
|
Red Damage
|
Proration
|
Cancel
|
Guard
|
| 500*4
|
376*4
|
100%
|
-
|
LHA
|
| First Active
|
Active
|
Recovery
|
Frame Adv
|
Circuit
|
Invuln
|
| 13
|
X
|
18
|
-
|
5.0%*4 (20.0%)
|
-
|
|
Ciel throws a Black Key that doesn't knock the opponent down but can be followed up with two additional inputs. The full series is j.214B -> 4B -> 4B. This series doesn't have as many variations as the ground version and it's not nearly as useful since it's pretty easy to avoid in general and there is no way to cancel her descent. If you're really high in the air, you can use it to hit a Nero who's trying to chase you with j.C or a Wara using j.B. Other than that, use with caution.
|
| EX
|
Damage
|
Red Damage
|
Proration
|
Cancel
|
Guard
|
| 300*18 (~4200)
|
(~3400)
|
100%
|
-
|
LHA
|
| First Active
|
Active
|
Recovery
|
Frame Adv
|
Circuit
|
Invuln
|
| 1+16
|
X
|
119
|
-
|
-100.0%
|
-
|
|
Ciel throws a volley of Black Keys downwards at a 45 degree angle. Retains air options afterwards. Technically does more damage than j.22C as a meterburn combo ender, but because j.22C is less height-restrictive, j.214C is less optimal overall. The only time you'll see this move in any serious capacity is as a timerscam.
|
|
|
|
| A
|
Damage
|
Red Damage
|
Proration
|
Cancel
|
Guard
|
| 1000
|
196
|
100% (O)
|
(J)
|
LHA
|
| First Active
|
Active
|
Recovery
|
Frame Adv
|
Circuit
|
Invuln
|
| 6
|
2
|
10
|
-25 (TK)
|
10.0%
|
-
|
- Ciel performs a somersault. Button pressed determines the height and number of hits.
This version only hits once.
|
| B
|
Damage
|
Red Damage
|
Proration
|
Cancel
|
Guard
|
| 600*2 (1111)
|
(362)
|
100%
|
EX, (J)
|
LHA
|
| First Active
|
Active
|
Recovery
|
Frame Adv
|
Circuit
|
Invuln
|
| 6
|
2
|
10
|
-30 (TK)
|
6.0%*2 (12.0%)
|
-
|
|
This version hits twice and is also air blockable. So why is this useful then? Well, you can use this to end your air strings because it's now possible to link an air throw afterward. Also, if you haven't used your double jump yet, you can double jump then perform an air dash or another attack to make this relatively safe.
|
| EX
|
Damage
|
Red Damage
|
Proration
|
Cancel
|
Guard
|
| 500*3, 400*3, 350*3 (3149)
|
(1429)
|
100%
|
-
|
LHA
|
| First Active
|
Active
|
Recovery
|
Frame Adv
|
Circuit
|
Invuln
|
| 1+0
|
39
|
10
|
-54 (TK)
|
-100.0%
|
Full 1-2, 15, 28
(Full dur. Landing 9-10)
|
|
A powered up version of her aerial somersaults. This version hits 9 times and does more damage than the other two. Since this super doesn't cause knockdown or allow you to air throw afterwards, this is best used as an air combo ender when the opponent is low on health.
|
|
Arc Drive
|
|
| Damage
|
Red Damage
|
Proration
|
Cancel
|
Guard
|
| 700*9, 2200 (3706)
|
(4983)
|
50%
|
-
|
LH
|
| First Active
|
Active
|
Recovery
|
Frame Adv
|
Circuit
|
Invuln
|
| 3+3
|
26
|
40
|
-24
|
removes all
|
Full 1-3, 31-32
Super Armor ?~?
|
|
Ciel quickly changes into her executioner uniform, dashes forward with the 7th Scripture and then fires the spike outwards for the finish. This attack sends the opponent flying across the stage. Ciel has hyper armor for a good duration of this move. Not particularly a useful arc drive considering that it doesn't come out very fast and can get stuffed randomly depending on what it's going up against. Not very useful in combos compared to tk.623C routes.
|
|
Another Arc Drive
|
|
| Damage
|
Red Damage
|
Proration
|
Cancel
|
Guard
|
| 0, 600*13, 1700 (4602)
|
(3694)
|
65% (O)
|
-
|
LH
|
| First Active
|
Active
|
Recovery
|
Frame Adv
|
Circuit
|
Invuln
|
| 3+3
|
10
|
85
|
-69
|
removes all
|
Full 1-3, 16-26
|
|
Ciel will impale the opponent on the 7th Scripture and fire blasts upwards toward the sky. This version works more like a throw in that if you can get the first hit to connect, the rest of the hits will always connect. It can even catch an opponent in otg state! Does significantly more damage than the regular version, but tk.623C routes are still a better use of meter for damage.
|
|
Last Arc
|
|
| Damage
|
Red Damage
|
Proration
|
Cancel
|
Guard
|
| -
|
-
|
-
|
-
|
LHA
|
| First Active
|
Active
|
Recovery
|
Frame Adv
|
Circuit
|
Invuln
|
| 1+0
|
X
|
141
|
-
|
removes all
|
-
|
|
After the EX shield connects, the background will black out and Ciel will throw a series of flaming Black Keys that engulf the opponent in flames. Not one of the greatest last arcs in the game but it can do a significant amount of chip damage. If you land this against a cornered opponent, it can deal upwards of 8000+ damage.
|
|
MBAACC Navigation
