Character Page Progress
This page is still a work in progress, consider joining as an editor to help expand it. Please update this character's roadmap page when one of the editing goals have been reached.
| In Progress |
To-do
|
- Move Descriptions:
- Add descriptions to the moves, specify how they function, cite their uses, add captions where helpful, etc.
|
- Additional Ressources/Players to watch/ask
- Add any external links to ressources such as video guides or articles.
- If you know any players in particular that can be helpful for learning this character, please add them with, if possible a way to contact them (such as a Discord handle) and a name that can be searched in the match video database.
- Overview/General Gameplan:
- Add a short summary of this character with a list of strengths and weaknesses
- Do your best to describe how to play this character, change or add subsections based on what you would write as a guide.
- Combos:
- Add tech in the starters, enders, OTG pickup and normal/corner combo sections.
- Add damage, meter gain/given numbers and video links to combos as you add them.
|
Additional Resources
F-NAC Match Video Database
Players to watch/ask
JP:
- Text goes here after asterisk
- Text goes here after asterisk
NA:
- Text goes here after asterisk
- Text goes here after asterisk
Overview
Playstyle
 F-NAC is a joke character who accomplishes nothing. F-NAC is a joke character who accomplishes nothing. |
| Pros |
Cons |
- Tiny: NAC has the smallest hurtbox in the game meaning that many optimized combos won't work on him. This has other ramifications in specific matchups where he can use his size to his advantage (e.g C-Roa).
- lol
|
- Frail: NAC has the second lowest health in the game, only having higher health than VAkiha. He cannot take much of a beating before going down.
- Awful Defense: F-NAC's reversal options are virtually non-existent. His heat activation is woefully small, and his true reversal, 63214C, is slow and easy to punish. To compound this issue, F-NAC has buttons that are some combination of pitifully tiny, painfully slow, and that have massive hurtboxes.
- Extended Hurtboxes: F-NAC's B and C normals all contain extended hurtboxes. This makes it harder to poke with them, and it makes what is an already frail character even more frail.
- Limited Mobility: Because his air dash is designed for stalling, it cannot be used to cover space quickly like a traditional air dash. Furthermore, NAC's grounded dash falls into the category of slow runs at 6F startup.
- What Mixups?: Opening up opponents is incredibly hard as F-NAC, not just because his actual options for mixups are weak, but also because it is very hard to get an opponent to respect his offense. Expect opposing players to play aggressively on defense and to disrespect your options.
- Poor Conversions: F-NAC has very limited combo starters, and he struggles to do meaningful damage due to terrible proration on his normals.
- Terrible Specials: Even for joke character standards, a lot of F-NAC's specials are downright garbage. A lot of them are horrendously slow and can generally be disrespected in neutral.
- Weak, Almost Non-Existent Neutral: Due to F-NAC's hurtboxes and generally poor specials, he cannot really play neutral, only a very poor keepaway/stalling game with j.236A.
|
General Gameplan
Place text here*
Neutral
Place text here*
Pressure
Place text here
Okizeme
Place text here
Defense
place text here*
Combos
| Combo Notation Help
|
Disclaimer: Combos are written by various writers, so the actual notation used in pages can differ from the standard one.
For more information, see Glossary and Controls.
|
| X > Y
|
X input is cancelled into Y.
|
| X > delay Y
|
Must wait for a short period before cancelling X input into Y.
|
| X, Y
|
X input is linked into Y, meaning Y is done after X's recovery period.
|
| X+Y
|
Buttons X and Y must be input simultaneously.
|
| X/Y
|
Either the X or Y input can be used.
|
| X~Y
|
This notation has two meanings.
- Use attack X with Y follow-up input.
- Input X then within a few frames, input Y. Usually used for option selects.
|
| X(w)
|
X input must not hit the opponent (Whiff).
|
| j.X
|
X input is done in the air, implies a jump/jump cancel if the previous move was done from the ground.
Applies to all air chain sections:
- Assume a forward jump cancel if no direction is given.
- Air chains such as j.A > j.B > j.C can be shortened to j.ABC.
|
| sj.X
|
X input is done after a super jump. Notated as sj8.X and sj9.X for neutral and forward super jumps respectively.
|
| dj.X
|
X input is done after a double jump.
|
| sdj.X
|
X input is done after a double super jump.
|
| tk.X
|
Stands for Tiger Knee. X motion must be buffered before jumping, inputting the move as close to the ground as possible. (ex. tk.236A)
|
| (X)
|
X is optional. Typically the combo will be easier if omitted.
|
| [X]
|
Input X is held down. Also referred to as Blowback Edge (BE). Depending on the character, this can indicate that this button is held down and not released until indicated by the release notation.
|
| ]X[
|
Input X is released. Will only appear if a button is previously held down. This type of input is referred to as Negative Edge.
|
| {X}
|
Button X should only be held down briefly to get a partially charged version instead of the fully charged one.
|
| X(N)
|
Attack "X" should only hit N times.
|
| (XYZ)xN
|
XYZ string must be performed N times. Combos using this notation are usually referred to as loops.
|
| (XYZ^)
|
A pre-existing combo labelled XYZ is inserted here for shortening purposes.
|
| CH
|
The first attack must be a Counter Hit.
|
| Air CH
|
The first attack must be a Counter Hit on an airborne opponent.
|
| 66
|
Performs a ground forward dash.
|
| j.66
|
Performs an aerial forward dash, used as a cancel for certain characters' air strings.
|
| IAD/IABD
|
Performs an Instant AirDash.
|
| AT
|
Performs an Air Throw. (j.6/4A+D)
|
| IH
|
Performs an Initiative Heat.
|
| AD
|
Performs an Arc Drive.
|
| AAD
|
Performs an Another Arc Drive.
|
Starter
| Condition
|
Notation
|
Damage
vs V.Sion
|
Notes
|
|
| Normal starter, grounded opponent
|
|
text
|
| |
| Meter Gained: text |
Meter Given (vs C-Moon): text |
| text |
|
|
Enders
| Condition
|
Notation
|
Damage
vs V.Sion
|
Notes
|
|
| Normal starter, grounded opponent
|
|
text
|
| |
| Meter Gained: text |
Meter Given (vs C-Moon): text |
| text |
|
|
OTG Pick ups
| Condition
|
Notation
|
Damage
vs V.Sion
|
Notes
|
|
| Normal starter, grounded opponent
|
|
text
|
| |
| Meter Gained: text |
Meter Given (vs C-Moon): text |
| text |
|
|
Normal Combos
| Condition
|
Notation
|
Damage
vs V.Sion
|
Notes
|
|
| Normal starter, grounded opponent
|
|
text
|
| |
| Meter Gained: text |
Meter Given (vs C-Moon): text |
| text |
|
|
Corner Combos
| Condition
|
Notation
|
Damage
vs V.Sion
|
Notes
|
|
| Normal starter, grounded opponent
|
|
text
|
| |
| Meter Gained: text |
Meter Given (vs C-Moon): text |
| text |
|
|
Move Descriptions
| Frame Data Help
|
| Header
|
Tooltip
|
| Move Box Colors
|
Light gray = Collision Box (A move lacking one means it can go through the opponent's own collision box).
Green: Hurt Boxes.
Red: Hit(/Grab) Boxes.
Yellow: Clash Boxes (When an active hitbox strikes a clash box, the active hitbox stops being active. Multi-hit attacks can beat clash since they will still progress to the next hitbox.)
Magenta: Projectile-reflecting boxes OR Non-hit attack trigger boxes (usually).
Blue: Reflectable Projectile Boxes.
|
| Damage
|
Base damage done by this attack.
(X) denotes combined and scaled damage tested against standing V. Sion.
|
| Red Damage
|
Damage done to the recoverable red health bar by this attack. The values are inherently scaled and tested against standing V. Sion.
(X) denotes combined damage.
|
| Proration
|
The correction value set by this attack and the way it modifies the scaling during a string. See this page for more details.
X% (O) means X% Overrides the previous correction value in a combo if X is of a lower percentage.
X% (M) means the current correction value in a combo will be Multiplied by X%. This can also be referred to as relative proration.
|
| Circuit
|
Meter gained by this attack on hit.
(X%) denotes combined meter gain.
-X% denotes a meter cost.
|
| Cancel
|
Actions this move can be cancelled into.
SE = Self cancelable.
N = Normal cancelable.
SP = Special cancelable.
CH = Cancelable into the next part of the same attack (Chain in case of specials).
EX = EX cancelable.
J = Jump cancelable.
(X) = Cancelable only on hit.
-X- = Cancelable on whiff.
|
| Guard
|
The way this move must be blocked.
L = Can block crouching
H = Can block standing.
A = Can block in the air.
U = Unblockable.
|
| Startup
|
Amount of frames that must pass prior to reaching the active frames. Also referred to as "True Startup".
|
| Active
|
The amount of frames that this move will have a hitbox.
(x) denotes frame gaps where there are no hitboxes is present. Due to varied blockstuns, (x) frames are difficult to use to determine punish windows. Generally the larger the numbers, the more time you have to punish.
X denotes active frames with a duration separate from its origin move's frame data, such as projectile attacks. In this case, the total length of the move is startup+recovery only.
|
| Recovery
|
Frames that this move has after the active frames if not canceled. The character goes into one frame where they can block but not act afterwards, which is not counted here.
|
| Advantage
|
The difference in frames where you can act before your opponent when this move is blocked (assuming the move isn't canceled and the first active frame is blocked).
If the opponent uses a move with startup that is at least 2 frames less than this move's negative advantage, it will result in the opponent hitting that move.
±x~±y denotes a range of possible advantages.
|
| Invul
|
Lists any defensive properties this move has.
X y~z denotes X property happening between the y to z frames of the animations. If no frames are noted, it means the invincibility lasts through the entire move.
Invicibility:
- Strike = Strike invincible.
- Throw = Throw invincible.
Hurtbox-Based Properties:
- Full = No hurtboxes are present.
- High = Upper body lacks a hurtbox.
- Low = Lower body lacks a hurtbox.
Miscellaneous Properties
- Clash = Frames in which clash boxes are active.
- Reflect = Frames in which projectile-reflecting boxes are active.
- Super Armor = Frames in which the character can take hits without going into hit stun.
|
Normal Moves
Standing Normals
|
|
| Damage
|
Red Damage
|
Proration
|
Cancel
|
Guard
|
| 350
|
202
|
75% (O)
|
-SE-, -N-, -SP-, -EX-, (J), -Backdash-
|
LH
|
| First Active
|
Active
|
Recovery
|
Frame Adv
|
Circuit
|
Invuln
|
| 5
|
4
|
8
|
0
|
3.15%
|
-
|
|
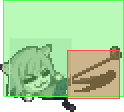
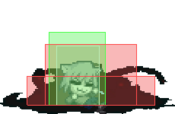
Cigarette poke, horrible range. Notably crucial to combos involving 214X. Shorter and less active than 2A but has a lot less pushback: 5AA is a true blockstring while 2AA isn't. This makes 5A your go-to button for stagger pressure and tick throws. Despite being backdash cancellable on hit, whiff or block like 2A (making it possible for NAC to be fully invincible as soon as the active frames end), 5A is mostly useless outside of the two aforementioned niches due to its abysmal range. Unusable as an anti-air because of how short NAC is.
|
|
|
|
| Damage
|
Red Damage
|
Proration
|
Cancel
|
Guard
|
| 200, 500*2 (784)
|
(336)
|
70% (O)
|
N, SP, EX, J
|
LH
|
| First Active
|
Active
|
Recovery
|
Frame Adv
|
Circuit
|
Invuln
|
| 11
|
2 (4) 2 (6) 2
|
23
|
-10
|
1.8%, 4.5%*2 (10.8%)
|
-
|
|
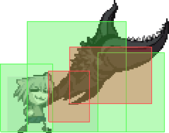
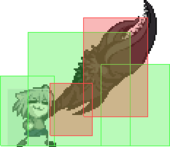
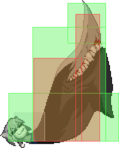
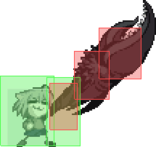
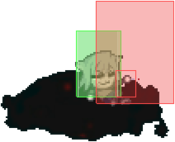
NAC turns his arm into a claw and pinches at an angle of 35° upwards, hits three times and launches on hit. Mostly used as a pressure tool, its first hit being jump cancellable on block opens up interesting possibilities. Unlike C/H-Nac's 5[B], F-Nac is unable to repeatedly pinch by mashing B after the initial attack. However, this is not a huge loss given the limited utility of 5[B]~B(N).
Despite apparences, 5B does not work very well as a grounded anti-air: it's too slow, it will often trade or downright lose to a jump-in due to its extended hurtbox, it doesn't reach high enough and whiffing it leaves you open for ages.
|
|
3 first hits 3 first hits Final hit Final hit Recovery hurtbox Recovery hurtbox
|
| Damage
|
Red Damage
|
Proration
|
Cancel
|
Guard
|
| 200*3, 700 (778)
|
(470)
|
65% (O)
|
N, SP, EX, (J)
|
LH
|
| First Active
|
Active
|
Recovery
|
Frame Adv
|
Circuit
|
Invuln
|
| 14
|
11
|
26
|
-14
|
1.8%*3, 6.3% (11.7%)
|
-
|
|
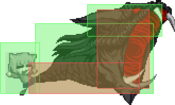
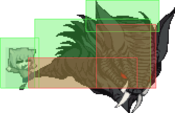
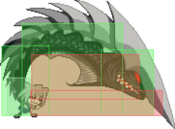
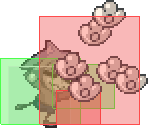
NAC changes his leg into a monstrous mouth, hits 4 times and launches on hit. This move's ability to frametrap after 2B and into 3C makes it a cornerstone of F-NAC's blockstrings. Also used in post-airthrow corner okizeme as it catches jump outs and beats low shield. Important to 214C combos when too far for the standard 5A 2C followup. Rarely used in combos otherwise due to its high proration and low damages.
Outside of blockstrings, 5C is an extremely commital button: if whiffed you'll be unable to act for almost a full second with an extended hurtbox out. On a hard read, 5C can be used in neutral to catch people jumping or airdashing at F-NAC, but be mindful of how risky this is.
|
|
Crouching normals
|
|
| Damage
|
Red Damage
|
Proration
|
Cancel
|
Guard
|
| 200*3 (495)
|
(249)
|
78% (O)
|
-SE-, -N-, -SP-, -EX-, (J), -Backdash-
|
L
|
| First Active
|
Active
|
Recovery
|
Frame Adv
|
Circuit
|
Invuln
|
| 5
|
6 (4) 3
|
9
|
0
|
1.8%*3 (5.4%)
|
-
|
|
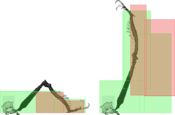
Three adorable small kicks, hits low three times. Tied with 5A for F-NAC's fastest attack but has a slightly longer range. Your main combo starter, really easy to hitconfirm. Key button for your 50/50 and fuzzies out of j.B. Would be an all-around amazing normal if not for NAC's size, still really good by NAC's standards.
While rather slow for a 2A, NAC's 2A is the most active 2A in the game with a total of 9 active frames. This means pressing 2A is at least a 17f commitment, which is significantly more than most of the cast. Thankfully, 2A can be backdash cancelled even on whiff, giving you full invincibility as soon as the active frames end.
|
|
1st hit 1st hit 2nd and 3rd hit 2nd and 3rd hit Recovery hurtbox Recovery hurtbox
|
| Damage
|
Red Damage
|
Proration
|
Cancel
|
Guard
|
| 300, 400, 450 (782)
|
(329)
|
68% (O), 90% (O)
|
N, SP, EX, (J)
|
LA
|
| First Active
|
Active
|
Recovery
|
Frame Adv
|
Circuit
|
Invuln
|
| 10
|
6
|
15
|
-2
|
3.6%*3 (10.8%)
|
-
|
|
Centipede, hits low three times. The first hit knocks the opponent down, the other two hits launch. An overall really important button for F-NAC, it recovers quite fast and has decent horizontal range making it one of your most usable button in neutral. Used in blockstrings and in most combos. 2B's first hit is the only reliable way for F-NAC to get okizeme access outside of Ground/Air Throw. While a 2B(1) ender gives you the best possibilities for oki (22A crow, safejump, etc..) it comes with a tradeoff in damage as it means completely forgoing your air combo.
|
|
|
|
| 2C
|
Damage
|
Red Damage
|
Proration
|
Cancel
|
Guard
|
| 1000
|
606
|
80% (O)
|
N, SP, EX, (J)
|
LH
|
| First Active
|
Active
|
Recovery
|
Frame Adv
|
Circuit
|
Invuln
|
| 8
|
4
|
19
|
-5
|
9%
|
-
|
|
NAC turns his lower body into a horn and strikes with it, hits mid. Your most damaging normal and also your fastest button outside of 5A/2A, reaches decently far and high. However, significantly extends your hurtbox before becoming active and has a rather long recovery. Used in almost every combo, F-NAC's main source of damage with j.C and 214X.
Usable as a grounded anti-air, though flawed in its lack of disjoint, its pre-emptive hurtbox and its recovery. Good at catching airdashes.
|
| 2[C]
|
Damage
|
Red Damage
|
Proration
|
Cancel
|
Guard
|
| 1250
|
909
|
80% (O)
|
N, SP, EX, (J)
|
LH
|
| First Active
|
Active
|
Recovery
|
Frame Adv
|
Circuit
|
Invuln
|
| 32
|
5
|
22
|
-9
|
10.8%
|
-
|
|
Charged version of 2C, still hits mid but now launches. Awfully slow with almost no benefits over regular 2C, minimally increases 2C's horizontal reach with a small disjoint and slightly more damages. Even improper as a CH pickup because of how high it launches your opponent, making the following air combo awkward. You probably should avoid using this button altogether.
|
|
Jumping Normals
|
|
| Damage
|
Red Damage
|
Proration
|
Cancel
|
Guard
|
| 250
|
151
|
75% (O)
|
SE, N, SP, EX, J
|
LHA
|
| First Active
|
Active
|
Recovery
|
Frame Adv
|
Circuit
|
Invuln
|
| 5
|
4
|
12
|
-
|
2.7%
|
-
|
|
An adorable aerial little poke that doesn't hit high. Has an impressive disjoint for a fast j.A that cancels into itself. Shines when used as a rising button to anti-air. Harder to utilize as an air-to-air because of its poor range due to NAC's size, although it can totally do the job if the situation is right. Like j.C workable for air tick throws in the right situation.
Doesn't look like much but a rather impressive button.
|
|
|
|
| Damage
|
Red Damage
|
Proration
|
Cancel
|
Guard
|
| 600, 500 (987)
|
(638)
|
80% (O), 90% (M)
|
N, SP, EX, J
|
H
|
| First Active
|
Active
|
Recovery
|
Frame Adv
|
Circuit
|
Invuln
|
| 9
|
7
|
-
|
-
|
5.9%, 6.3% (12.2%)
|
-
|
|
Tentacle, hits high twice.
|
|
Recovery green Recovery green
|
| Damage
|
Red Damage
|
Proration
|
Cancel
|
Guard
|
| 250*3, 700 (1360)
|
(1135)
|
100%, 90% (O)
|
SP, EX, J
|
LH
|
| First Active
|
Active
|
Recovery
|
Frame Adv
|
Circuit
|
Invuln
|
| 9
|
8
|
-
|
-
|
2.7%*3, 4.5% (12.6)
|
-
|
|
Nightmare, hits mid four times.
|
|
Command Normals
Green boxes Green boxes (Pre-1st hit/Pre-2nd hit/Post-hit) (Pre-1st hit/Pre-2nd hit/Post-hit)
|
| Damage
|
Red Damage
|
Proration
|
Cancel
|
Guard
|
| 700, 500 (955)
|
(558)
|
60% (O)
|
(J)
|
LHA
|
| First Active
|
Active
|
Recovery
|
Frame Adv
|
Circuit
|
Invuln
|
| 13
|
6 (2) 4
|
17
|
-11, -3
|
6.3%, 4.5% (10.8%)
|
-
|
|
NAC turns his leg into a giant mantis claw, hits mid twice. Unlike Nero's 4C, both hits are air blockable. However, neither hits of NAC's 3C whiff on crouchers.
Key button for F-NAC both in pressure and in neutral. Important as a frametrap after 5C to catch jump-outs. Your best moves to end pressure with as it allows you to safely return to neutral. Does not function well as an anti-air (slow, air blockable and the first hit doesn't contest well airborne opponents), 3C works best as a tool to control space.
Outside of counterhits or situations where only 3C(2) connects, not very rewarding on hit: only leads to j.8 dj.8 j.C, still gives you an opportunity to charge some meter.
However, like many FNAC moves it has some pretty glaring flaws: it significantly extends your hurtboxes before being active and it has a noticeable blind spot in front of FNAC.
Must be low-shielded, which can catch people off-guard.
|
|
Before the active frames Before the active frames
|
| Damage
|
Red Damage
|
Proration
|
Cancel
|
Guard
|
| 1000
|
606
|
75% (O)
|
(SP), (EX), (J)
|
H
|
| First Active
|
Active
|
Recovery
|
Frame Adv
|
Circuit
|
Invuln
|
| 33
|
5
|
16
|
-6
|
7.2%
|
-
|
|
Needlefish, slow standing overhead. Its good reach makes it rather safe on block. Really easy to shield if the opponent is looking for it. Extends your hurtbox before the active frames making it possible for an opponent to mash a fast normal during its startup to get a CH. Overall mediocre move but still one of F-NAC's best option to try to open up an opponent.
|
|
Universal Mechanics
|
|
| Damage
|
Red Damage
|
Proration
|
Cancel
|
Guard
|
| 1200
|
707
|
100%
|
-
|
U
|
| First Active
|
Active
|
Recovery
|
Frame Adv
|
Circuit
|
Invuln
|
| 3
|
1
|
20
|
-
|
0.0%
|
-
|
|
Standard ground throw. Gives a hard knockdown, your most common source of oki.
|
|
|
|
| Damage
|
Red Damage
|
Proration
|
Cancel
|
Guard
|
| 1600 (Gold)/1300
|
533
|
30%
|
-
|
U
|
| First Active
|
Active
|
Recovery
|
Frame Adv
|
Circuit
|
Invuln
|
| 2
|
1
|
12
|
-
|
9%
|
-
|
|
Standard air throw. Ground bounces if done raw. As a combo ender, it causes an untechable knockdown. Most common combo ender, leaves you rather close to the opponent and plus enough to meaty with 2B or 5C.
|
|
|
| Ground
|
Damage
|
Red Damage
|
Proration
|
Cancel
|
Guard
|
| 500 (345)
|
209
|
50%
|
(SP), (EX), (J)
|
LHA
|
| First Active
|
Active
|
Recovery
|
Frame Adv
|
Circuit
|
Invuln
|
| 9
|
4
|
18
|
-4
|
4.5%
|
-
|
|
Same animation as 5B. Terrible against jump-ins, will often just straight-up whiff. You'll often prefer to use 623A.
|
| Air
|
Damage
|
Red Damage
|
Proration
|
Cancel
|
Guard
|
| 500 (345)
|
209
|
50%
|
-
|
HA
|
| First Active
|
Active
|
Recovery
|
Frame Adv
|
Circuit
|
Invuln
|
| 9
|
4
|
-
|
-
|
4.5%
|
-
|
|
Same animation as j.B.
|
|
|
|
| Bunker
|
Damage
|
Red Damage
|
Proration
|
Cancel
|
Guard
|
| 500
|
202
|
50%
|
-
|
LHA
|
| First Active
|
Active
|
Recovery
|
Frame Adv
|
Circuit
|
Invuln
|
| 26
|
4
|
19
|
-5
|
0.0%
(-50.0% in blockstun)
|
Clash 1-10
|
| (Clash)
|
Damage
|
Red Damage
|
Proration
|
Cancel
|
Guard
|
| 500
|
202
|
50%
|
See description
|
LHA
|
| First Active
|
Active
|
Recovery
|
Frame Adv
|
Circuit
|
Invuln
|
| 8
|
4
|
19
|
-5
|
0.0%/-50.0%
|
Strike 1-7
|
|
Standard NECO bunker, significantly smaller hitbox than what the animation suggests.
NAC bunker has an unique oddity: when done outside blockstun, it's first frame can be cancelled into any multi-button input (grab, dash or meter charge). Due to how the game handles inputs, this is only usable if 214D clashes on its first frame as the cancel window is extended during clashstop. This allows NAC to cancel bunker into a strike invincibile dash and get a combo. Do note that getting a raw bunker to clash on its first frame can only reliably done on meaty attacks when waking up.
|
|
|
|
| Damage
|
Red Damage
|
Proration
|
Cancel
|
Guard
|
| 100
|
0
|
100%
|
-
|
U
|
| First Active
|
Active
|
Recovery
|
Frame Adv
|
Circuit
|
Invuln
|
| 9
|
6
|
26
|
-
|
Uses all
|
Full 1-14
|
|
Fastest Heat Activation startup in the game, ridiculously small hitbox however.
|
|
|
| Ground
|
Damage
|
Red Damage
|
Proration
|
Cancel
|
Guard
|
| 100
|
0
|
100%
|
-
|
U
|
| First Active
|
Active
|
Recovery
|
Frame Adv
|
Circuit
|
Invuln
|
| 11
|
10
|
20
|
-
|
Removes all
|
Full 1-39
|
| Air
|
Damage
|
Red Damage
|
Proration
|
Cancel
|
Guard
|
| 100
|
0
|
100%
|
-
|
U
|
| First Active
|
Active
|
Recovery
|
Frame Adv
|
Circuit
|
Invuln
|
| 12
|
10
|
15
|
-
|
Removes all
|
Strike 1-30
|
|
Universal burst mechanic. Unlike Crescent/Full Heat activation, the hitbox and frame data doesn't vary between characters. However, you can be thrown out of this move if you input it in the air.
|
|
Special Moves
Grounded Specials
A/B A/B EX EX
|
|
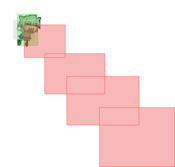
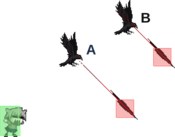
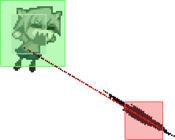
Air-to-Ground Beam series. NAC jumps forward and fires a laser toward the ground. After recovery, NAC is left airborne with all his air-options available. Unlike F-Neco, framedata varies between A/B.
|
| A
|
Damage
|
Red Damage
|
Proration
|
Cancel
|
Guard
|
| 250*4 (865)
|
(417)
|
100%
|
-EX-
|
LHA
|
| First Active
|
Active
|
Recovery
|
Frame Adv
|
Circuit
|
Invuln
|
| 28
|
14
|
23
|
-8
|
1.8%*4 (7.2%)
|
-
|
|
Fastest version. Doesn't really cover enough space to be a strong zoning option. Most commonly used in blockstrings after 5C as a pressure ender that builds some meter and leaves you far away. However 5C 236A is neither a true blockstring or safe, most of the cast can j.7 j.66 j.A on reaction to NAC leaving the ground and score a counterhit. With meter this creates a RPS situation as NAC can whiff cancel 236A/B into the fully invincible j.214C.
|
| B
|
Damage
|
Red Damage
|
Proration
|
Cancel
|
Guard
|
| 250*7 (1418)
|
(684)
|
100%
|
-EX-
|
LHA
|
| First Active
|
Active
|
Recovery
|
Frame Adv
|
Circuit
|
Invuln
|
| 41
|
14
|
23
|
-11
|
1.8%*7 (12.6%)
|
-
|
|
NAC jumps higher, hits further and covers more space but leaves a bigger blind spot up-close. More importantly, 13 frames slower than the A version makes B Beam a big commitment in neutral and a huge risk in pressure. Especially if you lack the meter to IH or EX cancel into j.214C. Can be safely used after a midscreen AT combo-ender to keep your opponent on their toes, however 3C is a much less high-commitment option for that purpose.
Notably has a lot less pushback on block than A Beam. If you get your opponent to overly respect 236A, feel free to go for 236B instead to extend pressure. Do note that while F-NAC prefers being above the opponent, being -11 in such a position is far from ideal and a knowledgeable opponent will take advantage of that.
|
| EX
|
Damage
|
Red Damage
|
Proration
|
Cancel
|
Guard
|
| 250*15 (2594)
|
(1562)
|
100%
|
-
|
LHA
|
| First Active
|
Active
|
Recovery
|
Frame Adv
|
Circuit
|
Invuln
|
| 3+54
|
29
|
16
|
0
|
-100.0%
|
-
|
|
NAC shoots a beam all across the ground starting from behind him. Horribly long startup made even worse by the fact that NAC starts by shooting where the opponent most likely is not. Technically even on block if they block the very last hitbox of the super, which is rather easy to setup after a 2B knockdown, but you have much better uses for your meter and your knockdowns. You most likely shouldn't bother with that super.
|
|
A/B A/B EX EX EX Circuit Break hitbox EX Circuit Break hitbox
|
|
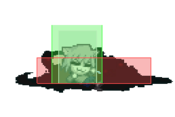
NAC unleashes a flurry of lightning fast blows with his cigarette. Has the unique property of having an incredibly high hitstun multiplier on counterhit, enough to follow it up with a full combo even on grounded opponents.
Outside of specific cases such as hitting an extended hurtbox or trading with another attack, 623X's extended CH hitstun often gets overwritten by its next hit.
|
| A
|
Damage
|
Red Damage
|
Proration
|
Cancel
|
Guard
|
| 80*30 (1305)
|
(588)
|
100%
|
-
|
LHA
|
| First Active
|
Active
|
Recovery
|
Frame Adv
|
Circuit
|
Invuln
|
| 7
|
12
|
5
|
5
|
0.18%*30 (5.4%)
|
-
|
|
Overall most useful version. Fast and really active. Strong defensive move that shines in scramble situations, you'll want to use that move often. Surprisingly strong anti-air, but still loses to some of the more disjointed jump-ins. +5 on block when done point blank, however the pushback doesn't allow F-NAC to reliably frametrap into anything. 623A 2B/2C still makes up for a workable knowledge check.
Can be used in blockstrings as a makeshift pseudo-rebeat, only really useful after 5C and still leaves you -10 (instead of -14).
|
| B
|
Damage
|
Red Damage
|
Proration
|
Cancel
|
Guard
|
| 80*48 (1344)
|
(588)
|
100%
|
-
|
LHA
|
| First Active
|
Active
|
Recovery
|
Frame Adv
|
Circuit
|
Invuln
|
| 13
|
12
|
3
|
7
|
(5.4%)
|
-
|
|
Slower than the A version but has more hits and recovers even faster. No real reason to use it in neutral, due to 623A outclassing it. However, 623B is +7 on block if the last hit is blocked, this makes it an interesting option on okizeme to meaty with.
|
| EX
|
Damage
|
Red Damage
|
Proration
|
Cancel
|
Guard
|
| 0*89 (0)
|
0
|
100%
|
-
|
LHA
|
| First Active
|
Active
|
Recovery
|
Frame Adv
|
Circuit
|
Invuln
|
| 1+9
|
29
|
12
|
-20
|
-100.0%
|
-
|
|
Joke move and an overall waste of meter. Slower than 623A, almost three times the recovery, deals no damage and might build the opponent a ton of meter. Can circuit break the opponent when hit point blank. When not hit point blank, might push the opponent enough for them to fall out of the move and punish you.
If not for the slower startup, 623C's more disjointed and larger hitbox would make for a great anti-air with good reward on CH. Significantly harder to confirm 623C's single hit CH on grounded opponents due to the move's much longer overall duration.
|
|
A/B's spew hitboxes (hits low) A/B's spew hitboxes (hits low) A/B A/B EX EX EX wallslam hit EX wallslam hit
|
|
Taxi sludge series, very active and moves NAC forwards a lot but leaves you open for ages if you whiff. For the A and B versions, the spew itself has multiples hitboxes that all hits low before NAC starts riding the sludge. Character defining special.
|
| A
|
Damage
|
Red Damage
|
Proration
|
Cancel
|
Guard
|
| 500*2, 250*6 (1844)
|
(1305)
|
85% (O), 70% (O)
|
-
|
L, LHA
|
| First Active
|
Active
|
Recovery
|
Frame Adv
|
Circuit
|
Invuln
|
| 11
|
14 (21) 8 (3) 8 (3) 8 (3) 8 (3) 8 (3) 8
|
11
|
-2
|
2.25%*2, 1.8%*6 (15.3%)
|
-
|
|
A sludge, great combo tool. Fast enough to combo from point-blank 2A midscreen or from 2A 2C in the corner. Opens up F-NAC's highest damage meterless combos and fullscreen corner carry. Being able to consistently hitconfirm 2A 214A midscreen is very important.
Can OTG but doesn't relaunch so you're better of taking the knockdown.
|
| B
|
Damage
|
Red Damage
|
Proration
|
Cancel
|
Guard
|
| 500*2, 250*6 (1844)
|
(1305)
|
85% (O), 70% (O)
|
-
|
L, LHA
|
| First Active
|
Active
|
Recovery
|
Frame Adv
|
Circuit
|
Invuln
|
| 23
|
14 (21) 8 (3) 8 (3) 8 (3) 8 (3) 8 (3) 8
|
6
|
3
|
2.25%*2, 1.8%*6 (15.3%)
|
-
|
|
The infamous B Sludge, too slow to be used in combos but +3 on block. Gimmicky pressure tool that can be looped in blockstrings. Very vulnerable to bunker or a well-timed shield.
Overall mostly a knowledge check but still usable on an opponent that did their homework if they lack the meter to bunker to force them into a shield RPS. Very funny against H-Moon characters to drain their meter.
|
| EX
|
Damage
|
Red Damage
|
Proration
|
Cancel
|
Guard
|
| 500*6, 200 (2198)
|
(1739)
|
70% (O)
|
-
|
LHA
|
| First Active
|
Active
|
Recovery
|
Frame Adv
|
Circuit
|
Invuln
|
| 2+7
|
8 (3) 8 (3) 8 (3) 8 (3) 8 (3) 8 (5) 2
|
15
|
-4
|
-100.0%
|
-
|
|
Like 214A a combo tool, central to F-NAC's highest damage combos. Combos midscreen from 2A 2C, much easier to hitconfirm than A sludge. Advances you a lot during superflash, this combined with its rather fast startup makes it a decent punish tool. If you're not using your meter to IH or stall for time with 22C, you're most likely sinking it in 214C.
|
| (Auto-Chain)
|
Damage
|
Red Damage
|
Proration
|
Cancel
|
Guard
|
| 10
|
0
|
60% (O)
|
-
|
-
|
| First Active
|
Active
|
Recovery
|
Frame Adv
|
Circuit
|
Invuln
|
| 116
|
10
|
20
|
-
|
0.0%
|
-
|
|
EX Sludge's finishing move, wallslams on hit. Will often whiff if 214C is used to juggle an airborne opponent or as an OTG pickup, often dropping the combo.
|
|
A/B A/B EX EX EX A/B EX A/B
|
| A/B
|
Damage
|
Red Damage
|
Proration
|
Cancel
|
Guard
|
| 210
|
101
|
90% (O)
|
-
|
LHA
|
| First Active
|
Active
|
Recovery
|
Frame Adv
|
Circuit
|
Invuln
|
| 148
|
7, 10
|
56
|
-
|
0.0%
|
-
|
|
Text
|
| EX
|
Damage
|
Red Damage
|
Proration
|
Cancel
|
Guard
|
| -
|
-
|
-
|
-
|
-
|
| First Active
|
Active
|
Recovery
|
Frame Adv
|
Circuit
|
Invuln
|
| 7+29
|
-
|
-
|
-
|
-100.0%
|
Full 1-7, 20-35
AT 13-19, 36-400
|
|
Text
|
| (A/B Lasers)
|
Damage
|
Red Damage
|
Proration
|
Cancel
|
Guard
|
| 250*4 (865)
|
(417)
|
100%
|
-
|
LHA
|
| First Active
|
Active
|
Recovery
|
Frame Adv
|
Circuit
|
Invuln
|
| 11
|
2 (2) 2 (2) 2
|
14
|
1
|
1.8%*4 (7.2%)
|
-
|
|
Text
|
|
Aerial Specials
A/B A/B EX EX
|
| A
|
Damage
|
Red Damage
|
Proration
|
Cancel
|
Guard
|
| 210
|
101
|
90% (O)
|
-
|
LHA
|
| First Active
|
Active
|
Recovery
|
Frame Adv
|
Circuit
|
Invuln
|
| 11
|
X
|
18
|
1
|
1.8%
|
-
|
|
Text
|
| B
|
Damage
|
Red Damage
|
Proration
|
Cancel
|
Guard
|
| 210
|
101
|
90% (O)
|
-
|
LHA
|
| First Active
|
Active
|
Recovery
|
Frame Adv
|
Circuit
|
Invuln
|
| 21
|
X
|
21
|
-21
|
1.8%
|
-
|
|
Text
|
| EX
|
Damage
|
Red Damage
|
Proration
|
Cancel
|
Guard
|
| 300*17 (2373)
|
(1593)
|
95% (M)
|
-
|
LHA
|
| First Active
|
Active
|
Recovery
|
Frame Adv
|
Circuit
|
Invuln
|
| 3+8
|
X
|
18
|
-35
|
-100.0%
|
Full 1-5
|
|
Text
|
|
A/B A/B EX EX
|
| A
|
Damage
|
Red Damage
|
Proration
|
Cancel
|
Guard
|
| 200*8 (1422)
|
(716)
|
100%
|
EX
|
LHA
|
| First Active
|
Active
|
Recovery
|
Frame Adv
|
Circuit
|
Invuln
|
| 7
|
40
|
8
|
-1 ~ 4
|
1.8%*8 (14.4%)
|
-
|
|
Text
|
| B
|
Damage
|
Red Damage
|
Proration
|
Cancel
|
Guard
|
| 250*10 (1910)
|
(920)
|
100%
|
EX
|
LHA
|
| First Active
|
Active
|
Recovery
|
Frame Adv
|
Circuit
|
Invuln
|
| 10
|
50
|
8
|
-1 ~ 4
|
2.25%*10 (22.5%)
|
-
|
|
Text
|
| EX
|
Damage
|
Red Damage
|
Proration
|
Cancel
|
Guard
|
| 120, 300*16 (3178)
|
(2471)
|
100%
|
-
|
LHA
|
| First Active
|
Active
|
Recovery
|
Frame Adv
|
Circuit
|
Invuln
|
| 6+7
|
3 (3) 80
|
8
|
-9 ~ -4
|
-100.0%
|
Full 7-80
|
|
Text
|
|
Arc Drives
Sole true reversal Sole true reversal Final hit Final hit
|
| Damage
|
Red Damage
|
Proration
|
Cancel
|
Guard
|
| 200*17 (2302)
|
(1387)
|
90% (O)
|
-
|
LHA
|
| First Active
|
Active
|
Recovery
|
Frame Adv
|
Circuit
|
Invuln
|
| 5+10
|
66
|
99
|
-60
|
Removes all
|
Full 1-129
|
|
Text
|
|
|
|
| Damage
|
Red Damage
|
Proration
|
Cancel
|
Guard
|
| 390*15, 800 (3351)
|
(2448)
|
96% (M)
|
-
|
LHA
|
| First Active
|
Active
|
Recovery
|
Frame Adv
|
Circuit
|
Invuln
|
| 11+14
|
X
|
92
|
9 ~ 51
|
Removes all
|
Full 1-18
|
|
Text
|
|
Another Arc Drive
|
|
| Damage
|
Red Damage
|
Proration
|
Cancel
|
Guard
|
| 666*21 (4612)
|
(3819)
|
96% (M)
|
-
|
LHA
|
| First Active
|
Active
|
Recovery
|
Frame Adv
|
Circuit
|
Invuln
|
| 10+13
|
X
|
93
|
1 ~ 30
|
Removes all
|
Full 1-17
|
|
Text
|
|
Last Arc
|
|
| Damage
|
Red Damage
|
Proration
|
Cancel
|
Guard
|
| 7000 (3500 ~ 7000)
|
2323 ~ 4260
|
50% + 50% * Remaining BH time
|
-
|
U
|
| First Active
|
Active
|
Recovery
|
Frame Adv
|
Circuit
|
Invuln
|
| 0
|
1
|
68
|
-
|
Removes all
|
Full 1
|
|
Giant Kaleidostick falls from the sky. Single hit last arc that hits everywhere on the screen, active on its very first frame but only for that single frame.
Beware, if your opponent manages to use invulnerability through the hit, you are vulnerable during the entire recovery.
|
|
MBAACC Navigation

