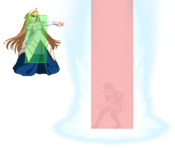
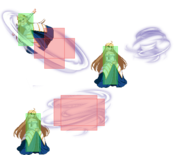
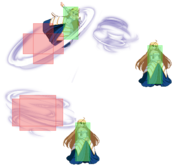
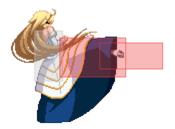
Overview
Playstyle
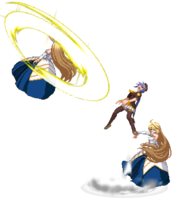
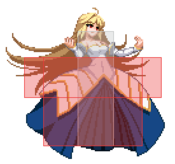
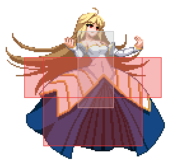
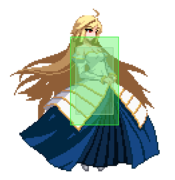
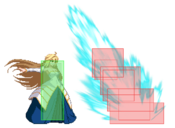
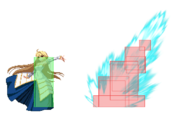
 H-Hime dominates the midrange with her large hitboxes and timed detonation wind mines. H-Hime dominates the midrange with her large hitboxes and timed detonation wind mines. |
| Pros |
Cons |
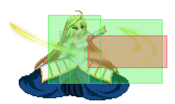
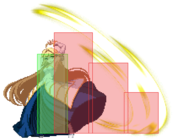
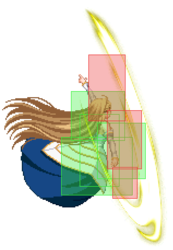
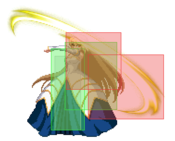
- Large, noncommittal, disjointed hitboxes control space extremely well.
- Very mobile and difficult to pin down. She has the best walk speed in the game and a good run. Her jump is unconventionally floaty, but her unique flight along with her airdash, airdodge, wind, and pillars give her excellent air maneuverability.
- Strong baseline offense with good tick throws, frame traps, several forward moving attacks, flight cancel mindgames, and good ways to outspace and call out defensive options.
- Wind mines make her neutral and offense even more threatening. Mines detonate automatically on a short (~2 second) timer, enabling passive space control, safe oki and pressure resets, unreactable mixups, and damaging combos.
- Very strong metered options. J236C is an amazing whiff punish, combo ender, and far-range conversion tool that leads to soft knockdown for tech traps or a setup. J63214C and Arc Drive, while costly, set up strong oki.
|
- Meter hungry. H-Hime has good uses for meter in almost any situation, but very poor meter generation. She is especially reliant on meter to improve her stray hit confirms and defensive options.
- Very limited and committal defense. Her floaty jump struggles to escape pressure, her normals are large but slow, and Half Moon means no EX Guard, EX Shield, or held Shield. Low health is compounded by poor access to Heat. Relies heavily on her DP and metered guard cancel Bunker to escape pressure.
- Poor meterless oki. Full combos leave her at midrange with limited to no frame advantage. Stray hits may not lead to knockdown at all without meter.
- Large frame, unusual air movement, and short minimum dash distance makes navigating around certain options difficult.
|
General Gameplan
Welcome to H-Hime, the hidden hime that boasts quite the punch whenever she exists on the screen. Her main gameplan is rather simple, H-hime controls the screen as the opponent tries endlessly to wade through her various tools. One tool that you will see a lot of is 214B and for good reason! Its a fairly fast, big and AUB special that also gives a combo on a lot of exchanges including trades that are not sweeps. Another set of tools you may see from this hime is 5A6AA which is kind of like the evolved form of H-Arc's 5A6AA and this time you can rebeat if the last 6A connects which is something unprecedented for all of h moon characters, but she can because she's the princess. She has the ability to protect her space with the air of wind mines(j214X) and 214B and if she really wanted to, she can even use 236A and be -9 while f hime is -17 on both. H hime also has 236B to use which is 2f faster than c hime's geysers, both of them which is also a major plus to her kit. where she falters is entirely being h moon as some of her more robust options comes from having hime kick (624C) and that happens to use up 150%. This is the same meter gauge that is used for bunker which costs 100% and a strong ex move called ex geyser(j.236C) also costs 100%. Typically For meter purposes. you want to remain at around 150+ so that you are readily able to bust out. Thankfully you gain meter for making the opponent block just about anything you throw at them and also you have meter gaining combo routes that while they don't give you strong oki/meaty options. you are an hime and frankly can afford to play neutral again.
In the corner is a place that H hime is really good at with TK windmine being incredibly + and allowing a low/throw/high mixup that is fairly strong. She can also just use the wind mine to extend her pressure and find a time to sneak in another windmine and make blocking a frustrating process for the opponent. She also gets some nice fancy tricks while in the corner but that will be covered further down the road from this little introduction.
So with all the power that you possess, its important to know how to control it, manage it and use it efficiently so that you get the best out of this character. There is also another bit of weaknesses that come with using a unique character such as hime and especially H hime which will be covered in the defense portion of this page. As long as you can get used to how flight works for hime and get used to managing your meter more intensely as a H moon you will find H hime to be particularly strong at what she does.
Neutral
In order to understand her neutral we will first go over core things this Hime of all moon types will essentially use to their advantage.
Walk
Now as any Hime player its actually to your benefit that you get used to walking, seriously as it moves a lot faster than what you may think it can even move as fast as a lot of character's airdash so holding forward or backwards will help you position yourself into places that you can use your tools much better. Because of her hurtboxes, and how fast she can walk back, she can make a lot of things whiff by walking back and you can now whiff punish with an array of tools for the course. If it's not stressed enough that walking is a valid and important skill as any Hime, you'll want to go into training mode and see what I mean -- especially since her backdash has a lot of recovery frames and you don't want to use that over walking back unless you have to. It will help you in play throughout any time on field.
Flight
Flight(22D or j.22D) is another one of the universal Flight mechanics that you will have to get used to with Hime, but it's a rather strong, unique and versatile special... if you could call it such. Reason why is because, for all intents and purposes, it's actually considered an EX move, meaning that you can cancel a lot of things into Flight whether you whiffed a move or not. For example, say you did Hime j.C and it whiffed, from there you could press j.22D and immediately enter into Flight. You may want to get used to this as you will use it to primarily avoid being put into helpless state if you happen to whiff an air normal or even an air pillar(j.236A/B)
It also important to note because it allows her to retain air options or regain them. To explain it shortly, if you used an airdash already, entering flight will regain that airdash a second time. Another crucial example is if you entered flight and did j236C vs just doing j236C, the former allows you press buttons while the latter does not. Flight can be reentered by inputting j236A/B if you already entered flight just before. One way you can try in training mode to see what i am talking about is doing this
- jump, j.22D(flight) double jump(this takes you out of flight) j236A(puts you in to flight mode again)
Flight is ran on a timer for four seconds, stops when you just double jump, airdash, j.236C enter out of flight mode and resumes when you reenter it via j236C. Once again its a unique special that you want to learn that is transferrable to all moons of hime that you would need to learn to make the most out of her and her kit, you can do it at anytime even if you have 0 meter and makes a lot of things safer or trickier to punish in many situations. Moving on from the core basic, lets talk about her Specials and Normals that will be seen in her overall neutral gameplan
214B
214B, Kaze, is a really strong oppressive tool that moves C/H hime forward as they let out a big gust of wind that is AUB in the first part and very huge throughout. Its a very active special that covers a lot of space for a considerable amount of time and makes it hard for a lot of the cast to get through. its -3 on block, but spacing it out well doesn't place you in any danger really and sometimes you can do it again to see what the opponent is doing. It gives you a combo on trade in many instance and of course on hit. This is one of your main tools for the job in neutral.
236A and 236B
These geysers are fairly different even though they look similar from F hime and C hime. For starters 236A is very similar F hime's geyser except that its -9 on block. You can use this to stuff ground approaches and very predictable air approaches if they are approaching at that low height for it to work. 236B resembles Chime's 236B geyser except that its 2F faster and allows some combos to work. It being 2F faster also helps its validity in neutral as well.
With these tools the opponent is usually biding their time to find a moment to sneak in. This is where you can use 5A6AA or 5A6A whenever you want to invade space and rushdown yourself. If the opponent tries to backdash or jump, this will more than likely catch, especially if they jumped a bit late. To stop ground approaches you can use this or use dash 5B, dash 2C among the toolset that you have. It also important to note that if the opponent has expended all their air options you can use 3C or DP for anti air them. While DP is far more reliable in a lot of situations, 3C is particularly good because it gives higher reward than DP would, especially on a counter hit opportunity.
Using j236A/B you will more so to wall off space for people. Like you use j236B as if you want to close off space of people trying to get into midscreen range while j236A is if they are already midscreen range and you want to close off the opponent trying to get into your close range space. This is different from just plotting the pillar to their exact location, where its least effective, instead plot the pillar to a place you think they will end up being a seconds ahead of present situation.
j.214A/j.214B and 214A
Wind mine, its a special that is a true cross up on both. its flexibility comes from it being a timed detonation and can be used both in pressure or in neutral as you can hide behind it. Because its on a timer and wind mine doesn't go away if hime is blocking (only goes away if she gets hit or techs a throw). it allows for coverage in ways that you wouldn't have previously. 214A also produces a wind mine and you can flight cancel to move away swiftly after making that wind mine. you would only use 214A especially if you have the space available to do it, but its very powerful in that it can AA as well.
With all these tools in mind, be sure to assess the situation of whenever you need to take to the air or just need to fight it out on the ground.
Pressure
H hime's pressure is very flexible in a lot of ways and there's even a few sneaky tricks that open up once you establish her pressure foundation. Let's start.
One of her main tools is using 5A6AA. 5A6AA is fairly standard for many h moon characters in their pressure as you can do the following for a basic understanding. One thing that is important is that leveraging the long normal cancel window of 5B can go a long way and you can choose to remain at a distance where most 2A mashing won't hit you but hitting another 5B will hit them. if they are feel threatened by it then you can simply go in again with redash pressure or 5A6AA from the current position you're standing.
- 5A6A > 2A > 5A6A
- 5A stagger 6A, stagger 5B
Hime is a little different in that she can do 5A6AA and then rebeat while other h moon characters cannot do that at all. this is really huge for H hime as it moves her forward and she can stagger her strings in such a way that her pressure can be quite troublesome. Another normal that is essential in her pressure is 5B as it is +1 so you can either choose to stop there or stagger to a 2B or a C normal of your choice. 6[C] also is another good normal to use since you can rebeat from it and it catches jumpouts if they try to jump out of pressure. Here's some examples of her pressure without introducing flight cancels.
- 5A6AA > stagger 2A > 5A6AA
- 2A > stagger 2A > 2A > stagger 5B
- 2A > stagger 2A > stagger 5B > stagger 5C > w5A >(236A)
- 2A > stagger 2A > stagger 5B > stagger 5C > stagger 2C > 236B'
- 2A > stagger 2A > Rising j.6B > airdash j.C > j.B
- 2A > stagger 2A > 6[C] > w5A > 6[C]
- 2A 2A > 5B > (let it recover) > 5B
- 5B > 6[C] > 5A 6A > 2A > 5A > 5A6AA
When someone is respecting your staggers you can then mix in throws in between the 2A's, 5B points and you can even do dash up TK j.214A which not only blows up throw tech oses but is also +20 which allows you to continue on your offense. Introducing another vital part of your pressure which is j.214A/B
j.214A and j.214B
j.214A and j.214B are the wind mines that H hime is known for, you got a couple of seconds after its deployed before it explodes it only goes away if H hime gets hit or techs a throw. j.214A she moves backwards while deploying wind and can be used for Same side mixups when doing it post bunker or post throw situations. In the corner it allows you to set up throw/low/high option as shown here The general thing for this is that for the j.6B mixups generally you want to do jump back instant j.6B if you're up close. If you're around two character spaces you may need to do neutral jump instant j.6B and any further than that you will need to do forward jump instant j.6B for it to work. j.214B is a true cross up wind special where she she moves forward(usually behind the opponent) and deploys wind. This special is also +, +16 to be in fact. These specials do have considerable start up and can be hit out of its start up if the opponent if the opponent is onto your motives, but most of the time you can sneak these in.
Which now brings on to some pressures ideas you can do. Revisiting the concept of flight and flight cancelling you can now to the following among other things:
- 2A > slight delay 2A > 6[C] 5A6AA > 22D > j214A
- 5A6AA > 2A > 2A > 5A6AA > 5B > 22D > j.214A
- 2A > 2A > 5B > 22D > j.214A
This now allows you to set up a wind mind in which now you can enforce the High/Low/Throw game. In order to set up the overhead, its usually looks like this
- 2A > delay 2A > instant j.6B (wind detonates)
You can mix this up with throw or another 2A/2C. You can choose that or you can choose to extend pressure by doing:
- 2A > slight delay 2A > 5C > 2C > w5A (wind detonates) > redash pressure
- 2A > slight delay 2A > 5C > 5A6AA > 22D > j.214A
There's honestly a lot of things that you can do that may not be featured here, so its important to gets the basic concepts down and trying out what blockstrings and such fit you. these are just basic examples for now to try out.
Okizeme
As for oki unless you have done the TK wind route which will be notated in the combo routes, did a low height air throw or did hime kick(j.624C) you don't get much oki other than a 236A which can be backdashed or hit with a reversal that moves forward. Let's cover her Tk Wind route/ Low height air throw ender.
So for TK wind route/Low height air throw you have enough frames to do dash 5A6AA/2A/5B things, if people are respecting that enough you can then try TK j.236B to cross people up at midscreen. Your pressure is fairly good enough to command enough respect to try some cross up shenanigans. Now with Hime kick(j.624C) you get the opportunity to do two things are fairly good to do in their own right, here's the set ups.
- 2A > 2A > 5B > 5C > 236A > j.B(1) > j.C > sdj j.C > hime kick > dash 2C > 22D
- 2A > 2A > 5B > 5C > 236A > j.B(1) > j.C > sdj j.C > hime kick > dash 2C > 5C > 214A > 22D > air throw > airdash > j.236A (wind explodes)
the first option sets up left/right mix ups and you can choose to pick cross up by doing pressing down for a bit then fly over to the other side and hitting j.2B. or same side by flying to one side then flying back to same side j.2B. The 2nd options sets up a left/right mix up in the corner and you must fully airdash into the corner to make this work. you can choose same side by either doing staying same side during flight and doing j.B j.A or doing cross up j.B j.A.
Its important to note that you can also get flight mix ups from j.236C enders if the opponent doesn't tech. and you can discourage this after j.236C by dashing to where they will fall after j.236C and doing the following
This catches all techs and goes into a combo. also allows you to set up meaty buttons on their wake up. Once they respect that, you can then just 22D once they fall and perform left/right mixups of your choosing.
Other little tricks
This portion is mainly going to be revolving around j214B in the corner and stuff to do in the corner. When you land a throw you can choose to either do the following:
- Airdash j.B(a safe jump)
- TK j.214A
- TK j.214B
The first two is self explanatory, the first option is a safe jump with j.B(2nd hit) hitting people on wake up, TK j.214A sets up the high/low/throw game. j.214B sets up the same thing, however it has an added property of sucking people inwards due to the nature of j214B's attack or more so the direction of the attack. because of this you can do some cute things, here's an examples you can do if the opponent blocks j.214B.
- j.214B, 2A > 2A > 2B > 236A > 22D cross up j.2B
There's plenty more you can do such as time for the wind explosion to go off as you complete your B or C normal and attempt to cross up with TK j214B or even mask it with a different special as you flight cancel. Be sure try some of the ideas out in training mode!
Defense
Defense is not hime's shining feature and definitely not H hime's. Her jump is fairly floaty which means its not necessarily the most valid defense option she has. Her fastest normal is 6F start up which makes it very difficult to poke out of pressure if its somewhat tight. leaving pressure safely will force hime to use bunker which is strong when it hits but it costs 100% and there's plenty of counter play to it. What you would need to do is make precise decision to use DP when there's a gap, Dodge on certain moves, Shield when you find the point to shield and bunker whenever someone overextended in their pressure. Unfortunately without the aid of ex guard you can't even generate an increased pushback to make the opponent change their pressure, You'll want to block until the opponent tries to to go for a charged overhead or throw and that's where you can make use of 1A~D, Dodge(on the overhead), shield, etc.
Combos
| Combo Notation Help
|
Disclaimer: Combos are written by various writers, so the actual notation used in pages can differ from the standard one.
For more information, see Glossary and Controls.
|
| X > Y
|
X input is cancelled into Y.
|
| X > delay Y
|
Must wait for a short period before cancelling X input into Y.
|
| X, Y
|
X input is linked into Y, meaning Y is done after X's recovery period.
|
| X+Y
|
Buttons X and Y must be input simultaneously.
|
| X/Y
|
Either the X or Y input can be used.
|
| X~Y
|
This notation has two meanings.
- Use attack X with Y follow-up input.
- Input X then within a few frames, input Y. Usually used for option selects.
|
| X(w)
|
X input must not hit the opponent (Whiff).
|
| j.X
|
X input is done in the air, implies a jump/jump cancel if the previous move was done from the ground.
Applies to all air chain sections:
- Assume a forward jump cancel if no direction is given.
- Air chains such as j.A > j.B > j.C can be shortened to j.ABC.
|
| sj.X
|
X input is done after a super jump. Notated as sj8.X and sj9.X for neutral and forward super jumps respectively.
|
| dj.X
|
X input is done after a double jump.
|
| sdj.X
|
X input is done after a double super jump.
|
| tk.X
|
Stands for Tiger Knee. X motion must be buffered before jumping, inputting the move as close to the ground as possible. (ex. tk.236A)
|
| (X)
|
X is optional. Typically the combo will be easier if omitted.
|
| [X]
|
Input X is held down. Also referred to as Blowback Edge (BE). Depending on the character, this can indicate that this button is held down and not released until indicated by the release notation.
|
| ]X[
|
Input X is released. Will only appear if a button is previously held down. This type of input is referred to as Negative Edge.
|
| {X}
|
Button X should only be held down briefly to get a partially charged version instead of the fully charged one.
|
| X(N)
|
Attack "X" should only hit N times.
|
| (XYZ)xN
|
XYZ string must be performed N times. Combos using this notation are usually referred to as loops.
|
| (XYZ^)
|
A pre-existing combo labelled XYZ is inserted here for shortening purposes.
|
| CH
|
The first attack must be a Counter Hit.
|
| Air CH
|
The first attack must be a Counter Hit on an airborne opponent.
|
| 66
|
Performs a ground forward dash.
|
| j.66
|
Performs an aerial forward dash, used as a cancel for certain characters' air strings.
|
| IAD/IABD
|
Performs an Instant AirDash.
|
| AT
|
Performs an Air Throw. (j.6/4A+D)
|
| IH
|
Performs an Initiative Heat.
|
| AD
|
Performs an Arc Drive.
|
| AAD
|
Performs an Another Arc Drive.
|
Starters
| Condition
|
Notation
|
Damage
vs V.Sion
|
Notes
|
|
| Normal starter, grounded opponent
|
- 2A > 2A > 2B > 5B > 5C > 2C > 236A/214B
|
2839 ~ 3069
|
| |
| Meter Gained: 26.8% ~ 27.3% |
Meter Given (vs C-Moon): 11.5 ~ 11.7% |
| One of the basic starters that you will typically see as a full ground starter. 2B>5B is slightly for damage, but 5B is easier to confirm and they're interchangeable as combo filler. Shorten or rearrange the string as needed for starter, spacing, remaining normals, etc. Can also start with 5AAA(>6A) from point blank. |
|
|
| Normal starter, grounded opponent
|
- 2A > 2A > 2B > 5B > 5C > (2C) > 6C
|
2668
|
| |
| Meter Gained: 24.5% |
Meter Given (vs C-Moon): 10.5% |
| A variant of the starter above. 6C is more limiting as a launcher and leads to worse oki due to height from the sjc followup. Generally better to avoid it unless specifically called for, but 6C/6[C] launches may come up in pressure or when converting unexpected hits. Omit 2C if you need to avoid misinputting 236C. |
|
|
| Normal starter, grounded opponent
|
- 2A > 5B > (2B) > 5C > 5A6AA
|
2389
|
| |
| Meter Gained: 23.1% |
Meter Given (vs C-Moon): 9.9% |
| 6AA leads to a different set of routes than the aforementioned due to the low launch, which you can then pick up with 2C. Requires starting from close range and not pushing the opponent too far out. This starter can work even if 5A whiffs, but only if close enough for 5C w5A 6A to connect. |
|
|
| Launcher, grounded opponent
|
|
1106
|
| |
| Meter Gained: 5.8% |
Meter Given (vs C-Moon): 2.5% |
| These are important neutral tools, so it's important to learn conversions from them. Advanced routes that use 236A or 236B as launchers may not work as reliably when starting from these attacks due to hitcount and/or spacing. |
|
|
| Launcher, grounded opponent
|
|
1213
|
| |
| Meter Gained: 6.3% |
Meter Given (vs C-Moon): 2.7% |
| Another essential neutral tool. Conversions from 214B vary significantly depending on spacing, whether the opponent is grounded or airborne, or if the detonation counterhits. Knowing when and how you can convert of 214B is important not only to making the most of your hits, but understanding how best to use 214B. |
|
|
| Launcher, grounded opponent
|
|
819
|
| |
| Meter Gained: 5.2% |
Meter Given (vs C-Moon): 2.2% |
| Air Wind hits lead to their own routing and come up fairly often in neutral, oki, and pressure. |
|
|
Enders
| Condition
|
Notation
|
Damage
vs V.Sion
|
Notes
|
|
| Airborne opponent
|
|
1600
|
| |
| Meter Gained: 0% |
Meter Given (vs C-Moon): 0% |
| Standard ender for this moon. Hard knockdown, but limited frame advantage that gets worse when further above the ground. Hime is unable to act until landing unless she entered flight state earlier in the combo and has flight time remaining. |
|
|
| Airborne opponent
|
|
1600
|
| |
| Meter Gained: 0% |
Meter Given (vs C-Moon): 0% |
| Worse frame advantage than the previous ender and not possible off routes that use flight beforehand, but adds a little extra damage and enables air options on the way down. Follow up with OTG j236C to further boost damage when trying to kill. |
|
|
| Airborne opponent, 100% meter
|
|
2329
|
| |
| Meter Gained: 0% |
Meter Given (vs C-Moon): 14.4% |
| Stray hit ender when airthrow won't reach or you can't get a full combo. Also a good meter dump after flight AT enders to kill and/or avoid Heat. Can often catch techs after on reaction, or try for a setup if they don't tech. |
|
|
| Airborne opponent, 150% meter
|
- j.63214C > land > 66 > 2C > 22D
|
3074
|
| |
| Meter Gained: -145.8% |
Meter Given (vs C-Moon): 11.9% |
| Metered ender into hard knockdown and flight oki. Very strong, but costs 150% meter. |
|
|
| Airborne opponent, 150% meter
|
- j.63214C > land > 66 > 2C > 5C > 214A > 22D > AT
|
???
|
| |
| Meter Gained: ??? |
Meter Given (vs C-Moon): ??? |
| Kick oki variant that sets a wind mine to detonate shortly after their wakeup. |
|
|
| Airborne opponent, 150% meter
|
|
???
|
| |
| Meter Gained: ??? |
Meter Given (vs C-Moon): ??? |
| Rarely used due to Half Moon meter management and HHime's poor meter gain, but grants very strong oki. |
|
|
OTG Pick ups
These are seen only after throw
| Condition
|
Notation
|
Damage
vs V.Sion
|
Notes
|
|
| Normal starter, grounded opponent
|
|
142
|
| |
| Meter Gained: 8.4% |
Meter Given (vs C-Moon): 3.6% |
| Hime's typical OTG string. Other normals are too slow to extend the string further. |
|
|
| Grounded opponent, 100% meter
|
|
1716
|
| |
| Meter Gained: -100% |
Meter Given (vs C-Moon): 19.9% |
| Meter management plus damage and soft knockdown. Use after throw, or on airthrow knockdown if in flight. |
|
|
| Normal starter, grounded opponent
|
|
100, 867
|
|
| Meter Gained: 3.5%, 5.2% |
Meter Given (vs C-Moon): 1.5%, 2.2% |
(Video) |
| Only do this in the corner. Covers all techs and sets up a wind mine on them if they decide to not tech. +3 against no tech for fastest wakeup timing. 6[C] is significantly tighter for marginal damage gains and doesn't work against Riesbyfe or White Len. Delaying the TK can cover no tech, but this will no longer punish neutral tech and simultaneously punishing forward/back tech is extremely difficult or impossible depending on wakeup timing. |
|
|
| Grounded opponent, Heat
|
|
???
|
| |
| Meter Gained: ??? |
Meter Given (vs C-Moon): ??? |
| Arc Drive can OTG for damage and oki. Very good use of meter after a throw if in Heat. |
|
|
Normal Combos
Wind detonate/explodes= WE
| Condition
|
Notation
|
Damage
vs V.Sion
|
Notes
|
|
| Normal starter, grounded opponent,
|
- 2A > 5B > 2B > 5C > 2C > 236A > jc > j.B(1) > j.C > jc > jB(1) > j.C > 22D > j.A > AT
|
4011
|
|
| Meter Gained: 29.6% |
Meter Given (vs C-Moon): 29.3% |
(Video) |
| One of the basic combos to learn |
|
|
| Normal starter, grounded opponent,
|
- 2A > 5B > 2B > 5C > 2C > 214B > jc > j.B(1) > j.C > jc > j.B(1) > j.C > 22D > j.A > AT
|
4239
|
|
| Meter Gained: 30.2% |
Meter Given (vs C-Moon): 30.1% |
(Video) |
| A 214B route that's universal as is the 236A route above |
|
|
| Normal starter, grounded opponent,
|
- 2A > 5B > 2B > 5C > 2C > 214B > jc > j.A > j.6B > j.B(1) > j.C > jc > j.B(1) > j.C > 22D > j.A > j.C > AT
|
4634
|
|
| Meter Gained: 36.7% |
Meter Given (vs C-Moon): 36.9% |
(Video) |
| A more optimized route of the one above |
|
|
| Normal starter, grounded opponent,
|
- 2A > 5B > 2B > 5C > 2C > 236A > TKj214B > sj > j.B(1) > j.C > 22d > AT > WE > j.B(2nd hit) > 66 > j.A > AT
|
???
|
|
| Meter Gained: ??? |
Meter Given (vs C-Moon): ??? |
(Video) |
| The TK wind route that grants the most advantage after knockdown via air throw. Its important to get the spacing during the ground starter so that you can get the TK wind route and that can be achieved through many ways. either by adding in an additional 2A in order to gain more space or by omitting 2B to ensure your combo doesn't drop. |
|
|
| Normal starter, grounded opponent,
|
- 236A > jc > jB(1) > j.C > jc > j.C > AT
|
2754
|
|
| Meter Gained: 17.7% |
Meter Given (vs C-Moon): 7.6% |
(Video) |
| a basic stray 236A conversion |
|
|
| Normal starter, grounded opponent,
|
- 236A > TKj214B > jc > jB(1) > jC > 22d > AT > WE > jB(2nd hit) > 66 > jA > AT
|
???
|
|
| Meter Gained: ??? |
Meter Given (vs C-Moon): ??? |
(Video) |
| A tk wind route from a stray 236A |
|
|
| Normal starter, grounded opponent,
|
- 236B > IAD > dl jB(1) > sdj > dl (jB(1) >) jC > ender
|
???
|
|
| Meter Gained: ??? |
Meter Given (vs C-Moon): ??? |
(Video) |
| Typical meterless conversion from 236B. Delay needed for the IAD jB1 gets progressively more strict with distance. Does not work from max range. |
|
|
| Normal starter, grounded opponent,
|
|
2985
|
|
| Meter Gained: -94.2% |
Meter Given (vs C-Moon): 16.9% |
(Video) |
| This is the route to use after flight canceling 236B, or if 236B hits at max range. |
|
|
| Normal starter, grounded opponent,
|
- 214B > j.B(1) j.C sdj j.C > ender
|
???
|
| |
| Meter Gained: ??? |
Meter Given (vs C-Moon): ??? |
| Conversion from a stray 214B. |
|
|
| Normal starter, grounded opponent,
|
|
3098
|
| |
| Meter Gained: -100% |
Meter Given (vs C-Moon): 17.1% |
| This route you use if you're unsure if the combo above will work |
|
|
| Normal starter, grounded opponent,
|
|
???
|
|
| Meter Gained: ??? |
Meter Given (vs C-Moon): ??? |
(Video) |
| Conversion into flight oki if you're ever in Heat. |
|
|
| Normal starter, grounded opponent,
|
- 2C > 214A > 22D > j.A > j.C > jc > j.A > j.6B > WE > 66 > j.C > AT
|
???
|
|
| Meter Gained: ??? |
Meter Given (vs C-Moon): ??? |
(Video) |
| You generally won't be doing this route unless you landed an air throw, an Air ch by 214B or Stand shield counter. |
|
|
| Normal starter, grounded opponent,
|
- AT > 2C > 6C > sjc > j.A > j.6B > j.B(1) > j.C > jc > j.B(1) > j.C > 22d > j.A > j.C > AT
|
???
|
|
| Meter Gained: ??? |
Meter Given (vs C-Moon): ??? |
(Video) |
| one of the basic airthrow starters |
|
|
| Normal starter, grounded opponent,
|
- AT > 2c > 214a > 22d > jA > jC > jc > jC > j6B > WE > 66 > jC > AT
|
???
|
|
| Meter Gained: ??? |
Meter Given (vs C-Moon): ??? |
(Video) |
| The best route to go for since it gives you the best frame advantage after airthrow |
|
|
| Normal starter, grounded opponent,
|
- 2D(low shield) 214a > 22d > jA > jC > jc > jC > j6B > WE > 66 > jC > AT
|
???
|
| |
| Meter Gained: ??? |
Meter Given (vs C-Moon): ??? |
| Low shield counter combo |
|
|
| Normal starter, grounded opponent,
|
- 5D(stand shield) > 2c > 214a > 22d > jA > jC > jc > jA > j6B > WE > 66 > jC > AT
|
???
|
| |
| Meter Gained: ??? |
Meter Given (vs C-Moon): ??? |
| Stand shield counter combo |
|
|
| Normal starter, grounded opponent,
|
- 2A > 5B > 2B > 5C > 2C > 236A > jc > j.B(1) > j.C > sdj > j.C > j,63214C > dash 2C 22D or 2C >5C > 22D > air throw.
|
???
|
|
| Meter Gained: ??? |
Meter Given (vs C-Moon): ??? |
(Video) |
| One of many ways to combo into hime kick. |
|
|
| Normal starter, grounded opponent,
|
- j.214B > jc > j.A > j.B(1) > j.C > 22D > AT > WE > jc > j.A > j.B(1) > j.C > AT
|
???
|
|
| Meter Gained: ??? |
Meter Given (vs C-Moon): ??? |
(Video) |
| The route you choose from if you land a low j214B crossup via low height or TK. Gives good frames for oki |
|
|
| Normal starter, grounded opponent,
|
- j.214B > 6C > hjc > j.C > j.6B > j.236A > j.22D > j.236A > sdj > j.C > AT/j236C
|
???
|
| |
| Meter Gained: ??? |
Meter Given (vs C-Moon): ??? |
| This is her damage route if you land cross up j214B. If they are too close, replace 6C with 3C or refer to the combo below. |
|
|
| Normal starter, grounded opponent,
|
- j.214B > 5A 6C > hjc > j.6B > j.236A > j.22D > j.236A > sdj > j.C > AT/j236C
|
???
|
| |
| Meter Gained: ??? |
Meter Given (vs C-Moon): ??? |
| This is her damage route with the correct sequence to do, in case you are too close after cross up |
|
|
Corner Combos
Note that all of H-Hime's standard routes also work in the corner.
| Condition
|
Notation
|
Damage
vs V.Sion
|
Notes
|
|
| Normal starter, grounded opponent,
|
- 2A > 5B > 2B > 5C > 2C > 214B > 6C > sjc > j.B(2) > j.6B > j.A > j.C > (s)dj > j.B(1) > j.C > (22D > jA > jC >) AT
|
???
|
|
| Meter Gained: ??? |
Meter Given (vs C-Moon): ??? |
(Video) |
| Damage optimization for the basic midscreen route. Allow the first hit of jB to whiff underneath them as you rise. Good damage and meter gain, but poor frame advantage. |
|
|
| Normal starter, grounded opponent,
|
- 2A > 5B > 2B > 5C > 2C > 214B > 6C > sjc > j.A > j.6B > j.B(1) > j.C > jc > j.B(1) > j.C > 22D > j.A > j.C > j63214C > Land > Dash > 2C > 214A > 22D > j.A > j.C > jc > j.A > j.6B > WE > 66 > AT
|
???
|
|
| Meter Gained: ??? |
Meter Given (vs C-Moon): ??? |
(Video) |
| This uses 150% meter. It can also (and generally should) stop at dash 2C to go into 22D for flight mix ups. |
|
|
| Normal starter, grounded opponent,
|
- 2A > 5B > 5C > 5A6AA > dl. 2C > 214A > 22D > j.A > j.C > (s)dj > j.A > j.6B > WE > j.236A > (j.A/j.C >) AT
|
???
|
|
| Meter Gained: ??? |
Meter Given (vs C-Moon): ??? |
(Video) |
| Damage and meter gain optimization for the 6AA 2C 214A route. Slightly worse frame advantage afterwards. |
|
|
| Normal starter, grounded opponent,
|
- 5AAA > 6A > 2B > 5B > 5C > 236B > tk j.214B > 8j > dl j.6B > j.A > j.C > (s)dj > dl j.6B > WE > j.236A > 22D > j.236A > (j.A/j.C >) AT
|
???
|
|
| Meter Gained: ??? |
Meter Given (vs C-Moon): ??? |
(Video) |
| Corner TK route variation for high meter gain. Requires enough space for 236B to connect cleanly, but otherwise not strict about spacing. At least two hits before 236B is recommended for consistency. Must omit 2C unless starting with 2C > 236B. Delays on the j.6Bs are very slight. Can go directly into kick enders from second j236A, or extend the ender with j.236A > j.6B > j.A > j.C > j.624C for additional hits if needed when going into Arc Drive. |
|
|
| Normal starter, grounded opponent,
|
- 5AAA > 6A > 2B > 5B > 5C > 236B > tk j.214B > 8j > dl j.6B > j.A > j.C > (s)dj > dl j.6B > WE > 66 > j.C > AT
|
???
|
|
| Meter Gained: ??? |
Meter Given (vs C-Moon): ??? |
(Video) |
| Variation of the above route that trades some damage for better oki while retaining high meter gain. |
|
|
| Normal starter, grounded opponent,
|
- tk j.214A > 236A > j.C > dj > j.6B > WE > j.236A > 22D > j.236A > (j.A/j.C) > AT
|
???
|
| |
| Meter Gained: ??? |
Meter Given (vs C-Moon): ??? |
| Corner adaptation of j214A 236A route that goes into double pillar for increased damage and meter gain but worse frame advantage. Take care to not sdj into j6B, as this may cause Hime to steal corner. If necessary you can adapt the route with 22D jC AT when this occurs.
This route is also possible off corner j214B, both crossup and noncrossup, but will not work on Necos from j214B. You must jump away from the corner then dj back towards the corner for j214B starter. |
|
|
| Normal starter, grounded opponent,
|
- tk j.214A/j.214B > 6[C]/6C/3C > sjc > dl j.C > j.6B > WE > j.236A > 22D > j.236A > ((s)dj > j.B(1) > j.C) > AT
|
???
|
| |
| Meter Gained: ??? |
Meter Given (vs C-Moon): ??? |
| Corner tk wind starter can adapt the double pillar j214B routing for 6C/3C confirms as well. Adjust the ender as necessary for height and desired damage/oki. J214A starter requires drifting forward after pillar if omitting dj extension. Drift back after sjc is strongly recommended for j214B to avoid crossing under and whiffing j6B. 6[C] only combos from tk j214A. |
|
|
| Normal starter, grounded opponent,
|
- tk j.214A/j.214B > 6[C]/6C/3C > sjc > dl j.C > j.6B > WE > 66 > dl j.6B > j.A > j.C > (s)dj > (j.B(1) >) j.C > AT
|
???
|
| |
| Meter Gained: ??? |
Meter Given (vs C-Moon): ??? |
| Hybrid routing that strikes a midpoint between the above route's damage and the j6B > WE > 66 > jC > AT variant's oki while offering better meter gain than either. Not recommended for crossup j.214B hits, but possible with a delayed airdash. |
|
|
| Normal starter, grounded opponent,
|
- tk j.214A > 66 > 5A > 6C > sjc > dl j.6B > WE...
|
???
|
| |
| Meter Gained: ??? |
Meter Given (vs C-Moon): ??? |
| Modification of the previous routes for dash 5A confirms, continue as normal after j6B. |
|
|
Move Descriptions
| Frame Data Help
|
| Header
|
Tooltip
|
| Move Box Colors
|
Light gray = Collision Box (A move lacking one means it can go through the opponent's own collision box).
Green: Hurt Boxes.
Red: Hit(/Grab) Boxes.
Yellow: Clash Boxes (When an active hitbox strikes a clash box, the active hitbox stops being active. Multi-hit attacks can beat clash since they will still progress to the next hitbox.)
Magenta: Projectile-reflecting boxes OR Non-hit attack trigger boxes (usually).
Blue: Reflectable Projectile Boxes.
|
| Damage
|
Base damage done by this attack.
(X) denotes combined and scaled damage tested against standing V. Sion.
|
| Red Damage
|
Damage done to the recoverable red health bar by this attack. The values are inherently scaled and tested against standing V. Sion.
(X) denotes combined damage.
|
| Proration
|
The correction value set by this attack and the way it modifies the scaling during a string. See this page for more details.
X% (O) means X% Overrides the previous correction value in a combo if X is of a lower percentage.
X% (M) means the current correction value in a combo will be Multiplied by X%. This can also be referred to as relative proration.
|
| Circuit
|
Meter gained by this attack on hit.
(X%) denotes combined meter gain.
-X% denotes a meter cost.
|
| Cancel
|
Actions this move can be cancelled into.
SE = Self cancelable.
N = Normal cancelable.
SP = Special cancelable.
CH = Cancelable into the next part of the same attack (Chain in case of specials).
EX = EX cancelable.
J = Jump cancelable.
(X) = Cancelable only on hit.
-X- = Cancelable on whiff.
|
| Guard
|
The way this move must be blocked.
L = Can block crouching
H = Can block standing.
A = Can block in the air.
U = Unblockable.
|
| Startup
|
Amount of frames that must pass prior to reaching the active frames. Also referred to as "True Startup".
|
| Active
|
The amount of frames that this move will have a hitbox.
(x) denotes frame gaps where there are no hitboxes is present. Due to varied blockstuns, (x) frames are difficult to use to determine punish windows. Generally the larger the numbers, the more time you have to punish.
X denotes active frames with a duration separate from its origin move's frame data, such as projectile attacks. In this case, the total length of the move is startup+recovery only.
|
| Recovery
|
Frames that this move has after the active frames if not canceled. The character goes into one frame where they can block but not act afterwards, which is not counted here.
|
| Advantage
|
The difference in frames where you can act before your opponent when this move is blocked (assuming the move isn't canceled and the first active frame is blocked).
If the opponent uses a move with startup that is at least 2 frames less than this move's negative advantage, it will result in the opponent hitting that move.
±x~±y denotes a range of possible advantages.
|
| Invul
|
Lists any defensive properties this move has.
X y~z denotes X property happening between the y to z frames of the animations. If no frames are noted, it means the invincibility lasts through the entire move.
Invicibility:
- Strike = Strike invincible.
- Throw = Throw invincible.
Hurtbox-Based Properties:
- Full = No hurtboxes are present.
- High = Upper body lacks a hurtbox.
- Low = Lower body lacks a hurtbox.
Miscellaneous Properties
- Clash = Frames in which clash boxes are active.
- Reflect = Frames in which projectile-reflecting boxes are active.
- Super Armor = Frames in which the character can take hits without going into hit stun.
|
Note: FL in the cancel section denotes that a move is cancelable into Flight.
Normal Moves
Standing Normals
|
|
| 5A
|
Damage
|
Red Damage
|
Proration
|
Cancel
|
Guard
|
| 300
|
144
|
75% (O)
|
-SE-, -N-, -SP-, -CH-, -EX-, (J), -FL-
|
LH
|
| First Active
|
Active
|
Recovery
|
Frame Adv
|
Circuit
|
Invuln
|
| 7
|
4
|
8
|
0
|
2.45%
|
-
|
|
Neutral on block, can be used for pressure and tick throws. Decent range for a 5A, but slow. Cancelable on whiff.
|
| 5A~6A
|
Damage
|
Red Damage
|
Proration
|
Cancel
|
Guard
|
| 300
|
144
|
75% (O)
|
-N-, SP, -CH-, EX, (J), FL
|
LH
|
| First Active
|
Active
|
Recovery
|
Frame Adv
|
Circuit
|
Invuln
|
| 8
|
7
|
17
|
-12
|
2.1%
|
-
|
|
A very minus on block follow-up that moves Hime forward. Does not add any additional proration over 5A, so you can use this to adjust spacing or add hits from 5A without sacrificing damage. Cancels to B or C normals without rebeat penalty. Also nice for moving forward in pressure and catching backdashes. Very short window to cancel into anything except 6AA.
|
| 5A~6A~6A
|
Damage
|
Red Damage
|
Proration
|
Cancel
|
Guard
|
| 1000
|
768
|
60% (O)
|
N, SP, EX, (J), FL
|
LH
|
| First Active
|
Active
|
Recovery
|
Frame Adv
|
Circuit
|
Invuln
|
| 11
|
8
|
14
|
-4
|
7.0%
|
-
|
|
Launches on hit. Unlike other Half Moon characters HHime can cancel into normals from this move on block, not just on hit. Cancels to C normals do not incur rebeat penalty. High pushback on block more than offsets its forward movement, so it's best used sparingly on offense. Has use in some close range combo routes.
|
|
|
|
| Damage
|
Red Damage
|
Proration
|
Cancel
|
Guard
|
| 300*2 (532)
|
(340)
|
80% (O)
|
N, SP, EX, (J), FL
|
LH
|
| First Active
|
Active
|
Recovery
|
Frame Adv
|
Circuit
|
Invuln
|
| 9
|
6
|
9
|
1
|
2.1%*2 (4.2%)
|
-
|
|
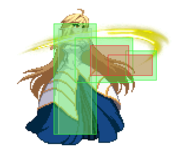
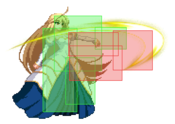
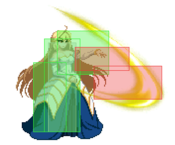
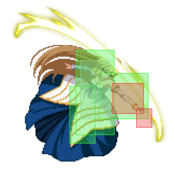
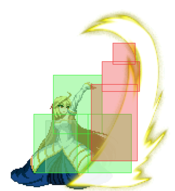
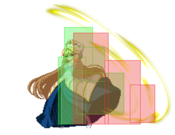
+1 on block and hits twice, making it a good general purpose pressure/hitconfirm tool. Also a very good poke due to range, disjoint, and low recovery/total duration. Not reliable as a general purpose antiair due to hitbox placement and hurtbox extension before active frames, but very good at catching opponents when well spaced or used to hit from behind.
|
|
|
|
| Damage
|
Red Damage
|
Proration
|
Cancel
|
Guard
|
| 800
|
480
|
90%
|
N, SP, EX, (J), FL
|
LH
|
| First Active
|
Active
|
Recovery
|
Frame Adv
|
Circuit
|
Invuln
|
| 13
|
4
|
18
|
-4
|
4.9%
|
-
|
|
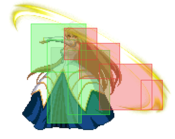
Hime takes a spinning step forward and backhands her opponent. Useful for whiff punishing, confirms, and blockstrings for its significant range and forward movement. Can be used as a long range poke, but extends her hurtbox quite a bit relative to her other normals. Good anti-jump normal in pressure, but requires careful spacing to use as an anti-air. Rear hitbox gives 5C good coverage on tech traps, though it lacks the active frames to punish all options.
|
|
Crouching Normals
|
|
| Damage
|
Red Damage
|
Proration
|
Cancel
|
Guard
|
| 300
|
96
|
75% (O)
|
SE, N, SP, EX, (J), FL
|
L
|
| First Active
|
Active
|
Recovery
|
Frame Adv
|
Circuit
|
Invuln
|
| 7
|
4
|
9
|
-1
|
2.1%
|
-
|
|
Low hitting 2A. Has good range but 7f startup, so be wary when trying to use this to mash out of pressure. 1f slower to recover than 5A and unable to cancel on whiff.
|
|
|
|
| Damage
|
Red Damage
|
Proration
|
Cancel
|
Guard
|
| 500
|
384
|
80% (O)
|
N, SP, EX, (J), FL
|
LH
|
| First Active
|
Active
|
Recovery
|
Frame Adv
|
Circuit
|
Invuln
|
| 10
|
4
|
12
|
-1
|
2.8%
|
-
|
|
-1 on block, hits mid. Combo/blockstring filler with good disjoint and a slightly better starter than 5B. One of her primary options against stand shield.
|
|
|
|
| Damage
|
Red Damage
|
Proration
|
Cancel
|
Guard
|
| 900
|
624
|
65% (O)
|
N, SP, EX, (J), FL
|
L
|
| First Active
|
Active
|
Recovery
|
Frame Adv
|
Circuit
|
Invuln
|
| 12
|
4
|
15
|
-1
|
4.9%
|
-
|
|
A very different move from F-Hime's 2C, but still quite good. 2C is a single hit low sweep with very good range and disjoint, and is only -1 on block. Solid low poke, usually confirmed into 5C, 236A, or 214B. Her preferred followup for air counterhits. Difficult to confirm non-counterhit on reaction due to single hit and poor cancel window. Low counterhits (counterhit against normals) can link into 236A.
|
|
Aerial Normals
|
|
| Damage
|
Red Damage
|
Proration
|
Cancel
|
Guard
|
| 250
|
96
|
75% (O)
|
N, SP, EX, J, FL
|
LHA
|
| First Active
|
Active
|
Recovery
|
Frame Adv
|
Circuit
|
Invuln
|
| 5
|
4
|
17
|
-
|
2.1%
|
-
|
|
Regular girl j.A. teeny hitbox. Not great as a jump-in and has limited air-to-air utility, but can be used to make IAD strings tighter. Does not hit most opponents crouching if used immediately from IAD. Not self-chainable.
Can cancel on whiff during frames 20-25, but cannot act after recovery unless in flight. If j.A recovers near the apex of her double jump during flight then she can buffer flight movement options to regain control or immediately fastfall to ground.
|
|
|
|
| Damage
|
Red Damage
|
Proration
|
Cancel
|
Guard
|
| 350, 600 (872)
|
(526)
|
90% (O)
|
N, SP, -EX-, J, -FL-
|
HA
|
| First Active
|
Active
|
Recovery
|
Frame Adv
|
Circuit
|
Invuln
|
| 6
|
2 (8) 4
|
18
|
-
|
2.1%, 2.8% (4.9%)
|
-
|
|
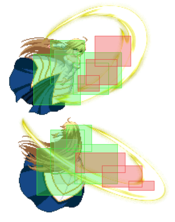
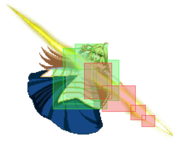
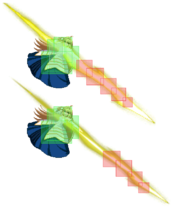
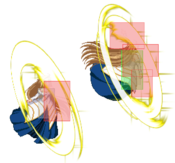
Two hit swipe, hitting above then below. Can cancel on both hits. First hit is a decent air-to-air given its speed and disjoint, and is also key to some of her most ambiguous mixups. The second hit threatens opponents below, but is less useful as an air-to-air due to its late timing and is more often used in spaced air-to-ground engagements. The long gap and differing hitboxes may sometimes cause both hits to whiff depending on trajectory and timing, and there is a 1f gap between the two hits if air blocked. Whiff cancelable into EX specials and Flight after frame 24.
|
|
|
|
| Damage
|
Red Damage
|
Proration
|
Cancel
|
Guard
|
| 850
|
576
|
75% (O)
|
N, SP, -EX-, J, -FL-
|
HA
|
| First Active
|
Active
|
Recovery
|
Frame Adv
|
Circuit
|
Invuln
|
| 14
|
4
|
20
|
-
|
4.9%
|
-
|
|
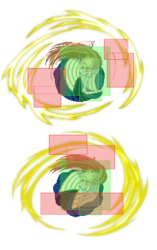
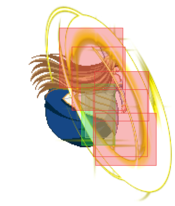
Savage. Hime claws your face off with an omnidirectional swipe. Really really big, but also quite slow, so don't be surprised if you get counter hit out of it. Will not hit most crouching opponents (except Wara, Hime, and Nero) until the later active frames if used immediately from an IAD. Useful in some flight mixups, and good coverage behind her can lead to tricky pressure sequences with wind and flight. Probably one of your favourite buttons. Whiff cancelable into EX specials and Flight after frame 24.
|
|
Command Normals
|
|
| Damage
|
Red Damage
|
Proration
|
Cancel
|
Guard
|
| 800
|
384
|
55% (O)
|
N, SP, EX, (J), FL
|
LH
|
| First Active
|
Active
|
Recovery
|
Frame Adv
|
Circuit
|
Invuln
|
| 11
|
5
|
15
|
-2
|
2.8%
|
-
|
|
Upwards crouching strike that launches on hit. Has a command high jump cancel on hit with neutral jump. Used to launch mid-combo for certain routes where 6C is unreliable due to forward movement or longer startup. Safe on block and rebeatable, with horizontal range between 5A and 2A. Catches jump outs during tick throw pressure. Can function as a preemptive, low commitment anti-air if care is given to the startup time and extended hurtboxes during startup.
|
|
|
|
| 6C
|
Damage
|
Red Damage
|
Proration
|
Cancel
|
Guard
|
| 800
|
384
|
70% (O)
|
SP, EX, (J), FL
|
LH
|
| First Active
|
Active
|
Recovery
|
Frame Adv
|
Circuit
|
Invuln
|
| 13
|
5
|
23
|
-10
|
3.5%
|
-
|
|
Large command launching normal. Jump cancelable on hit, with a command superjump cancel on neutral jump. Very minus on block if not canceled and only cancels into specials. Can catch airborne opponents, but extends hurtboxes both horizontally and vertically well before active frames. Begins charging if held for more than 6f, full charge on 16f hold.
|
| 6[C]
|
Damage
|
Red Damage
|
Proration
|
Cancel
|
Guard
|
| 1000
|
480
|
70% (O)
|
N, SP, EX, (J), FL
|
LH
|
| First Active
|
Active
|
Recovery
|
Frame Adv
|
Circuit
|
Invuln
|
| 20
|
5
|
19
|
-6
|
7.0%
|
-
|
|
6[C] adds some damage, significant forward movement, ability to rebeat, and better frame advantage. Hitbox and hurtbox properties do not change. Rebeat makes it more useful as a forward moving frame trap in blockstrings, and it retains some use as a launcher for combos.
|
|
|
|
| j.6B
|
Damage
|
Red Damage
|
Proration
|
Cancel
|
Guard
|
| 700
|
384
|
90% (O)
|
N, SP, -EX-, J, -FL-
|
HA
|
| First Active
|
Active
|
Recovery
|
Frame Adv
|
Circuit
|
Invuln
|
| 12
|
6
|
18
|
-
|
2.8%
|
-
|
|
Big stab, can be held to become even larger and halt air momentum. The regular version is used as combo filler, an instant overhead, and to set up a double overhead. Whiff cancelable into EX specials and Flight after frame 12. Begins charging if held for more than 4f, full charge on 16f hold.
|
| j.6[B]
|
Damage
|
Red Damage
|
Proration
|
Cancel
|
Guard
|
| 900
|
672
|
50%
|
N, SP, -EX-, -J-, -FL-
|
HA
|
| First Active
|
Active
|
Recovery
|
Frame Adv
|
Circuit
|
Invuln
|
| 25
|
4
|
-
|
-
|
7.0%
|
-
|
|
The held variant for occasional mixups post air throw ender, or as a cheeky long ranged overhead in neutral. You can airdash cancel this for pressure or a short combo on block and hit. Rebeating will end the vertical momentum from this attack, causing Hime to immediately fall instead of pausing for a moment first. Whiff cancelable into EX specials and Flight after frame 25. Also jump cancelable on whiff after frame 41.
|
|
Universal Mechanics
|
|
| Damage
|
Red Damage
|
Proration
|
Cancel
|
Guard
|
| 1300
|
960
|
30%
|
-
|
U
|
| First Active
|
Active
|
Recovery
|
Frame Adv
|
Circuit
|
Invuln
|
| 3
|
1
|
20
|
-
|
0.0%
|
-
|
|
Hime levitates the opponent, then slams them into the ground. Untechable knockdown, can be followed up with an OTG string.
|
|
|
|
| Damage
|
Red Damage
|
Proration
|
Cancel
|
Guard
|
| 1600
|
480
|
30%
|
-
|
U
|
| First Active
|
Active
|
Recovery
|
Frame Adv
|
Circuit
|
Invuln
|
| 3
|
1
|
12
|
-
|
0.0%
|
-
|
|
If done raw, this ground bounces the opponent and teleports you behind them. As a combo ender, this causes an untechable knockdown and leaves you in a normal falling animation that is not actionable until landing unless in Flight.
|
|
|
|
| Standing
|
Damage
|
Red Damage
|
Proration
|
Cancel
|
Guard
|
| 500 (345)
|
300 (198)
|
50%
|
(SP), (EX), (J)
|
LHA
|
| First Active
|
Active
|
Recovery
|
Frame Adv
|
Circuit
|
Invuln
|
| 9
|
4
|
13
|
1
|
3.5%
|
Strike 1-12
|
|
Same animation as 6C, with a very large hitbox to match. Unique shield counter for being plus on block, though sometimes still punishable if air blocked.
|
| Crouching
|
Damage
|
Red Damage
|
Proration
|
Cancel
|
Guard
|
| 1500 (1117)
|
1000 (714)
|
60%
|
(SP), (EX)
|
LA
|
| First Active
|
Active
|
Recovery
|
Frame Adv
|
Circuit
|
Invuln
|
| 9
|
4
|
18
|
-4
|
11.5%
|
Strike 1-12
|
|
Same animation as 2C. Reaches quite far along the ground. Many characters can neutral jump over the furthest hitbox.
|
| Air
|
Damage
|
Red Damage
|
Proration
|
Cancel
|
Guard
|
| 500 (303)
|
300 (174)
|
50%
|
-
|
HA
|
| First Active
|
Active
|
Recovery
|
Frame Adv
|
Circuit
|
Invuln
|
| 9
|
4
|
-
|
-
|
3.5%
|
Strike 1-12
|
|
Similar to the later frames of her DP. Halts Hime's vertical momentum and causes her to fall with normal gravity.
|
|
|
|
| Neutral
|
Damage
|
Red Damage
|
Proration
|
Cancel
|
Guard
|
| 500
|
192
|
50%
|
-
|
LHA
|
| First Active
|
Active
|
Recovery
|
Frame Adv
|
Circuit
|
Invuln
|
| 26
|
4
|
19
|
-5
|
0.0%
|
Clash 1-10
|
| (Clash)
|
Damage
|
Red Damage
|
Proration
|
Cancel
|
Guard
|
| 500
|
192
|
50%
|
-
|
LHA
|
| First Active
|
Active
|
Recovery
|
Frame Adv
|
Circuit
|
Invuln
|
| 8
|
4
|
19
|
-5
|
0.0%
|
Strike 1-7
|
|
A shield bunker with the standard Hime disjoint.
|
| Blockstun
|
Damage
|
Red Damage
|
Proration
|
Cancel
|
Guard
|
| 0
|
0
|
100%
|
-
|
LHA
|
| First Active
|
Active
|
Recovery
|
Frame Adv
|
Circuit
|
Invuln
|
| 19
|
3
|
22
|
-7
|
-100.0%
|
Strike 1-43
|
|
H-Moon specific reversal bunker, strike invulnerable for the full duration. Expensive, but a very important option given HHime's limited tools on defense.
|
|
|
|
| Ground
|
Damage
|
Red Damage
|
Proration
|
Cancel
|
Guard
|
| 100
|
0
|
100%
|
-
|
U
|
| First Active
|
Active
|
Recovery
|
Frame Adv
|
Circuit
|
Invuln
|
| 11
|
10
|
20
|
-
|
removes all
|
Full 1-39
|
| Air
|
Damage
|
Red Damage
|
Proration
|
Cancel
|
Guard
|
| 100
|
0
|
100%
|
-
|
U
|
| First Active
|
Active
|
Recovery
|
Frame Adv
|
Circuit
|
Invuln
|
| 12
|
10
|
15
|
-
|
removes all
|
Strike 1-30
|
|
Universal burst mechanic. Unlike Crescent/Full Heat activation, the hitbox and frame data doesn't vary between characters. However, you can be thrown out of this move if you input it in the air.
|
|
Special Moves
Special Movement
|
|
| Damage
|
Red Damage
|
Proration
|
Cancel
|
Guard
|
| -
|
-
|
-
|
-
|
-
|
| First Active
|
Active
|
Recovery
|
Frame Adv
|
Circuit
|
Invuln
|
| 12 (13)
|
-
|
14
|
-
|
-0.1% per frame
|
-
|
|
Flight. Hime decides the ground is for losers and spends some meter to take to the skies. A core part of her gameplan, you'll use this often.
Flight counts as an EX move, so she can cancel into it from most attacks on hit or block and can also flight cancel most specials on whiff. This enables some very freeform (obnoxious) neutral and pressure strings. Drains meter until she lands, but it can be activated with any amount of meter and ends on a timer rather than when her meter reaches 0. Corrects facing if she stops or changes direction after moving past the opponent, which allows for disgusting mixups. Her hurtbox is slightly smaller while floating in place, but not while moving.
Hime can glide forward and backwards, but descends slightly as she glides. She can also descend more quickly by holding down; holding 1 or 3 will act the same as 4 or 6, respectively. Resets her airdash upon activation, effectively giving her two airdashes, and she can fast-fall to the ground with 22, allowing her to quickly descend to the ground if necessary. Flight also allows her to act after recovering from most airborne attacks, including successful airthrows.
Flight has 4f prejump if starting from the ground, then 12f startup while rising before Hime can act. However, movement is disabled for 26f (total 30f if starting from ground). Movement from airdash, double jump, and j214X is thus shortened if performed early, since Hime is locked in place for up to 14f. Glide and fastfall are enabled after the full 26f completes.
See the rebeat table for frame advantage when flight canceling different attacks.
|
|
Grounded Specials
|
|
|
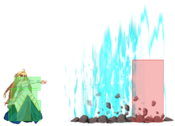
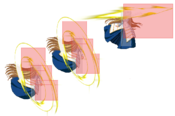
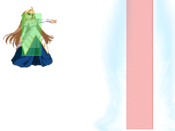
Geyser series. They hit low and are air unblockable. Multi-purpose move that can whiff punish, catch jump-outs, trap landings, and check ground movement. A and B geysers are flight cancelable after first active frame, and jump cancelable only when the first hitbox hits the opponent.
|
| A
|
Damage
|
Red Damage
|
Proration
|
Cancel
|
Guard
|
| 1000, 100*2 (1106)
|
(743)
|
65% (O)
|
-EX-, (J), -FL-
|
L
|
| First Active
|
Active
|
Recovery
|
Frame Adv
|
Circuit
|
Invuln
|
| 10
|
8
|
20
|
-9
|
(5.85%)
|
-
|
|
Hime summons a geyser at midrange. Pulls the opponent in slightly on block, and launches them towards Hime on hit. HHime's primary launcher and a key component of her midrange game. HHime's 236A is safer than Crescent or Full Moon's on block, though opponents may still be able to punish careless use depending on matchup and spacing. Good advantage on flight cancel.
Jump or flight canceling 236A temporarily increases j214A startup. See j214A for more information.
|
| B
|
Damage
|
Red Damage
|
Proration
|
Cancel
|
Guard
|
| 1000, 100*2 (1106)
|
(743)
|
65% (O)
|
-EX-, (J), -FL-
|
L
|
| First Active
|
Active
|
Recovery
|
Frame Adv
|
Circuit
|
Invuln
|
| 16
|
8
|
23
|
-12
|
(5.85%)
|
-
|
|
Hime steps forward and summons a geyser just beyond 236A range. Starts up slower and launches the opponent away from her, covering space just outside the range of her other ground tools. Generally low reward on hit due to spacing and launch trajectory.
|
| EX
|
Damage
|
Red Damage
|
Proration
|
Cancel
|
Guard
|
| 500*N
|
294*N
|
95%*N (M)
|
-
|
LH
|
| First Active
|
Active
|
Recovery
|
Frame Adv
|
Circuit
|
Invuln
|
| 11+6
|
X
|
66
|
-40 ~ 1
|
-100.0%
|
-
|
|
The EX version of geyser makes a giant series of waves that carries opponents to the other side of the screen. Soft knockdown on hit. Still air unblockable, but won’t lead to much on hit without trading. Long recovery yields poor frame advantage and inhibits shield punishes. Can start combos on trades if spacing is favorable and you run after them.
Does not contribute to internal hitcount for gravity and meter scaling. If you somehow combo off of it this is potentially useful, but linking it into Arc Drive after a throw in an attempt to jack up the hit count real quick won't work and does less damage.
|
|
|
|
|
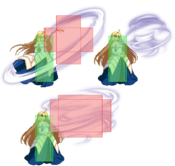
DP series. A key defensive option as a reversal and particularly to anti-air.
|
| A
|
Damage
|
Red Damage
|
Proration
|
Cancel
|
Guard
|
| 700, 250*2 (1147)
|
(460)
|
100%
|
-
|
LH
|
| First Active
|
Active
|
Recovery
|
Frame Adv
|
Circuit
|
Invuln
|
| 8
|
7
|
23
|
-13
|
2.8%, 0.7%*2 (4.2%)
|
-
|
|
623A has large hitboxes and good disjoint, but is somewhat slow and has no invulnerability. Pulls her hurtbox up slightly on startup, so it can low crush attacks that hit very low to the ground. Modest recovery time, which can sometimes bait responses from your opponent or avoid punishment if baited. If it hits once and counterhits, you can combo afterwards.
|
| B
|
Damage
|
Red Damage
|
Proration
|
Cancel
|
Guard
|
| 700*2, 400*2 (1944)
|
(1022)
|
100%
|
-
|
LH
|
| First Active
|
Active
|
Recovery
|
Frame Adv
|
Circuit
|
Invuln
|
| 6
|
7 (12) 7
|
29
|
-17 (vs Stand.), -33 (vs Crouch.)
|
2.8%*2, 1.4%*2 (8.4%)
|
Full 1-8
|
|
Faster startup than 623A and has some invulnerability on startup. The larger hitboxes have no invulnerability and aren't quite as big as 623A's. Has two additional hits high in the air after a long gap. Very punishable, but an important defensive option.
|
| EX
|
Damage
|
Red Damage
|
Proration
|
Cancel
|
Guard
|
| 500*5, 700 (2637)
|
(1913)
|
100%
|
-
|
LH(5), LHA
|
| First Active
|
Active
|
Recovery
|
Frame Adv
|
Circuit
|
Invuln
|
| 1+5
|
7 (8) 6 (18) 6
|
73
|
-83 (vs Stand.), -97 (vs Crouch.)
|
-100.0%
|
Full 1-73
|
|
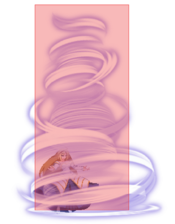
Extended DP with bigger hitboxes and a final hit that launches the opponent across the stage. Fully invulnerable until Hime starts falling. Useful if you need more invulnerability than 623B offers, or as a fast and air unblockable EX cancel from a whiffed special. Opponents can fall out from some spacings. All hits cause untechable knockdown, but opponents who fall out early enough may recover in time to punish on hit. Has no landing recovery, so opponents must punish while Hime is airborne.
Hime can link Arc Drive after 623C for good damage (5106) and oki during Heat against all characters except White Len.
|
|
|
|
|
Wind Mine series. Air unblockable initial hitbox, does ample chip and guard damage. Set mines detonate on a timer, are air blockable, and dissipate if Hime is hit or thrown.
|
| A
|
Damage
|
Red Damage
|
Proration
|
Cancel
|
Guard
|
| 400*3 (867)
|
(416)
|
70% (O)
|
-EX-, -FL-
|
LH
|
| First Active
|
Active
|
Recovery
|
Frame Adv
|
Circuit
|
Invuln
|
| 16
|
12
|
18
|
-2
|
1.75*3 (5.25%)
|
-
|
|
Hime spins gracefully and places a projectile which turns into a lingering wind mine. You cannot use this move again when a wind mine is already set. Earliest flight cancel starts on frame 30. Only -2 on block, so Hime may be able to continue pressure afterwards with good spacing.
|
| (Mine Detonation)
|
Damage
|
Red Damage
|
Proration
|
Cancel
|
Guard
|
| 1000
|
384
|
100%
|
-
|
LHA
|
| First Active
|
Active
|
Recovery
|
Frame Adv
|
Circuit
|
Invuln
|
| 117
|
9
|
-
|
-
|
2.8%
|
-
|
|
Wind mines automatically detonate approximately two seconds after they are set. Wind detonation has many applications including passive space control, combos, mixups, oki, and safe pressure resets. Counterhit detonation is very rewarding as a single hit launcher. Stray det hits are more difficult to confirm on Half Moon due to 3f hitstop, high launch, and 28f untech time.
|
| B
|
Damage
|
Red Damage
|
Proration
|
Cancel
|
Guard
|
| 400*2, 1000 (1213)
|
(527)
|
70% (O)
|
-EX-, -FL-
|
LH(2), LHA
|
| First Active
|
Active
|
Recovery
|
Frame Adv
|
Circuit
|
Invuln
|
| 15
|
6 (6) 9
|
9
|
-3
|
(6.3%)
|
-
|
|
Hime spins even more elegantly and follows the initial hitbox with an immediate detonation. Only -3 on block and moves forward more than 214A. Very good for space control, midrange pressure, catching jumpouts, and sharking airborne opponents. Many characters struggle to challenge 214B due to its excellent range, coverage, and recovery.
The initial hits are air unblockable, but the detonation is not. Spacing a C normal such that the initial hits of 214B whiff and the detonation connects on block results in a 9f gap. Earliest flight cancel starts on frame 31.
|
| EX
|
Damage
|
Red Damage
|
Proration
|
Cancel
|
Guard
|
| 200*18 (2337)
|
(1679)
|
100%
|
-
|
LHA
|
| First Active
|
Active
|
Recovery
|
Frame Adv
|
Circuit
|
Invuln
|
| 1+16
|
63
|
57
|
-20
|
-100.0%
|
Full 1-121
|
|
Large but very slow reversal. Long duration and recovery, air blockable, and pulls the opponent in on block, so they have ample time to ponder how they're going to kill you. Primarily useful for EX canceling specials to beat invulnerable EX moves from other characters thanks to the large hitbox and very long invulnerability time. Opponents can recover high in the air on hit.
Opponents should not shield this move. If they do, Hime will recover first and can punish with throw.
|
|
|
|
|
Hikari series. Hime takes her sweet time and summons 3 star-shaped fireballs which fly forwards, with trajectories dependent on the version used. The first star appears at head height, while the second and third appear at about the same time and move from chest and leg height. Gains meter both when the fireballs are created and on hit/block. Not used often due to the heavy commitment and low reward, but the space control and frame advantage are very good if the opponent respects it.
|
| A/B
|
Damage
|
Red Damage
|
Proration
|
Cancel
|
Guard
|
| 500*3 (1127)
|
(648)
|
75% (O)
|
-
|
LHA
|
| First Active
|
Active
|
Recovery
|
Frame Adv
|
Circuit
|
Invuln
|
| 53
|
X
|
29
|
6
|
2.1*3, 1.75%*3 (11.65%)
|
-
|
|
22A's first star drifts down as it flies forwards, while the second and third star move slightly upward. 22B's stars all move upwards. The third star will hit most crouchers in both cases. 22A will pin down grounded opponents sooner, while 22B offers a mix of moderate ground and air control with the rising stars.
Unlike Crescent and Full Moons, Half Moon cannot EX cancel 22A/B during startup. She can however drift along the ground during startup by holding left or right, and can EX cancel after frame 71.
|
| EX
|
Damage
|
Red Damage
|
Proration
|
Cancel
|
Guard
|
| 500*7
|
-
|
75% (O)
|
-
|
LHA
|
| First Active
|
Active
|
Recovery
|
Frame Adv
|
Circuit
|
Invuln
|
| 1+22
|
X
|
40
|
38
|
-100.0%, 2.5%*7
|
Full 1
|
|
Hime summons 7 stars to lock the opponent down, with all stars moving forward and very slightly down from their initial positions. Stars are summoned in two patterns of three with an additional low star at the end. EX stars persist once generated even if Hime is hit. Can function as a metered pseudo-reversal and reset to neutral in some cases, but the first star will whiff crouching opponents. More commonly used as a quick meter dump at the end of Heat or to avoid Heat if there is no better use of meter available at the time.
|
|
Aerial Specials
|
|
|
Homegirl summons a pillar of light to smite her opponents. Retains flight state if used during flight time, allowing her to retain her air options and harass her opponent from above. Also re-enters flight if used after other air options, provided flight duration has not expired. Does not reset flight time. Overall decent move to annoy and zone people with, but feeds a lot of meter if opponents shield it.
|
| A/B
|
Damage
|
Red Damage
|
Proration
|
Cancel
|
Guard
|
| 800*3 (1470)
|
(882)
|
50% (O)
|
-EX-, -FL-
|
LHA
|
| First Active
|
Active
|
Recovery
|
Frame Adv
|
Circuit
|
Invuln
|
| 34
|
19
|
6
|
7 (TK)
|
3.5%*3 (10.5%)
|
-
|
|
Hime summons a pillar of light ~1 character length in front of her. Slow startup, but has a large hitbox and very good frame advantage. Hitbox width expands slightly during early active frames before contracting back to normal, so can sometimes clip people unexpectedly. Can EX cancel starting frame 37.
B version functions the same, only the pillar is summoned further away.
|
| EX
|
Damage
|
Red Damage
|
Proration
|
Cancel
|
Guard
|
| 450*13 (2329)
|
(1740)
|
50% (O)
|
-
|
LHA
|
| First Active
|
Active
|
Recovery
|
Frame Adv
|
Circuit
|
Invuln
|
| 6+3
|
28
|
8
|
11 (TK)
|
-100.0%
|
Full 6, 19-21, 46-48
|
|
The fear. Hime decides she wants you dead and whips out her gun. Tracks, low startup, comes out almost instantly post super flash, good damage. Extremely useful move, one of Hime's main uses for meter.
Strong tool for whiff punishing, also secures damage/knockdown from stray hits and instant overhead j6B. Can cover whiffs while airborne. Sometimes used to tech trap. Knockdown is techable, but Hime can tech trap after in most situations or go into flight oki if close and the opponent doesn't tech. Can add significant damage after Flight > Airthrow depending on starter and routing. Very plus on block if TK'd or used in Flight, but if the opponent has not already committed to an action they can shield on reaction to superflash for significant meter gain and better frame advantage.
|
|
|
|
|
Air wind mine series. Hime zooms through the air before placing a wind mine. Slower than 214A, but very plus when used low to the ground. Sometimes useful as an evasive attack in the air. Hime's collision detection is disabled until after the first active frame, so j214 can cross through opponents. Opponents can always block j214 opposite her direction of movement, while it is only blockable sameside if Hime does not successfully pass across the opponent before the attack hits. Recovery time during flight varies depending on relative facing at the end of the attack.
|
| A
|
Damage
|
Red Damage
|
Proration
|
Cancel
|
Guard
|
| 400*3 (867)
|
(416)
|
70% (O)
|
N/A
|
LH
|
| First Active
|
Active
|
Recovery
|
Frame Adv
|
Circuit
|
Invuln
|
| 22
|
12
|
-
|
20 (TK)
|
1.75%*2, 2.8% (5.25%)
|
-
|
|
Hime dashes backwards and sets a wind mine. Very plus when TK'd, so it's a strong tool in pressure. Can catch opponents by surprise if used from behind to cross back over them, and the quick backwards movement can bait many options.
Flight into immediate j.214A shortens her movement, allowing Hime to set a mine on top of an opponent during pressure if she's close enough. 22D j214A is +11.
J214A is bugged such that certain sequences can extend its startup and travel time:
- Match intros, if not skipped. Effect can be dramatic depending on actions from round start to first j214A. Can also cause desyncs in replays if intros are skipped on the replay.
- Jump or Flight canceling 236A extends j214A startup to 27f.
Looping idle or movement animations will eventually reduce/clear Hime's internal loop count and reset j214A startup. Certain specials will also set and clear the loop counter: 236A/C, 623C, 214C, 22X (not 22D), j.236C, j.214B/C, and Arc Drive.
|
| (Mine Detonation)
|
Damage
|
Red Damage
|
Proration
|
Cancel
|
Guard
|
| 1000
|
384
|
100%
|
-
|
LHA
|
| First Active
|
Active
|
Recovery
|
Frame Adv
|
Circuit
|
Invuln
|
| 117
|
9
|
-
|
-
|
2.8%
|
-
|
|
Detonations from j214 set have the same properties as from 214A.
|
| B
|
Damage
|
Red Damage
|
Proration
|
Cancel
|
Guard
|
| 400*3 (867)
|
(416)
|
70% (O)
|
-
|
LH
|
| First Active
|
Active
|
Recovery
|
Frame Adv
|
Circuit
|
Invuln
|
| 30
|
12
|
-
|
16 (TK)
|
1.75%*2, 2.8% (5.25%)
|
-
|
|
Hime flies forward to set a mine. Pushback on j214B and its mine attempt to push the opponent away from the direction of the crossup, which results in a vacuum effect if blocked sameside. Slower than the other versions and is generally used moving towards the opponent, so it's more vulnerable to counterattacks. TK j214B is occasionally used in pressure, along with some of her combos. Flight into j.214B has shortened movement similar to j.214A, but in the opposite direction and will usually whiff during pressure.
|
| EX
|
Damage
|
Red Damage
|
Proration
|
Cancel
|
Guard
|
| 200*18 (2337)
|
150*18 (1679)
|
100%
|
-
|
LHA
|
| First Active
|
Active
|
Recovery
|
Frame Adv
|
Circuit
|
Invuln
|
| 1+16
|
63
|
-
|
-11 (TK)
|
-100.0%
|
Full 1-95
|
|
Similar to the ground version.
|
|
|
|
| Damage
|
Red Damage
|
Proration
|
Cancel
|
Guard
|
| 1400, 700*4 (2415)
|
(1561)
|
60% (M)
|
-
|
H
|
| First Active
|
Active
|
Recovery
|
Frame Adv
|
Circuit
|
Invuln
|
| 1+9
|
4
|
0
|
-
|
-150.0%
|
Full 1-13
|
|
Big Kick. EX move that costs 150% meter. Does decent damage, but more importantly allows her to set up flight or wind oki after air combos. Has a cool animation and rebounds the opponent off the walls, dropping them close to the corner. Follow up with Arc Drive, 2C > 22D, or 2C > 5C > 214A > 22D > AT and make them guess.
Kick is air unblockable and has invulnerability through the active frames. It can serve as a damaging but expensive alternative to airthrow to start a full combo against airborne opponents at the proper height and grants instant carry to corner. Follow up after landing with 2C 214A 22D corner routing.
|
|
Arc Drive
The enemy’s hard-earned meter is now just a memory. The enemy’s hard-earned meter is now just a memory.
|
| Damage
|
Red Damage
|
Proration
|
Cancel
|
Guard
|
| 0, 275*25, 250 (3960)
|
0, 275*26 (2809)
|
100%
|
-
|
LHA
|
| First Active
|
Active
|
Recovery
|
Frame Adv
|
Circuit
|
Invuln
|
| 3+2
|
3 (17) 3
|
52
|
-31
|
removes all
|
Full 7-68
|
|
A powerful combo ender. Inflicts a 5 second Circuit Break that also removes 100 meter. High hit count contributes significant meter to the opponent; will trigger the protection system if done after a full combo and thus donate even more meter. If your generous donation puts the opponent in MAX, or they were already in it, the 100 deduction becomes an elimination, setting enemy meter to zero. Half Moon characters will instead have their meter reduced to 100 since they do not have MAX and do not auto-Heat during combos.
Donating the opponent meter is affected by moon-specific meter generation; Full Moon gets 10% less than C, and Half Moon gets 30% less.
In addition to ruining the enemy’s meter, it leads to hard knockdown with massive frame advantage. Gives ample time to set up flight oki, a wind mine, or even do both with 214A > 22D.
Has two hitboxes. The first only connects on opponents in hitstun and makes it easy to combo into. The second, beginning frame 25, tries to hit again if the cinematic hasn’t already begun. This makes it more difficult to punish things with, and combined with delayed invulnerability frames makes it a very situational reversal at best.
Half Moon doesn't get much opportunity to utilize her Arc Drive, but it's situationally useful after a throw or when entering Heat midcombo such that j63214C > Arc Drive is feasible.
See this spreadsheet for more specifics.
|
|
Notable Rebeats and Gaps
Rebeat Table
| Attack
|
Chain
|
Advantage
|
| 5C, 3C, 6[C]
|
5A
|
-1
|
| 2A
|
-2
|
| 5A, 5A6A, 2A, 214B
|
22D
|
-4
|
| 5B, 2B, 214A
|
-1
|
| 5C, 2C, 3C, 6C, 6[C], 5A6AA
|
+2
|
| 236A, 236B
|
+3
|
| j236A, j236B
|
+26
|
Gap Table
| Attack
|
Chain
|
Frame Gap
|
| 5A, 5A6A, 2A
|
2C
|
0
|
| 5C, 6C
|
1
|
| 214B
|
3
|
| 236B, 214A
|
4
|
| 6[C]
|
8
|
| 5B, 2B
|
214B
|
0
|
| 236B, 214A
|
1
|
| 6[C]
|
5
|
| 5C, 2C, 3C, 5A6AA
|
6[C]
|
2
|
MBAACC's "neutral frame" is counted as the "0th" gap frame in this table. Opponents do not benefit from autoguard on this frame and must block all attacks correctly, but are not able to act until the next frame.
Additional Resources
H-Hime Match Video Database
Melty Bits: H-Hime
H-Archehype Earth Combo Movie (Notations in the comments)
H Hime workshop
C/H hime compilation
C/H hime compilation 2
hime combo video
Notable Players
| Name |
Color
|
Region |
Common Venues |
Status |
Details
|
| gaku |

|
North America |
Netplay, Lunar Phase |
Active |
CAoko main with a secondary H-Hime. Very good technical knowledge of the character.
|
| Index |

|
North America |
Netplay |
Inactive |
AKA Cadenza or Cat.
|
| Inso |

|
Brazil |
Netplay |
Active (dropped) |
Obtained high-level results at majors with the character. Has since switched mains to H-WArc then C-Miyako.
|
| Magemo |

|
Europe |
Netplay |
Inactive |
Can be found in the Community Server.
|
| Mavi |

|
North America |
Netplay |
Active |
Can be found in the Community Server.
|
shirokuma
(しろくま) |

|
Japan |
Netplay |
Active? |
Mains C-Hime and plays in netplay brackets. Strong player but not a lot of footage.
|
Character Page Progress
This page is mostly complete, consider joining as an editor to help finish it up. Please update this character's roadmap page when one of the editing goals have been reached.
| In Progress
|
- Combos:
- Add damage, meter gain/given numbers and video links to pre-existing combos.
- Expand combo listings where needed.
|
MBAACC Navigation
