Additional Resources
H-Miyako Match Video Database
Notable Players
| Name |
Color
|
Region |
Common Venues |
Status |
Details
|
| Eika |

|
Europe |
Netplay |
Active |
Found in Meltycord.
|
| hekuto (ヘクト) |

|
Japan |
KorewaMelty |
Inactive |
|
| nic |

|
North America |
Netplay |
Active |
Found in Meltycord and Melty Blood Community Server.
|
| ViviMayoi |

|
North America |
Netplay |
Active |
F-Miyako main with H-Miyako secondary.
Found in Melty Blood Community Server.
|
| yunomi (ゆのみ) |

|
Japan |
Netplay |
Inactive |
|
Overview
Strengths / Weaknesses
| Strengths
|
- High meterless damage
- Good pressure
- Good combo conversions
- 236C, the long range special to punish zoning with a lot of iframes (unlike F-Miyako's 236C)
- Amazing ground grab
|
| Weaknesses
|
- Small hitboxes on normals
- Reliance on rebeats makes damage inconsistent
- Poor shield counter will whiff sometimes shielding air attacks from above
- Bad dodge
|
General Gameplan
Neutral
Abuse her very strong air normals. Try to be as unpredictable as possible.
Her ground dashes may not be the best, but they serve their purposes well. Dash up 2B/2C can be good for catching your opponent off guard. Dash 5C sometimes works for forcing your opponent out of the air.
She also has a very good walk speed.
Pressure
While H-Miyako pressure is not as good as C-Miyako, H-Miyako pressure is still very good. Better than F-Miyako's.
The biggest problem is that you have to be unpredictable to not allow opponent to get away without risk.
Knowing when to rebeat and which buttons/options are available is a key to doing this.
Each H-Miyako player that wants to be competent will need to have reliable rebeat system against certain opponents mindsets. For example if they jump out a lot, try to block 22A standing a lot, shield, dodge, backdash etc.
H-Miyako retains ability to nullify a lot of DPs via 2B > 22A. 2B and 22A both has clash frames, so they can each eat one hit of the DP.
This is an important loop, but unlike C-Miyako's 22A loop, it's flawed because it allows opponent to jump out. The reason why opponent can jump out is 2A has low blockstun frames as opposed to C-Miyako's 5B or 6B. However you still have to rely on this loop, because it keeps the pressure up. You will have to vary blockstrings to include 2B and 5C to catch jumps.
For example 5B > 5C > 2A > 22A > 5B > 5C > 2A > 22A now opponent saw the loop twice, and you can do more, instead of that they know they can just jump out.
But if you then follow up with 5B > 5C > 2A > tiny delay > 2C they will get hit. If they didn't jump you can reverse beat with 5A whiff and try to restart pressure.
You can also do a proper 22A pressure which doesn't allow jump outs: ...2B > 5C > 5B > 22A.
This would not allow jump outs. Depending on distance you will most likely be able to connect with 5B again.
Since 22A is -3 when blocked standing, opponents will try to do just that to get their turn.
To counter that, you can either do quick 2C, or 22B.
Tech
- Corner AD 50/50:
- Miyako's AD pulls opponent out of the corner a little bit, so you can do dash > dodge to get behind for a 50/50.
- If dodge is delayed, dash can push opponent so that dodge fails to crossup.
- It is hard/impossible to see due to amount of dust ther is when opponent falls down.
- With the amount of meter H-Miyako is gaining and corner carry she has, you should be able to use AD > dodge mixup quite often.
- Corner 5BB 214[B] 50/50:
- H-Miyako has 50/50 that works on few characters.
- It can be achieved via the following route:
- Throw, 5C > 5BB > 214[B], 2B > 236A, 2C. Then 8 jump drift towards opponent. You will land on difference sides depending on the timing.
- The 50/50 depends on when you press 2B. Hit it early, and you will land on the same side, hit it later, and you will switch side.
- Switching side is harder to see than not switching. So side switch first, otherwise, the opponent will not respect your mixup (Unless you know they know and expect this right away).
- This timing is character dependent, some need 2B hit earlier to stay on the same side.
- Here is the list of characters where this 50/50 works:
- Tohno, Sion, VSion, Akiha, Arc, WArc, Seifuku, Satsuki, Ryougi, Hisui, Kohaku
- Corner 5BB 421B mixup:
- H-Miyako has a fake-ish mixup off of 421B hitting behind opponent after wall slam.
- Example is Throw > 2C > 5BB > delay > 421B. Delay allows opponent to get off the wall after the slam, making 421B hit from behind.
- When 421B hits, opponent will get thrown towards the corner. Once 421B hits, jump cancel with 8.
- By default if you do not press anything you will land in the corner. But the timing is obvious, so you need to be in the air to be more ambiguous. You can do that with doing a air backdash, then dodge > j.B whiff > land.
- This would be around the time opponent starts to wake up.
- However to not end up in the corner, after jump cancelling with 8, do a tiny drift forward, then do air backdash > dodge > j.B whiff > land.
- Post air throw corner oki:
- It is recommended to keep corner, as Miyako's neutral is tough, and the corner is where she is the most scary.
- In the corner, combos that end with extremely high in the air, and end with an air throw, will allow Miyako to do a dash grab that punishes neutral tech.
- Since it's a punish, it is guaranteed until opponent stops neutral/back teching.
Defense
H-Miyako has plenty of defensive tools, all with it's own drawbacks.
- 623A. Meterless DP, but it is not a strong DP and can trade sometimes.
- 623C. More reliable DP. If second hit is blocked (if opponent didn't crouch it), it can be jump cancelled allowing you to run away.
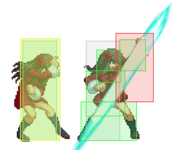
- 214C. Not a true reversal, because hurtbox shows up before the hitbox. But has iframes from the first frame (even before screen flash). It is safe on block! But opponents able to react and shield the hit and punish.
- 22C. A fake reversal. Hitbox comes out at the same time as hurtbox and launches high up. The hitbox is extremely small and travels almost fullscreen very quickly. This would only beat certain oki like C-Nero 5[C] meaty. Can also be used to punish zoning far away. The problem with this move is that opponents will simply jump and punish.
- 214D during blockstun. Half moon special bunker that costs 100% meter. Safest reversal.
- Shield. Not only it's a Half moon shield, it's counter is also bad. Other than that, nothing special about it.
- Dodge. Rolling dodge, generally, is worse than standing dodges. However Miyako's AD pulls opponent out of the corner a little bit, so you can do dash > dodge to get behind for a 50/50. If dodge is delayed, dash can push opponent so that dodge fails to crossup. With the amount of meter H-Miyako is gaining and corner carry she has, you should be able to use AD > dodge mixup quite often.
- Backdash. Pretty bad backdash, slow and doesn't go very far. Doesn't jump so if opponent catches you they get full combo. She does funny roll though.
Character specific issues
| Midscreen or further character issues
|
| Character group
|
Issue
|
Solution
|
| Roa, Mech, Neco-Mech |
214B > 2C |
214B > 5C > 2C
|
| Nanaya, Nero, Aoko |
6AAA > 214B |
421A combos
|
| Kouma, Waracha |
421A/B > 2C |
214B combos
|
| Miyako, PCiel |
2C > 5C > 5B |
2C > 5C > 5A > 5B
|
| Neco-arc, NAC |
2C > 5C > 5BB |
5C > 2C > 5BB
|
| Corner only character issues
|
| Character group
|
Issue
|
Solution
|
| Roa, Mech, Neco-Mech |
236A > 2C |
214B > 5C > 2C
|
| Nanaya, Nero, Aoko |
5BB > 214[B] |
421A combos
|
| Ground throw character issues
|
| Character group
|
Issue
|
Solution
|
Aoko, Tohno, Nanaya, Miyako, Arc, WArc,
VAkiha, Mech, Len, WLen, Kohaku |
Throw > 5C > 5A |
Throw > 2C combos
|
Combos
| Combo Notation Help
|
Disclaimer: Combos are written by various writers, so the actual notation used in pages can differ from the standard one.
For more information, see Glossary and Controls.
|
| X > Y
|
X input is cancelled into Y.
|
| X > delay Y
|
Must wait for a short period before cancelling X input into Y.
|
| X, Y
|
X input is linked into Y, meaning Y is done after X's recovery period.
|
| X+Y
|
Buttons X and Y must be input simultaneously.
|
| X/Y
|
Either the X or Y input can be used.
|
| X~Y
|
This notation has two meanings.
- Use attack X with Y follow-up input.
- Input X then within a few frames, input Y. Usually used for option selects.
|
| X(w)
|
X input must not hit the opponent (Whiff).
|
| j.X
|
X input is done in the air, implies a jump/jump cancel if the previous move was done from the ground.
Applies to all air chain sections:
- Assume a forward jump cancel if no direction is given.
- Air chains such as j.A > j.B > j.C can be shortened to j.ABC.
|
| sj.X
|
X input is done after a super jump. Notated as sj8.X and sj9.X for neutral and forward super jumps respectively.
|
| dj.X
|
X input is done after a double jump.
|
| sdj.X
|
X input is done after a double super jump.
|
| tk.X
|
Stands for Tiger Knee. X motion must be buffered before jumping, inputting the move as close to the ground as possible. (ex. tk.236A)
|
| (X)
|
X is optional. Typically the combo will be easier if omitted.
|
| [X]
|
Input X is held down. Also referred to as Blowback Edge (BE). Depending on the character, this can indicate that this button is held down and not released until indicated by the release notation.
|
| ]X[
|
Input X is released. Will only appear if a button is previously held down. This type of input is referred to as Negative Edge.
|
| {X}
|
Button X should only be held down briefly to get a partially charged version instead of the fully charged one.
|
| X(N)
|
Attack "X" should only hit N times.
|
| (XYZ)xN
|
XYZ string must be performed N times. Combos using this notation are usually referred to as loops.
|
| (XYZ^)
|
A pre-existing combo labelled XYZ is inserted here for shortening purposes.
|
| CH
|
The first attack must be a Counter Hit.
|
| Air CH
|
The first attack must be a Counter Hit on an airborne opponent.
|
| 66
|
Performs a ground forward dash.
|
| j.66
|
Performs an aerial forward dash, used as a cancel for certain characters' air strings.
|
| IAD/IABD
|
Performs an Instant AirDash.
|
| AT
|
Performs an Air Throw. (j.6/4A+D)
|
| IH
|
Performs an Initiative Heat.
|
| AD
|
Performs an Arc Drive.
|
| AAD
|
Performs an Another Arc Drive.
|
Normal Combos
- Meterless, Midscreen 2A starter into damage:
- These are damage optimised, you will not get corner advantage using these.
| Condition
|
Notation
|
Damage
vs V.Sion
|
Notes
|
|
Normal starter, grounded opponent
Works On: All but below
|
- 2AAA > 2B > 5B > 5C > 5A6AA > 214B > 2C > 2B > 5C > 236A > 2C > 5C > 5B > 2B > j.BCA > dj.ABC > AT
|
5521
|
| |
| Meter Gained: ??? |
Meter Given (vs C-Moon): ??? |
| Damage tested on: V.Sion. Hard link is 214B > 2C, rest is easy. Have to delay 214B. You can omit this link and do 214B > 2B > 236A, but you will lose a bit of dmg and meter. |
|
|
Character-specific version
Works On: Miyako, Powered Ciel, Hime
|
- 2AAA > 2B > 5B > 5C > 5A6AA > 214B > 2C > 2B > 5C > 236A, 2C > 5C > 5A > 5B > 2B > j.BCA > dj.ABC > AT
|
5498
|
| |
| Meter Gained: ??? |
Meter Given (vs C-Moon): ??? |
| Damage tested on: Miyako. |
|
|
Character-specific version
Works On: Aoko, Nanaya, Nero
|
- 2AAA > 2B > 5B > 5C > 5A6AA > 2C > 2B > 5C > 236A > 2C > 5C > 5B > 2B > j.BCA > dj.ABC > AT
|
5507
|
| |
| Meter Gained: ??? |
Meter Given (vs C-Moon): ??? |
| Damage tested on: Aoko. |
|
|
Character-specific version
Works On: Roa, Mech-Hisui
|
- 2AAA > 2B > 5B > 5C > 5A6AA > 214B > 2B > 5C > 236A > 5A > 5B > 2B > j.ABC > dj.ABC > AT
|
5042
|
| |
| Meter Gained: ??? |
Meter Given (vs C-Moon): ??? |
| Damage tested on: Roa. |
|
|
- Meterless, Far away 2A starter into corner carry:
- Carries to corner from full screen. You keep corner after these.
| Condition
|
Notation
|
Damage
vs V.Sion
|
Notes
|
|
Normal starter, grounded opponent
Works On: All but below
|
- 2AAA > 2B > 5B > 5C > 5A6AA > 214B > 2C > 5C > 5BB > 421B > AT(w), land 2C > 2B > 5B > j.ABC > dj.ABC > AT
|
5338
|
| |
| Meter Gained: ??? |
Meter Given (vs C-Moon): ??? |
| Might need to omit 5BB from 5C > 5BB if too close to corner to avoid wall slam from 5C. |
|
|
Character-specific version
Works On: Roa, Mech-Hisui
|
- 2AAA > 2B > 5B > 5C > 5A6AA > 214B > 5C > 2C > 5BB > 421B > AT(w), land 2C > 2B > 5B > j.ABC > dj.ABC > AT
|
5256
|
| |
| Meter Gained: ??? |
Meter Given (vs C-Moon): ??? |
| Damage tested on: Roa. 2C doesn't connect on them, but you can do 5C > 2C instead of 2C > 5C! |
|
|
Character-specific version
Works On: Aoko, Nanaya, Nero
|
- 2AA > 2B > 5B > 5C > 5A6AA > 421A > AT(w), land 2C > 5C > 5BB > j.ABC > dj.ABC > AT
|
4995
|
| |
| Meter Gained: 91.7% |
Meter Given (vs C-Moon): ??? |
| Damage tested on: Aoko. Note that 2AA is used, as 2AAA has big chance of allowing tech after 421A. |
|
|
Character-specific version
Works On: Kouma, Warachia
|
- 2AAA > 2B > 5B > 5C > 5A6AA > 214B > 2C > 5C > 5BB > 421B > AT(w), land 2B > 5B > j.ABC > dj.ABC > AT
|
4902
|
| |
| Meter Gained: ??? |
Meter Given (vs C-Moon): ??? |
| Damage tested on: Kouma. Second 2C doesn't connect on them. |
|
|
Character-specific version
Works On: Powered Ciel
|
- 2AAA > 2B > 5B > 5C > 5A6AA > 214B > 2C > 5C > 5A > 5BB > 421B > AT(w), land 2C > 2B > 5B > j.ABC > dj.ABC > AT
|
5155
|
| |
| Meter Gained: ??? |
Meter Given (vs C-Moon): ??? |
| Strangely, Miyako doesn't need 5A before 5BB. |
|
|
Corner Combos
Meterless, 2A starter into damage:
- These lose the corner advantage, but deal big damage.
| Condition
|
Notation
|
Damage
vs V.Sion
|
Notes
|
|
Normal starter, grounded opponent
Works On: All except below
|
- 2AAA > 2B > 5C > 5BB > 214[B] > 2B > 236A > 2C > 5C > 5B > 2B > j.BCA > dj.ABC > AT
|
5596
|
| |
| Meter Gained: 100.8% |
Meter Given (vs C-Moon): ??? |
| Damage tested on: V.Sion |
|
|
Character-specific version
Works On: Miyako, Powered Ciel, Hime
|
- 2AAA > 2B > 5C > 5BB > 214[B] > 2B > 236A > 2C > 5C > 5A > 5B > 2B > j.BCA > dj.ABC > AT
|
5589
|
| |
| Meter Gained: 102.9% |
Meter Given (vs C-Moon): ??? |
Damage tested on: Miyako. Same combo as before but you have to do 5C > 5A, otherwise Miyako/PCiel will fly off and 5B wont catch.
Hime won't fly off, but her air ender will become janky and require super double jump j.BC <sdj> j.AABC. It would do 9 more dmg on her, but you will lose 2% meter, so just do 5C > 5A. |
|
|
(Character-specific version)
Works On: Nanaya, Nero, Aoko
|
- 2AAA > 2B > 5B > 5C > 5A6AA > 214B > 2C > 2B > 5C > 236A > 2C > 5C > 5B > 2B > j.BCA > dj.ABC > AT
|
5662
|
| |
| Meter Gained: 121.1% |
Meter Given (vs C-Moon): ??? |
Damage tested on: Nanaya. Damage varies depending on timing due to reverse beat penalty coming off gradually.
Hard link is 214B > 2C, rest is easy. Have to delay 214B. You can omit this link and do 214B > 2B > 236A, but you will lose a bit of dmg and meter. |
|
|
Character-specific version
Works On: Roa, Mech-Hisui
|
- 2AAA > 2B > 5C > 5BB > 214[B] > 2B > 236A > 5A > 5B > 2B > j.ABC > dj.ABC > AT
|
5365
|
| |
| Meter Gained: 90.3% |
Meter Given (vs C-Moon): ??? |
Damage tested on: Roa. 2C doesnt work on these a-holes.
You have to hit 2B part from 2B > 236A asap, so that they are still high in the air. Then you have to 236A asap too, so that they don't get to air tech.
There are better pickups after 236A, like 5A > 5C > 5B > 2B but combos become janky. |
|
|
100%, 2A starter into corner:
- Deals big damage and keeps corner at a price of 100% meter.
| Condition
|
Notation
|
Damage
vs V.Sion
|
Notes
|
|
Normal starter, grounded opponent
Works On: All except below
|
- 2AAA > 2B > 5C > 5BB > 214[B] > 2B > 236C > dash > 2C > 2B > 5B > j.ABC > dj.ABC > AT
|
5810
|
| |
| Meter Gained: ??? |
Meter Given (vs C-Moon): ??? |
| Damage tested on: V.Sion. Dash 2C switches side so you don't lose corner. |
|
|
(Character-specific version)
Works On: Nanaya, Nero, Aoko
|
- 2AAA > 2B > 5B > 5C > 5A6AA > 214B > 2C > 2B > 5C > 236C > dash > 2C > 2B > 5B > j.ABC > dj.ABC > AT
|
5693
|
| |
| Meter Gained: ??? |
Meter Given (vs C-Moon): ??? |
Damage tested on: Nanaya.
Hard link is 214B > 2C, rest is easy. Have to delay 214B. |
|
|
Character-specific version
Works On: Roa, Mech-Hisui
|
- 2AAA > 2B > 5C > 5BB > 214[B] > 2B > 236C > dash > 5B > 2B > j.ABC > dj.ABC > AT
|
5571
|
| |
| Meter Gained: ??? |
Meter Given (vs C-Moon): ??? |
| Damage tested on: Roa. 2C doesnt work on these a-holes. |
|
|
100%, 2A starter into oki:
- Deals good damage and gains oki at a price of 100% meter.
| Condition
|
Notation
|
Damage
vs V.Sion
|
Notes
|
|
Normal starter, grounded opponent
Works On: All except below
|
- 2AAA > 2B > 5B > 5C > 5A6AA > 214B > 2C > 2B > 5C > 421B > AT(w), land 2C > 2B > 5B > 421C
|
5041
|
| |
| Meter Gained: 86.1% - 100% |
Meter Given (vs C-Moon): ??? |
| Damage tested on: V.Sion. You get a lot of meter before the required 100%. You can do this combo even if you have 15%. |
|
|
Character-specific version
Works On: Roa, Mech-Hisui
|
- 2AAA > 2B > 5B > 5C > 5A6AA > 214B > 2B > 5C > 421B > AT(w), land 2C > 2B > 5B > 421C
|
4752
|
| |
| Meter Gained: ??? |
Meter Given (vs C-Moon): ??? |
| Damage tested on: Roa. 214B > 2C doesnt work on these a-holes. |
|
|
Corner OTGs
- Sometimes you get a knockdown that you don't have time to pick up an air hit from, often from 22a or 2c.
| Condition
|
Notation
|
Damage
vs V.Sion
|
Notes
|
|
any knockdown
Works On: all
|
- 2AAAA(A) > 5C > 5AAA > 5B > 2B > (2C)
|
1916
|
| |
| Meter Gained: 42.7 |
Meter Given (vs C-Moon): ??? |
| Builds a ton of meter. This is most applicable after 22a. 5th 2A and 2C drop on some characters. |
|
|
22A
Works On: all
|
- 22A > 22C > 2C > 5C > 5B > 2B > jABC > jABC > AT
|
3424
|
| |
| Meter Gained: 15.5 |
Meter Given (vs C-Moon): ??? |
| Highest damage otg from 22a but requires quick reactions. If you're slow, instead do the above otg into either 623c (keeps corner) or 236c (more damage). |
|
|
Move Descriptions
| Frame Data Help
|
| Header
|
Tooltip
|
| Move Box Colors
|
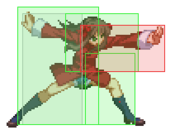
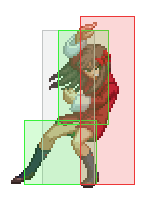
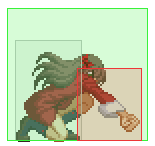
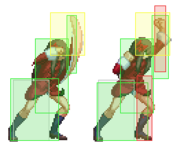
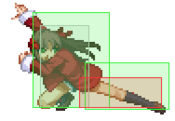
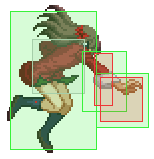
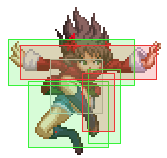
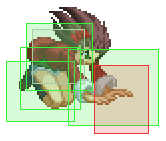
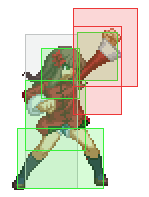
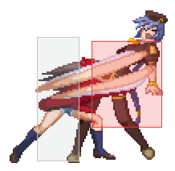
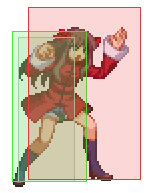
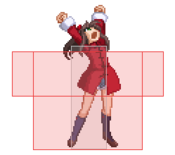
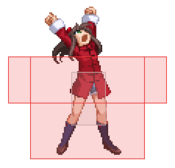
Light gray = Collision Box (A move lacking one means it can go through the opponent's own collision box).
Green: Hurt Boxes.
Red: Hit(/Grab) Boxes.
Yellow: Clash Boxes (When an active hitbox strikes a clash box, the active hitbox stops being active. Multi-hit attacks can beat clash since they will still progress to the next hitbox.)
Magenta: Projectile-reflecting boxes OR Non-hit attack trigger boxes (usually).
Blue: Reflectable Projectile Boxes.
|
| Damage
|
Base damage done by this attack.
(X) denotes combined and scaled damage tested against standing V. Sion.
|
| Red Damage
|
Damage done to the recoverable red health bar by this attack. The values are inherently scaled and tested against standing V. Sion.
(X) denotes combined damage.
|
| Proration
|
The correction value set by this attack and the way it modifies the scaling during a string. See this page for more details.
X% (O) means X% Overrides the previous correction value in a combo if X is of a lower percentage.
X% (M) means the current correction value in a combo will be Multiplied by X%. This can also be referred to as relative proration.
|
| Circuit
|
Meter gained by this attack on hit.
(X%) denotes combined meter gain.
-X% denotes a meter cost.
|
| Cancel
|
Actions this move can be cancelled into.
SE = Self cancelable.
N = Normal cancelable.
SP = Special cancelable.
CH = Cancelable into the next part of the same attack (Chain in case of specials).
EX = EX cancelable.
J = Jump cancelable.
(X) = Cancelable only on hit.
-X- = Cancelable on whiff.
|
| Guard
|
The way this move must be blocked.
L = Can block crouching
H = Can block standing.
A = Can block in the air.
U = Unblockable.
|
| Startup
|
Amount of frames that must pass prior to reaching the active frames. Also referred to as "True Startup".
|
| Active
|
The amount of frames that this move will have a hitbox.
(x) denotes frame gaps where there are no hitboxes is present. Due to varied blockstuns, (x) frames are difficult to use to determine punish windows. Generally the larger the numbers, the more time you have to punish.
X denotes active frames with a duration separate from its origin move's frame data, such as projectile attacks. In this case, the total length of the move is startup+recovery only.
|
| Recovery
|
Frames that this move has after the active frames if not canceled. The character goes into one frame where they can block but not act afterwards, which is not counted here.
|
| Advantage
|
The difference in frames where you can act before your opponent when this move is blocked (assuming the move isn't canceled and the first active frame is blocked).
If the opponent uses a move with startup that is at least 2 frames less than this move's negative advantage, it will result in the opponent hitting that move.
±x~±y denotes a range of possible advantages.
|
| Invul
|
Lists any defensive properties this move has.
X y~z denotes X property happening between the y to z frames of the animations. If no frames are noted, it means the invincibility lasts through the entire move.
Invicibility:
- Strike = Strike invincible.
- Throw = Throw invincible.
Hurtbox-Based Properties:
- Full = No hurtboxes are present.
- High = Upper body lacks a hurtbox.
- Low = Lower body lacks a hurtbox.
Miscellaneous Properties
- Clash = Frames in which clash boxes are active.
- Reflect = Frames in which projectile-reflecting boxes are active.
- Super Armor = Frames in which the character can take hits without going into hit stun.
|
Normal Moves
Standing Normals
|
|
| 5A
|
Damage
|
Red Damage
|
Proration
|
Cancel
|
Guard
|
| 300
|
192
|
72% (O)
|
-SE-, -N-, -SP-, -CH-, -EX-, (J)
|
LH
|
| First Active
|
Active
|
Recovery
|
Frame Adv
|
Circuit
|
Invuln
|
| 4
|
5
|
8
|
-1
|
2.1%
|
-
|
|
A quick, forward jab. It's fast, but otherwise not particularly notable. It's safe on block and good for whiff cancelling.
|
| 5A~6A
|
Damage
|
Red Damage
|
Proration
|
Cancel
|
Guard
|
| 600
|
384
|
80% (M)
|
N, SP, -CH-, EX, (J)
|
LH
|
| First Active
|
Active
|
Recovery
|
Frame Adv
|
Circuit
|
Invuln
|
| 8
|
4
|
16
|
-5
|
4.2%
|
-
|
|
A slightly downward palm thrust.
|
| 5A~6A~6A
|
Damage
|
Red Damage
|
Proration
|
Cancel
|
Guard
|
| 1000
|
768
|
60% (O)
|
(N), SP, EX, (J)
|
LH
|
| First Active
|
Active
|
Recovery
|
Frame Adv
|
Circuit
|
Invuln
|
| 11
|
4
|
16
|
-2
|
7.0%
|
-
|
|
A lunging double palm thrust. Not cancellable to any normals on block, only specials.
|
|
|
|
| 5B
|
Damage
|
Red Damage
|
Proration
|
Cancel
|
Guard
|
| 600
|
336
|
80% (O)
|
N, SP, -CH-, EX, (J)
|
LH
|
| First Active
|
Active
|
Recovery
|
Frame Adv
|
Circuit
|
Invuln
|
| 7
|
3
|
16
|
-4
|
4.2%
|
-
|
|
A quick chop.
|
| 5B~B
|
Damage
|
Red Damage
|
Proration
|
Cancel
|
Guard
|
| 800
|
576
|
70% (O)
|
SP, EX, (J)
|
LH
|
| First Active
|
Active
|
Recovery
|
Frame Adv
|
Circuit
|
Invuln
|
| 7
|
3
|
19
|
-4
|
5.6%
|
-
|
|
A lunging palm thrust. Wall slams even grounded opponents.
|
|
|
|
| Damage
|
Red Damage
|
Proration
|
Cancel
|
Guard
|
| 800
|
576
|
75% (O)
|
N, SP, EX, (J)
|
LH
|
| First Active
|
Active
|
Recovery
|
Frame Adv
|
Circuit
|
Invuln
|
| 10
|
8
|
18
|
-6
|
7.0%
|
-
|
|
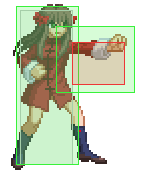
A strong shoulder thrust. It moves forward a good amount and does good guard damage, so it's pretty good in blockstrings. It also has a low prorate and the highest damage of all her normals, so use it as much as possible in combos! Note that against an airborne opponent, it wall slams.
|
|
Crouching Normals
|
|
| Damage
|
Red Damage
|
Proration
|
Cancel
|
Guard
|
| 300
|
172
|
70% (O)
|
-SE-, -N-, -SP-, -EX-, (J)
|
L
|
| First Active
|
Active
|
Recovery
|
Frame Adv
|
Circuit
|
Invuln
|
| 4
|
4
|
9
|
-1
|
1.4%
|
-
|
|
A crouching, downward angled jab. It's fast and hits low, but has slightly less range than 5A. A good poke, and safe on block.
|
|
|
|
| Damage
|
Red Damage
|
Proration
|
Cancel
|
Guard
|
| 800
|
-
|
75%
|
N, SP, EX, (J)
|
LH
|
| First Active
|
Active
|
Recovery
|
Frame Adv
|
Circuit
|
Invuln
|
| 8
|
5
|
17
|
-7
|
7.0%
|
Clash 7-12
|
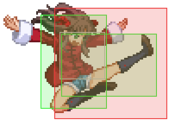
|
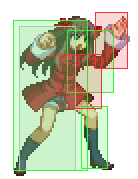
A rising uppercut. This normal is a mixed bag. It doesn't have much horizontal range, it doesn't hit low, and it has a kind of weird hitbox; however, it's great for anti-air. Your character hitbox is very low and your attack hitbox is rather high during the attack, so you can poke out of a lot of jump-ins with it.
|
|
|
|
| Damage
|
Red Damage
|
Proration
|
Cancel
|
Guard
|
| 800
|
576
|
60% (O)
|
N, SP, EX, (J)
|
L
|
| First Active
|
Active
|
Recovery
|
Frame Adv
|
Circuit
|
Invuln
|
| 6
|
7
|
11
|
0
|
5.6%
|
-
|
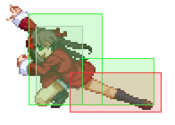
|
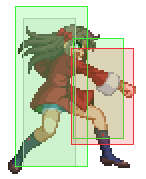
A sliding low kick. This move is pretty much exactly like F moon's 2B. Except with more active frames and damage. It has pretty fast startup, it's neutral on block, and it gives a guaranteed knockdown. This is easily one of H moon's best normals. Use it for tech punishes and resets during pressure strings.
|
|
Aerial Normals
|
|
| Damage
|
Red Damage
|
Proration
|
Cancel
|
Guard
|
| 300
|
115
|
75% (O)
|
SE, N, SP, EX, J
|
LHA
|
| First Active
|
Active
|
Recovery
|
Frame Adv
|
Circuit
|
Invuln
|
| 5
|
4
|
10
|
-
|
2.1%
|
-
|
|
A downward angled jab. It's basically the same as 2A, but in the air. It's fast, so it's great for air-to-air counter hitting.
|
|
|
|
| Damage
|
Red Damage
|
Proration
|
Cancel
|
Guard
|
| 700
|
364
|
90%
|
N, SP, EX, J
|
HA
|
| First Active
|
Active
|
Recovery
|
Frame Adv
|
Circuit
|
Invuln
|
| 7
|
7
|
-
|
-
|
4.9%
|
-
|
|
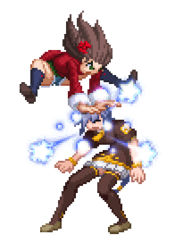
A palm strike to both sides. This is one of Miyako's best air normals. It comes out moderately fast, has pretty good range, and also hits a good distance behind her. Use this for awesome crossup shenanigans, because hitting someone with the crossup side of the attack actually pushes them into you! Be careful though, it starts to become shield bait if you get too predictable with it.
|
|
|
|
| Damage
|
Red Damage
|
Proration
|
Cancel
|
Guard
|
| 900
|
-
|
90% (M)
|
N, SP, EX, J
|
HA
|
| First Active
|
Active
|
Recovery
|
Frame Adv
|
Circuit
|
Invuln
|
| 8
|
8
|
-
|
-
|
7.0%
|
-
|
|
A downward double palm thrust. This has a deceptively massive attack hitbox and is amazing for jump-ins. Use it early in jump-ins to stuff all kinds of stuff, and just reverse beat into j.B on hit to confirm into ground combo for maximum damage bnb.
|
|
Command Normals
|
|
| Damage
|
Red Damage
|
Proration
|
Cancel
|
Guard
|
| 1000
|
576
|
70% (M)
|
(SP), (EX), (J)
|
LH
|
| First Active
|
Active
|
Recovery
|
Frame Adv
|
Circuit
|
Invuln
|
| 10
|
4
|
17
|
-3
|
7.0%
|
-
|
|
An exaggerated uppercut. This move is just plain bad. It launches, but it has horrible multiplicative proration. This move has only 2 purposes. 1 is that it is a panic confirm, as Miyako can super jump cancel it by holding 8 and confirm into air combo. 2 is that Miyako can do AD right after it. It's the only way to do it without wall slams or bounces.
|
|
Universal Mechanics
|
|
| Damage
|
Red Damage
|
Proration
|
Cancel
|
Guard
|
| 500
|
0
|
37%
|
-
|
U
|
| First Active
|
Active
|
Recovery
|
Frame Adv
|
Circuit
|
Invuln
|
| 3
|
1
|
20
|
-
|
0.0%
|
-
|
|
One of the best ground throws in the game.
Throw it self cannot kill and doesn't cause knockdown, but it's big point is that it can be comboed into her farther-ranged normals like 2C and 5C.
Meaning that all ground throw turn into combos gaining meter and causing big damage (relative to other ground throws).
|
|
|
|
| Damage
|
Red Damage
|
Proration
|
Cancel
|
Guard
|
| 1600 (Raw)/1300
|
465
|
30%
|
(Any if Raw)
|
U
|
| First Active
|
Active
|
Recovery
|
Frame Adv
|
Circuit
|
Invuln
|
| 2
|
1
|
12
|
-
|
0.0%
|
-
|
|
Sparkly air throw that sends the opponent in the air behind you, resulting in a side switch.
|
|
|
|
| Standing
|
Damage
|
Red Damage
|
Proration
|
Cancel
|
Guard
|
| 500 (345)
|
198
|
50%
|
(SP), (EX), (J)
|
LHA
|
| First Active
|
Active
|
Recovery
|
Frame Adv
|
Circuit
|
Invuln
|
| 9
|
4
|
18
|
-4
|
5.0%
|
-
|
|
Same animation as 5B.
|
| Crouching
|
Damage
|
Red Damage
|
Proration
|
Cancel
|
Guard
|
| 1500 (1117)
|
714
|
50%
|
(SP), (EX)
|
LA
|
| First Active
|
Active
|
Recovery
|
Frame Adv
|
Circuit
|
Invuln
|
| 9
|
4
|
18
|
-4
|
15.0%
|
-
|
|
Same animation as 2C.
|
| Aerial
|
Damage
|
Red Damage
|
Proration
|
Cancel
|
Guard
|
| 500 (345)
|
198
|
50%
|
-
|
HA
|
| First Active
|
Active
|
Recovery
|
Frame Adv
|
Circuit
|
Invuln
|
| 9
|
4
|
-
|
-
|
5.0%
|
-
|
|
Same animation as her 236 series.
|
|
|
|
| Neutral
|
Damage
|
Red Damage
|
Proration
|
Cancel
|
Guard
|
| 500
|
192
|
50%
|
-
|
LHA
|
| First Active
|
Active
|
Recovery
|
Frame Adv
|
Circuit
|
Invuln
|
| 26
|
4
|
19
|
-5
|
0.0%
|
Clash 1-10
|
| (Clash)
|
Damage
|
Red Damage
|
Proration
|
Cancel
|
Guard
|
| 500
|
192
|
50%
|
-
|
LHA
|
| First Active
|
Active
|
Recovery
|
Frame Adv
|
Circuit
|
Invuln
|
| 8
|
4
|
19
|
-5
|
0.0%
|
Strike 1-6
|
|
Similar to 6C, now as a shield bunker.
|
| Blockstun
|
Damage
|
Red Damage
|
Proration
|
Cancel
|
Guard
|
| 0
|
0
|
100%
|
-
|
LHA
|
| First Active
|
Active
|
Recovery
|
Frame Adv
|
Circuit
|
Invuln
|
| 19
|
3
|
22
|
-7
|
-100.0%
|
-
|
|
H-Moon specific reversal bunker.
|
|
|
|
| Ground
|
Damage
|
Red Damage
|
Proration
|
Cancel
|
Guard
|
| 100
|
0
|
100%
|
-
|
U
|
| First Active
|
Active
|
Recovery
|
Frame Adv
|
Circuit
|
Invuln
|
| 11
|
10
|
20
|
-
|
removes all
|
Full 1-39
|
| Air
|
Damage
|
Red Damage
|
Proration
|
Cancel
|
Guard
|
| 100
|
0
|
100%
|
-
|
U
|
| First Active
|
Active
|
Recovery
|
Frame Adv
|
Circuit
|
Invuln
|
| 12
|
10
|
15
|
-
|
removes all
|
Strike 1-30
|
|
Universal burst mechanic. Unlike Crescent/Full Heat activation, the hitbox and frame data doesn't vary between characters. However, you can be thrown out of this move if you input it in the air.
|
|
Special Moves
Grounded Specials
|
|
| A
|
Damage
|
Red Damage
|
Proration
|
Cancel
|
Guard
|
| 1000
|
700
|
70% (O)
|
-
|
LHA
|
| First Active
|
Active
|
Recovery
|
Frame Adv
|
Circuit
|
Invuln
|
| 8
|
13
|
24
|
-19
|
7.0%
|
-
|
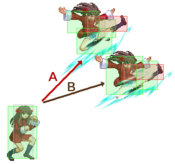
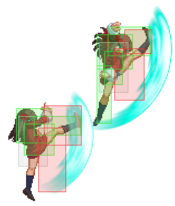
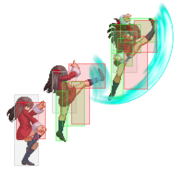
- A powerful combo tool. All versions wall slam.
Upwards kick. Easy to combo after 2B. Can be used in corner for easy and damaging combos, but it gives up corner.
|
| B
|
Damage
|
Red Damage
|
Proration
|
Cancel
|
Guard
|
| 1200
|
768
|
70% (O)
|
-EX-
|
LHA
|
| First Active
|
Active
|
Recovery
|
Frame Adv
|
Circuit
|
Invuln
|
| 10
|
13
|
18
|
-13
|
8.4%
|
-
|
|
Forwards kick. Can be used in corner combos for easy damage. But also gives up corner.
|
| EX
|
Damage
|
Red Damage
|
Proration
|
Cancel
|
Guard
|
| 2000
|
1440
|
90% (M)
|
-
|
LHA
|
| First Active
|
Active
|
Recovery
|
Frame Adv
|
Circuit
|
Invuln
|
| 1+8
|
13
|
12
|
-7 to +3
|
-100.0%
|
-
|
|
Same direction as B version, but this one is faster. Has a lot of invulnerability when in air, so much so that even half moon shields whiff, if shielded early this makes it very useful in certain matchups. Also can be used as combo tool, and keeps the corner.
Whiffs on crouching opponents, might not whiff vs some characters like Nero.
The frame advantage depends on the distance too, if blocked later, it can be plus.
|
|
|
|
| A
|
Damage
|
Red Damage
|
Proration
|
Cancel
|
Guard
|
| 600, 800 (1366)
|
(875)
|
100%
|
EX (2nd Hit)
|
LH, LHA
|
| First Active
|
Active
|
Recovery
|
Frame Adv
|
Circuit
|
Invuln
|
| 6
|
2 (12) 2
|
30
|
-28
|
3.5%, 5.6% (9.1%)
|
Full 1-5, Low 6-7
|
- 2 jumping crescent kicks.
Poor man's reversal. Gets beaten by many things. First kick is air unblockable.
|
| B
|
Damage
|
Red Damage
|
Proration
|
Cancel
|
Guard
|
| 500*2, 1000 (1395)
|
(880)
|
100%, 50% (O), 60% (O)
|
(J) (3rd Hit)
|
HA, LH, LHA
|
| First Active
|
Active
|
Recovery
|
Frame Adv
|
Circuit
|
Invuln
|
| 27
|
4 (2) 4 (8) 2
|
19
|
-2
|
3.5%*2, 7.0% (14.0%)
|
-
|
|
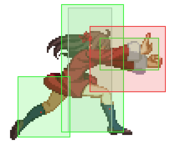
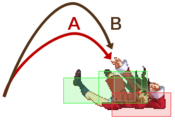
Slow overhead. Can beat opponents sleeping in corner. Can be grab whiffed on hit, followed by 236A for combo in the corner. The second kick is air unblockable.
|
| EX
|
Damage
|
Red Damage
|
Proration
|
Cancel
|
Guard
|
| 600*2, 1000 (2005)
|
(1417)
|
100%, 50% (O, 3rd Hit)
|
J (3rd Hit)
|
LH (2), LHA
|
| First Active
|
Active
|
Recovery
|
Frame Adv
|
Circuit
|
Invuln
|
| 1+3
|
4 (2) 3 (9) 2
|
31
|
-15 (vs Stand.)
-27 (vs Crouch.)
|
-100.0%
|
Full 1-9, High 10-12
|
|
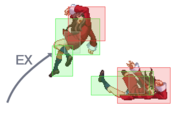
Reversal. If enemy blocks 3rd hit, it is jump cancellable.
|
|
|
|
| A
|
Damage
|
Red Damage
|
Proration
|
Cancel
|
Guard
|
| 800
|
528
|
70% (O)
|
-EX-
|
LHA
|
| First Active
|
Active
|
Recovery
|
Frame Adv
|
Circuit
|
Invuln
|
| 15
|
4
|
16
|
-5
|
7.0%
|
-
|
| [A]
|
Damage
|
Red Damage
|
Proration
|
Cancel
|
Guard
|
| 800
|
528
|
70% (O)
|
-
|
H
|
| First Active
|
Active
|
Recovery
|
Frame Adv
|
Circuit
|
Invuln
|
| 28
|
4
|
16
|
-
|
7.0%
|
-
|
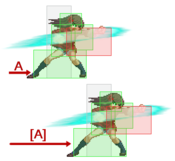
- Punch. Useful combo and pressure tool. Hitting opponent in the air wall slams in all versions.
A strong lunging punch. It comes out pretty fast and launches on hit. Used in certain confirms. Frame traps after 2A.
[A]: Same as A version, but slower and is an overhead. It also wall slams now.
|
| B
|
Damage
|
Red Damage
|
Proration
|
Cancel
|
Guard
|
| 800
|
539
|
70% (O)
|
-EX-
|
LHA
|
| First Active
|
Active
|
Recovery
|
Frame Adv
|
Circuit
|
Invuln
|
| 23
|
4
|
16
|
-2
|
7.0%
|
Low 8-21
|
| [B]
|
Damage
|
Red Damage
|
Proration
|
Cancel
|
Guard
|
| 800
|
528
|
70% (O)
|
-
|
H
|
| First Active
|
Active
|
Recovery
|
Frame Adv
|
Circuit
|
Invuln
|
| 34
|
4
|
16
|
-2
|
7.0%
|
Low 17-32
|
|
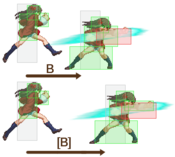
A strong leaping punch. Goes further than A version. Retains same properties, and is a frame trap after B normals.
[B]: Same as B version. Overhead, basically same gains as [A] version has over A.
|
| EX
|
Damage
|
Red Damage
|
Proration
|
Cancel
|
Guard
|
| 1800
|
1440
|
70% (M)
|
-
|
LHA
|
| First Active
|
Active
|
Recovery
|
Frame Adv
|
Circuit
|
Invuln
|
| 7+9
|
3
|
18
|
-3
|
-100.0%
|
Full 1-13
|
|
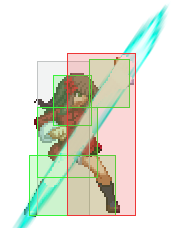
This move can be used as a safe reversal. However the start-up is slow, so good opponents will be able to shield it. Wall slams.
|
|
|
|
| A
|
Damage
|
Red Damage
|
Proration
|
Cancel
|
Guard
|
| 1000
|
768
|
58% (O)
|
J, AT
|
H
|
| First Active
|
Active
|
Recovery
|
Frame Adv
|
Circuit
|
Invuln
|
| 25
|
8
|
32
|
-22
|
4.9%
|
-
|
|
Low to the ground. Ground bounces opponents. Overhead. Air jumpable and airgrab whiff-able on block.
|
| B
|
Damage
|
Red Damage
|
Proration
|
Cancel
|
Guard
|
| 1000
|
768
|
58% (O)
|
J, AT
|
H
|
| First Active
|
Active
|
Recovery
|
Frame Adv
|
Circuit
|
Invuln
|
| 25
|
13
|
32
|
-27
|
4.9%
|
-
|
|
Higher-up version.
|
| EX
|
Damage
|
Red Damage
|
Proration
|
Cancel
|
Guard
|
| 700*2, 1000 (1835)
|
(1151)
|
80% (O)*2, 100%
|
-
|
H
|
| First Active
|
Active
|
Recovery
|
Frame Adv
|
Circuit
|
Invuln
|
| 3+12
|
6 (4) 12
|
32
|
-26
|
-100.0%
|
-
|
|
Same as B version, but multihit, and last hit causes hard knockdown. Can be used to get oki.
|
|
|
|
| A
|
Damage
|
Red Damage
|
Proration
|
Cancel
|
Guard
|
| 800
|
288
|
65% (O)
|
-
|
LH
|
| First Active
|
Active
|
Recovery
|
Frame Adv
|
Circuit
|
Invuln
|
| 16
|
3
|
20
|
-3 (vs Stand.)
3 (vs Crouch.)
|
5.6%
|
Full 1, Clash 2-7
|
- Stomp. Mainly used in pressure resets.
Plus when blocked crouching. Which allows for the pressure resets. Safe when blocked standing, but it's the opponent's turn now.
|
| B
|
Damage
|
Red Damage
|
Proration
|
Cancel
|
Guard
|
| 700
|
240
|
70%
|
-
|
L
|
| First Active
|
Active
|
Recovery
|
Frame Adv
|
Circuit
|
Invuln
|
| 27
|
9
|
12
|
-1
|
4.9%
|
Clash 3-12
|
|
Long range stomp. Hits low. Used at a distance where enemy wont be able to punish with their normals. Also can catch enemies teching.
|
| EX
|
Damage
|
Red Damage
|
Proration
|
Cancel
|
Guard
|
| 1800
|
960
|
80%
|
-
|
LH
|
| First Active
|
Active
|
Recovery
|
Frame Adv
|
Circuit
|
Invuln
|
| 1+24
|
X
|
25
|
-6 ~ 0
|
-100.0%
|
Full 1-24
|
|
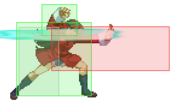
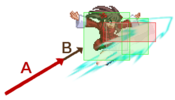
Becomes a very fast projectile that is scooting super quickly on the ground. Mainly used to punish long range zoning.
|
|
Aerial Specials
|
|
| A
|
Damage
|
Red Damage
|
Proration
|
Cancel
|
Guard
|
| 800 (704)
|
422
|
70% (M)
|
-
|
LHA
|
| First Active
|
Active
|
Recovery
|
Frame Adv
|
Circuit
|
Invuln
|
| 10
|
5
|
5
|
-
|
5.6%
|
-
|
- Kind of useless dragon kick.
Upwards kick.
|
| B
|
Damage
|
Red Damage
|
Proration
|
Cancel
|
Guard
|
| 1000 (880)
|
591
|
70% (M)
|
-
|
LHA
|
| First Active
|
Active
|
Recovery
|
Frame Adv
|
Circuit
|
Invuln
|
| 12
|
5
|
5
|
-
|
7.0%
|
-
|
|
Forwards kick. Can be used if you know airthrow will whiff.
|
| EX
|
Damage
|
Red Damage
|
Proration
|
Cancel
|
Guard
|
| 2000
|
1440
|
90% (M)
|
-
|
LHA
|
| First Active
|
Active
|
Recovery
|
Frame Adv
|
Circuit
|
Invuln
|
| 1+5
|
5
|
5
|
-
|
-100.0%
|
-
|
|
Same direction as B version. Does more damage than airthrow combo ender.
|
|
Arc Drive
|
|
| Damage
|
Red Damage
|
Proration
|
Cancel
|
Guard
|
| 3800
|
2561
|
100%
|
-
|
LH
|
| First Active
|
Active
|
Recovery
|
Frame Adv
|
Circuit
|
Invuln
|
| 4+17
|
10
|
66
|
-43
|
removes all
|
Full 1-20
|
|
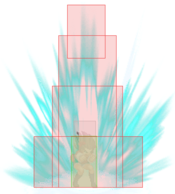
This AD is invulnerable from frame 1, but has a long startup, so it can't really act as a reversal. Therefore you have to combo it.
You can combo it after a wall slam in the corner, or after 6C midscreen.
In the corner, it can be used to setup ambiguous left right situation, as it pulls enemy out of corner a bit. You can then use dodge to get behind the enemy.
|
|
MBAACC Navigation


