Character Page Progress
This page is still a work in progress, consider joining as an editor to help expand it. Please update this character's roadmap page when one of the editing goals have been reached.
| In Progress |
To-do
|
|
|
- Additional Resources/
- Add any external links to ressources such as video guides or articles.
- Overview/General Gameplan:
- Add a short summary of this character with a list of strengths and weaknesses
|
Additional Resources
H-Sion Match Video Database
H-Sion Basic Resources
Notable Players
| Name |
Color
|
Region |
Common Venues |
Status |
Details
|
EmeraldPink
|

|
South America |
Netplay |
Inactive |
Korean rising star.
|
momiyama
(もみやま) |

|
Japan |
A-cho |
Inactive |
Uses various palettes.
|
rosha
(ろしゃ) |

|
Japan |
A-cho, KorewaMelty |
Inactive |
Knows the character very well with notable plays to learn.
|
Overview
Strengths / Weaknesses
| Strengths
|
- Text goes here after asterisk
- Text goes here after asterisk
|
| Weaknesses
|
- Place text here be sure to use "*" for each point*
|
Unique Mechanics
Sion has an Ammo gauge that affects how many bullets can be shot from her 236 specials. If she runs out of ammo after one of these specials, she will automatically go into a reloading state during the move's recovery, where she loads all bullets back in but is left vulnerable and very minus.
General Gameplan
Half-moon style gives Sion the ability to make her rushdown elements even scarier. If you can manage to get your opponent in the corner blocking, you can keep him there for a pretty long time, potentially leading into a Guard Crush. She has several tools to keep her opponent guessing - whether to block high, low or just poke out - and a mistake on their end leads into high damage combos AND more corner pressure.
Simultaneously, Sion has a number of tools that can assist her in some basic zoning (her 236 series) and spacing (her whips). Some areas of the screen become simply too dangerous for your opponent to be in, because Sion can just hit them out of there. Unless, of course, your opponent is blocking, in which case you can quickly move from neutral to the offensive thanks to her swift movement options - her dash and airdash are both very fast!
On the defensive, Sion has access to one great reversal move with 623B. It easily beats most attempts at okizeme your opponent might have; however, it is easily baited and very punishable. Her 421 series also have selective invulnerability properties which can be useful for getting out of corners every now and then, though it's nothing you should entirely rely on. Something else that Sion has access to is her already-abusable 214B: it gives her twenty-five frames of lower body invulnerability, with the whip's hitbox coming out on frame 24. Against moves that hit low and have a noticeable start-up, this is without a doubt one very good trick to know.
Neutral
The air is your best friend. Your j.B is fast and has a great hitbox below H-Sion, it'll beat a lot of your opponent's attempts to hit you from below. If they're at your level or above you, j.C has it covered; it hits everything in front of Sion within a 180º angle and is quite fast.
Should you choose to keep yourself grounded, you can attempt to zone from afar using your 236A/B; they're not exactly amazing, but they're enough to put your opponent on their toes and limit what they can do and where. It also has the bonus of dealing a good amount of chip damage on block; if they don't, and get hit instead, you're no longer in neutral: go in for the kill. And hey, if it was a counterhit? Enjoy the free combo.
If ranged zoning isn't an option, use your whips to scare your opponent. 214A hits low (it is, however, air-blockable) and 214B has an amazing hitbox in front of and above Sion (be careful, though, since it does have a reasonable recovery time).
All things considered, though, you shouldn't need to spend too much time in neutral. Just keep your opponent guessing about your next move and try to get a hit in; once you do, the match is in your favour.
Offense
H-Sion's offense midscreen is fairly decent. 5A6A 2B is a valid frametrap, and easy to convert into damage. As has been stated before, Sion's ground dash is fast. This allows for some hard to read tick throw setups. You can easily do something along the lines of 5AA 2AAA dash grab on opponents that aren't expecting it, and you still get okizeme afterwards.
However, the real fun comes when you get your opponent cornered. Everything you've been doing midscreen works, but better. You also gain access to some other tricks while pressuring (mainly revolving around more tick throw setups, like 2AA 5B 2B 5C 5A(whiff) dash grab). This is just an example of the kind of stuff you can do without even getting into the more complex pressure strings.
Your main goal when you get your opponent in the corner is to "open them up", to break their defense. To help her do this, H-Sion has access to not one, but two overheads: 6B and 6C. Thanks to this, her high-low mixups are strong and unpredictable. Example strings include:
- 5AA 6A 5B 2B 6B 2C 2A(whiff) dash
- 5A 6AA 5C 6B 2AAA 5B 6C
- 5A 6A 2A 6B
Not much detail can go into this section, simply because nothing is established. Hit up the lab for a bit and see what works and what doesn't. Half-moons are all about experimenting and trying things out.
214A Knockdown
Let's get this out there right now: 214A combo enders are your best friend. It forces a guaranteed, untechable knockdown while still giving you plenty of time to mess around on your opponent's wake-up. It is without a doubt your best tool to maintain your momentum at the end of your combos.
Generally, you have three possible courses of action.
- (...) 214A walk back(slightly) 6[C](whiff)
- This is one of your trickiest setups. Depending on how much you held down 4, 6[C] will either cross up your opponent or simply make you land on the same side. It is extremely ambiguous, sometimes it's hard for even yourself to notice exactly on which side you're going to land. From this, you can do whatever you want - you will always be in range.
- Note: This does not work on Archetype Earth
- (...) 214A j.66 j.A/B/C(w)
- The most standard one but the one works the most. It has many variants this mix, either if you delay the jump before airdash or delay the air normals before hitting the ground, you can get to change sides or stay on same side. Normally for sameside you'd press the air normals earlier or do an instant airdash in order to work that. It's the most essential as it's the most simple but effective way to mix.
- (...) 214A sj.9 j.214A
- This one is pretty simple to understand: superjump forwards, use j.214A to slide down on top of your opponent while they're still getting up. It'll take a while to get used to the spacing, but once you get it down you'll be landing 50/50 mix-ups on your opponent frequently.
2C Drift Knockdown
While 214A as ender does have great options for mixups, 2C drift is also another great option for ender to a mixup, as the following goes:
- (...) 5A6A 2C dj~6
It's an option that works generally if you have a very high hitcount so 214A can make the enemies tech or if the 214A ender doesn't hard knockdown on characters like Hime. The mix works depending if you delay the jump after 2C or not, if you delay it, you get to change side since the 2C moves her forward towards the opponent, but if you don't delay it, you get same side.
Defense
You won't always be in your opponent's face. Sometimes you'll get cornered yourself, and there's nothing you can do about it. When this happens, though, don't get careless: be patient. Wait until you see an opening when you can escape. A little blocking - and by little, I mean anything between 3 and 45 seconds of the ingame timer - can go a long way.
If blocking isn't enough, there are some other ways for you to get out.
- Like everyone else in the cast, H-Sion has access to a shield bunker (214D). However, this is Half-moon we're talking about, and as such you get a better bunker than most. At the cost of 100% Magic Circuit, you can 214D during blockstun and hit your opponent. It deals no damage, but guarantees an untechable knockdown on your opponent whilst Sion is completely invulnerable throughout the entire move's duration (start-up, active frames and recovery, which in total add up to ~30 frames). A costly option, but one that's very much worth it.
- If you notice that your opponent's blockstring is not airtight but is still tight enough to not allow you to jump/dash out, you can attempt to 623B out. It is Sion's reversal move of choice. However, it is easily baited and very punishable on block. Be careful with it; don't use it too often, and even then use it only when you know you'll hit with it.
Combos
| Combo Notation Help
|
Disclaimer: Combos are written by various writers, so the actual notation used in pages can differ from the standard one.
For more information, see Glossary and Controls.
|
| X > Y
|
X input is cancelled into Y.
|
| X > delay Y
|
Must wait for a short period before cancelling X input into Y.
|
| X, Y
|
X input is linked into Y, meaning Y is done after X's recovery period.
|
| X+Y
|
Buttons X and Y must be input simultaneously.
|
| X/Y
|
Either the X or Y input can be used.
|
| X~Y
|
This notation has two meanings.
- Use attack X with Y follow-up input.
- Input X then within a few frames, input Y. Usually used for option selects.
|
| X(w)
|
X input must not hit the opponent (Whiff).
|
| j.X
|
X input is done in the air, implies a jump/jump cancel if the previous move was done from the ground.
Applies to all air chain sections:
- Assume a forward jump cancel if no direction is given.
- Air chains such as j.A > j.B > j.C can be shortened to j.ABC.
|
| sj.X
|
X input is done after a super jump. Notated as sj8.X and sj9.X for neutral and forward super jumps respectively.
|
| dj.X
|
X input is done after a double jump.
|
| sdj.X
|
X input is done after a double super jump.
|
| tk.X
|
Stands for Tiger Knee. X motion must be buffered before jumping, inputting the move as close to the ground as possible. (ex. tk.236A)
|
| (X)
|
X is optional. Typically the combo will be easier if omitted.
|
| [X]
|
Input X is held down. Also referred to as Blowback Edge (BE). Depending on the character, this can indicate that this button is held down and not released until indicated by the release notation.
|
| ]X[
|
Input X is released. Will only appear if a button is previously held down. This type of input is referred to as Negative Edge.
|
| {X}
|
Button X should only be held down briefly to get a partially charged version instead of the fully charged one.
|
| X(N)
|
Attack "X" should only hit N times.
|
| (XYZ)xN
|
XYZ string must be performed N times. Combos using this notation are usually referred to as loops.
|
| (XYZ^)
|
A pre-existing combo labelled XYZ is inserted here for shortening purposes.
|
| CH
|
The first attack must be a Counter Hit.
|
| Air CH
|
The first attack must be a Counter Hit on an airborne opponent.
|
| 66
|
Performs a ground forward dash.
|
| j.66
|
Performs an aerial forward dash, used as a cancel for certain characters' air strings.
|
| IAD/IABD
|
Performs an Instant AirDash.
|
| AT
|
Performs an Air Throw. (j.6/4A+D)
|
| IH
|
Performs an Initiative Heat.
|
| AD
|
Performs an Arc Drive.
|
| AAD
|
Performs an Another Arc Drive.
|
As a note for all combos:
- If you don't trust your execution, you can omit the airdash j.C combo enders.
- The first chain is spacing dependant (as in, you may have to omit 5C and/or 5B and can insert 2A/5A in front).
- All combos that end with airthrow are possible to end with j.214C if you can get the necessary height above them (use an sdj to make this easier).
Normal Combos
- Meterless Combos:
| Condition
|
Notation
|
Damage
vs V.Sion
|
Notes
|
|
| Normal starter, grounded opponent
|
- 2AA > 5C > 5B > 2B > 2C > 3C > j.ABC > sdj.BC > j.66 > j.C > AT
|
4568
|
| |
| Meter Gained: 59.5% |
Meter Given (vs C-Moon): 25.5% |
| H-Sion's most basic "works anywhere" combo. Her other combos are much better though. |
|
|
| Normal starter, grounded opponent
|
- 2A > 2B > 2C > 5C > j.ABC > dj.BC > j.66 > j.C > AT
|
3865
|
| |
| Meter Gained: 49% |
Meter Given (vs C-Moon): 21% |
| Easy confirm off of a stray 2B hit. |
|
|
| Normal starter, grounded opponent
|
- 2A > 2B > 2C > 5C > j.A~B~~C > dj.[C] > j.214A(w), land j.BC > sdj.BC > AT
|
4191
|
| |
| Meter Gained: 58.8% |
Meter Given (vs C-Moon): 25.2% |
| Harder confirm combo off of far range 2As. Can also be used as a hit confirm combo when using anti-backdash 2A 2C okizeme. Done by delaying the hits as much as possible between j.A~B~~C in order to be low enough to the ground for the rejump to connect. |
|
|
| Normal starter, grounded opponent
|
- 2AA > 5C > 5B > 2B > 2C > 3C > j.[C] > dj8~4.[C] > j.214A(w), land j.BC > sdj.BC > j.66 > j.C > AT
|
4936
|
| |
| Meter Gained: 67.2% |
Meter Given (vs C-Moon): 28.8% |
| Your main BnB if you can't do the airdash variation consistently. Nets high damage; the only really hard part is the 3C j.[C] link. Make sure to delay the dj.[C] as much as possible so that you're as close to the ground as possible, not mention also do a little drift back to avoid any side switch. While you can switch side if you don't drift, that's character specific only. |
|
|
| Normal starter, grounded opponent
|
- 2AA > 5C > 5B > 2B > 2C > 3C > j.[C] > dl~j.66 > j.[C] > dj8~4.[C] > j.214A(w), land j.BC > sdj.BC > j.66 > j.C > AT
|
5102
|
| |
| Meter Gained: 72.1% |
Meter Given (vs C-Moon): 30.9% |
| Same as the previous combo, only a little tougher. For the first dj.[C] you have to drift a bit back or else you're gonna side switch the combo, and you have to delay the airdash j.[C] a bit so that you dash into their hitbox, not under them. |
|
|
| Normal starter, grounded opponent
|
- 2AA > 5C > 5B > 2B > 2C > 3C > j.[C] > dl~j.66 > j.[C] > dj8~4.[C] > j.214A(w), land j.BC > dj.[C] > dl~j.66 > j.[C]AB > AT
|
5196
|
| |
| Meter Gained: 72.8% |
Meter Given (vs C-Moon): 31.2% |
| The same as the previous one but the toughest it can get. For the last dj.[C] you gotta delay a bit of the airdash to get right into the enemy to hit the j.[C]AB, or else AB are going to whiff and won't let you end it. You can do j.214C if you need to waste meter. |
|
|
| Raw airthrow starter
|
|
1864
|
| |
| Meter Gained: 7% |
Meter Given (vs C-Moon): 4.1% |
| Lazy pickup combo, just to ensure some added damage. Guaranteed okizeme, like always. |
|
|
| Raw airthrow starter
|
- Raw AT, land 66 > 5B > 5C > j.(A)BC > dj.BC > j.66 > j.C > AT
|
3090
|
| |
| Meter Gained: 39.2% |
Meter Given (vs C-Moon): 16.8% |
| Midscreen version of your airthrow combo. It is imperative that you land and dash instead of simply airdash - you won't be in range for the 5B to connect if you airdash. |
|
|
- 214B Combos (whip-loops):
Out of all of H-Sion's combos, the ones that use her 214B loops are without a doubt the most finnicky. Having some extra hits before or after each rep can possibly give your opponent an opening to escape by airteching. Be very mindful of how many hits your opponent has while he's being combo-ed to avoid this; this is something you'll only begin to understand fully by trying things out for yourself. Also, since 214B is considered a grab, your opponent can NOT Circuit Spark out of any of these combos after they're hit by it.
'5B > 2B > 5C > 5A6AA > 214B, 66 is your basic whip-loop rep. Learn it.
| Condition
|
Notation
|
Damage
vs V.Sion
|
Notes
|
|
| Normal starter, grounded opponent
|
- (5B > 2B > 5C >) 5A6AA > 214B, 66 > 5B > 2B > 5C > 5A6AA > 214B, 66 > 5B > 2B > 5C > 5A6A > 2C > 214A
|
4942
|
| |
| Meter Gained: 93.4% |
Meter Given (vs C-Moon): 65.3% |
| Basic whip-loop combo. This is as much damage as you can get without wasting meter while still having a chance at okizeme afterwards. This combo will carry your opponent from one corner to the other. |
|
|
| Normal starter, grounded opponent
|
- (5B > 2B > 5C >) 5A6AA > 214B, 66 > 5B > 2B > 5C > 2C > 3C > j.ABC > dj.BC > AT
|
5193
|
| |
| Meter Gained: 78.7% |
Meter Given (vs C-Moon): 34.8% |
| Another whip-loop combo. Has a higher damage output than the previous combo at the cost of losing okizeme. Optimally, only use this combo when you're sure that it will kill your opponent. |
|
|
- Aerial Counterhit Combos:
These combos will also work off of any 236A/B counterhit, regardless of where your opponent is.
| Condition
|
Notation
|
Damage
vs V.Sion
|
Notes
|
|
| Counterhit starter, airborne opponent
|
- air CH, (2B >) 5B > 5C > j.BC > dj.BC > j.66 > j.C > AT
|
4770
|
| |
| Meter Gained: 46.9% |
Meter Given (vs C-Moon): 20.1% |
| Your highest damage combo when it comes to picking up aerial counterhits.(damage calculated with a j.C starter) |
|
|
| Counterhit starter, airborne opponent
|
- air CH, 214B > (whip-loop^) > 5B > 2B > 5C > 2C > 214A
|
4520
|
| |
| Meter Gained: 64% |
Meter Given (vs C-Moon): 30.7% |
| Requires you to be relatively close to the ground/grounded when the aerial counterhit occurs. It will put your opponent in the corner, no matter where you started it. Use this when you need meter, since it builds more meter than the previous one. |
|
|
- Shield Counter Combos:
Don't expect high damage outputs on these combos - shield counters have very high proration.
Aerial shield counter starters are so very circumstancial that not much can honestly be said.
| Condition
|
Notation
|
Damage
vs V.Sion
|
Notes
|
|
| Standing shield counter starter
|
- 5D, (6) 2B > 5B > 5C > j.BC > dj.BC > j.66 > j.C > AT
|
2896
|
| |
| Meter Gained: 48.3% |
Meter Given (vs C-Moon): 19.2% |
| H-Sion's standing shield counter knocks her opponent straight up and has a fairly decent hitbox, giving you ample time to position yourself correctly for the combo. |
|
|
| Standing shield counter starter
|
- 5D, 214B, 66 > (whip-loop^) > 5B > 2B > 5C > 2C > 214A
|
2507
|
| |
| Meter Gained: 65.4% |
Meter Given (vs C-Moon): 29.8% |
| More meter gain than the previous combo. Guaranteed okizeme as well; unless you're sure the previous combo will kill, use this one. Sion moves forward a bit with her 214B - be careful not to cross yourself up. |
|
|
| Crouching shield counter starter
|
|
1542
|
| |
| Meter Gained: 21.0% |
Meter Given (vs C-Moon): 8.6% |
| H-Sion's crouching shield counter has ridiculous range. As simple as this combo might be, though, that 214A follow-up is essential to completely shift the momentum in your favour because it puts her opponent at the exact distance that makes Sion's okizeme game scary. |
|
|
| Crouching shield counter starter, 100% meter
|
- 2D, 214C, (whip-loop^) > 5B > 2B > 5C > 2C > 214A
|
3298
|
| |
| Meter Gained: 38.6% |
Meter Given (vs C-Moon): 37.0% |
| If you have the meter to waste, go right ahead and do this instead. The end results are very much the same when it comes to spacing, except it deals more damage. |
|
|
| Aerial shield counter starter
|
- j.5D, land (6/4) 2B > 5B > 5C > j.BC > dj.BC > j.66 > j.C > AT
|
1933
|
| |
| Meter Gained: 51.8% |
Meter Given (vs C-Moon): 20.7% |
| The follow-up for j.5D can hit your opponent when he's either on the ground or in the air. In either situation, this combo is viable; just remember to position yourself correctly after landing before attempting it. |
|
|
| Aerial shield counter starter, airborne opponent
|
- j.5D, 214B, 66 > (whip-loop^) > 5B > 2B > 5C > 2C > 214A
|
1719
|
| |
| Meter Gained: 68.9% |
Meter Given (vs C-Moon): 31.3% |
| This one is highly situational. Your opponent needs to be airborne at a reasonable height for it to work. Overall, not worth using but still worth knowing. |
|
|
- Metered Combos:
| Condition
|
Notation
|
Damage
vs V.Sion
|
Notes
|
|
| Normal starter, grounded opponent, 100% meter
|
- 2AA > 5C > 5B > 2B > 2C > 3C > 214C, 5B > 2B > 5C > 5A6A > 2C > 214A
|
4478
|
| |
| Meter Gained: 45.6% |
Meter Given (vs C-Moon): 35.0% |
| Your basic 214C combo extension. You can pretty much do anything into 2C into 214C for some added damage (you can do 3C 214C as listed above. This is, however, character and combo-hit-count specific; experiment and see what works). Use it if you need to waste meter to avoid entering HEAT mode prematurely. |
|
|
| Normal starter, grounded opponent, 100% meter
|
- 2AA > 5C > 5B > 2B > 2C > 3C > j.[C] > dj.[C] > j.214C(w), land j.[C] > dj.[C] > j.214A, land j.BC > sdj.BC > AT
|
5140
|
| |
| Meter Gained: 53.8% |
Meter Given (vs C-Moon): 30.6% |
| High damage metered version of the easier j.[C] combo. This does almost as much damage as the highest damage corner combos; the hard part is knowing all the j.[C] delays. |
|
|
| Normal starter, grounded opponent, 100% meter
|
- 5B > 2B > 5C > (whip-loop^)x2 > 5B > 2B > 5C > 2C > 3C > 236C
|
5002
|
| |
| Meter Gained: 84.7% |
Meter Given (vs C-Moon): 51.3% |
| Another way of wasting unwanted meter. You get okizeme out of this. Sion reloads her gun with 236C, so use this if you need those extra bullets in your magazine ASAP. |
|
|
| Raw airthrow starter, 100% meter
|
- Raw AT, land 214C, (whip-loop^) > 5B > 2B > 5C > 2C > 214A
|
2952
|
| |
| Meter Gained: 24.6% |
Meter Given (vs C-Moon): 32.5% |
| Another possible way to pick up off of an airthrow. Knowing when to abuse Sion's 214C is key to managing your meter correctly. |
|
|
Corner Combos
| Condition
|
Notation
|
Damage
vs V.Sion
|
Notes
|
|
| Raw airthrow starter
|
- Raw AT, land 2B > 5B > 5C > j.BC > sdj.BC > j.66 > j.C > AT
|
3162
|
| |
| Meter Gained: 41.3% |
Meter Given (vs C-Moon): 17.7% |
| Corner variety of the same combo. Since your opponent isn't sent back as much because of the stage boundaries, you can tack in an extra hit with 2B. |
|
|
| Normal starter, grounded opponent, 100% meter
|
- (2A >) 5B > 2B > 5C > 2C > 3C > 421C(3) > j.214A(w), land 214B, 66 > (whip-loop^) > 5B > 2B > 5C > 2C > 214A
|
5160
|
| |
| Meter Gained: 57.6% |
Meter Given (vs C-Moon): 66.8% |
| Deals very good damage for 100% meter with okizeme to boot. The j.214A 214B link is somewhat tight; be mindful of it - buffering the 214B whilst airborne might help. |
|
|
| Normal starter, grounded opponent, 100% meter
|
- (2A >) 5B > 2B > 5C > 2C > 3C > 421C(3) > j.214A(w), land 2C > 5C > 3C > j.[C] > dj.[C] > j.214A(w), land j.BC > sdj.BC > AT
|
5845
|
| |
| Meter Gained: 50.0% |
Meter Given (vs C-Moon): 36.9% |
| Best damage output possible off of 421C. There's a bunch of other variations to it, but this really seems to be the one to go to. |
|
|
| Normal starter, grounded opponent, 200% meter
|
- (2A >) 5B > 2B > 5C > 2C > 3C > 421C(3) > j.214A(w), land 2C > 5C > 3C > 421C(2-3) > j.214A(w), land 214B, 66 > (whip-loop^) 5B > 2B > 5C > 2C > 214A
|
5870
|
| |
| Meter Gained: 24.9% |
Meter Given (vs C-Moon): 107.9% |
| Use this if you're in HEAT while performing the previous corner combo for some extra damage while still maintaining okizeme. The number of hits you get out of the second 421C is character specific (two for most of the cast, three for the larger characters). The j.214A 214B link is tighter with this as well; be careful not to input it too late at the risk of being punished for it. |
|
|
| Normal starter, grounded opponent, 100% meter
|
- 2AA > 5C > 5B > 2B > 2C > 3C > 421C(3) > j.214A(w), land 2C > 5C > 3C > j.[C] > j.66 > j.[C] > dj.[C] > j.214A(w), land j.BC > sdj.BC > j.66 > j.C > AT
|
5969
|
| |
| Meter Gained: 56.6% |
Meter Given (vs C-Moon): 47.6% |
| Another variety with 421C but doing 2AA > 5C starter since it's the most go to starter for the character. |
|
|
Move Descriptions
| Frame Data Help
|
| Header
|
Tooltip
|
| Move Box Colors
|
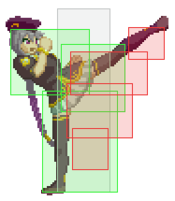
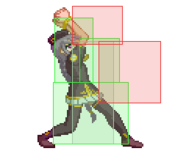
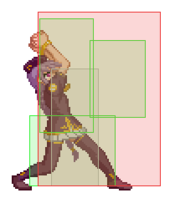
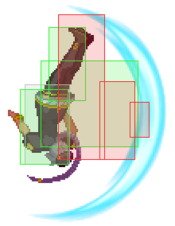
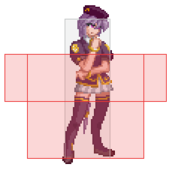
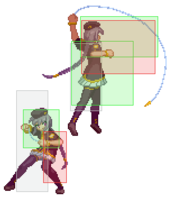
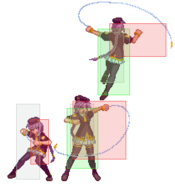
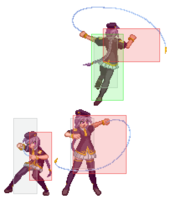
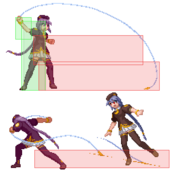
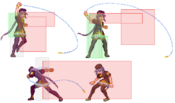
Light gray = Collision Box (A move lacking one means it can go through the opponent's own collision box).
Green: Hurt Boxes.
Red: Hit(/Grab) Boxes.
Yellow: Clash Boxes (When an active hitbox strikes a clash box, the active hitbox stops being active. Multi-hit attacks can beat clash since they will still progress to the next hitbox.)
Magenta: Projectile-reflecting boxes OR Non-hit attack trigger boxes (usually).
Blue: Reflectable Projectile Boxes.
|
| Damage
|
Base damage done by this attack.
(X) denotes combined and scaled damage tested against standing V. Sion.
|
| Red Damage
|
Damage done to the recoverable red health bar by this attack. The values are inherently scaled and tested against standing V. Sion.
(X) denotes combined damage.
|
| Proration
|
The correction value set by this attack and the way it modifies the scaling during a string. See this page for more details.
X% (O) means X% Overrides the previous correction value in a combo if X is of a lower percentage.
X% (M) means the current correction value in a combo will be Multiplied by X%. This can also be referred to as relative proration.
|
| Circuit
|
Meter gained by this attack on hit.
(X%) denotes combined meter gain.
-X% denotes a meter cost.
|
| Cancel
|
Actions this move can be cancelled into.
SE = Self cancelable.
N = Normal cancelable.
SP = Special cancelable.
CH = Cancelable into the next part of the same attack (Chain in case of specials).
EX = EX cancelable.
J = Jump cancelable.
(X) = Cancelable only on hit.
-X- = Cancelable on whiff.
|
| Guard
|
The way this move must be blocked.
L = Can block crouching
H = Can block standing.
A = Can block in the air.
U = Unblockable.
|
| Startup
|
Amount of frames that must pass prior to reaching the active frames. Also referred to as "True Startup".
|
| Active
|
The amount of frames that this move will have a hitbox.
(x) denotes frame gaps where there are no hitboxes is present. Due to varied blockstuns, (x) frames are difficult to use to determine punish windows. Generally the larger the numbers, the more time you have to punish.
X denotes active frames with a duration separate from its origin move's frame data, such as projectile attacks. In this case, the total length of the move is startup+recovery only.
|
| Recovery
|
Frames that this move has after the active frames if not canceled. The character goes into one frame where they can block but not act afterwards, which is not counted here.
|
| Advantage
|
The difference in frames where you can act before your opponent when this move is blocked (assuming the move isn't canceled and the first active frame is blocked).
If the opponent uses a move with startup that is at least 2 frames less than this move's negative advantage, it will result in the opponent hitting that move.
±x~±y denotes a range of possible advantages.
|
| Invul
|
Lists any defensive properties this move has.
X y~z denotes X property happening between the y to z frames of the animations. If no frames are noted, it means the invincibility lasts through the entire move.
Invicibility:
- Strike = Strike invincible.
- Throw = Throw invincible.
Hurtbox-Based Properties:
- Full = No hurtboxes are present.
- High = Upper body lacks a hurtbox.
- Low = Lower body lacks a hurtbox.
Miscellaneous Properties
- Clash = Frames in which clash boxes are active.
- Reflect = Frames in which projectile-reflecting boxes are active.
- Super Armor = Frames in which the character can take hits without going into hit stun.
|
Normal Moves
Standing Moves
|
|
| 5A
|
Damage
|
Red Damage
|
Proration
|
Cancel
|
Guard
|
| 350
|
192
|
75% (O)
|
-SE-, -N-, -SP-, -CH-, -EX-, (J)
|
LH
|
| First Active
|
Active
|
Recovery
|
Frame Adv
|
Circuit
|
Invuln
|
| 5
|
4
|
9
|
-1
|
2.45%
|
-
|
|
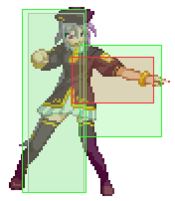
5A's placement is pretty high and a major part of her corner pressure. Use this move to fish for poke outs in the corner.
|
| 5A~6A
|
Damage
|
Red Damage
|
Proration
|
Cancel
|
Guard
|
| 600
|
384
|
80% (M)
|
N, SP, -CH-, EX, (J)
|
LH
|
| First Active
|
Active
|
Recovery
|
Frame Adv
|
Circuit
|
Invuln
|
| 8
|
4
|
16
|
-5
|
4.2%
|
-
|
|
After 5A Sion attacks with her elbow.
|
| 5A~6A~6A
|
Damage
|
Red Damage
|
Proration
|
Cancel
|
Guard
|
| 1000
|
768
|
60% (O)
|
(N), SP, EX, (J)
|
LH
|
| First Active
|
Active
|
Recovery
|
Frame Adv
|
Circuit
|
Invuln
|
| 10
|
4
|
14
|
0
|
7.0%
|
-
|
|
After the first 6A Sion then kicks forward and launches her opponent. This move can combo into 236A or 214B or even an air combo.
|
|
|
|
| Damage
|
Red Damage
|
Proration
|
Cancel
|
Guard
|
| 600
|
307
|
100%
|
N, SP, EX, (J)
|
LH
|
| First Active
|
Active
|
Recovery
|
Frame Adv
|
Circuit
|
Invuln
|
| 6
|
4
|
15
|
-4
|
3.5%
|
-
|
|
A knee kick. Comes out rather quickly and moves you forward, but there isn't much use for it out side of blockstrings and combos.
|
|
|
|
| Damage
|
Red Damage
|
Proration
|
Cancel
|
Guard
|
| 1000
|
672
|
100%
|
N, SP, EX, (J)
|
LH
|
| First Active
|
Active
|
Recovery
|
Frame Adv
|
Circuit
|
Invuln
|
| 11
|
5
|
15
|
-3
|
7.0%
|
-
|
|
The range of this move is short, and depending on your range, you might not be able to link this move into anything. You don't want to end a blockstring with this move because you will be at a slight disadvantage.
|
|
Crouching Normals
|
|
| Damage
|
Red Damage
|
Proration
|
Cancel
|
Guard
|
| 300
|
96
|
75% (O)
|
-SE-, -N-, -SP-, -EX-, (J)
|
L
|
| First Active
|
Active
|
Recovery
|
Frame Adv
|
Circuit
|
Invuln
|
| 4
|
4
|
9
|
-1
|
2.1%
|
-
|
|
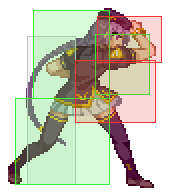
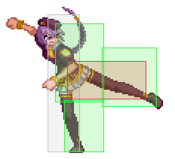
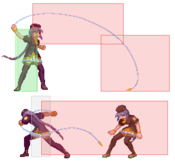
Does a medium range, fast, low kick. Great poke and mashable.
|
|
|
|
| Damage
|
Red Damage
|
Proration
|
Cancel
|
Guard
|
| 600
|
288
|
80% (O)
|
N, SP, EX, (J)
|
LH
|
| First Active
|
Active
|
Recovery
|
Frame Adv
|
Circuit
|
Invuln
|
| 7
|
5
|
10
|
0
|
4.2%
|
-
|
|
The range of this move is a bit short so its a bit hard to combo with. If you hit an airborne opponent with this move, the get launched and float a bit strangely, so it might make a decent anti-air because the hit box is a bit high and her profile is low. You can pick up air counter hits with ease, or even go for an anti-air trade and pick it up for a combo.
|
|
|
|
| Damage
|
Red Damage
|
Proration
|
Cancel
|
Guard
|
| 1000
|
624
|
60% (O)
|
N, SP, EX, (J)
|
L
|
| First Active
|
Active
|
Recovery
|
Frame Adv
|
Circuit
|
Invuln
|
| 13
|
12
|
12
|
-6
|
7.0%
|
-
|
|
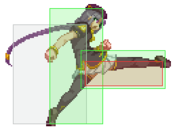
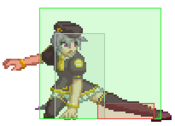
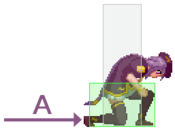
Sion slides towards the opponent to trip them. This move has quite a bit of movement, so you can use to aim at the opponents landing, backsteps, or even a subtle crossup against airborne opponents.
|
|
Aerial Normals
|
|
| Damage
|
Red Damage
|
Proration
|
Cancel
|
Guard
|
| 300
|
172
|
75%
|
SE, N, SP, EX, J
|
LHA
|
| First Active
|
Active
|
Recovery
|
Frame Adv
|
Circuit
|
Invuln
|
| 6
|
5
|
11
|
-
|
2.1%
|
-
|
|
A downward angled kick with a rather high hitbox. This is your go-to move to keep people on the ground if you're above them.
|
|
|
|
| Damage
|
Red Damage
|
Proration
|
Cancel
|
Guard
|
| 700/560
|
480/384
|
90% (O)
|
N, SP, EX, J
|
HA
|
| First Active
|
Active
|
Recovery
|
Frame Adv
|
Circuit
|
Invuln
|
| 8
|
5
|
-
|
-
|
4.9%
|
-
|
|
A fast arm swing attack. Great range and hitbox. This is your go to move with Sion in the air to air and ground. After extended play this move beats out j.C is most situations when the opponent is not above you.
|
|
|
|
| j.C
|
Damage
|
Red Damage
|
Proration
|
Cancel
|
Guard
|
| 1000
|
576
|
90% (M)
|
N, SP, EX, J
|
HA
|
| First Active
|
Active
|
Recovery
|
Frame Adv
|
Circuit
|
Invuln
|
| 7
|
2
|
-
|
-
|
7.0%
|
-
|
|
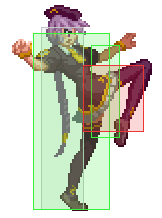
Jumping somersault kick with a nice big hitbox. Your general air-to-anything move. If your opponent is above you, this move is going to beat anything they do 80% of the time; most moves that can beat it while you're under them come out really slow. Unfortunately, if you're ABOVE your opponent it loses to a lot of things if you're bad at timing.
|
| j.[C]
|
Damage
|
Red Damage
|
Proration
|
Cancel
|
Guard
|
| 1000
|
384
|
98% (M)
|
N, SP, EX, J
|
HA
|
| First Active
|
Active
|
Recovery
|
Frame Adv
|
Circuit
|
Invuln
|
| 18
|
4
|
23
|
-
|
7.0%
|
-
|
|
Same as j.C but charged. Generally only used for fuzzy guards, fakeout high or combos. On whiff, after you pop up, you retain your air options, meaning you can double jump/air dash and/or use an attack or special.
|
|
Command Normals
|
|
| 6B
|
Damage
|
Red Damage
|
Proration
|
Cancel
|
Guard
|
| 700
|
384
|
72% (O)
|
(N), (SP), (EX), (J)
|
H
|
| First Active
|
Active
|
Recovery
|
Frame Adv
|
Circuit
|
Invuln
|
| 25
|
2
|
19
|
-3
|
4.9%
|
-
|
|
An overhead knee attack, cancels into anything on hit, minus on block. An essential component of Sion's mix-up game.
|
| 6[B]
|
Damage
|
Red Damage
|
Proration
|
Cancel
|
Guard
|
| 700
|
384
|
75% (O)
|
N, SP, EX, (J)
|
H
|
| First Active
|
Active
|
Recovery
|
Frame Adv
|
Circuit
|
Invuln
|
| 31
|
3
|
15
|
0
|
4.9%
|
-
|
|
Charged version of Sion's 6B. Can be cancelled on block and comes out pretty fast. Untechable bounce on hit. Terrible in combos now.
|
|
|
|
| Damage
|
Red Damage
|
Proration
|
Cancel
|
Guard
|
| 700
|
384
|
75% (O)
|
(SP), (EX), (J)
|
LH
|
| First Active
|
Active
|
Recovery
|
Frame Adv
|
Circuit
|
Invuln
|
| 10
|
4
|
27
|
-13
|
4.8%
|
-
|
|
Sion does a double fist volleyball uppercut which launches her opponent. Cancels into anything on hit but is unsafe on block. Your main combo starter. Inputting 8 on hit will allow Sion to do an extra high follow-up jump.
|
|
|
|
| 6C
|
Damage
|
Red Damage
|
Proration
|
Cancel
|
Guard
|
| 1000
|
768
|
70% (O)
|
-
|
H
|
| First Active
|
Active
|
Recovery
|
Frame Adv
|
Circuit
|
Invuln
|
| 27
|
4
|
10
|
-2
|
7.0%
|
-
|
|
Sion jumps out from where she is standing and crash hammers into the opponent. You cannot cancel this move on block or on hit. There doesn't seem to be much of a use for this combo besides subtle mixups and the combo: 5A6AA (delay) 6C 5A ~ (air). You have a slight disadvantage after using this move.
|
| 6[C]
|
Damage
|
Red Damage
|
Proration
|
Cancel
|
Guard
|
| 1500
|
1152
|
70% (O)
|
N, SP, EX, J
|
H
|
| First Active
|
Active
|
Recovery
|
Frame Adv
|
Circuit
|
Invuln
|
| 35
|
2
|
4
|
13
|
10.5%
|
-
|
|
Similar to 6C, but Sion jumps out further. Unlike 6C though, is that you can all cancel this move on hit or block (except airdash). You'll be in air but j.B or j.A will still be a reverse beat and you can only jump one more time. On hit, you should be able to cancel into 66 2A/5A and follow it up with a combo. This move gives you a large advantage.
|
|
Universal Mechanics
|
|
| Damage
|
Red Damage
|
Proration
|
Cancel
|
Guard
|
| 1500
|
720
|
100%
|
-
|
U
|
| First Active
|
Active
|
Recovery
|
Frame Adv
|
Circuit
|
Invuln
|
| 4
|
1
|
20
|
-
|
0.0%
|
-
|
|
Sion grabs the enemy and kicks them away. You can go straight into oki after this, so it is one of the more useful, normal throws.
|
|
|
|
| Damage
|
Red Damage
|
Proration
|
Cancel
|
Guard
|
| 1600 (Raw)/1300
|
480
|
30%
|
(Any if Raw)
|
U
|
| First Active
|
Active
|
Recovery
|
Frame Adv
|
Circuit
|
Invuln
|
| 2
|
1
|
12
|
-
|
0.0%
|
-
|
|
Sion grabs the opponent and throws them diagonally, but the opponent can tech after it.
|
|
|
|
| Standing
|
Damage
|
Red Damage
|
Proration
|
Cancel
|
Guard
|
| 500 (345)
|
198
|
50%
|
(SP), (EX), (J)
|
LHA
|
| First Active
|
Active
|
Recovery
|
Frame Adv
|
Circuit
|
Invuln
|
| 9
|
4
|
18
|
-4
|
3.5%
|
-
|
|
Same animation as 3C.
|
| Crouching
|
Damage
|
Red Damage
|
Proration
|
Cancel
|
Guard
|
| 1500 (1117)
|
714
|
50%
|
(SP), (EX)
|
LA
|
| First Active
|
Active
|
Recovery
|
Frame Adv
|
Circuit
|
Invuln
|
| 9
|
4
|
18
|
-4
|
10.5%
|
-
|
|
Same animation as C-Moon's 2C.
|
| Aerial
|
Damage
|
Red Damage
|
Proration
|
Cancel
|
Guard
|
| 500 (345)
|
198
|
50%
|
-
|
HA
|
| First Active
|
Active
|
Recovery
|
Frame Adv
|
Circuit
|
Invuln
|
| 9
|
4
|
-
|
-
|
3.5%
|
-
|
|
Same animation as j.C.
|
|
|
|
| Neutral
|
Damage
|
Red Damage
|
Proration
|
Cancel
|
Guard
|
| 500
|
192
|
50%
|
-
|
LHA
|
| First Active
|
Active
|
Recovery
|
Frame Adv
|
Circuit
|
Invuln
|
| 26
|
4
|
21
|
-5
|
0.0%
|
Clash 1-10
|
| (Clash)
|
Damage
|
Red Damage
|
Proration
|
Cancel
|
Guard
|
| 500
|
192
|
50%
|
-
|
LHA
|
| First Active
|
Active
|
Recovery
|
Frame Adv
|
Circuit
|
Invuln
|
| 8
|
4
|
21
|
-5
|
0.0%
|
Strike 1-7
|
|
Similar to C-Moon's 6C and F-Moon's 5C, but the huge hurtboxes also appear on whiff.
|
| Blockstun
|
Damage
|
Red Damage
|
Proration
|
Cancel
|
Guard
|
| 0
|
0
|
100%
|
-
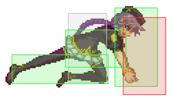
|
LHA
|
| First Active
|
Active
|
Recovery
|
Frame Adv
|
Circuit
|
Invuln
|
| 19
|
3
|
22
|
-7
|
-100.0%
|
-
|
|
H-Moon specific reversal bunker.
|
|
|
|
| Ground
|
Damage
|
Red Damage
|
Proration
|
Cancel
|
Guard
|
| 100
|
0
|
100%
|
-
|
U
|
| First Active
|
Active
|
Recovery
|
Frame Adv
|
Circuit
|
Invuln
|
| 11
|
10
|
20
|
-
|
removes all
|
Full 1-39
|
| Air
|
Damage
|
Red Damage
|
Proration
|
Cancel
|
Guard
|
| 100
|
0
|
100%
|
-
|
U
|
| First Active
|
Active
|
Recovery
|
Frame Adv
|
Circuit
|
Invuln
|
| 12
|
10
|
15
|
-
|
removes all
|
Strike 1-30
|
|
Universal burst mechanic. Unlike Crescent/Full Heat activation, the hitbox and frame data doesn't vary between characters. However, you can be thrown out of this move if you input it in the air.
|
|
Special Moves
Grounded Specials
|
|
| A
|
Damage
|
Red Damage
|
Proration
|
Cancel
|
Guard
|
| 1700
|
1344
|
65% (M)
|
-
|
LHA
|
| First Active
|
Active
|
Recovery
|
Frame Adv
|
Circuit
|
Invuln
|
| 25
|
X
|
24
50 (Reload)
|
4
-22 (Reload)
|
11.9%
|
-
|
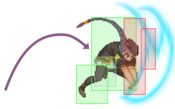
- A set of of ricocheting shots to help keep the opponent at bay of for using in block strings.
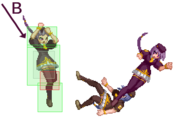
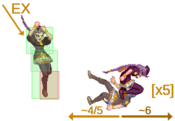
A bouncing gun shot which shoots downwards first and looks much like the above chart. When it hits the opponent near you, you can start an air combo even if it is not a counter. The move comes out a bit slow, but if it is blocked, you have a nice frame advantage making it great for pressure in the corner. This move can stack damage on counter too (CH 5B 5C ~ air combo).
|
| B
|
Damage
|
Red Damage
|
Proration
|
Cancel
|
Guard
|
| 1700
|
1344
|
65% (M)
|
-
|
LHA
|
| First Active
|
Active
|
Recovery
|
Frame Adv
|
Circuit
|
Invuln
|
| 25
|
X
|
24
50 (Reload)
|
4
-22 (Reload)
|
11.9%
|
-
|
|
Another bouncing gunshot which follows the same pattern as 236A, but reversed (shoots up first).
|
| C
|
Damage
|
Red Damage
|
Proration
|
Cancel
|
Guard
|
| 1500 ~ 3000
|
960 ~ 1943
|
100%
|
N/A
|
LHA
|
| First Active
|
Active
|
Recovery
|
Frame Adv
|
Circuit
|
Invuln
|
| 3+11
|
2
|
61
|
-35
|
-100.0%
|
-
|
|
Big single forward shot that eats your remaining bullets. Reaches forward full screen. Does more damage the less ammo you have. Pretty unsafe on block, but gives you a very workable hard knockdown as a whiff punish even from fullscreen. Do not whiff this.
|
|
|
|
| A
|
Damage
|
Red Damage
|
Proration
|
Cancel
|
Guard
|
| 1000, 800 (1682)
|
(663)
|
100%, 60% (O)
|
EX
|
LHA, LH
|
| First Active
|
Active
|
Recovery
|
Frame Adv
|
Circuit
|
Invuln
|
| 4
|
2 (2) 8
|
31
|
-21
|
7.0%, 5.6% (12.6%)
|
Full 1, Low 2-5
|
|
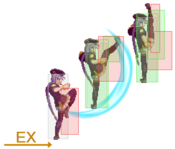
A 2 hit DP that can be EX-cancelled, mainly into 214C and 421C. Has one frame of invincibility and low invulnerability.
|
| B
|
Damage
|
Red Damage
|
Proration
|
Cancel
|
Guard
|
| 800, 500, 300*5 (2375)
|
(1092)
|
100%
|
-
|
LH
|
| First Active
|
Active
|
Recovery
|
Frame Adv
|
Circuit
|
Invuln
|
| 4
|
18
|
32
|
-25
|
5.6%, 3.5%, 2.1%*5 (19.6%)
|
Full 1-7
|
|
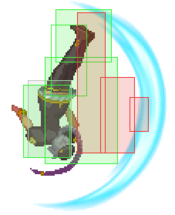
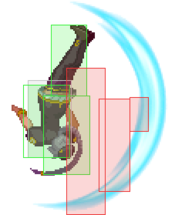
A 7 hit DP that is air unblockable and comes with full start-up invincibility.
|
| EX
|
Damage
|
Red Damage
|
Proration
|
Cancel
|
Guard
|
| 800, 500, 400*5 (3101)
|
(1913)
|
100%
|
-
|
LH(1), LHA(2-7)
|
| First Active
|
Active
|
Recovery
|
Frame Adv
|
Circuit
|
Invuln
|
| 2+2
|
18
|
34
|
-31
|
-100.0%
|
Full 1-10
|
|
A 7 hit EX DP that is air unblockable and comes with a lot of invincibility. Generally a waste of meter, being that the only thing it does better than 623B is deal more damage.
|
|
A A B B EX EX
|
| A
|
Damage
|
Red Damage
|
Proration
|
Cancel
|
Guard
|
| 1000 (880)
|
(591)
|
100%
|
-
|
LA
|
| First Active
|
Active
|
Recovery
|
Frame Adv
|
Circuit
|
Invuln
|
| 13
|
4
|
21
|
-13 ~ -11
|
7.0%
|
-
|
|
A fast whip used for knockdown. Hits low, comes out fast, sets up Sion's okizeme.
|
| B
|
Damage
|
Red Damage
|
Proration
|
Cancel
|
Guard
|
| 200*2 (373)
|
(179)
|
90%*2 (M)
|
(J)
|
LHA
|
| First Active
|
Active
|
Recovery
|
Frame Adv
|
Circuit
|
Invuln
|
| 24
|
4
|
23
|
-15 ~ -13
|
0.35%*2 (0.7%)
|
Low 1-25
|
|
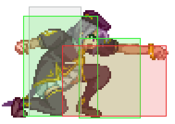
A slow whip that brings the enemy closer to you. Hits mid. Has lower body invicibility until the second half of the active frames.
Low invincibility will avoid most characters 2A. However there are exceptions whose 2A is tall enough:
Moons	Character
CH 	Arc
C 	Red Arc
CHF 	Hime
F 	Hisui
CHF 	Kohaku
CHF 	KohaMech
CF 	Nanaya
CHF 	Nero
F 	Ryougi
C 	Satsuki
CHF 	Tohno
F 	Wara
|
| EX
|
Damage
|
Red Damage
|
Proration
|
Cancel
|
Guard
|
| 350*4 (1334)
|
(914)
|
100%*3, 70% (M)
|
-
|
LHA
|
| First Active
|
Active
|
Recovery
|
Frame Adv
|
Circuit
|
Invuln
|
| 5+16
|
4
|
23
|
-13
|
-100%
|
-
|
|
A fast whip that brings the enemy closer to you and hits 4 times. Hits mid, comes out fast (not as fast as 214A).
|
|
|
|
| A
|
Damage
|
Red Damage
|
Proration
|
Cancel
|
Guard
|
| -
|
-
|
-
|
-
|
-
|
| First Active
|
Active
|
Recovery
|
Frame Adv
|
Circuit
|
Invuln
|
| -
|
-
|
23
|
-
|
-
|
Full 5-13, High 14-23
|
|
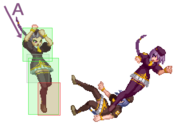
Fakeout only. Has invincibility, then upper invincibility. Does not kick or cross up like Crescent's version. Hidden 22.5% Reverse Beat penalty.
|
| B
|
Damage
|
Red Damage
|
Proration
|
Cancel
|
Guard
|
| 600, 1000 (1568)
|
(904)
|
100%, 65% (O)
|
(J)
|
LH
|
| First Active
|
Active
|
Recovery
|
Frame Adv
|
Circuit
|
Invuln
|
| 35
|
2 (2) 3
|
28
|
-6
|
3.5%, 5.6% (9.1%)
|
Full 5-17, Low 18-37
|
|
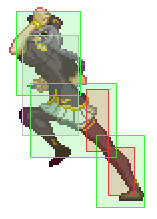
A slide with a kick that launches your opponent. Has lower half invincibility. Air unblockable, jump cancellable, can be continued into air combo. Unlike Crescent's version, does NOT add Reverse Beat penalty.
|
| EX
|
Damage
|
Red Damage
|
Proration
|
Cancel
|
Guard
|
| 600*2, 800, 1200 (2006)
|
(1346)
|
70% (O), 65%*2 (O), 90% (M)
|
(N), (SP), (EX), (J)
|
LH
|
| First Active
|
Active
|
Recovery
|
Frame Adv
|
Circuit
|
Invuln
|
| 2+14
|
16
|
42
|
-40
|
-100.0%
|
Full 1-17
|
|
EX slide with a jumping kick that hits the opponent 4 times. Launches, air unblockable, can be cancelled into anything on hit, unsafe on block.
|
|
Aerial Specials
|
|
| A
|
Damage
|
Red Damage
|
Proration
|
Cancel
|
Guard
|
| 100, 1200 (1262)
|
(1026)
|
100%
|
-
|
LH
(Whiffs vs Air.)
|
| First Active
|
Active
|
Recovery
|
Frame Adv
|
Circuit
|
Invuln
|
| 12
|
X
|
4
|
2 ~ -3
|
0.7%
|
-
|
|
A fast air slide attack. Safe on block with very fast recovery, even on whiff. A and EX versions gain upper body invicibility until landing when blocked, for some reason.
|
| B
|
Damage
|
Red Damage
|
Proration
|
Cancel
|
Guard
|
| 100, 800 (900)
|
(375)
|
100%
|
-
|
U
|
| First Active
|
Active
|
Recovery
|
Frame Adv
|
Circuit
|
Invuln
|
| 30
|
X
|
22
|
-
|
0.7%
|
-
|
|
A slow air slide attack, but is unblockable. Unsafe on whiff.
|
| EX
|
Damage
|
Red Damage
|
Proration
|
Cancel
|
Guard
|
| 100, 700*5 (3270)
|
(1335)
|
100%
|
-
|
HA
|
| First Active
|
Active
|
Recovery
|
Frame Adv
|
Circuit
|
Invuln
|
| 3+2
|
X
|
6
|
4 ~ -5
|
-100.0%
|
-
|
|
EX air slide. Flips the opponents 5 times. Hold 4 or 6 to control the direction of her throw. Safe on block and whiff.
|
|
Arc Drive
Der bullet Der bullet
|
| AD
|
Damage
|
Red Damage
|
Proration
|
Cancel
|
Guard
|
| 100, 450*10 (3076)
|
(2204)
|
90% (O)
|
-
|
LH, LHA
|
| First Active
|
Active
|
Recovery
|
Frame Adv
|
Circuit
|
Invuln
|
| 9
|
33 (18) 19
|
81
|
-133 (First Hit)
|
removes all
|
Full 1-133
|
| ~C Max.
|
Damage
|
Red Damage
|
Proration
|
Cancel
|
Guard
|
| 400*6 (4023)
|
(1984)
|
-
|
-
|
-
|
| First Active
|
Active
|
Recovery
|
Frame Adv
|
Circuit
|
Invuln
|
| -
|
-
|
-
|
-
|
-
|
-
|
|
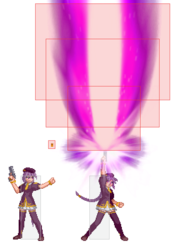
Sion flips an air unblockable bullet into the sky and then fires a huge purple laser upward from her gun. You get more hits if you mash C as she fires the laser. Good anti air if you think it will kill, as it's barely telegraphed at all, with no superflash until she fires the gun. As an arc drive, it also works as a reversal, as it has ludicrous amounts of invuln starting from frame 1, though it's a free punish for the opponent if it's blocked.
|
|
MBAACC Navigation


