Samurai Deeper Kyo/Mechanics
Samurai Deeper Kyo's Mechanics are very simple and straight forward:
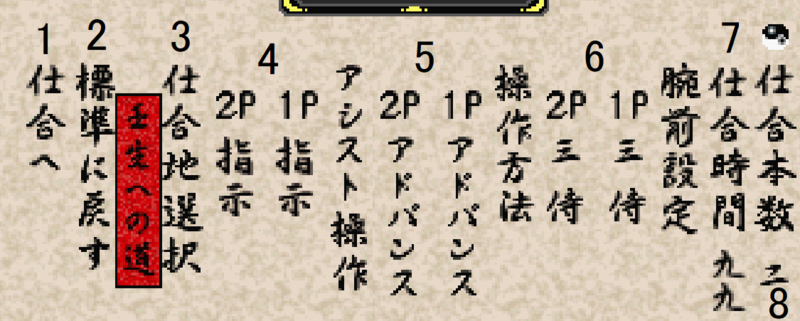
VS Menu Translation
1 - Options Set
2 - Set to Default (Don't)
3 - Stage Select (Stage is automatically based on P1 character)
4 - Assist Type:
- Automatic
- Burst
- Manual ( This is the option selected in the image and is by far the best option)
5. Control Type
- Beginner (Default)
- Advanced ( This is the option selected in the image and is the best option )
6. Handicap (?)
7. Timer
- 40
- 60
- 80
- 99 (The option set in the image)
- Infinite
8. Rounds:
- 1
- 2 (The option set in the image)
- 3
Each of the options set in the image are the most suitable options for VS.
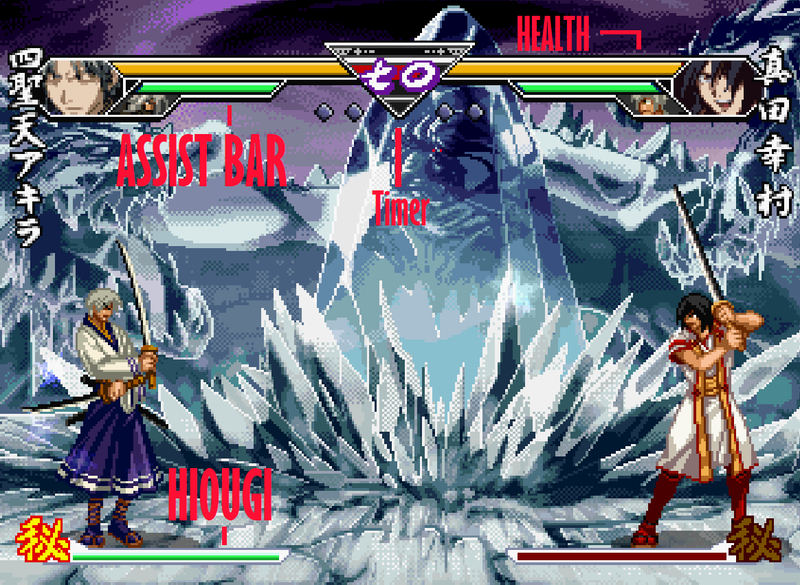
GUI
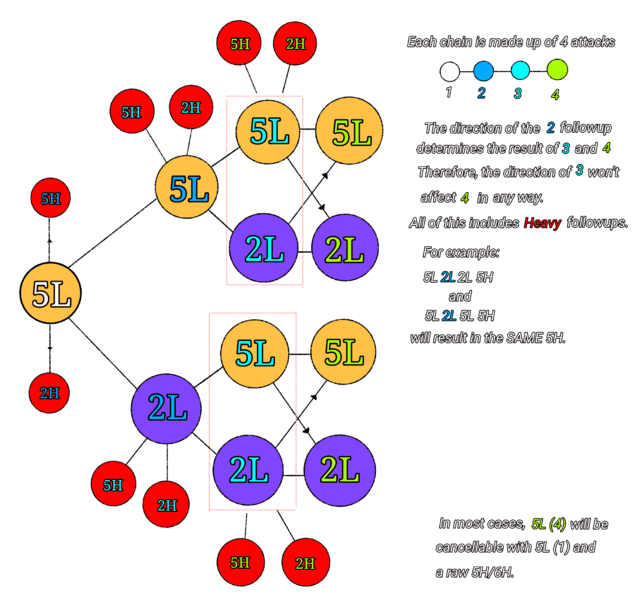
Chains
Every character (Except Mukuro) features the ability to perform an intricate set of strings from a 5L like the diagram above. Each followup may result in anything. From a projectile to an overhead or unblockable or even to a short hop or command dash you name it!
Assists
Assists are rather self-explanitory. The support or partner you choose on the character select prior to the match will be available for use in-game as an assist.
The Assist Bar measures the amount of time it will take for your Assist to be available and increases passively over time. The length of time it will take for it to fill heavily depends on which assist you chose.
For example: The Sasuke Assist takes about 8 seconds to charge while the Mukuro Assist takes 30!
Assists can be used in and out of hitstun as well as during combos. This means they can be used as combo extenders, bursts and pressure extenders/approach locks. The effectiveness in each of those sectors also of course depends on which assist is chosen. Each assist is distinct and unique.
Hiougi
Hiougi or your Super Meter is a bar that fills both to offer you the ability to execute a Hiougi Attack and to prevent infinite pressure. It is built by performing attacks.
You can press AA to perform your character's unique Hiougi attack once its filled but the meter comes with a side-effect. With a filled bar, the game will slow down your character's attacks! Any attack or cancel you do will now be done three frames later than intended until you use your meter! That said, it does not mean you can just act earlier as though you were playing on delay based netcode....a cancel will always be performed later than usual no matter how fast you press the button! It is a strange mechanic.
Hiougis will eliminate all assists and projectiles on screen when the super flash occurs!
Blocking
In Samurai Deeper Kyo, blocking works in a very strange way. You cannot block in the air and chip damage does not exist, but that isn't the weird part.
Whats odd is its blockstun system. While in blockstun, you are locked in the blocktype you chose when you were attacked until you are out of it. This means that an opponent blocking high on a 5L can get hit by an unblockable and unavoidable 2L (Low) afterwards because the 5L kept them in high blockstun for a longer period of time than it took to low show them!
Most overheads in this game come before an attack that lets the opponent out of blockstun fast enough to block the overhead. Therefore mixups do require delayed attacks and a freed opponent. If not, the opponent can hold 4 while still blocking low after blocking low once, to automatically block an overhead!
Timeout
Timeout in this game is also odd. When a time out occurs, the game ignores the health values of both players and enters a sudden-death of sorts. It gives both players full meter, and who ever hits the other with a super first wins the round. If a super is whiffed, it will automatically refill. Its almost like a training mode.
In competitive play, there will most likely be an honor rule of storts that lets the opponent with more health prior to the timeout freely hiougi the other.
Launching, Wallbouncing and Sweeps
They all are very self-explanitory:
Wallbouncing - The opponent flies across the stage until they hit the edge of the screen.
Launching - The opponent is thrown into the sky. Launched even.
Sweep - The opponent gets tripped, this can happen at any height.
Despite being three different airborne-states, they really only differ in the trajectory/momentum of the player in the air. Neither offer any sort of invincibility on the air-borne opponent and can definitely be juggled off of under the right circumstances. The speed of falling from a wallbounce or sweep is universal and is not affected by weights.
Clashing
Clashing occurs when two attacks' hitboxes make contact with each other without hitting with the other player's hurtboxes.
When two non-projectile attacks clash, the screen fades to white then cuts to both characters dashing past each other crashing their swords against each other. They do this three times. During this period, both players must press the Heavy Button exactly when they're about to make contact with the enemy to hit them instead of clash again! Three successful button hits can mean quite a bit of damage!!! So its pretty important that you learn how to time your attack!
At the end of it, both players will be positioned a full screen length away from each other.
Scaling and Infinites
With the game's extremely freeform juggle system, infinites are not difficult to perform. Whether it be launcher, wallbounce or ground loops, almost everyone has one (They can be escaped by use of an assist but they're still infinites). However...
Combos in SDK scale based on number of hits and its damage will begin to scale drastically by about 10. When performing a combo, its best to start it with the highest damage attacks first, and when doing an infinite, you let it drop and try to go for another combo setup on the opponent's wakeup to deal an efficient amount of damage before an assist charges. For some assists, interrupting infinites can be a difficult/specific feat and makes performing an infinite forever become the best option against it, even if the damage is deteriorated to a pixel worth. For other assists, it is fair to fear getting hit by them. For example: The Mukuro Assist. Its fast and can take down 50% of an ordinary character's health on contact which is absolutely terrifying. This creates a situation of; should I keep doing the infinite/pressuring the opponent? or should I stop here and respect whatever comes next?
Some characters have attacks that reset scaling/ignore it. For example: Tokugawa's Hiougi will both reset scaling and do unscaled damage when it hits the opponent as on contact it begins a cutscene that restarts the combo counter. This is the same with Benitora's (Tokugawaa's son's) Hiougi.
Variables
Each character in SDK features a different defense multiplier that affects their health. They also can be segregated into weight classes. When the information is compiled it will be listed here.


