
ナコルル, Nakoruru
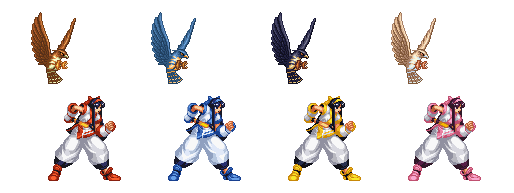
Colors
Introduction
Everyone's favorite Ainu environmentalist is paying dearly for S-Tier crimes committed in Samsho 3 and 4. Things got so bad her wolf-riding alter ego split off from her and started her own club.
While Nako has very fast movement and a pretty decent set of special moves, she suffers from overall low damage and crummy normals. Pretty much all of the factors that made her an absolute demon in the previous game were either nerfed or taken away entirely, and the newly added features don't help her out very much. Nakoruru has to work a lot harder to get her wins this time around.
| Strengths |
Weaknesses
|
- Good movement and a small hurtbox.
- Specials can have good utility, particularly 421S.
- Has a 1f diving overhead on the bird.
|
- Short range.
- Low damage output means she needs to make more correct guesses on offense.
- Very unsafe special moves.
- Low defense.
|
Data
- Damage taken: 120%
- Rage duration: 7 seconds
- Amount to rage: 24
- Walk speed: 768
- Backwalk speed: 640
- Dash speed: 1856
- Jump duration: 45 frames
- Width: 20
- Throw range: 8
- Throw recovery: 46 frames
- Tier placing: C
Normals
Far Slashes
n.2AB
5A
|
| Damage
|
Guard
|
Cancel
|
Invul
|
Property
|
Level
|
| 6
|
Mid
|
1~5(5)
|
-
|
Deflectable (Weak)
Recoil Cancel
Weapon Clash 9~11(3) / 14~17(4)
|
Weak
|
| Startup
|
Active
|
Recovery
|
Hit Adv
|
Backhit Adv
|
Block Adv
|
| 12
|
2
|
10
|
-1
|
-1
|
-3
|
|
Slow startup for a poke, same range as 5B, weak damage. Only advantage over 5B is that it's completely safe on block.
|
|
5B
5B
|
| Damage
|
Guard
|
Cancel
|
Invul
|
Property
|
Level
|
| 11
|
Mid
|
1~2(2) / 5~23(19
|
-
|
Deflectable (Medium)
Recoil Cancel
Weapon Clash 7~12(6)
|
Medium
|
| Startup
|
Active
|
Recovery
|
Hit Adv
|
Backhit Adv
|
Block Adv
|
| 13
|
2
|
17
|
-1
|
+7
|
-9
|
|
Below average startup and range for a medium, this recovers pretty quickly and combos into most of her attacks, making it a good combo starter. The cancel window is extremely wide, starting before the attack even comes out, so be careful about when you use it.
|
|
5AB
5AB
|
| Damage
|
Guard
|
Cancel
|
Invul
|
Property
|
Level
|
| 27
|
Mid
|
1~13(13)
|
-
|
Deflectable (Heavy)
Recoil Cancel
Weapon Clash 10~15(6)
|
Heavy
|
| Startup
|
Active
|
Recovery
|
Hit Adv
|
Backhit Adv
|
Block Adv
|
| 16
|
2
|
38
|
-3
|
+7
|
-21
|
|
Nakoruru's only single-hit heavy, it's reasonably fast and long-ranged for what it is, so it makes for a great punisher when available. Since it's cancelable on block it's not horrible to toss out occasionally.
While the attack itself isn't cancelable, most of the startup is. You can buffer something else after hitting it in case you see something coming.
|
|
2A
2A
|
| Damage
|
Guard
|
Cancel
|
Invul
|
Property
|
Level
|
| 5
|
Low
|
7~13(7)
|
-
|
Deflectable (Weak)
Recoil Cancel
|
Weak
|
| Startup
|
Active
|
Recovery
|
Hit Adv
|
Backhit Adv
|
Block Adv
|
| 7
|
3
|
8
|
-1
|
-1
|
-3
|
|
Quick low poke. Much better than 5A, but susceptible to hopping. Combos into both her ground slide and cape attack.
|
|
2B
2B
|
| Damage
|
Guard
|
Cancel
|
Invul
|
Property
|
Level
|
| 5x3
|
Mid
|
1~14(14)
|
-
|
Deflectable (Medium)
Recoil Cancel
|
Medium
|
| Startup
|
Active
|
Recovery
|
Hit Adv
|
Backhit Adv
|
Block Adv
|
| 15
|
11
|
34
|
-1
|
+9
|
-9
|
|
Starts up very slow, does little damage, has a lousy hitbox, doesn't combo into anything. The period before the attack comes out is fully cancelable, for whatever that is worth.
|
|
2AB
2AB
|
| Damage
|
Guard
|
Cancel
|
Invul
|
Property
|
Level
|
| 5+25
|
Low
|
1~12(12)
|
-
|
Deflectable (Heavy)
Recoil Cancel
|
Heavy
|
| Startup
|
Active
|
Recovery
|
Hit Adv
|
Backhit Adv
|
Block Adv
|
| 13
|
2
|
33
|
+6
|
+16
|
-21
|
|
Two hit upwards swing that connects low. The second hit hurts hard, but beware of rage explosion. In most circumstances this is actually pretty good to use because of the recoil cancel near the end of the animation.
There is a third hitbox that does not connect on anyone even if the first two hits land, but it could catch people coming down from a jump. Which doesn't mean that that is what you should use this move for at all.
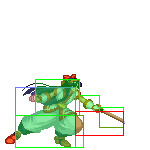
Click here for animated hitboxes.
|
|
Near Slashes
n.5A
n.5A
|
| Damage
|
Guard
|
Cancel
|
Invul
|
Property
|
Level
|
| 4
|
Mid
|
1(1) / 5~12(8)
|
-
|
Deflectable (Weak)
Recoil Cancel
Weapon Clash 1~2(2)
|
Weak
|
| Startup
|
Active
|
Recovery
|
Hit Adv
|
Backhit Adv
|
Block Adv
|
| 5
|
4
|
8
|
-1
|
-1
|
-3
|
|
Nako's fastest cancelable normal, combos into ground slide and cape easily. This lets her punish a lot of things she wouldn't be able to normally, so use wisely!
|
|
n.5B
n.5B
|
| Damage
|
Guard
|
Cancel
|
Invul
|
Property
|
Level
|
| 7
|
Mid
|
10~29(20)
|
-
|
Deflectable (Medium)
Recoil Cancel
Weapon Clash 4~9(6)
|
Medium
|
| Startup
|
Active
|
Recovery
|
Hit Adv
|
Backhit Adv
|
Block Adv
|
| 10
|
4
|
15
|
-1
|
+7
|
-9
|
|
Close range mid-height slice. Combos with her WFT, strongest cape attack, and ground slide. Pretty good stuff but not much of a poke.
|
|
n.5AB
n.5AB
|
| Damage
|
Guard
|
Cancel
|
Invul
|
Property
|
Level
|
| 5+24
|
Mid
|
1~2(2)
|
-
|
eflectable (Heavy)
Recoil Cancel
Weapon Clash 12~14(2) / 17~20(4)
|
Heavy
|
| Startup
|
Active
|
Recovery
|
Hit Adv
|
Backhit Adv
|
Block Adv
|
| 15
|
2
|
47
|
0
|
+10
|
-21
|
|
Similar to 2AB, it's a two hit attack. It starts slower than 2AB, does less damage, has less frame advantage on hit, and its hitboxes on whiff are horrible. Always use 2AB instead.
|
|
Overheads
5BC
5BC
|
| Damage
|
Guard
|
Cancel
|
Invul
|
Property
|
Level
|
| 14
|
High
|
-
|
-
|
Knockdown
|
-
|
| Startup
|
Active
|
Recovery
|
Hit Adv
|
Backhit Adv
|
Block Adv
|
| 20
|
2
|
18
|
KD
|
KD
|
-14
|
|
Universal Overhead, decent range forward hop. Good for avoiding throws.
|
|
u.5BC
u.5BC
|
| Damage
|
Guard
|
Cancel
|
Invul
|
Property
|
Level
|
| 14
|
High
|
-
|
-
|
Knockdown
|
-
|
| Startup
|
Active
|
Recovery
|
Hit Adv
|
Backhit Adv
|
Block Adv
|
| 30
|
9
|
11
|
KD
|
KD
|
-14
|
|
30 frame startup makes this the most useless, but also humiliating, universal overhead in the game.
|
|
Kicks
5C
5C
|
| Damage
|
Guard
|
Cancel
|
Invul
|
Property
|
Level
|
| 5
|
Mid
|
1~22(22)
|
-
|
-
|
-
|
| Startup
|
Active
|
Recovery
|
Hit Adv
|
Backhit Adv
|
Block Adv
|
| 13
|
6
|
3
|
+1
|
+1
|
-4
|
|
Slowish kick. Decent range and recovery but its speed isn't so great. Combos into ground dash or cape attack.
|
|
6C
6C
|
| Damage
|
Guard
|
Cancel
|
Invul
|
Property
|
Level
|
| 3+3+2
|
Mid
|
4~6(3)
|
-
|
Knockdown
|
-
|
| Startup
|
Active
|
Recovery
|
Hit Adv
|
Backhit Adv
|
Block Adv
|
| 4
|
1
|
41
|
KD
|
KD
|
-32
|
|
Nako's trademark 'walking up their body' attack. This is actually really good. It has four frame startup, making it a universal punish. Near the corner the recovery is cancelable into 8BC for more damage.
Animated hitboxes.
|
|
2C
2C
|
| Damage
|
Guard
|
Cancel
|
Invul
|
Property
|
Level
|
| 2
|
Low
|
1~5(5)
|
-
|
-
|
-
|
| Startup
|
Active
|
Recovery
|
Hit Adv
|
Backhit Adv
|
Block Adv
|
| 6
|
4
|
8
|
-2
|
-2
|
-7
|
|
Quick low kick. Recovery is pretty lame on block, so use sparingly. Makes an okay tick throw tool.
|
|
3C
3C
|
| Damage
|
Guard
|
Cancel
|
Invul
|
Property
|
Level
|
| 5
|
Low
|
1~6(6)
|
-
|
Knockdown
|
-
|
| Startup
|
Active
|
Recovery
|
Hit Adv
|
Backhit Adv
|
Block Adv
|
| 14
|
6
|
17
|
KD
|
KD
|
-18
|
|
Low sweep. Damage is pretty bad, it's almost as bad on block as 2AB, but doesn't have any recoil cancel. There's no hitstop so it's harder to react to in order to punish, at least.
|
|
Jumping
j.A
j.A
|
| Damage
|
Guard
|
Cancel
|
Invul
|
Property
|
Level
|
| 5
|
High
|
-
|
-
|
-
|
Weak
|
| Startup
|
Active
|
Recovery
|
Hit Adv
|
Backhit Adv
|
Block Adv
|
| 5
|
3
|
20
|
-
|
-
|
-
|
|
Downwards angled slice with little range. No real reason to use this over any of her other jumping normals.
|
|
j.B
j.B
|
| Damage
|
Guard
|
Cancel
|
Invul
|
Property
|
Level
|
| 10
|
High
|
-
|
-
|
-
|
Medium
|
| Startup
|
Active
|
Recovery
|
Hit Adv
|
Backhit Adv
|
Block Adv
|
| 6
|
2
|
19
|
-
|
-
|
-
|
|
Forwards slice. Not active for very long. If you don't need the slightly faster startup, use j.AB instead.
|
|
j.AB
j.AB
|
| Damage
|
Guard
|
Cancel
|
Invul
|
Property
|
Level
|
| 23
|
High
|
-
|
-
|
-
|
Heavy
|
| Startup
|
Active
|
Recovery
|
Hit Adv
|
Backhit Adv
|
Block Adv
|
| 11
|
2
|
23
|
-
|
-
|
-
|
|
Nako slashes in a wide arc in front of her for massive damage. This is one of her best attacks, covering a solid space in front of her that's difficult for the opponent to get through. Use it always!
|
|
j.C
j.C
|
| Damage
|
Guard
|
Cancel
|
Invul
|
Property
|
Level
|
| 4
|
High
|
-
|
-
|
-
|
-
|
| Startup
|
Active
|
Recovery
|
Hit Adv
|
Backhit Adv
|
Block Adv
|
| 8
|
24
|
2
|
-
|
-
|
-
|
|
The happiest kick. Hits down and in front of Nako for basically no damage. The angle isn't covered by anything else, and it has a ton of active frames, so it's a good jumpin tool. Since it has no hitstop it's also a great reset tool, or just to annoy throw mashers.
|
|
Dashing
66A
66A
|
| Damage
|
Guard
|
Cancel
|
Invul
|
Property
|
Level
|
| 5
|
Mid
|
1~4(4)
|
-
|
Deflectable (Heavy)
Recoil Cancel
|
Weak
|
| Startup
|
Active
|
Recovery
|
Hit Adv
|
Backhit Adv
|
Block Adv
|
| 5
|
4
|
10
|
-4
|
-4
|
-21
|
|
Quick dashing slice. Fast and good range. Recoil period is like a much heavier attack, so be careful about it.
|
|
66B
66B
|
| Damage
|
Guard
|
Cancel
|
Invul
|
Property
|
Level
|
| 12
|
Mid
|
1~8(8)
|
-
|
Deflectable (Heavy)
Recoil Cancel
|
Heavy
|
| Startup
|
Active
|
Recovery
|
Hit Adv
|
Backhit Adv
|
Block Adv
|
| 9
|
4
|
36
|
-3
|
+7
|
-21
|
|
Nako comes in for a long ranged downwards slice. Despite the animation, this is not an overhead.
Unfortunately, it only hits near the bottom of the attack, so it won't catch jumpers. Since the recovery period is horrible, you really don't want to whiff this, either. Would be a much more useful attack if it hit in the full arc.
|
|
66AB
66AB
|
| Damage
|
Guard
|
Cancel
|
Invul
|
Property
|
Level
|
| 5+12
|
Mid
|
1~8(8)
|
-
|
Knockdown
Deflectable (Heavy)
|
Heavy
|
| Startup
|
Active
|
Recovery
|
Hit Adv
|
Backhit Adv
|
Block Adv
|
| 9
|
1
|
26
|
KD
|
KD
|
-18
|
|
Two hit upwards slice. This is really good anti-air, especially on crossunder, but lack of block recoil makes it not at all safe to use.
|
|
66C
66C
|
| Damage
|
Guard
|
Cancel
|
Invul
|
Property
|
Level
|
| 5
|
Low
|
1~3(3) / 21~27(7)
|
-
|
Knockdown
|
-
|
| Startup
|
Active
|
Recovery
|
Hit Adv
|
Backhit Adv
|
Block Adv
|
| 4
|
10
|
13
|
KD
|
KD
|
-18
|
|
Quick knockdown kick. Nako basically halts her dash instantly, so it doesn't go very far.
|
|
Unarmed
u.5S
u.5S
|
| Damage
|
Guard
|
Cancel
|
Invul
|
Property
|
Level
|
| 3
|
Mid
|
1~5(5)
|
-
|
-
|
-
|
| Startup
|
Active
|
Recovery
|
Hit Adv
|
Backhit Adv
|
Block Adv
|
| 9
|
7
|
11
|
0
|
+8
|
-13
|
|
Reaches out and touches them. Slow, lousy on block, uncancelable. Avoid.
|
|
u.2S
u.2S
|
| Damage
|
Guard
|
Cancel
|
Invul
|
Property
|
Level
|
| 3
|
Mid
|
-
|
-
|
-
|
-
|
| Startup
|
Active
|
Recovery
|
Hit Adv
|
Backhit Adv
|
Block Adv
|
| 6
|
5
|
6
|
-1
|
-1
|
-6
|
|
Very fast poke. Can be hopped over but otherwise a very nice move.
|
|
u.jS
u.jS
|
| Damage
|
Guard
|
Cancel
|
Invul
|
Property
|
Level
|
| 5
|
High
|
-
|
-
|
-
|
-
|
| Startup
|
Active
|
Recovery
|
Hit Adv
|
Backhit Adv
|
Block Adv
|
| 7
|
21
|
4
|
-
|
-
|
-
|
|
Like j.C, it's a poke that's out for a long time. Not any more or less useful.
|
|
u.66S
u.66S
|
| Damage
|
Guard
|
Cancel
|
Invul
|
Property
|
Level
|
| 6
|
Mid
|
1~8(8)
|
-
|
Knockdown
|
-
|
| Startup
|
Active
|
Recovery
|
Hit Adv
|
Backhit Adv
|
Block Adv
|
| 9
|
5
|
5
|
KD
|
KD
|
-5
|
|
Oddly, this is better than u.5S in every way. Recovers very quickly, making for a good tick throw setup. Use this a lot when disarmed.
|
|
Pursuit
2BC
2BC Small Pursuit Small Pursuit
|
| Damage
|
Guard
|
Cancel
|
Invul
|
Property
|
Level
|
| 5
|
-
|
-
|
-
|
-
|
-
|
| Startup
|
Active
|
Recovery
|
Hit Adv
|
Backhit Adv
|
Block Adv
|
| 17
|
17
|
35
|
-
|
-
|
-
|
|
Nako can and should use this for extra damage after every 412A.
|
|
u.2BC
u.2BC Unarmed Small Pursuit Unarmed Small Pursuit
|
| Damage
|
Guard
|
Cancel
|
Invul
|
Property
|
Level
|
| 8
|
-
|
-
|
-
|
-
|
-
|
| Startup
|
Active
|
Recovery
|
Hit Adv
|
Backhit Adv
|
Block Adv
|
| 15
|
10
|
38
|
-
|
-
|
-
|
|
Somehow, this does more damage than the armed version while also being slightly faster.
|
|
8BC
8BC Big Pursuit Big Pursuit
|
| Damage
|
Guard
|
Cancel
|
Invul
|
Property
|
Level
|
| 14
|
-
|
112~114(3)
|
-
|
-
|
-
|
| Startup
|
Active
|
Recovery
|
Hit Adv
|
Backhit Adv
|
Block Adv
|
| 39
|
17
|
58
|
-
|
-
|
-
|
|
If Mamahaha (214S) knocks them down and you're close enough, you can follow up with this.
|
|
u.8BC
u.8BC Unarmed Big Pursuit Unarmed Big Pursuit
|
| Damage
|
Guard
|
Cancel
|
Invul
|
Property
|
Level
|
| 14
|
-
|
-
|
-
|
-
|
-
|
| Startup
|
Active
|
Recovery
|
Hit Adv
|
Backhit Adv
|
Block Adv
|
| 39
|
3
|
41
|
-
|
-
|
-
|
|
Again faster than the armed version, but equal damage this time around.
|
|
System
Deflect
Deflect 216D 216D
|
| Damage
|
Guard
|
Cancel
|
Invul
|
Property
|
Level
|
| -
|
-
|
-
|
-
|
Deflect
|
-
|
| Startup
|
Active
|
Recovery
|
Hit Adv
|
Backhit Adv
|
Block Adv
|
| -
|
-
|
-
|
-
|
-
|
-
|
|
Short range deflect. Still as useful as ever though.
|
|
Weapon Pickup
Weapon Pickup u.5A u.5A
|
| Damage
|
Guard
|
Cancel
|
Invul
|
Property
|
Level
|
| -
|
-
|
-
|
-
|
-
|
-
|
| Startup
|
Active
|
Recovery
|
Hit Adv
|
Backhit Adv
|
Block Adv
|
| -
|
-
|
-
|
-
|
-
|
-
|
|
Quick animation.
|
|
Wall Jump
Wall Jump j.9 or j.3 near wall j.9 or j.3 near wall
|
| Damage
|
Guard
|
Cancel
|
Invul
|
Property
|
Level
|
| -
|
-
|
-
|
-
|
-
|
-
|
| Startup
|
Active
|
Recovery
|
Hit Adv
|
Backhit Adv
|
Block Adv
|
| -
|
-
|
-
|
-
|
-
|
-
|
|
It certainly is a wall jump.
|
|
Taunt Disarm
Taunt Disarm 3 x Start 3 x Start
|
| Damage
|
Guard
|
Cancel
|
Invul
|
Property
|
Level
|
| -
|
-
|
-
|
-
|
-
|
-
|
| Startup
|
Active
|
Recovery
|
Hit Adv
|
Backhit Adv
|
Block Adv
|
| -
|
-
|
-
|
-
|
-
|
-
|
|
Pretty long animation. Stands around for about a second, telling her opponent she doesn't want to fight, and then puts her weapon down. She might always change her mind though.
|
|
Specials
Kamui Fumukesupu
Kamui Fumukesupu j.2C j.2C
|
| Armed
|
Damage
|
Guard
|
Cancel
|
Invul
|
Property
|
Level
|
| 8
|
High
|
-
|
-
|
Knockdown
|
Medium
|
| Startup
|
Active
|
Recovery
|
Hit Adv
|
Backhit Adv
|
Block Adv
|
| 14
|
12
|
9
|
KD
|
KD
|
-
|
| Unarmed
|
Damage
|
Guard
|
Cancel
|
Invul
|
Property
|
Level
|
| 8
|
High
|
-
|
-
|
Knockdown
|
Medium
|
| Startup
|
Active
|
Recovery
|
Hit Adv
|
Backhit Adv
|
Block Adv
|
| 14
|
23
|
9
|
KD
|
KD
|
-
|
|
Heel drop. It doesn't have much range, but it does reasonable damage and forces knockdown on hit. Helpful when coming in from certain angles. When unarmed it is active for almost twice as long.
|
|
Annu Mutsube
Annu Mutsube 412A 412A 412B 412B 412AB 412AB
|
| A
|
Damage
|
Guard
|
Cancel
|
Invul
|
Property
|
Level
|
| 15
|
Low
|
-
|
-
|
Knockdown
|
-
|
| Startup
|
Active
|
Recovery
|
Hit Adv
|
Backhit Adv
|
Block Adv
|
| 10
|
6
|
30
|
KD
|
KD
|
-25
|
| B
|
Damage
|
Guard
|
Cancel
|
Invul
|
Property
|
Level
|
| 18
|
Low
|
-
|
1-8f hit invincible
9-14f upper body invincible
|
Knockdown
|
-
|
| Startup
|
Active
|
Recovery
|
Hit Adv
|
Backhit Adv
|
Block Adv
|
| 16
|
9
|
34
|
KD
|
KD
|
-37
|
| AB
|
Damage
|
Guard
|
Cancel
|
Invul
|
Property
|
Level
|
| 23
|
Low
|
-
|
1-16f fully invincible
17-22f throw and upper body invincible
|
Knockdown
|
-
|
| Startup
|
Active
|
Recovery
|
Hit Adv
|
Backhit Adv
|
Block Adv
|
| 24
|
20
|
39
|
KD
|
KD
|
-37
|
|
Ground slide, hits low. B and AB versions have startup hit invulnerability, making them useful as a reversal. Probably Nakoruru's best move, giving her both a low mixup and a surprisingly fast forwards moving attack. A version is best used for combos and mixups, while B/AB versions are better for their reversal properties or distance.
|
|
Rera Mutsube
Rera Mutsube 236S 236S
|
| A
|
Damage
|
Guard
|
Cancel
|
Invul
|
Property
|
Level
|
| 22
|
Mid
|
-
|
1-7f upper body invincible
|
Knockdown
|
-
|
| Startup
|
Active
|
Recovery
|
Hit Adv
|
Backhit Adv
|
Block Adv
|
| 9
|
8
|
44
|
KD
|
KD
|
-57
|
| B
|
Damage
|
Guard
|
Cancel
|
Invul
|
Property
|
Level
|
| 22
|
Mid
|
-
|
1-10f upper body invincible
|
Knockdown
|
-
|
| Startup
|
Active
|
Recovery
|
Hit Adv
|
Backhit Adv
|
Block Adv
|
| 13
|
10
|
56
|
KD
|
KD
|
-76
|
| AB
|
Damage
|
Guard
|
Cancel
|
Invul
|
Property
|
Level
|
| 22
|
Mid
|
-
|
1-13f upper body invincible
|
Knockdown
|
-
|
| Startup
|
Active
|
Recovery
|
Hit Adv
|
Backhit Adv
|
Block Adv
|
| 15
|
19
|
75
|
KD
|
KD
|
-109
|
|
Rising Nako missile. Don't think too hard about the physics of this one. Regardless of what slash you use, it does the same damage and Nako will stop the instant she hits the sides.
You might be under the impression that these are good anti-airs. You would be wrong. They have no invulnerability in the air, and not much range beyond Nako's hittable box, so if they have any attack out at the time you will probably get stuffed. Even if you do hit, you recover pretty slowly, making it really not much better than jumping at them and doing j.AB, if at all.
236A is normally the best of these, since her angle and low profile makes her the hardest to hit, but it will have issues with strong downwards strikes like Haoh j.AB.
|
|
Kamui Rimse
Kamui Rimse 421S 421S ...S ...S
|
| A
|
Damage
|
Guard
|
Cancel
|
Invul
|
Property
|
Level
|
| 3
|
Mid
|
-
|
-
|
-
|
-
|
| Startup
|
Active
|
Recovery
|
Hit Adv
|
Backhit Adv
|
Block Adv
|
| 11
|
4
|
33
|
0
|
-11
|
-28
|
| B
|
Damage
|
Guard
|
Cancel
|
Invul
|
Property
|
Level
|
| 3x2
|
Mid
|
-
|
-
|
-
|
-
|
| Startup
|
Active
|
Recovery
|
Hit Adv
|
Backhit Adv
|
Block Adv
|
| 13
|
2
|
50
|
0
|
-11
|
-24
|
| AB
|
Damage
|
Guard
|
Cancel
|
Invul
|
Property
|
Level
|
| 3x3
|
Mid
|
-
|
-
|
-
|
-
|
| Startup
|
Active
|
Recovery
|
Hit Adv
|
Backhit Adv
|
Block Adv
|
| 18
|
1
|
63
|
+1
|
-10
|
-31
|
|
Cape attack. Or whatever it is. This move is actually really good, with the followup doing a lot of damage and the A version coming out very quickly. The strength of the slash affects how many times she attacks with her cape. Each one reflects projectiles.
The biggest problem with this move is that the command interpreter hates it. If you're having trouble, input it as 4521S to not get Annu Mutsube instead.
|
| ...S
|
Damage
|
Guard
|
Cancel
|
Invul
|
Property
|
Level
|
| 3+18
|
Mid
|
-
|
-
|
Knockdown
|
-
|
| Startup
|
Active
|
Recovery
|
Hit Adv
|
Backhit Adv
|
Block Adv
|
| 11
|
9
|
13
|
KD
|
KD
|
-12
|
|
After the last attack, you can input another slash to have one final swipe come out. This does NOT reflect projectiles, but it does a far knockdown. It also does a surprisingly large amount of damage for something so easy to land. Combos into 8BC, but you have to wait until they're just about to land before doing it.
|
|
Amube Yatoro
Amube Yatoro 214S 214S
|
| Damage
|
Guard
|
Cancel
|
Invul
|
Property
|
Level
|
| 10
|
Mid
|
-
|
-
|
Knockdown
|
-
|
| Startup
|
Active
|
Recovery
|
Hit Adv
|
Backhit Adv
|
Block Adv
|
| 18
|
-
|
32
|
KD
|
KD
|
-14
|
|
Flying bird attack. Decent all-purpose projectile, good at stuffing forward advances and hitting people jumping in. Despite appearances, the bird comes out and Nakoruru recovers in the same amount of time regardless of the slash used, but it takes more time for the bird to travel further.
|
|
Taka Ni Tsukamaru
Taka Ni Tsukamaru 214C
214C
Taka Tsukamari Kougeki
b.A / b.B Taka Tsukamari Kougeki
b.A / b.B b.AB
b.AB
Kamui Mutsube
b.BC
Kamui Mutsube
b.BC
Yatoro Pok
b.236S Yatoro Pok
b.236S
|
| 214C
|
Damage
|
Guard
|
Cancel
|
Invul
|
Property
|
Level
|
| -
|
-
|
-
|
-
|
-
|
-
|
| Startup
|
Active
|
Recovery
|
Hit Adv
|
Backhit Adv
|
Block Adv
|
| -
|
-
|
-
|
-
|
-
|
-
|
|
Literally "Hold onto the hawk." After inputting this Nako will jump up onto the hawk. Once on, she can't do anything for 13 frames. In total, she'll hang on for at most 58 frames before dropping off, which is slightly less than a second. Don't expect to be doing any awesome runaway tactics with it. When you get off the bird, either manually or automatically, you're stuck on the ground wide open for 24 frames.
All attacks done from the bird are overhead, so if they see you get on it's really obvious which way you're going to hit. They can also all be used when unarmed. While on it, you can move around slowly with the controller. She moves faster horizontally than vertically.
- Taka ni Oriru - b.2C / b.3C / b.1C - Drop off the hawk. You still have the huge landing recovery, so if you do this expect to get whacked on reaction. If you do 3C, you fall forwards, in case you're feeling suicidal. If you use 1C, you fall backwards, making it slightly safer.
|
| b.A/B
|
Damage
|
Guard
|
Cancel
|
Invul
|
Property
|
Level
|
| 8
|
High
|
5~8(4)
|
-
|
-
|
-
|
| Startup
|
Active
|
Recovery
|
Hit Adv
|
Backhit Adv
|
Block Adv
|
| 5
|
2
|
6
|
-3
|
+4
|
-2
|
| b.AB
|
Damage
|
Guard
|
Cancel
|
Invul
|
Property
|
Level
|
| 8
|
High
|
7~30(24)
|
-
|
-
|
-
|
| Startup
|
Active
|
Recovery
|
Hit Adv
|
Backhit Adv
|
Block Adv
|
| 7
|
2
|
21
|
-18
|
+25
|
-17
|
|
Taka Tsukamari Kougeki - Normal slashes while hanging onto the bird. She has one slash for both A and B, and then an AB slash. Despite AB being slower, all three slashes do the exact same (weak) damage, making only its hitbox better. All of them are cancelable into any other bird action, including b.BC and b.2C. The biggest problem is that when you get on the bird, you will be out of range to attack, so one of you has to move closer in order to hit, drastically limiting the usefulness of this.
|
| b.BC
|
Damage
|
Guard
|
Cancel
|
Invul
|
Property
|
Level
|
| 20
|
High
|
-
|
-
|
Knockdown
|
-
|
| Startup
|
Active
|
Recovery
|
Hit Adv
|
Backhit Adv
|
Block Adv
|
| 1
|
-
|
-
|
KD
|
KD
|
-28
|
|
Kamui Mutsube - Diagonally diving overhead. The startup on this is extremely fast at one frame and the hitbox is nice, which would make this a great overhead if they couldn't just react to Nako getting on the bird. It is surprisingly good at knocking people out of the air, though, and when used immediately from 214C makes for a very fast dodge -> attack sequence. Unarmed version has same frames but only does 12 damage.
|
| b.236S
|
Damage
|
Guard
|
Cancel
|
Invul
|
Property
|
Level
|
| 3xn
|
High
|
-
|
-
|
-
|
-
|
| Startup
|
Active
|
Recovery
|
Hit Adv
|
Backhit Adv
|
Block Adv
|
| 29
|
1
|
8
|
-
|
-
|
-
|
|
Yatoro Pok - Spinny attack. Doesn't do much damage, but gets you in nicely. Has 8 frame landing recovery, but since hit/block advantage is variable it's hard to say what this means to you other than that you'll be vulnerable to light pokes or things like Rasetsumaru WFT. Decent move, overall.
|
|
Apefuchi Kamui Rimse
Apefuchi Kamui Rimse u.3214623BC u.3214623BC
|
| Damage
|
Guard
|
Cancel
|
Invul
|
Property
|
Level
|
| 2x4, 4x5, 12
|
Mid
|
-
|
-
|
Knockdown
|
-
|
| Startup
|
Active
|
Recovery
|
Hit Adv
|
Backhit Adv
|
Block Adv
|
| 10
|
2
|
-
|
KD
|
KD
|
-25
|
|
Unarmed 10 hit autocombo on a completely useless motion. Can be rage exploded.
Does okay damage, starts up quickly, forces knockdown, can combo with 8BC. Good luck landing it.
|
|
Rera Kishima Tek
Rera Kishima Tek j.[1/2/3/4/6]C j.[1/2/3/4/6]C
|
| Damage
|
Guard
|
Cancel
|
Invul
|
Property
|
Level
|
| 18
|
-
|
-
|
-
|
Knockdown
|
-
|
| Startup
|
Active
|
Recovery
|
Hit Adv
|
Backhit Adv
|
Block Adv
|
| -
|
-
|
-
|
-
|
-
|
-
|
|
Airthrow. While it's not listed on the frame data, it does a fixed 18 damage. As with all airthrows, you have to do it from slightly below the opponent.
|
|
Elerushi Kamui Rimse
Elerushi Kamui Rimse 236CD 236CD
|
| Damage
|
Guard
|
Cancel
|
Invul
|
Property
|
Level
|
| 30
|
High
|
-
|
-
|
Knockdown, Disarm
|
-
|
| Startup
|
Active
|
Recovery
|
Hit Adv
|
Backhit Adv
|
Block Adv
|
| ~17
|
-
|
-
|
KD
|
KD
|
-76
|
|
Nakoruru hops onto the hawk and then does a diving attack similar to her b.BC. Oddly, she can't use this while already holding onto the hawk. Hits overhead, can't be exploded. Comes out pretty fast, with 18 frames being the earliest it can attack. Massively punishable on block.
Overall this is actually a decent punishing move. It even works as antiair in a pinch, and can combo on the ground from her n.5B if you cancel it instantly. Mostly hampered by Nako's absolutely horrible rage balance, giving her a long charge time and very little time to actually use it.
|
|
Combos
Normal
- Nako's fastest pokes make for good combo starters, so you can punish a lot of stuff with it. 5C can cancel before it actually hits, so be careful about that.
- More reliable option than others. More damage than 412A and don't put you in corner if you close to one.
- Ground slide, forces knockdown, easy to do.
- Oddly, this is a very powerful combo. Wait until they almost land from the juggle before doing 8BC.
- For 2A, you probably want to input this something like 452A1A. Not recommended, either way.
- All of her strongest combos start here.
- 5B can cancel before it actually hits, so be careful about that.
- More reliable option than others. More damage than 412B and don't put you in corner if you close to one.
- Easy to do, good damage.
- You have to be close to make this work. If you're sufficiently close, you can do 421AB for maximum hurtiness.
- As before, wait until they almost land from the juggle before doing 8BC.
- For 5B, must be somewhat close. Good punisher, especially when you can't normally combo into WFT.
- If you hit them with a bird anywhere on screen you can follow up with dash 8BC for a good damage. If bird hit opponent mid air then you have more time to do follow up.
- Corner only. This is actually really useful. 6C has 4 frame startup, making it a universal punish move, and 8BC does decent damage.
- Corner only. If you hit opponent with 66AB in corner, you can follow up with 8BC even on anti air.
- Hits low, works anywhere. Doesn't hurt much.
- Hits low. Corner only. Doesn't really hurt, 2AB is probably a better choice.
- Why would you ever do this.
- For those rare times you're actually in range to use the bird slash.
Backhit
- If you block attack that puts opponent in air during recovery you can run under and punish with this combo.
- Same as combo above.
- If you don't know if backhit land or not you can use this combo. It's much more safer than other options and has decent damage.
Time slow
- The usual for when you can't wait for them to come down and eat an Issen.
- Nako j.C is fast and has very downward hitbox and it can be mixed up with her empty jump 2C for Issen setup.
- Not very reliable since it depends on opponent height and width, your position and version used, but you can cross up hit opponent with Yatoro Pok for Issen setup.
Strategies
Frame Data
| Move
|
Damage
|
Startup
|
Active
|
Total
|
Cancel
|
Weapon
Clash
|
Hit
Adv.
|
Backhit
Adv.
|
Block
Adv.
|
Guard
|
Notes
|
| 5A |
6 |
12 |
2 |
24 |
1~5(5) |
9~11(3) / 14~17(4) |
-1 |
-1 |
-3 |
Mid |
Weak attack, Deflectable(weak)
|
| 5B |
11 |
13 |
2 |
32 |
1~2(2) / 5~23(19) |
7~12(6) |
-1 |
+7 |
-9 |
Mid |
Medium attack, Deflectable(med)
|
| 5AB |
27 |
16 |
2 |
56 |
1~13(13) |
10~15(6) |
-3 |
+7 |
-21 |
Mid |
Heavy attack, Deflectable(heavy)
|
| 2A |
5 |
7 |
3 |
18 |
7~13(7) |
- |
-1 |
-1 |
-3 |
Low |
Weak attack, Deflectable(weak)
|
| 2B |
5x3 |
15 |
11 |
60 |
1~14(14) |
- |
-1 |
+9 |
-9 |
Mid |
Heavy attack, Deflectable(med)
|
| 2AB |
5, 25 |
13 |
2 |
48 |
1~12(12) |
- |
+6 |
+16 |
-21 |
Low |
Heavy attack, Deflectable(heavy)
|
| n.5A |
4 |
5 |
4 |
17 |
1(1) / 5~12(8) |
1~2(2) |
-1 |
-1 |
-3 |
Mid |
Weak attack, Deflectable(weak)
|
| n.5B |
7 |
10 |
4 |
29 |
10~29(20) |
4~9(6) |
-1 |
+7 |
-9 |
Mid |
Medium attack, Deflectable(med)
|
| n.5AB |
5, 24 |
15 |
2 |
64 |
1~2(2) |
12~14(2) / 17~20(4) |
+0 |
+10 |
-21 |
Mid |
Heavy attack, Deflectable(heavy)
|
| n.2A |
5 |
7 |
3 |
18 |
7~13(7) |
- |
-1 |
-1 |
-3 |
Low |
Weak attack, Deflectable(weak)
|
| n.2B |
5x3 |
15 |
11 |
60 |
1~14(14) |
- |
-1 |
+9 |
-9 |
Mid |
Heavy attack, Deflectable(med)
|
| n.2AB |
5, 25 |
13 |
2 |
48 |
1~12(12) |
- |
+6 |
+16 |
-21 |
Low |
Heavy attack, Deflectable(heavy)
|
| 5C |
5 |
13 |
6 |
22 |
1~22(22) |
- |
+1 |
+1 |
-4 |
Mid |
Weak attack
|
| 6C |
3, 3, 2 |
4 |
1 |
46 |
4~6(3) |
- |
KD |
KD |
-32 |
Mid |
Medium attack Knockdown attack
|
| 2C |
2 |
6 |
4 |
18 |
1~5(5) |
- |
-2 |
-2 |
-7 |
Low |
Weak attack
|
| 3C |
5 |
14 |
6 |
37 |
1~6(6) |
- |
KD |
KD |
-18 |
Low |
Knockdown attack
|
| j.A |
5 |
5 |
3 |
28 |
x |
- |
-- |
-- |
-- |
High |
Weak attack, Deflectable(weak)
|
| j.B |
10 |
6 |
2 |
27 |
x |
- |
-- |
-- |
-- |
High |
Medium attack, Deflectable(med)
|
| j.AB |
23 |
11 |
2 |
36 |
x |
- |
-- |
-- |
-- |
High |
Heavy attack, Deflectable(heavy)
|
| j.C |
4 |
8 |
24 |
36 |
x |
- |
-- |
-- |
-- |
High |
Heavy attack
|
| ju.C |
4 |
8 |
24 |
36 |
x |
- |
-- |
-- |
-- |
High |
Heavy attack
|
| 5BC |
14 |
20 |
2 |
40 |
x |
- |
KD |
KD |
-14 |
High |
Medium attack Knockdown attack
|
| u.5BC |
14 |
30 |
9 |
50 |
x |
- |
KD |
KD |
-14 |
High |
Medium attack Knockdown attack
|
| 66A |
5 |
5 |
4 |
19 |
1~4(4) |
- |
-4 |
-4 |
-21 |
Mid |
Weak attack, Deflectable(heavy)
|
| 66B |
12 |
9 |
4 |
49 |
1~8(8) |
- |
-3 |
+7 |
-21 |
Mid |
Heavy attack, Deflectable(heavy)
|
| 66AB |
5, 12 |
9 |
1 |
36 |
1~8(8) |
- |
KD |
KD |
-18 |
Mid |
Knockdown attack
|
| 66C |
5 |
4 |
10 |
27 |
1~3(3) / 21~27(7) |
- |
KD |
KD |
-18 |
Low |
Knockdown attack
|
| u.5S |
3 |
9 |
7 |
27 |
1~5(5) |
- |
+0 |
+8 |
-13 |
Mid |
Medium attack
|
| u.2S |
3 |
6 |
5 |
17 |
x |
- |
-1 |
-1 |
-6 |
Mid |
Weak attack
|
| ju.S |
5 |
7 |
21 |
32 |
x |
- |
-- |
-- |
-- |
High |
Weak attack
|
| u.66S |
6 |
9 |
5 |
19 |
1~8(8) |
- |
KD |
KD |
-5 |
Mid |
Knockdown attack
|
| u.66C |
6 |
4 |
10 |
27 |
1~3(3) / 21~27(7) |
- |
KD |
KD |
-18 |
Low |
Knockdown attack
|
| 2BC |
5 |
17 |
17 |
69 |
x |
- |
-- |
-- |
-- |
Mid |
|
| u.2BC |
8 |
15 |
10 |
63 |
x |
- |
-- |
-- |
-- |
Mid |
|
| 8BC |
14 |
39 |
17 |
114 |
112~114(3) |
- |
-- |
-- |
-- |
Mid |
|
| u.8BC |
14 |
39 |
3 |
83 |
x |
- |
-- |
-- |
-- |
Mid |
|
| Kamui Fumukesupu - j.2C |
8 |
14 |
12 |
35 |
x |
- |
KD |
KD |
-- |
High |
Medium attack Knockdown attack
|
| Kamui Fumukesupu - ju.2C |
8 |
14 |
23 |
46 |
x |
- |
KD |
KD |
-- |
High |
Medium attack Knockdown attack
|
| Annu Mutsube - 412A |
15 |
10 |
6 |
46 |
x |
- |
KD |
KD |
-25 |
Low |
Knockdown attack
|
| Annu Mutsube - 412B |
18 |
16 |
9 |
59 |
x |
- |
KD |
KD |
-30 |
Low |
Knockdown attack
1-8f hit invincible
9-14f upper body invincible
|
| Annu Mutsube - 412AB |
23 |
24 |
20 |
83 |
x |
- |
?? |
?? |
-37 |
Low |
Knockdown attack
1-16f fully invincible
17-22f throw and upper body invincible
|
| Rera Mustube - 236A |
22 |
9 |
8 |
61 |
x |
- |
KD |
KD |
-57 |
Mid |
Knockdown attack
1-7f upper body invincible
|
| Rera Mustube - 236B |
22 |
13 |
10 |
79 |
x |
- |
KD |
KD |
-76 |
Mid |
Knockdown attack
1-10f upper body invincible
|
| Rera Mustube - 236AB |
22 |
15 |
19 |
109 |
x |
- |
KD |
KD |
-109 |
Mid |
Knockdown attack
1-13f upper body invincible
|
| Kamui Rimse - 421A |
3 |
11 |
4 |
48 |
x |
- |
+0 |
-11 |
-28 |
Mid |
|
| Kamui Rimse - 421B |
3x2 |
13 |
2 |
65 |
x |
- |
+0 |
-11 |
-24 |
Mid |
|
| Kamui Rimse - 421AB |
3x3 |
18 |
1 |
82 |
x |
- |
+1 |
-10 |
-31 |
Mid |
|
| Kamui Rimse Gaeshi - ... S |
3, 18 |
11 |
9 |
33 |
x |
- |
KD |
KD |
-12 |
Mid |
Knockdown attack
|
| Amube Yatoro - 214S |
10 |
18 |
x |
50 |
x |
- |
KD |
KD |
-14 |
Mid |
Knockdown attack
|
| Yatoro Pok - b.236S |
3xn |
29 |
1 |
x |
x |
- |
-- |
-- |
-- |
High |
Weak attack
|
| Yatoro Pok - b.u.236S |
1xn |
28 |
1 |
x |
x |
- |
-- |
-- |
-- |
High |
Weak attack
|
| Taka Tsukamari Kougeki - b.A/B |
8 |
5 |
2 |
13 |
5~8(4) |
- |
-3 |
+4 |
-2 |
High |
Weak attack
|
| Taka Tsukamari Kougeki - b.AB |
8 |
7 |
2 |
30 |
7~30(24) |
- |
-18 |
+25 |
-17 |
High |
Heavy attack
|
| Taka Tsukamari Kougeki - b.u.S |
8 |
5 |
2 |
14 |
5~12(8) |
- |
-4 |
+18 |
-3 |
High |
Medium attack
|
| Kamui Mutsube - b.BC |
20 |
1 |
x |
x |
x |
- |
KD |
KD |
-28 |
High |
Medium attack Knockdown attack
|
| Kamui Mutsube - b.u.BC |
12 |
1 |
x |
x |
x |
- |
KD |
KD |
-28 |
High |
Medium attack Knockdown attack
|
| Apefuchi Kamui Rimse - u.3214623BC |
2x4, 4x5, 12 |
10 |
2 |
220 |
x |
- |
KD |
KD |
-25 |
Mid |
|
| Elerushi Kamui Rimse - 236CD |
30 |
x |
x |
x |
x |
- |
KD |
KD |
-76 |
High |
18f earliest hit time
|


