Samurai Shodown V Special/Kazuki Kazama

From Mizuumi Wiki
Jump to navigation Jump to search
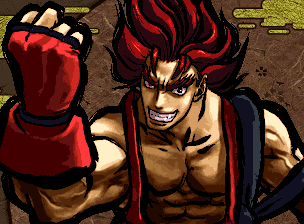
風間 火月, Kazama Kazuki
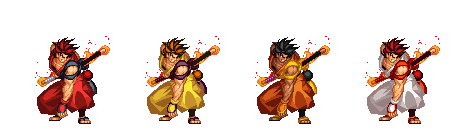
Colors

Introduction

Kazuki, the most enthusiastic ninja what ever there were. With a sweet Dragon Ball style mane and boisterous laugh, what's not to love?

Kazuki sacrifices range for speed, combos (potentially of either the long or insanely damaging variety), a monstrous (if flawed) air game, and some ridiculous gimmicks. Kazuki's game is a skittish one, involving much dashing, much poking, much air defense and much fishing for a big combo opener. And gimmicks. And fireball charging. And exploding pants. And pants gimmicks. Seriously, if you like gimmicks, stick around.

Strengths Weaknesses
  • Has the potential for dino damage if loaded on resources.
  • Pretty zippy ground movement.
  • Good counterpoke game.
  • Air normals have good utility.
  • Gimmicks, as stated above.
  • Fireball charge leaves him vulnerable. Can be punished on reaction depending on matchups.
  • Not actually that good at jumping in.
  • Most of his specials are heavily punishable on block/whiff.
  • Combos deplete a LOT of sword gauge, especially when looping fireballs.

Data

  • Damage taken: 105%
  • Rage duration: 6 seconds
  • Amount to rage: 13
  • Walk speed: 688
  • Backwalk speed: 384
  • Dash speed: 1792
  • Jump duration: 46 frames
  • Width: 16
  • Throw range: 16
  • Throw recovery: 42 frames
  • Tier placing: A

Normals

Far Slashes

5A:
Properties: Cancelable.
The great elbow of stumpiness. This is a respectable poke, but not in a far situation. See the near section for information on this move.
5B:
Properties: Cancelable. Recoil cancel on block. Deflectable.
Fisherman's delight. Slowish startup, slowish recovery, but nice range and both regular and recoil cancelable. This is not an all day poke as the speed leaves much to be desired, but the length of this move allows you to combo with increasing distance depending on your fireball level. At full level 3, your fireball will combo at maximum range. Use this to combo off of deep hit j.Bs with full fireball charge for disgusting damage off a tiny lucky hit. You may OS with this move but be wary when not using it in conjunction with a deep hit as whiffs can also be canceled and you can easily blow your entire stockpile in one moronic swoop. Fear not though it is extremely easy to hit confirm.
5AB:
Properties: Cancelable. Recoil cancel on block. Deflectable.
Slow, poor range. I'm pretty sure god kills a kitten when you try to make use of this move. It reaches only slightly farther than 5B. Use that with charge or go for a dash in throw or BNB.
2A:
Properties: Cancelable.
Crouching finger jab. A fine poke when outside of n.5A range. In comparison to 2C, it is slower and has roughly the same range, but the hitbox is higher, making it more functional for hoption select stuffing.
2B:
Properties: Cancelable. Deflectable.
Christ Almighty how can a 2B be slow slow? With 17 frames of startup, this is one of those moves you have to train yourself NOT to use. It can be canceled on hit/block/whiff but what's the point when it is your slowest normal? I repeat, TRAIN YOURSELF NOT TO USE THIS.
2AB:
Properties: Cancelable. Deflectable.
This move is the same as n.2AB and that's where the majority of its use comes in. Refer to that section for more info.

Near Slashes

n.5A:
Properties: Cancelable.
The recovery on this move is what makes it pretty snazzy as a poke. Though suffering from fairly miserable range, the +3 frames on hit and only -2 on block make this a nasty tool for tick throws or simply keeping the opponent from grabbing you. Bear in mind however that this move is not very fast. 2C is the superior option as far as speed is concerned, but the high hitbox and the great frame advantage (for this game) make this a very functional tool in the poking/throw bullshit game. Using this after jumpin ABs to stuff throw happy opponents is just lovely. And remember, kids, you have throw priority after an opponent is reset.
n.5B:
Properties: Cancelable. Deflectable.
Standard issue near 5B for comboing into DP/fireball. Effective for that purpose, not much use beyond it.
n.5AB:
Properties: Cancelable. Recoil cancel on block. Deflectable.
Very slightly faster, very slightly weaker 5AB. Unless you have a full kenki gauge, B xx 623B is a better punisher. Remember, God will kill kittens. He doesn't even care.
n.2A:
Properties: Cancelable.
Same as far 2A but stop using this at very close range in favor of 5A or 2C.
n.2B:
Properties: Cancelable. Deflectable.
Same as far 2B which in case you've forgotten means DO NOT USE THIS MOVE UNDER ANY CIRCUMSTANCES WHATSOEVER AND SMACK YOURSELF IF YOU ACCIDENTALLY DO
n.2AB:
Properties: Cancelable. Deflectable.
Grounded uppercut, hooray. This move is tremendously valuable for its combo potential. One might think it can be used as an anti air and indeed it can, but it is sometimes fickle and the last thing you want to do is get blatted on a jumpin while performing a crouching move. That's huge, free damage right there. As far as its comboability goes, the pushback makes it impossible to combo into his 623, but good enough to combo into at least a level 2 fireball, his WFT, and even his fatality. Keep in mind that this move hits heavy so if you attempt to combo it during stun (a deep hit or during timeslow) it will knock down. The cancel point is a bit odd so practice it. The last thing you want is to have an opening to combo into your WFT and drop it.

Overhead

5BC:
Properties: Hits high. Knockdown.
What can I say? It's an average overhead with a tech jump. Not bad, not exceptional. It's his only grounded overhead so I guess there's that.
u.5BC:
Properties: Hits high. Knockdown.
Hopping kick. It doesn't move forward which is likely sometimes a curse, sometimes a blessing. It makes the range pretty crappy but at least it doesn't heave you into your opponent's waiting arms.

Kicks

5C:
Properties: Cancelable. 1-11f throw invincible. 12-27f feet invincible.
This move is magnificently gimmicky. It causes you to advance, will squirm away from throw attempts, and it can be canceled mid-animation. Some tricks include using it on wakeup to stuff wakeup throws and mix up into exploding pants cancel or simply throw after empty knee. It can combo into 623 and fireball but the fact that it cancels at any point and therefore cannot be OSed makes it risky to do so.
6C:
Properties: Cancelable. Hits low. Knockdown.
Rather slow, not particularly damaging, not particularly long reaching foot stomp that knocks down. It's not great but it can combo into big pursuit and does sweep low. All in all, rather unexceptional and not so much worth using very often at all unless you are relying far too much on BC to set it up. If that's the case though, you might be doing it all wrong.
2C:
Properties: Cancelable. Hits low.
A very quick low poke with very unremarkable frame advantage. While you can rely on this as a tick tool if you really want to, it certainly isn't a reliable one if the opponent is conscious. 5A serves you better to that end and likely even better at hoption selecting opponents giving the placement of the hitbox versus 2C, but it's worth knowing that this is your speediest grounded move.
3C:
Properties: Hits low. Knocks down.
As slow as 6C but telegraphs more and is not cancelable. Don't bother.

Jumping

j.8A:
Properties: Hits high. Deflectable.
Insane defensive air move. It has a hitbox that will stuff nearly anything, comes out extremely fast and is active for 18 frames. It's almost enough to make Kazuki's ridiculous floating leap safe from takeoff to landing. This is a great move to stop jumpin attempts and generally play defense with. It can play a decent roll in timeslow on offense or defense. On characters that are big enough, it can function as an instant overhead, making it a nasty offensive mixup. On defense, an opponent who attempts to jump in can be met with this move to piss in their yomi juice.
j.7/9A:
Properties: Hits high.
Kazuki's airborne magic fingers. A strong, defensive air to air attack but much more mortal than the j.8A version. Decently quick to come out, decent range, decent hitbox and active frames. Very functional when you're caught up in the air and need a stop, it just sort of pales in comparison overall to the straight up version.
j.8B:
Properties: Hits high. Deflectable.
Kazuki's slowest air move, this one has little upside. It resembles j.8A but it's painfully slow to come out and stays out a very short period. It's hard imagining this ever having any use when j.AB is faster as well as more damaging and j.8A is MUCH faster as well as insanely active. Another B move from Kazuki with F- performance. Delete it from your game.
j.7/9B:
Properties: Hits high. Deflectable.
A damn fine retreating defensive air move and a fishing rod for trying to land huge combos. The outstanding range on this move along with its respectable speed make it great to flit out while jumping back and playing triangle jump mixup games. It can also open up a big enough stun on deep hit to combo into 5B, near or far and land a huge fireball. All in all a rather important tool.
j.AB:
Properties: Hits high. Deflectable.
Airborne uppercut. There is just something about this move that makes it special. Or maybe it's just a combination of speed and hitbox and animation. It is quite fast. You can use it as a DP by mashing it on the way up to meet jumping opponents. That's probably its greatest use.

Dashing

66A:
Properties: Cancelable.
Dashing elbow of lag abuse. This move is often seen from Kazuki players who love to tick throw. In reality, it's only neutral on hit, -5 on block. You can probably get away with it with or without much lag but it's mostly just a silly gimmick and alternative to flat out running in and grabbing or mixing in 66C.
66B:
Properties: Cancelable. Recoil cancel on block. Deflectable.
Important move in BnB deep hit combos. This isn't a move to bust out for shits and/or giggles unless you want to gamble the clutch with a recoil cancel 623 or pants recoil cancel, though all of your cancel options should leave you open for a grab.
66AB:
Properties: Cancelable.
The main use for this move is to punish when you can't close fast enough for a BnB. It really isn't safe so avoid the urge to do it randomly or at least use sparingly to clip with it in situations that you think the opponent will be doing something stupid.
66C:
Properties: Hits low. Knockdown.
This is a solid dashing sweep that can combo with 8BC, making it respectably damaging. However, Kazuki does not have another bothersome dashing option aside from throw and his mediocre tick throw, leading to this getting blocked frequently. It's fairly safe on block so long as you don't wait until point blank range to bust it out. Generally, this is his best low option.

Unarmed

u.5S:
Properties: Cancelable.
Same as armed 5A/n.5A.
u.2S:
Properties: Cancelable
Same as armed 2A/n.2A.
ju.S:
Properties: Hits high.
Same as armed j.7/9A
u.66S:
Properties: Knocks down.
Similar to armed 66A except it does a little more damage knocks down. Fun fact, u.66A has no hitstop whereas u.66B does. Theoretically, u.66A therefore has the tiniest edge. Unlike other characters' dashing moves that usually knock the opponent away, this knocks the opponent straight down.

System

Deflect - 216D:
Weapon Pickup - 5A:
Taunt Disarm - Start Start Start:

Specials

Saien - 214C:
Fireball summon. Resembles the startup of the exploding pants. Make sure you have space to use this as you're vulnerable for a whopping 62 frames -- some characters can punish you for doing this on reaction even at fullscreen. There are a total of three levels of flaminess. If you attempt to charge beyond the level three fireball, Kazuki will only confuse himself.
Shounetsukon - 236x:
Burning discharge. There are four versions, each unleashing a corresponding amount of helper balls for multiple hits with followup combo potential. The highest level available will be used when a higher level than currently possessed is called for. On backhit, all but the level 3 fireball will send the opponent skyward, allowing a big pursuit to be landed.
  • 236A:
Level zero fireball. No amassed charge will be drained with this version. The recovery is positively miserable so it's important to not be overly predictable unless you have a full screen between you and the opponent when using it at random.
  • 236B:
Level one fireball. One level cost. Hits twice. The recovery is half as bad as level zero. Combo possibilities are opened on hit, though the range to properly follow up a landed level one fireball is fairly short.
  • 236C:
Level two fireball. Two levels cost. Hits three times. The recovery is minimal, making it even easier to combo off of with some added hit stun to boot.
  • 236AB:
Level three fireball. Three levels cost. Hits just once. Scary damage. As your charge is valuable, using this move at random is just silly. OS or hit confirm into it.
Daibakusatsu - 623x:
Kazuki's one fisted grab. Like his projectile, this move can use the fireball charge, but unlike everything else it only spends them on a successful hit. It has melee invulnerability on startup so it can be used like a reversal but the recovery is brutal and you are still open to throws. Of course, you can't be thrown on wakeup so you can use it on an over-aggressive opponent trying to apply oki. Again though, it is terribly unsafe making it primarily a combo tool.
Damage on the first hit is fixed with the kenki gauge being referenced for spent additional charge hits. When not raged, the A version is usually your safest bet for efficient damage and charge expenditure. Of course, when you're raged, charged versions deal even more damage so go nuts. Startup, recovery and invulnerability properties are the same across all versions.
Enmetsu - 421x:
The Sisterhood of the Exploding Pants. Another move with invincible properties that makes it a candidate for a reversal but again throwable on startup and again, terrible recovery. The startup looks the same as the fireball charge. This move will see the brunt of its usefulness in the corner because the pushback on block will send Kazuki a great distance and it does extra chip there because of the inability to push the blocking opponent back. By and large a risky move, use at your own clutchy discretion.
Homura Gaeshi - AC while downed:
Anti-oki ball of general douchery. Possibly Kazuki's most irritating gimmick, this move may be activated at any point while knocked down, sending your fireball after your opponent. Bear in mind that it will consume your entire charge and will chase your opponent in a straight line based on where they are when sent. This means that if they're in the process of jumping, it can very well fly off into the sky. A level 3 ball will knock down and can allow for an 8BC followup. The damage of a fully charged ball can be fairly formidable, particularly when raged.
Boubaku: Kaen Geki - 236CD:
Flaming bull rush. This move has great hit invincibility throughout the startup and lower body invincibility during the dash but the startup is abysmal. While it's capable of being a nice reversal move, it's frankly near impossible to use it as one on reaction. So again, another spectacularly stupid risky move. This is however a damn fine move to use on a deep hit with j.AB and can be comboed into off a 2AB.

Combos

Normal

  • 2AB 236CD
  • 5B/2B/66B/5C 236B, 66B 236B ...
  • 6C/66C 8BC

Time Slow

  • 623A, jAB, jAB ... - Juggle from 623A. Immune to Rage Explosion.

Strategies

Frame Data

Move Damage Startup Active Total Cancel Weapon
Clash
Hit
Adv.
Backhit
Adv.
Block
Adv.
Guard Notes
5A 4 7 4 14 1~6(6) - +3 +3 -2 Mid Weak attack
5B 12 11 2 38 11~29(19) 5~10(6) -9 -1 -9 Mid Medium attack, Deflectable(med)
5AB 29 16 2 64 1~5(5) 11 -11 -1 -21 Mid Heavy attack, Deflectable(heavy)
2A 4 8 3 19 1~4(4) - -1 -1 -6 Mid Weak attack
2B 12 17 3 48 17~42(26) - -13 -5 -9 Mid Medium attack, Deflectable(med)
2AB 27 12 6 52 18~31(14) - -3 +7 -21 Mid Heavy attack, Deflectable(heavy)
n.5A 4 7 4 14 1~6(6) - +3 +3 -2 Mid Weak attack
n.5B 8 9 2 34 9~31(23) 6~8(3) -7 +1 -9 Mid Medium attack, Deflectable(med)
n.5AB 28 15 2 52 1~4(4) 13~14(2) +0 +10 -21 Mid Heavy attack, Deflectable(heavy)
n.2A 4 8 3 19 1~4(4) - -1 -1 -6 Mid Weak attack
n.2B 12 17 3 48 17~42(26) - -13 -5 -9 Mid Medium attack, Deflectable(med)
n.2AB 27 12 6 52 18~31(14) - -3 +7 -21 Mid Heavy attack, Deflectable(heavy)
5C 6 14 4 33 14~27(14) - -1 +7 -14 Mid Medium attack
1-11f throw invincible
12-27f feet invincible
6C 6 16 3 34 16~29(14) - KD KD -13 Low Knockdown attack
2C 2 5 3 17 1~2(2) - -2 -2 -7 Low Weak attack
3C 6 16 6 34 x - KD KD -13 Low Knockdown attack
j8.A 7 4 18 29 x - -- -- -- High Weak attack, Deflectable(weak)
j8.B 11 14 4 33 x - -- -- -- High Medium attack, Deflectable(med)
j7/9.A 6 6 10 23 x - -- -- -- High Weak attack
j7/9.B 11 8 2 33 x - -- -- -- High Medium attack, Deflectable(med)
j.AB 26 7 5 33 x - -- -- -- High Heavy attack, Deflectable(heavy)
j.C 5 6 6 17 x - -- -- -- High Medium attack
ju.C 5 6 6 17 x - -- -- -- High Medium attack
5BC 16 20 2 39 x - KD KD -13 High Medium attack Knockdown attack
u.5BC 6 20 7 41 x - KD KD -15 High Medium attack Knockdown attack
66A 4 6 9 16 1~5(5) - +0 +0 -5 Mid Weak attack
66B 9 8 2 28 10~25(16) 5~7(3) -2 +6 -21 Mid Medium attack, Deflectable(heavy)
66AB 16 8 4 42 1~4(4) 5~7(3) KD KD -27 Mid Knockdown attack
66C 5 10 5 21 1~3(3) - KD KD -6 Low Knockdown attack
u.5S 4 7 4 14 1~6(6) - +3 +3 -2 Mid Weak attack
u.2S 4 8 4 19 1~4(4) - -1 -1 -6 Mid Weak attack
ju.S 4 6 10 23 x - -- -- -- High Weak attack
u.66S 8 6 9 16 1~5(5) - KD KD -5 Mid Knockdown attack
u.66C 5 10 5 21 1~3(3) - KD KD -6 Low Knockdown attack
2BC 5 18 3 46 1~4(4) - -- -- -- Mid
u.2BC 5 18 3 46 1~4(4) - -- -- -- Mid
8BC 12 39 2 72 x - -- -- -- Mid
u.8BC 6 39 2 75 x - -- -- -- Mid
Shounetsukon - 236A 6 14 x 57 x - -6 KD -31 Mid Medium attack
Shounetsukon - 236B 13, 6 16 x 50 x - +21 KD -14 Mid Medium attack
Shounetsukon - 236C 16, 8, 6 16 x 46 x - +28 KD -3 Mid Medium attack
Shounetsukon - 236AB 45 13 x 90 x - KD KD -63 Mid Knockdown attack
Daibakusatsu - 623A 21 10 7 54 x - KD KD -34 Mid Knockdown attack
1-9f hit invincible
fixed damage
Daibakusatsu - 623B 21, 24 10 7 54 x - KD KD -34 Mid Knockdown attack
1-9f hit invincible
first hit fixed damage
Daibakusatsu - 623C 21, 1, 35 10 7 54 x - KD KD -34 Mid Knockdown attack
1-9f hit invincible
first hit fixed damage
Daibakusatsu - 623AB 21, 1x3, 48 10 7 54 x - KD KD -34 Mid Knockdown attack
1-9f hit invincible
first hit fixed damage
Saien - 214C x x x 62 x - -- -- -- Mid
Homura Gaeshi - k.AC x 2 x x x - -- -- -- Mid
Enmetsu - 421S 24 27 7 70 x - KD KD -31 Mid Knockdown attack
1-6f above knees invincible
7-26f hit invincible
27-44f full invincible
Boubaku: Kaen Geki - 236CD 30 26 x x x - KD KD -78 Mid Knockdown attack
1-25f hit invincible
during dash lower body invincible
Samurai Shodown V Special
General

FAQControlsHUD

Characters

AmakusaBasaraCharlotteEnjaGairaGalfordGaohGenjuroHanzoHaohmaruJubeiKazukiKusaregedoKyoshiroMinaMizukiNakoruruRasetsumaruReraRimururuShizumaruSogetsuSuijaTam TamUkyoYoshitoraYunfeiZankuro

Mechanics

MechanicsTablesHitboxesHidden Moves