Shaman King: Spirit of Shamans/Systems
Note: Make sure to check out the HUD Detail and Basic Control overview pages first, so that the notation and things referred to on this page aren't confusing!
temp Note 2: This page is extremely work in progress, and is possibly missing some information aswell as bearing misinformation. Working on it! ![]()
Health-bar System
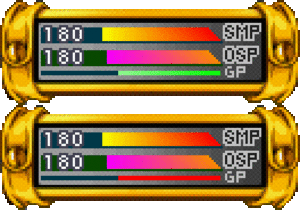
The most peculiar part of this game is what is immediately visible on the HUD: There are 3 bars, two of which are related to your health, and one which is related to your damage.
OSP AND SMP
OSP and SMP are how damage is taken in Shaman King, and you can think of them as concepts of a "Shield" and "Real Health".
OSP is what characters will be primarily dealing damage to in Shaman King, and draining it is how you deal damage to the SMP bar. The OSP bar starts at its maximum amount (with the amount depending on character), and when the OSP bar reaches 0 from the opponent hitting you, it'll refill and its max amount in number is dealt to the SMP bar as damage.
For example, if a character's max OSP is 75, and their OSP bar gets drained, 75 damage is dealt to the SMP bar.
OSP does get chipped by special moves, but it cannot go any lower than 1 (unless you are at CRITICAL SMP), and an actual hit is always required to drain it and damage SMP. This is why IOH's are always a very useful tool within a character's kit.
You may also notice that the OSP bar turns a light pink-red color after being drained once or twice; this color indicates you are in danger of getting stunned, and it getting drained while in this state will initiate the stun. However, you can use Spirit Burst to give yourself more OSP and potentially prevent this.
SMP is your actual health-bar, and when it is drained to 0, you lose the round. When you're at CRITICAL SMP, the bar will begin flashing and you'll be able to use super moves indefinitely. The draw back to this is that during the last portion of SMP, your OSP will also become red and you'll bee vulnerable to being killed by chip damage unless your spirit percentage is at 100%.
GP
GP is the third bar on the HUD, and it is strictly related to damage; this bar starts at an amount that is character-specific, and it can be raised by either increasing Spirit Percentage or using Spirit Burst. Depending on how full the GP bar is, you'll deal extra flat damage on all of your moves (normals, specials, supers, etc).
Damage data on character move-lists assumes the character is at their default GP amount.
Chain System
This game's primary Chain System is as specific as it is freeform, having the ability to chain any normal into another up to four times before performing a unique chain-ender attack dictated by the W or S button at the end of the chain. Normals done within a chain can only be repeated two times in a row before a directional change (5 or 2) or a strength change (W or S) must occur. When the third attack within a chain is initiated, said attack and each attack after it will have an advancing effect, which is the root of pretty much all illegal infinites.
Add image here for diagram
All normals can be cancelled into special moves or supers except for Dash Attacks. Chain Enders can also be cancelled into special moves, but some Chain Enders count as airborne while others count as grounded, so depending on the ender and character, you may not be able to cancel into anything.
Dashes can be cancelled into specials or supers mid-dash as well, but remember that Dash Attacks cannot be cancelled into anything.
Jumping normals cannot be chained together but they can be cancelled into specials if the character has special moves in the air.
Spirit Bursting
Spirit Bursting is a mechanic used to sacrifice your SMP to modify your OSP and GP, which can be extremely crucial for dealing optimal damage as some characters.
Spirit Bursting is done by pressing 6X, which will make your character flash white as some of their SMP/Health is drained and their OSP/GP increase. After Spirit Bursting, your health-bar will look like this:
Note: this gif was made with captures of Anna's SMP/OSP/GP stats
The GP bar flashing red indicates that the buffs of Spirit Burst are now active, and after roughly 6 seconds, the buffs will go away. However, during the duration which the GP bar flashes, you can input 6X again to "undo" the buffs of the Spirit Burst and get your SMP/Health back; but you do not get a full refund. The amount of SMP refunded depends on how much time you spent with the buffs, and averages at about an 80% refund.
The amount of GP granted by Spirit Bursting is character-specific, so experiment with it and see if you can find any nuclear damage strategies!
Spirit Percentage
Spirit Percentage is a... well, percentage, that is indicated at the bottom of the screen. At the beginning of a match, the percentage starts at a set amount that is specific for every character (which will be listed on their respective pages), and can be raised by doing Spirit Prompts or attacking the opponent with chain combos.
The Spirit Gauge increases the damage of your special moves and supers (also gives them "cutscenes"/cut-ins) significantly when at 100%, aswell as changing the start-up time of the universal Reflector.
Spirit Percentage cannot be lost until it reaches 100%; after reaching 100%, taking too many successive hits will make you lose a portion of Spirit Percentage, and you'll have to raise it again.
Spirit Prompts

Spirit Prompts, also referred to as just Prompts and "QTE's", are for raising the Spirit Percentage. They show up in intervals for both players, and dictate a random button to be pressed. Failing to complete the prompt doesn't punish the player and simply does nothing. They are more likely to be directional buttons than Attack or Special buttons. All of the buttons that can appear in prompts are as follows:
- Up - 8
- Down - 2
- Back - 4
- Forward - 6
- Dash Back - L1
- Dash Forward - R1
- Square - Special Button
- X/Cross - "Shaman Power"
- Triangle - Weak Attack
- Circle - Strong Attack
NOTE: During directional prompts,
you can't do diagonals and have it register.
It has to be a clean directional input!
Pressing the designated button will make the prompt disappear as you gain anywhere from +2% to +5% Spirit Percentage. You can press the button that is designated for the prompt in the middle of another action and it will still register as completing the prompt, which allows you to gain Spirit Percentage without doing an unsafe option, such as throwing a random S normal.
Reflectors
Reflectors are this game's unique answer to zoning and other special move-related pressure, activated by inputting 4X. Without 100% Spirit Percentage, you'll have to hold the input for longer before the reflector actually comes out. The duration which you have to hold it goes down as you gain Spirit Percentage, until 100% where it becomes instant and a true reversal.
Example: Yoh's Reflector animation. Note that the hitbox does not change between reflectors, only the visual is different.
When the Reflector is active, your character will go into a unique animation (usually using their Spirit as a shield or blocking with their weapon), and for as long as you hold the input, the Reflector will stay out. Upon contact with a Special or Super move that would normally hit, you'll reflect it and deal instant damage to the attacker regardless of where they are on the screen.
The drawback of Reflectors is that you cannot block while holding the input to activate them, you cannot block while they're active, and they lose to Normal attacks.


