Background
Kinoko is a great addition to many recipes.
The edible portions of a Kinoko are the head, hair, and tail.
The wild Kinoko has become increasingly rare due to people overhunting after its newfound popularity in cooking.
It was added to the IUCN Red List in 2019.
YOU ARE KINOKO
WE ARE KINOKO
Overview
Playstyle
|
Recommended Types: Stamina
 kinoko, one of the hardest characters, hiding behind a facade of rockfall memes. kinoko, one of the hardest characters, hiding behind a facade of rockfall memes.
|
| Pros |
Cons |
- The Mushroom: kinoko can pick up her mushroom, giving her a bar of meter and a free natural cancel to use to string together combos with. She's insanely flexible in the right hands due to this.
- Insane Mobility: kinoko is insanely hard to pin down due to her air mobility and j.A, allowing her to completely invalidate match-ups against characters with bad anti-airs. 2EX is also a safe fullscreen teleport that she can pick and choose where to come out of the ground from.
- Chaotic Ultras: U1 is a meme, but it's a meme that shuts down the game. While U2 is an insanely stable and useful command grab that almost guarantees her a TOD if she lands it.
- Absurd Damage: Deals TODs for cheap and most pick-ups leave her chunking 100-dmg from the opponent, when she works she's a scary sight to behold.
|
- Genuinely No Neutral: kinoko has zero way to command space outside of U1, which hardly counts as it shuts down the entire game. While her mobility may be scary, if an opponent can control the space around her, she loses.
- No Reversal/Ground Options: kinoko completely lacks a reversal, even in her 5A, which is 4f. This means she has absolutely zero presence on the ground, once you lock her in the corner she's effectively dead.
- Execution: Unlike most characters, kinoko's movement and combos are very difficult, which can get even worse on netplay. When one mistake can be all it takes, she's extremely volatile even in the lead. Mushroom cancel combos only compound this.
- No Taunt Bonus, At All: kinoko's taunt does nothing, which means she's missing out on free meter or damage that other characters get. While she doesn't need it, thanks to her mushroom, it's something she doesn't have to force wins/meter economy.
- Can't Respond to Anti-airs: If a character can anti-air kinoko, she's as good as dead. She can't start the party if you stop her only approach option.
- Zero Mix: Even if she's in her win condition in a favorable match-up, she can't make you hold anything besides pestering you with j.A and hoping she eventually wins. Her approach is extremely predictable.
|
Movelist
Tech
Mushroom Cancel (MC)
Kinoko is one of the few characters who has natural cancels.
Those characters are: Robo-Azuma, Rogue, and Kinoko of course.
Since cancelling meterlessly is just a rare commodity and a huge advantage in a primarily link-based game.
There's usually tons of caviats to come with it, and of course Kinoko is no exception.
Kinoko after picking a mushroom can cancel ANYTHING (except for super-flash) with 5X/j.X, although you have to sacrafice the mushroom.
Mushroom Land Cancel (MLC)
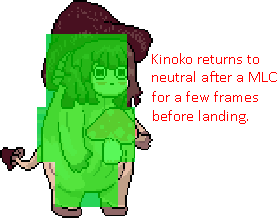
Remember how I said you needed to sacrifice the mushroom for Kinoko's cancels?
You can get around this by doing j.B > j.X. Preserving the mushroom.
This works due to j.X being cancelled by landing, much like every other air button in the game that doesn't have a bounce.
This in tandem with j.B giving extra downward momentum, allows you to cancel j.X with very good timing. Keeping the shroom.
More or less: j.B > Mushroom Cancel > j.X > Ground Cancel
Cuz of this it's called Mushroom Land Cancel (or MLC for short), cuz it's weird.
J.Y Float

One of the rare cases of a strictly movement tool in Kyanta.
This move is key to her movement, it's faster than normal jumps or walking.
Not only that, but allows for some links in the air to connect and is key to pestering opponents with j.A.
Moves
5A
|
| Damage
|
Guard
|
Startup
|
Active
|
Recovery
|
Invuln
|
Adv. Hit
|
Adv. Block
|
Adv. Parry
|
Effect
|
| 5
|
Mid
|
4
|
2
|
1
|
0
|
?
|
?
|
?
|
N/A
|
An extremely stubby and unsafe jab for whatever reason.
I guess to emphasize Kinoko being an air-character since it anti-airs? Anyways this jab sucks.
It's slower than all standard jabs, giving her little to no presence on the ground and reducing her to abusing her EXs since 2A/2B isn't that good either.
|
|
2A
|
| Damage
|
Guard
|
Startup
|
Active
|
Recovery
|
Invuln
|
Adv. Hit
|
Adv. Block
|
Adv. Parry
|
Effect
|
| 5
|
Low
|
4
|
2
|
1
|
0
|
?
|
?
|
?
|
N/A
|
The worst jab in the game, probably.
Extends your hurtbox, can only be safely done if inside the opponent.
Despite that, Kinoko has to work with it since it's her only reliable low.
For comparison, the second slowest jab in the game is Well-Done's 2A, which is 3f.
On some tall characters, such as the Gators or Cocorn, you can hit a difficult link by doing 2A > j.A for a commanding high/low mix.
|
|
J.A
|
| Damage
|
Guard
|
Startup
|
Active
|
Recovery
|
Invuln
|
Effect
|
| 15
|
High
|
4
|
Until Ground
|
Until Ground
|
0
|
N/A
|
Another active until-ground j.A
Uniquely, Kinoko's j.A ends in the air returning her to neutral on a successful hit/block/parry, using j.A > j.Y > j.A to quickly pester opponents is key to her neutral.
Just in general, spamming j.A is what you'll be doing for the majority of her combos and neutral, so learn it well.
|
|
5B
|
| Version
|
Damage
|
Guard
|
Startup
|
Active
|
Recovery
|
Invuln
|
Adv. Hit
|
Adv. Block
|
Adv. Parry
|
Effect
|
| 5B
|
15
|
Mid
|
7
|
7
|
12
|
0
|
?
|
?
|
?
|
N/A
|
A very very good anti-air, horrible neutral button.
It's not invulnerable so you won't be using it nearly as much as you would a DP, but it doesn't trade too often so it's a good option.
You'll mainly be using this when you don't have enough time to charge 5B, since Kinoko likes to be in the air or abusing her easy access to meter with 2EX~EX.
|
| 5[B]
|
40
|
Mid
|
50 (Charge)/1 (Move)
|
6
|
N/A
|
2-11
|
Knockdown
|
N/A
|
N/A
|
AR, KD
|
You can hold 5B to charge it, giving you armor.
After 50 frames it'll start flashing, indicating a powered-up version of the move.
Has an insanely huge hitbox instead of 5B's uncharged hitbox, along with invulnerability and a flying knockdown.
Just like all other armor, 5[B] can only be punished with a grab, so it's best to charge it while the opponent is stuck in animation.
Completely unpunishable after she gets her charge, so grab it quick.
|
|
2B
|
| Damage
|
Guard
|
Startup
|
Active
|
Recovery
|
Invuln
|
Adv. Hit
|
Adv. Block
|
Adv. Parry
|
Effect
|
| 20
|
Low
|
12
|
10
|
7
|
0
|
Knockdown
|
?
|
?
|
KD
|
A sweep, sort of out of obligation though.
Has follow-ups from very specific spacing, or with a mushroom cancel.
You can sort-of slide under projectiles, the list is as follows:
- Anna - 5X, 5EX.
- Spike - 5X, 5EX.
- Michelle - 5EX.
- Azuma - 5X, 5EX, U1.
- Rare - 5X
- Well Done - 5X, 2X.
- Katana Kyanta - 5X, U1. (Although you shouldn't 2B under these.)
You cannot 2B under these:
- Kyanta - 5X, 5EX, U1.
- Jakor - 5X, 5EX.
- Michelle - 5X, j.X, j.EX.
- Rare - U1.
- Gyanta - 5X, 5EX, U2.
However, you can still trade with some of these fireballs from round start range.
Due to the front of the move having a lower profile than the rest of the body.
|
|
J.B
|
| Damage
|
Guard
|
Startup
|
Active
|
Recovery
|
Invuln
|
Effect
|
| 15 (Normal)/10 (OTG)
|
High
|
9
|
7
|
?
|
0
|
KD, OTG
|
Just a strictly better version of Masao's j.B. Hits OTG, which means "On-The-Ground", so she can get free unscaled damage after every knockdown.
It also allows for follow-ups using either MC (Mushroom Cancel) or MLC (Mushroom Land Cancel).
If you hit the ground while the move is still active you'll do a bounce, this isn't a problem in juggles however since it ends wayyy before you hit the ground.
In tandem with Kinoko's j.A, it's a great mix-up and allows her to start juggles from the air, along with extending juggles multiple times over.
|
|
X (With Mushroom)
|
| Version
|
Damage
|
Guard
|
Startup
|
Active
|
Recovery
|
Invuln
|
Adv. Hit
|
Adv. Block
|
Adv. Parry
|
Effect
|
| 5X
|
30 (Small)/60 (Big)
|
Mid
|
3
|
Until Off-screen
|
7
|
0
|
?
|
?
|
?
|
N/A
|
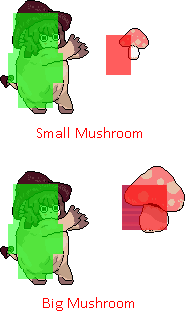
A fullscreen projectile that ignores every other projectile and cannot be destroyed.
The only way to get rid of it is for it to leave the screen or for it to be parried/blocked.
Depending on the size of the mushroom, the hitbox is different as well.
Weirdly enough though, using 5X (and j.X) cancels every move Kinoko has at the cost of a mushroom.
This means safe attacks, ultras, combos that wouldn't work otherwise, etc etc.
You name it, Mushroom Cancel can do it.
Sadly though, all of this power comes at the cost of losing the mushroom, which you have to regain.
|
| Version
|
Damage
|
Guard
|
Startup
|
Active
|
Recovery
|
Invuln
|
Effect
|
| j.X
|
30 (Small)/60 (Big)
|
Mid
|
3
|
Until Off-screen
|
Until Ground
|
0
|
N/A
|
Listed separately due to it having different recovery.
Same use case as 5X, cancels air moves though and works in tandem with j.B for the MLC (Mushroom Land Cancel).
Would be a great up-back fireball if it weren't for the fact that you lose the mushroom after using it.
|
|
2X (Near Mushroom)
|
| Damage
|
Guard
|
Startup
|
Active
|
Recovery
|
Invuln
|
Adv. Hit
|
Adv. Block
|
Adv. Parry
|
Effect
|
| N/A
|
N/A
|
N/A
|
N/A
|
9
|
0
|
N/A
|
N/A
|
N/A
|
N/A
|
Only can be used when near the mushroom, after enough 2X presses you'll pick the mushroom.
Picking up the mushroom grants a bar of meter along with giving you the mushroom to abuse.
Once the mushroom is picked, pressing 2X again does nothing.
To pick:
Notes:
- If there's two Kinokos on screen, they have to fight for this single mushroom.
- If they both press 2X on the mushroom at the same time, they'll clash like grabs do.
- Kinoko will drop the mushroom if defeated or boko-broken.
|
|
EX (With Mushroom)
|
| Damage
|
Guard
|
Startup
|
Active
|
Recovery
|
Invuln
|
Adv. Hit
|
Adv. Block
|
Adv. Parry
|
Effect
|
| -30 (Small)/-60 (Big)
|
N/A
|
N/A
|
N/A
|
25
|
1-25
|
N/A
|
N/A
|
N/A
|
H
|
Depending on the size of the mushroom, you can eat it to heal off either 30 or 60 damage.
That's not really the main draw though, for whatever reason the invuln is fully active during the entire animation and completely unpunishable.
This means you can pretty much reliably invuln through just about anything by using j.EX and gain some health back.
A very good option when jumping in against something like K. Kyanta's U1 or Rare's U1.
|
|
2EX
|
| Version
|
Damage
|
Guard
|
Startup
|
Active
|
Recovery
|
Invuln
|
Adv. Hit
|
Adv. Block
|
Adv. Parry
|
Effect
|
| 2EX
|
N/A
|
N/A
|
31
|
N/A
|
33
|
1-61
|
N/A
|
N/A
|
N/A
|
N/A
|
A ground-dig teleporty thingio.
Hold either left or right to move around, surprisingly hard to accurately position yourself with it.
Just some solid movement that's almost fully invuln except for a bit at the end, avoids practically everything.
|
| 2EX~5EX (Follow-up)
|
40
|
Mid
|
3
|
7
|
21
|
1-14
|
Knockdown
|
N/A
|
N/A
|
KD
|
5[B] but with none of the charging, Kinoko's "win-neutral" button.
Since it's technically another move, it spends 0.5 bar of meter just like every other EX, making 2EX~5EX cost a bar.
After a successful hit it will launch the opponent and Kinoko sky high, this is the most common way to get this type of launch as Kinoko.
She can hold j.Y to extend off of it, even from midscreen, guaranteeing about 100 damage off of a single 2EX~5EX, much like 5[B].
Although since you don't have to worry about charging along with the movement from 2EX, you'll be dictating neutral entirely with this move.
Even if this move gets blocked or parried, Kinoko is completely safe.
|
|
J.[Y]
|
| Damage
|
Guard
|
Startup
|
Active
|
Recovery
|
Invuln
|
Effect
|
| N/A
|
N/A
|
N/A
|
N/A
|
5
|
N/A
|
N/A
|
Purely movement move.
Pretty rare in Kyanta, where moves are usually multi-purpose.
Allows you to dictate your air movement, pressing A/B/X while j.Y is held makes Kinoko fall like a rock for whatever reason, instead let go of j.Y to stop flying.
Make good use of this move to get around in neutral and to make her super-launch combos link.
|
|
Ultra 1 (2Y) unfunny unfunny
|
| Damage
|
Guard
|
Startup
|
Active
|
Recovery
|
Invuln
|
Adv. Hit
|
Adv. Block
|
Adv. Parry
|
Effect
|
| 30 (Kinoko)/30*(2) (Opponent)/999 (Red)
|
Unblockable
|
0
|
N/A
|
1
|
0-1
|
?
|
N/A
|
N/A
|
UB, UP
|
Meme rocks that hurt everyone.
Rocks appear randomly from the top of the screen, complete and utter RNG. They're completely unblockable/unparryable.
There is also a red rock that randomly appears, it's just as RNG, it does 999 damage on hit.
Rocks come out even during superflash, Rockfall lasts approximately 446 frames? Impossible to check.
Rockfall persists for these 400~ish frames, even if a new round starts as long as Kinoko is still alive.
Potentially creating unblockable wake-ups or round-start unblockable TODs, stupid move.
|
|
Ultra 2 (2Y)
|
| Damage
|
Guard
|
Startup
|
Active
|
Recovery
|
Invuln
|
Adv. Hit
|
Adv. Block
|
Adv. Parry
|
Effect
|
| 120
|
Grab
|
4
|
89
|
13
|
0-4
|
Knockdown
|
Knockdown
|
N/A
|
KD
|
Has insane activity for whatever reason.
Has very poor invuln and recovery so the move is best used pre-emptively or like a normal grab, it's very punishable.
Gives same launch as 2EX~5EX and 5[B], giving you a lot of freedom for combos.
There's ways to automatically time the follow-ups after this, but the optimal follow-ups can't be easily timed.
They are:
- (9)x3 -- Three jumps to the right
- Taunt -- Taunt sets up roughly for a follow-up (only works once per round though)
- 5[B] -- Roughly after the fully charged 5[B] noise plays (only works if you're already at corner)
|
|
Grab (AB)
|
| Damage
|
Guard
|
Startup
|
Active
|
Recovery
|
Invuln
|
Adv. Hit
|
Adv. Block
|
Adv. Parry
|
Effect
|
| 40
|
Grab
|
3
|
5
|
4
|
0
|
Knockdown
|
Knockdown
|
N/A
|
KD
|
One of the rare grabs that can be combo'd out of, thanks to Kinoko's Mushroom Cancel.
Not much else to say really, it's a solid grab that doesn't multi-hit, making it great for juggle combos.
|
|
Taunt (Select)
|
| Damage
|
Guard
|
Startup
|
Active
|
Recovery
|
Invuln
|
Adv. Hit
|
Adv. Block
|
Adv. Parry
|
Effect
|
| N/A
|
N/A
|
N/A
|
N/A
|
61
|
N/A
|
N/A
|
N/A
|
N/A
|
N/A
|
Taunts in this game usually have some sort of meter build, damage buff, or whatever it might be.
This one does nothing, absolutely nothing.
Yep, that's it, a proper joke taunt if you're one of those people who hate taunts having applications.
Different animation depending on what side you're facing too.
|
|
Combos
| Notation Help
|
Disclaimer:
Combos are written by various writers, so notation may differ slightly from this notation.
For more information, see Controls.
Character-specific notation, will be on the character's page.
|
| FB
|
Refers to the act of gaining a "Flash Bonus", which grants you extra meter, on the hit of a move.
|
| KC
|
Refers to pressing B+Y on the same frame, or the macro-button for B+Y. This is known as a Kyanta-Cancel, this game's Roman-Cancel.
|
| DC
|
Refers to cancelling a move by activating Demon type's buff, similar to KC.
|
| XEX
|
Refers to pressing X+Y on the same frame, or the macro-button for X+Y.
This is known as an EX move, for example: j.EX>5EX>2EX.
|
| {X/Y/Z}
|
Move X or Y or Z can be used.
|
| #X
|
Indicates that any of A, B and C may be used with #. Example: 3A (Down-right, Light.)
If you have trouble with this notation, you may want to google for "Numpad Notation" elsewhere.
|
| (X)xN or (X)xN-N
|
Loop the inputs in the square brackets or parenthesis as many times as N, sometimes doesn't include brackets or parenthesis but still means the same thing.
Also occasionally includes a dash to indicate that a varying amount of hits can be performed.
|
| j.X
|
Button X is input while you are in the air jump.
|
| X(whiff)
|
Indicates that X is intended to whiff.
|
| (Delay) or (Wait)
|
Indicates a short delay on the hit.
|
| (X)
|
X move is omittable from the combo, this will be mentioned in the hover text.
|
| tk.X
|
Indicates the motion "X" is input immediately after leaving the ground. Stands for tiger knee.
|
| AA
|
Indicates the move hits an opponent in the air, referred to as an Anti-air. Hence AA.
|
| [X]
|
Indicates if a move should be held down.
|
| ]X[
|
Indicates if a held move should be released, for example: 5[B] > 5]B[.
|
Midscreen
| Condition
|
Notation
|
Damage
|
Notes
|
|
Midscreen, Anti-air
0 Bar
Works On: All
|
- AA j.A > j.A > j.Y > (j.A)x2 > j.B > j.A > j.B > j.B-OTG (73)
|
73
|
|
| Meter Gained: ? Bar |
Meter Spent: 0 Bar |
Very tricky anti-air combo.
j.Y link, almost works from fullscreen but drops after the first j.B. |
|
|
Midscreen
0 Bar
Works On: Specific
|
- 2A/5A > j.A > j.B > j.B-OTG
|
39
|
|
| Meter Gained: ? Bar |
Meter Spent: 0 Bar |
A widely applicable 5A or 2A link.
Only works on these characters (Standing-only unless specified):
- Anna
- Tsukinami
- Jakor
- Sendou
- Rogue
- Chihiro
- Rare
- Nanatsu
- Gyanta
- Zackywild
- Masako
- Azuma-Deka (Crouching & Standing)
- Well-Done (Crouching & Standing)
- Cocorn (Crouching & Standing)
- Robo-Azuma (Crouching & Standing)
- Michelle
- M.Michelle
Has to end in corner for OTG follow-up. |
|
|
Midscreen
0 Bar
Works On: All
|
- 2B > 5X (Small) > j.Y > (j.A)x2 > j.B > j.B-OTG
|
85
|
|
| Meter Gained: ? Bar |
Meter Spent: 0 Bar |
| Must be small mushroom, big mushroom's hitbox is too big and makes the j.A link fail. |
|
|
Midscreen
1 Bar
Works On: All
|
- U2 > (9)x3 > j.A(FB) > j.A > j.B > j.A > j.B > (j.B-OTG)x2
|
185
|
|
| Meter Gained: .5 Bar + something |
Meter Spent: 1 Bar |
Yes, 9 is just 3 jumps, completely auto-timed.
This works from fullscreen as well. |
|
|
Midscreen
1 Bar/0 Bar
Works On: All
|
*2EX~EX > j.Y > j.A(FB) > (j.A)x2 > j.B > j.A > j.B > (j.B-OTG)x2
|
105
|
|
| Meter Gained: ? Bar |
Meter Spent: 1 Bar/0 Bar |
Requires tricky timing on j.Y to properly space it, works with 5[B] as well.
Probably the most common Kinoko combo. |
|
|
Corner
| Condition
|
Notation
|
Damage
|
Notes
|
|
Corner
1 Bar
Works On: All
|
- U2 > 5[B] > 5]B[ > j.Y > j.A(FB) > j.A > j.B > j.A > j.B > j.B-OTG
|
203
|
|
| Meter Gained: ? Bar |
Meter Spent: 1 Bar |
5[B] requires odd timing, it's best to use the audio-cue to know when to release.
Same with j.Y, has it's own weird timing and takes longer than you'd think. |
|
|
Corner
1 Bar
Works On: All
|
*U2 > 5[B] > 5]B[ > MC > 5[B] > 5]B[ > j.Y > j.A(FB) > j.A > j.B > j.A > j.B > (j.B-OTG)x2
|
?/188
|
|
| Meter Gained: ? Bar |
Meter Spent: 1 Bar |
(Video) |
Ridiculous mushroom cancel 5[B] combo, you either spend the bar on U2 or you spend it on KC'ing 5[B].
Costs the same and you get the same meter in return, but the damage is different.
The video links to the alternate triple 5[B] version. |
|
|
Corner
0 Bar
Works On: All
|
- 2B > 5X > (j.A)x2 > j.B > j.B-OTG
|
85/115
|
|
| Meter Gained: ? Bar |
Meter Spent: 0 Bar |
| Easy mushroom launch, unlike the midscreen version this works with Big Mushroom. |
|
|
Other Resources/Notable Players
Other Guides/Showcases
Notable Players
Disclaimer: This list is derived from community input and is in no way comprehensive or a form of ranking of any kind. Our community criteria can be found here.
| Usual Color |
Handles/Links |
Region |
Status |
Notes
|
|
|
Aru7.62mmR
|

United States
|
|
|
| General
|
|
| Advanced
|
|
| Characters
|
|


