Wonderful World/Orphe

Profile
Background
Orphe is a bounty hunter in the royal capital of Ainefir. She is quiet and expressionless, but she is actually a friendly person that likes to tell jokes. It's hard to tell what she's thinking, she doesn't say much so you'll never get what she means if you don't carefully scrutinize her words. She like's kids, but they often run away from her strange, expressionless face when she tries to run their heads. She is still young, but she is ranked quite high as a bounty hunter as her abilities are top notch. She is particular skilled at treasure hunts. She is always in high demand, but extremely choosy on what quests she take. Before she knew anything, but of her parents were gone and she was living off the streets. After certain circumstances, she was admitted to a sword and magic school. She was cold and unresponsive until one day, suddenly becoming cheerful and truly enjoyed school; giving her the eccentric personality she has today. She was in the same class a Neva from the Rakleia Knights. Orphe decided to be a bounty hunter on a whim, thinking that it would be fun. When on requests to inspect ancient ruins, she often runs in to the thieving Alicephia. As a reward for ruin expeditions, she likes to take several non-dangerous items back with her. She takes the items and sell them at her shop "Fortune Circle," in the Commercial City Cornalia when she is home. She uses Magical Tools as a hobby and all of her money, besides the bare minimum for vital costs, go towards buying junk.
Game Play
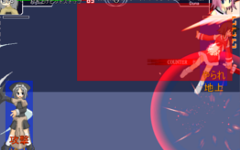
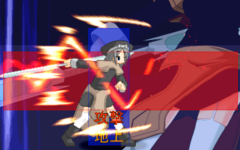
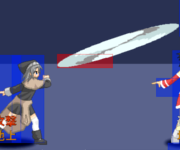
Orphe's most defining traits are her strong rushdown game as well as the "Guard Points" on her slash and heavy slash normals (grounded only). Her weapon attacks to compensate for this are all pretty slow, making them very dangerous to wiff. Overall mostly a momentum character who can create upsets with successfully executed Guard Points. Orphe takes a decent - though not hand breaking - amount of execution (you should be able to push buttons quickly). You should also be able to react quickly with appropriate guard point attacks in order to fully utilize her potential.
Character Specific Data
Total Life - 730
Combo Hits Before Damage Reduction - 1
Move List
Strategy
Neutral Game
Air approach
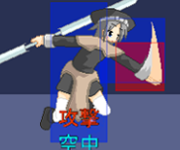
For a basic aerial approach, generally you want to maneuver yourself into a position where you can hit near the end of Orphe's j.S. It doesn't really have a good downwards hitbox, but it's made up for with horizontal range that can be hard to deal with when used right. j.HS has a huge crossup box (though awful as a regular jumpin), so don't be afraid to go for crossups. You can even crossup from quite far away if you are feeling an anti air or such, you can think of it like a backwards j.S with a nerfed downwards hitbox.
Ground Approach
For good ground poking, Orphe's best all-around move is probably her f.5S. It may not be anything super special, but it has a good hitbox, decent startup, and it chains into 5HS on hit/block which has more than enough range and momentum to connect from almost any distance. 5HS on it's own also has uses, but it shouldn't be used in situations where there's a good chance of it wiffing due to huge active frames.
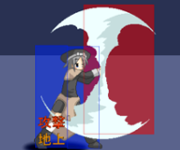
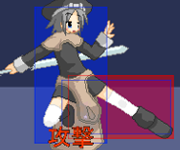
Orphe's 2S is also a pretty effective anti air when used right. The animation isn't completely true to it's hitbox, so check out the hitbox in the Normals section.
Projectile Use
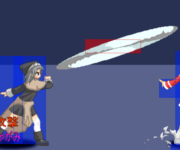
236P, 236S, and 623HS are all projectiles that stay out for a pretty long time. They cover different general areas - 236P: in front and upwards, 236S: straight ahead, and 623HS: a fairly long angle between the two previous. Using these moves to safely poke your opponent helps to build respect as well as reduce the amount of risks you need to take.
Dashing
Orphe has a very fast dash, letting you capitalize on openings easily. Generally if you see your opponent wiff something stupid, you can dash in and punish (or at least force a block) with a 2K or f.5S. Because of the fast nature of her dash, you can also use it to go under bad aerial approaches when you aren't confident an anti air will work.
Summary
Overall, nothing really extraordinary about Orphe's neutral game. How far you can bring her neutral game depends on how well you're able to use her fairly unique Hitboxes, Guard Points, and other various tools together as a whole.
Pressuring
Orphe has some of the best blockstrings and mixups in the game thanks to some negative pushback and a very fast/chainable overhead. Effectively pressuring and applying her bullshit overhead is probably Orphe's strongest point.
Basic mixup: 2P > 6P or delayed 2K.
When you confirm a blocked 2S, you can go into 214S~S which will leave you at +4 if timed properly (no lower than +1 if timed improperly) situation very near your opponent - deftinately a good situation for Orphe.
If you are blocked and you're too far away to land 2S, you can still do a 214S~K and cancel the recovery, but it puts you at a frame disadvantage. The trick here is that you can just keep spinning, and the autoguard on 214S will catch any attempts to poke out with a mid or high hitting move. To beat a low poke this way you actually have to do 214S~S which is risky, basically the same as DPing after a move that's bad on block.
However that tends to not be very effective when used as your primary method of pressuring. If you feel like taking a safer route outside of 214S range, you can chain into cl.5S > (f.5S) > 236P which puts you at a minor frame disadvantage, and around your optimal f.5S and 5HS range. Against people who mash on pokes you can do the followup into S. If they like to jump you can go for a safe 623HS, or jump forward and blockstring/hit them in the air.
If you have meter you can 236P BRK > Dash > whatever you want at any time to put you back at at point blank.
2S, and 214S~K both have negative pushback - so working these moves in as much as possible are what let you pressure for extended periods of time.
Sample Blockstrings
- [2P / 2K > 2S > 214S~S] xN
- [2P / 2K > 6P 2S > 214S~S] xN
- 2P 6P 2S > 214S~S > 2P 2K cl.5S f.5S 5HS > 236P BRK > Dash > 2P 2K 6P > etc...
- xx > 214S~S > 5P 2S (2S is air unblockable, this punishes people who try to chicken block after 214S~S)
Combos
BnBs
Meterless, Anywhere xx > 5HS > 236P~S > (OTG)
•Basic BnB for when you are out of 214S range, can follow up with an OTG to build some meter by sacrificing oki.
Meterless, Anywhere xx > 2HS > 214S(1)~K > 2P cl.5S 2S > j8.S HS > dj8.S HS > j.236K(1)
•Beginner mode 214S~K combo.
Meterless, Anywhere xx > 2HS > delayed 214S(1)~K > 2P 5K 2S > 236P(1) > 5P 2S > j8.S HS > dj8.S HS > j.236K(1)
•This is the real 214S~K combo.
50% Meter, Anywhere xx > 236S BRK > Dash > 5K cl.5S 2S > 236P(1) > 5P 2S > Super combo / Aerial combo
•Goes into all your standard stuff from outside of 214S range.
50% Meter, Anywhere xx > 236P BRK > Dash > 6P cl.5S 2S 2HS > Delayed 214S(1)~K > 2P 5K 2S > 236P(1) > 5P 2S > Super combo / Aerial combo
•Not quite as flexible or easy as the previous combo but also works.
50% Meter, Anywhere xx > 2HS > delayed 214S(1)~K > 2P 5K 2S > 236P(1) > j8.S slightly delayed HS > dj9.S delayed HS > j.236K(1) BRK > Land, Dash > 2P cl.5S 2S > j.8S slightly delayed HS > dj8.S HS > j.236K(1)
•A great use of meter and has a ton of corner carry. You can't begin building meter again until around the time your opponent stands up.
•You can also use this combo transition to pick up lots of extra damage on confirms in the air. Just make sure to add delays as appropriate so that you are low enough, and they are high enough to still be able to combo after j.236K BRK.
•Because of proration you may find that this combo is not as much worth it if started off a kick or a punch level attack (you can consider 6P a slash level attack for proration's sake). Instead you may want to save the meter for a super combo instead which will generally scale well no matter how you start it.
100% Meter, Midscreen xx > 2HS > delayed 214S(1)~K > 2P 5K 2S > 236P(1) > 5P 2S > 2364S > Dash > f.5S 5HS > j9.S delayed HS > dj8.S HS > j.236K(1)
•Midscreen super combo, great damage and a great use of meter, a bit more damage than the BRK combo. Builds back, 25% meter after the super and about 20% more if you dash twice for oki. Sideswaps. It can be sort of difficult to get the perfect spacing and height for j.236K(1) in this combo, but it will come with practice.
100% Meter, Corner xx > 2HS > delayed 214S(1)~K > 2P 5K 2S > 236P(1) > 5P 2S > 2364S > Delayed Dash > 2P cl.5S 2S > j8.S HS > dj8.S HS > j.236K(1)
•Keep in mind the super does still side swap, so if you know it won't be enough to kill them, it might be worth giving up some damage to keep your opponent cornered.
150% Meter, Anywhere near corner xx > 2HS > delayed 214S(1)~K > 2P 5K 2S > 236P(1) > 5P 2S > j8.S HS > dj9.S Delayed HS > j.236K(1) BRK > Land, Dash > 2P cl.5S 2S > 2364S > Delayed Dash > 2P cl.5S 2S > j8.S (Delayed) HS > dj8.S HS > j.236K(1)
•Flashy or kill combo.
•A huge waste of meter if it doesn't kill. If you can do the midscreen super combo then you don't generally need this at all. It does do slightly more damage (less than 10%) more than the super only combos. Keep in mind that using a BRK kills a lot of the meter gain, making this more than "just 50% more" meter cost than a super combo.
Combo Flow Notes
- Almost any combo that uses the 2HS > 214S~K > 2P 5K 2S > 236P(1) > 5P 2S chunk, can be replaced with 2HS > 214S~K >2P cl.5S 2S to keep things simple and easy.
- There's also a more difficult / inconsistent corner super combo variant that goes into 6P cl.5S 2S right after the super.
- There is endless different ways to set up a j.236K(1), but the spacing is very specific. Learning to freestyle that spacing can come with experience, but juggles into 2S are generally very consistent.
- Remember that you often need to add some minor delays to your aerial combos so that all hits connect properly.
- Any combo using the 214S(1)~K launcher needs to not be delayed on Ryuza and Sabe, amount of delay required can also be more or less difficult depending on the character (generally more delay needed for smaller characters).
- The stuff I've notated above should hopefully work on almost any if not all character with some minor timing tweaks. I've tried to make things as little character specific as possible, but learning what characters you can squeeze out extra damage on can help in the long run.
Ver 0.55test Combos
50% Meter, Anywhere xx > 2HS > 214S~K (1 or 2 hits) > 2P (5K/5S) 2S > 214S~S BRK > 6HS > j.S j.HS > dj.S j.HS > j.236K
•Basic meter combo using the new BRK on 214S. Doesn't do much damage, no knockdown either, but could give an idea as to the BRK's timing. Easy to do this one, just mash 6HS+SP to confirm.
•Most characters will need the 5K/5S in the middle, but some will not, such as Friede.
50% Meter, Anywhere xx > 2HS > 214S~K (1 or 2 hits) > 2P (5K) 5S > 214S~S BRK > Slight delay f.5S > 623HS > Ender
•Tricky meter combo using 623HS's new hit properties. It's usually better to omit the 5K, as it makes the aircombo ender (nearly) impossible to do, and is generally harder to followup.
•The trick here is after the BRK to catch the opponent with f.5S as low to the ground as possible. If they're too high up or too close, 5P will whiff, or 623HS won't even pull them in at all.
100% Meter, Corner xx > 2HS > 214S~K (1 or 2 hits) > 2P (5K) 5S 2S > 2364S > Delay f.5S > 623HS > Ender
•Other followups after the super may be possible, you want to have f.5S after the super to hit them as low to the ground as possible to have 623HS vacuum them in as much as possible.
- Enders
- Aircombo: (slight delay) 5P 2S > j.S j.HS > dj.S j.HS > j.236K
- •Standard aircombo ender, does the most meterless damage.
- Knockdown: (5S) > 214S~S
- •Sacrifices a bit of damage for good knockdown.
- Super: 5P 2S > 2364S > dash 5S/5HS 214S~S
- •Super ender, requires another 100% meter, results in knockdown.
- Corner Super: 5P 2S > 2364S > delay > (f.5S) 623HS Ender
- •For when you use a super that puts you into the corner, allows you to extend with another ender.
- •Based on spacing, you can sometimes omit the f.5S.
Confirms From Mixups
These are obviously very important, especially for Orphe!
The section where you will generally be confirming in is bolded. Hopefully you are confirming in only 2 hits (initial hit then 1 more), or 1 counterhit. If you're having trouble starting out using a longer chain never hurts. Consistency first.
However, once you've learned to confirm off just 2 hits, Orphe's blockstring potential goes up a lot, so learn it at one point or another.
6P > Normal String > 2HS BnB / 5HS BnB
2K > Normal String > 2HS BnB / 5HS BnB
6HS > j9.S j.HS > Land > j.P j.S j.HS > DJ j.S j.HS > j.236K
•You can't jump cancel if it gets blocked. 6HS isn't actually a good overhead but you need to know what combo to do for it anyway.
6HS > j9.S j.HS > Land > 2364S > Etc...
•Actually very damaging because of proration. Too bad it's off 6HS.
Throw > BRK > 5K f.5S 5HS(1) > Aerial combo / Super combo
Throw > Dash > OTG
IAD j.K > Deep j.P > 2P / 2K > 2HS BnB
IAD j.K > 2K > 2S / cl.5S > 2HS BnB / 5HS BnB
Counter Combos
4O / 5O / 214O > 5P > 214S~S
•This should always knock down for if you're not sure about spacing.
5O / Mid Range 4O / Anti Air 4O > 5P 2S > j8.S HS > dj8.S HS > j.236K(1)
•You can also go into an BRK exender or super combo as usual.
Far 4O > 5P f.5S (5HS) > Etc...
•From a far 4O you will be out of range for a 2S, so use this. Pretty difficult to get a meterless knockdown aerial here.
High and Far 4O > j.P > Custom Aerial
•It's possible in some matchups to land 4O on someone very far away and high in the air. You can't always combo off this.
214O > 5P 2S > Aerial
•Too much proration to go into anything fancy.
OTGs
- Dash > 2K > 2S / cl.5S / cl.5S f.5S > 5HS > 236P
- Dash > 2K > cl.5S > (f.5S) > 623HS
- Dash > 2K > anything ending with a Jump Cancelable normal > IAD
- Dash > 2K / cl.5S > 214S
Vary depending on how much meter / damage / post OTG oki you want to get... 236P has good recovery, 623HS does not, 214S followup has awful recovery.
Recommended: Dash > 2K cl.5S 5HS > 236P
•Good balance of positioning damage and meter gain. Note that 2S doesn't have negative pushback during OTGs.
Post OTG Game
In general it's not reccomended to go for OTGs midscreen since back techs are unpunishable without meter. Using meter to punish a post-OTG tech would be rather silly, since the whole point of OTGs is to build meter (as well as add minor damage).
OTG > Dash > 2S
•Punishes everything but Quick Techs in the corner.
OTG > Dash > 5P 2S
•Punishes everything but Upwards and Forward Techs in the corner.
OTG > (delayed?) Dash > cl.5S 2S
•Punishes everything but Forward and Quick Techs in the corner. Whether or not it actually properly punishes Upwards Techs needs to be tested, the timing is rather finnicky to not cross under.
Air Backdashing
If your opponent does a tech that gives them enough time to do an aerial backdash (which has invulnerability), you have another dynamic to worry about. Air backdashing while in the corner isn't QUITE as risky as backdashing on the ground in the corner, but still not too difficult to punish. All you need to do is dash and then delay some move (probably 2S). This is a hard counter though, you sort of need a read to do this.
A soft counter to this air backdashing option is to throw out a projectile immediately after doing 236P. Generally you would do 623HS since it goes the highest and covers a lot of range. You can experiment with 236P as well though it may be more limited, 236S recovery is sort of too long to really make it useful without burning meter. The bonus to the soft counter is that if your opponent techs and then blocks, you're left at a relatively neutral situation. And if they so much think of hitting a button or fail to block immediately they will get hit by it. 623HS itself isn't really easy to capitalize off of, when it hits you should probably just dash and go for an another airtech punish (or throw another 623HS).
Okizeme
j.236K(1)
Ground dash twice, then do a meaty 2P / 2K (slower moves aren't fast enough). You can also dash once, do 236P/S BRK then dash again if you are worried about reversals and such.
j.236K(2)
Air techable. Near the corner generally you start out by waiting for the opponent to tech and fall down and hit them with anti air 2S. Once they start getting smart and trying to airdash out jump up and attempt to hit them with j.S or HS. Hopefully eventually you'll be be able to
236S / 214S / 2HS / etc
Ground dash once and meaty anything. You can also do a 236S right away and it will hit meaty giving you some frame adv (not really that much though, blockstun is rather low). Another Alternative is to IAD j.K into whatever.
Backdash Punishing
It's not an option select, but if you use the string meaty 2P > 5K it should punish most backdashes midscreen, and allow you to continue pressure as normal if they block.
Match-ups
- He has a true reversal DP, meaning you have to be careful about your oki. Consider using a late 236P or early 236S with SP Cancel for safe oki if you don't want to bait a lot. Ryuza also out-ranges you by a lot at most positions, meaning he will often be in a range that you're unable to counter with either 4O or 5O.
- However, his only multihit moves are his Dark Flame (236K and 236O versions), and Night Burial Edge (214P and 214K versions). Dark Flame isn't really much of an issue outside of okizeme anyways because of how slow the startup is (meaning you can just mash it out with a f.5S or a 5HS. And Night Burial Edge is unsafe on block, meaning you won't really see it coming out outside of combos very often. What this means is that you can pretty much autoguard any of his moves with 5HS pretty safely without canceling into a GP special move. You can also try using 5HS > 66 against slower moves (i.e. 6HS) for a stronger punish. His 6HS is safe on block from further distances so learn to 5HS it on reaction.
Duna:
- This seems like a really fair matchup, the main moves you should be looking out for are her Tinder Strike, 2HS, f.5S, and j.S.
- It takes some getting used to but you need to learn when you are in range for Tinder Strike, Lemius comes down from a 45 degree angle so if you can constantly be drawing that line in your head you shouldn't be getting hit by it. Lemius' j.S is similar to Orphe's j.S but with a larger hitbox, you have to be really careful to respect her range unless you are at a height where you can fight back with your own j.S. Lemius 2HS is one of the better anti airs in the game, don't try to beat it except for with well timed crossup j.HS or a deep j.K. Otherwise her 2HS has a lot of recovery on wiff, allowing you to punish accordingly if you bait it. Also be careful of lemius f.5S, she can stick it out when she expects you to bait a 2HS and hit you if you were attacking, and otherwise just a good move with a lot of range.
- The second hit of Lemius' mid hitting rekka is +1 on block, and Lemius players will often use this as a chance to reset pressure. This gap is the most obvious time to use Orphe's Guard Point attacks. However be careful of Lemius' 2K which will stuff your GPs that have no catch box at the feet.
Sabe:
Neva:
Guard Points
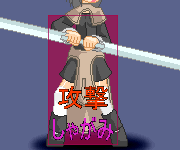
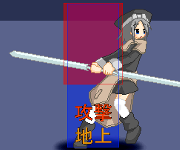
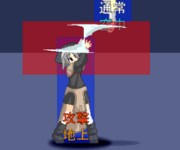
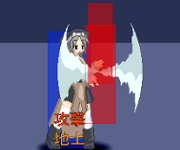
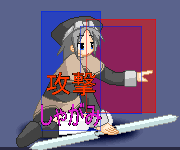
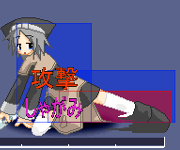
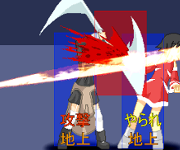
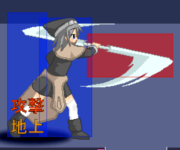
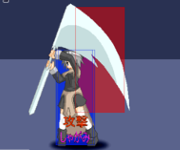
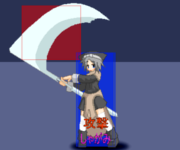
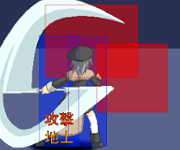
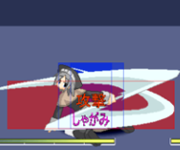
Orphe's ground based slashes all have Guard Point frames on them. This means she can like, block while attacking (WTF cheater?).
No, it's not actually cheating, it's a unique and interesting (though not completely original) character specific mechanic. What makes Orphe's Guard Points special, is that she has some special moves she can cancel into only from the Guard Point state (there's a window after actually guarding the attack in which you can still do the input). Though it's not mentioned in the official movelist, Orphe can also cancel her GP normal on a sucessful GP into another GP normal that is further up the cancel chain. For example on cl.5S GP she can cancel into 5HS (which is still allowed to GP another attack).
For more details on the actual followups, see the Original Action Details section.
Effectively using GP against various projectiles, blockstrings, pokes, and anything else you can think of is another huge part of Orphe's game. Familiarize yourself with these moves as much as you can so you can pick and choose what to use where.
GP Frames
| Move | Startup | Duration | Recovery | Total | Hitbox Details |
|---|---|---|---|---|---|
| cl.S | 5 | 12 | 0 | 17 | Upper Body |
| f.S | 0 | 8 | 10 | 18 | Upper Body |
| 2S | 4 | 9 | 5 | 18 | Full Body |
| 5HS | 0 | 17 | 3 | 20 | Upper body |
| 2HS | 3 | 12 | 8 | 23 | Full Body |
- Startup is the amount of time before the first frame of guard point (this means that even a perfectly time wakeup 5HS / f.5S will NOT beat meaties).
- Duration is the duration of the Guard Point itself.
- Recovery is the amount of frames remaining after the guard point has finished until the actual active frames of the attack.
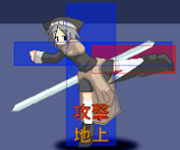
- Note that the Full Body guard points remove all hittable boxes other than the guard point box (meaning if timed right it is garunteed).
- Also remember that the red box will go away as soon as it has absorbed ONE attack (clusters of projectiles and multihit moves will go through if you don't cancel into something quickly).
GP Details
|
|
2S [ Full Body GP ] 2S GP > Original Actions, 5HS | ||
| Really great because it has full body GP box. The attack itself also has a good hitbox meaning if you don't go into a followup, the attack itself is pretty likely to hit.
Primarily for use as an anti air (landing recovery ensures that you will get a punish on jumpin, and the fact it's air unblockable means a double jump bait is highly unlikely). Also good for beating low pokes. Good against projectiles as well. | |||
|
|
f.5S [ Upper Body GP ] f.5S GP > Original Actions, 5HS | ||
| The combination of near instant startup and good reach make this a prime choice for poking against mid and high level pokes. Still has some good uses against high/mid projectiles, as well as very tight IAD gaps in blockstrings where 2S might not be fast enough.
Be careful using this move uncanceled because it has the longest gap between GP ending and the actual attack portion of the move. | |||
|
|
cl.5S [ Upper Body GP ] cl.5S GP > Original Actions, f.5S, 2S, 5HS | ||
| The fact that this move has the slowest GP startup and can only be used when really near the opponent makes it feel... not very useful. However it does have some decent duration, and if you ever happen to land it, you have more cancel options than any of her other GPs. | |||
|
|
5HS [ Upper Body GP ] 5HS GP > Original Actions | ||
| Very important GP move because it's the only one with 0F startup that you can use while close to the opponent. It also has the longest duration, making it the most effective against stagger pressure, and the most accessible to new Orphe players.
There are plenty of situations where this blindspot is only covered by the powerful reach of 5HS, and many of them are a garunteed 5HS hit. However a 5HS wiff is still very dangerous, so be wary of situations where it can be baited. | |||
|
|
2HS [ Full Body GP ] 2HS GP > Original Actions | ||
| Full body GP means it's similar to 2S in use. However as it's a sweep... using it as an anti air isn't generally recommended.
This is the move recommended to use against projectiles in almost all situations. Still useful against low pokes and projectiles, choose between 2S and 2HS is generally a matter of preference. 2HS GP starts up only 1 frame faster than 2S, which is barely a difference but it can count. More importantly it has significantly more active frames, meaning countering with it tends to be quite a bit easier, especially against staggered pressure. It does on the flip side have more recovery than 2S, but the low profile of the hitbox tend to make that difference fairly negligible. If you don't cancel into something, 2S will generally lead into a more damaging combo than 2HS as well. |
Special Skills
All of these moves can only be used from a successful Guard Point. Knowing when and when not to use these moves is important, they all have fairly specific uses.
| Sprial - 5O [ Mid ] | ||||
| Sort of a generic counter, Orphe steps back and then swings out lotus - hitting on both sides with an attack that will launch for a combo. Generally you use this to counter melee attacks that are done at a relatively close range.
This move does have a relatively large flaw, it's 20F of startup meaning it's not actually fast enough to punish everything. It will still pretty much punish any normal (even jabs unless they are fast on recovery and hit very late, or you execute the counter late), but what you're more worried about is jump cancelable normals and double jump cancelable air normals. This move can be chicken blocked and tends to wiff people higher up in the air. In other words, don't get baited. | ||||
|
|
Magical Flame - 4O [ Mid, Projectile ] | |||
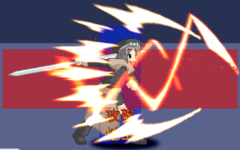
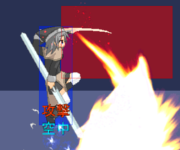
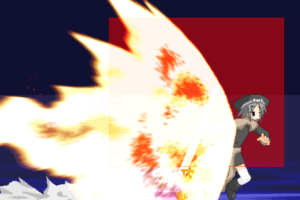
| Orphe's fullscreen counter. There's a sizable deadspot between 4O and 5O, but 4O covers a pretty hefty range when far away from your opponent (it will hit someone that is standing as far away as possible). This move starts up very fast, and is generally used for punishing full screen projectiles. It won't punish everything especially if they use a SP cancel or it's a slow projectile such as Lynia's 236P. But it's still a fullscreen projectile that's too fast to react to, so it's not a bad idea to throw it out sometimes anyway, not everyone is blocking at full screen.
As you can see there's also a melee portion of this hitbox, it occurs between the first and second projectile hits. It looks like a really amazing hitbox, but it actually only hits people in the air and it tends to send them flying across the screen (not always). Not the most useful thing ever... but you can use it to hit people jumping to bait 5O. | ||||
| Lightning Feet - 66 [ Invulnerable ] | ||||
| This is a special dash that only works from GP. It just looks like Orphe's regular dash, but it actually has some invulnerable frames. This can be used to go through clusters of projectiles (depends on the projectile, wider / slower projectiles aren't so easy), which is useful because eventually people start to respect your 4O. It can also be used to get a stronger punish off very slow moves (GP > 66 > 2K / something). | ||||
|
|
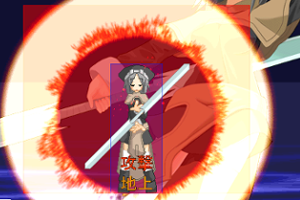
Spiral Ascension - 214O [ Mid, 100% Meter (Finishing Move) ] | |||
| Basically the same in use to 5O, but because it has super flash it's easier to bait. This being said you really should only use it when you are sure it will hit. However when it does hit, the followup does a TON of damage, and you can still do an aerial combo afterwards. |
Move Details
Specials
| Crimson Flower - 236P [ Mid, Projectile, BRK ] 236P > S | ||||
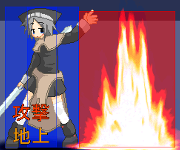
| Orphe raises her hand and summons a pillar of flame from the ground that persists for a fair amount of time. This move is useful as both a zoning and pressure tool. At neutral you can use the persistence and high reaching hitbox to throw people off their momentum. On the offense you can use this move to make your normals safe, or BRK and dash back in to open up more mixup opportunities. | ||||
| Sorrowful Lotus - 236S / 236P~S [ Mid, Projectile, BRK ] | ||||
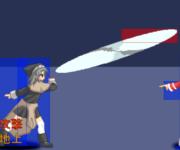
| Orphe thrusts Lotus forward and a wave of flame comes out and slowly floats forward, lasts for quite some time. Similar to 236P this move is good for zoning and poking because it stays out a long time, except for this move hits more horizontally and less vertically. Try to restrain from using it much in pressure, it has hardly any blockstun and can be unsafe on block if you are too close. | ||||
|
|
Windmill - 623HS [ Mid, Projectile, BRK ] | |||
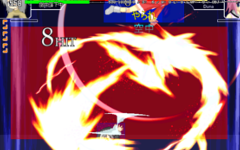
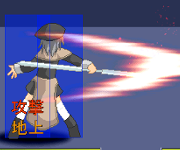
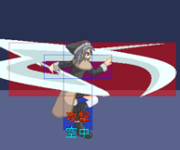
| Orphe spins Lotus and throws it out forward like a boomerang, as it spins it hits 10 times before returning to her. This move has quite a lot of range and while it doesn't go into big damage, it does a respectable amount of damage on its own.
Not a bad tool for poking and catching the other player off guard with the large range. You can BRK it but it really doesn't help much with the recovery, not a move to be used often. | ||||
|
|
Moment - 214S [ Mid, Autoguard ] 214S > K, S | |||
| Orphe holds Lotus in front of her, and spins it creating a sort of shield. Any attacks that connect with the blade will be autoguarded. You may cancel the spinning animation at any time by pressing K. You can do a followup attack by pressing S, the followup will force knockdown. The followup will also come out automatically after a certain period of time if an opponent is within proximity (so cancel with K quickly if you do not want to do the S followup, especially since it is unsafe).
Useful for blocking projectiles fullscreen to avoid chip damage. Also a staple in pressure allowing you to cancel normals into ambiguously long autoguard. If you're close enough you can even 214S~K when the 214S is blocked, and there will be negative pushback that allows you to continue pressuring. | ||||
|
|
Hell's Reversal - j.236K [ High, Projectile, BRK ] | |||
| Orphe summons two dragon-like flames, the first attacks downwards the second up. The first one causes untechable knockdown, the second wallslams.
Outside of combos it has pretty limited uses, but you can use it as a preemptive air-to-air against opponents above you. If you are close enough you can also TK it as an overhead. If TK'd you must be very close for the second hit to connect and allow for easy meterless followup, otherwise you may have to BRK it. Viable mixup with 2HS because it's unreactable if TK'd properly, however 2HS is a bad low option. You might also get it to work on a respectful opponent by using 2P frame advantage. |
Finishing Moves
|
|
Crimson Windmill - 2364S [ Mid, 100% Meter ] | ||
| Orphe's super. Not generally very useful outside of combos because it can be air blocked fairly easily.
However this move is AMAZING in combos. Not only does it do quite a bit of damage, but when you set it up to connect against someone who is fairly high in the air, you can still dash and continue to combo afterwords. Saving up meter for this move is generally a good idea (depends on matchup and opponent). |
Command Normals
| Ass Attack - 6P [ High ] 6P > cl.5S, f.5S, 5HS, 6HS | |
| Officially the "Ass Attack". This move makes Orphe, overall it's probably the best overhead in the game at 22F startup (remember 100FPS). It also has a ton of active frames, and is throw invulnerable, making it a great meaty. The active frames make it another dangerous move to wiff so be wary of back dashes. | |
| 6HS [ High, Jump on hit ] 6HS > N/A | |
| Pretty standard universal overhead, sort of a last ditch effort or final suprise. Avoid using it very often. |
Normals
| 5P [ Mid ] 5P > 5K, 2K, cl.5S, f.5S, 6P, 5HS, 6HS | |||
| Short range sissy slap, surprisingly doesn't wiff crouchers. Good anti air against bad jumps. | |||
| 2P [ Mid ] 2P > 5K, 2K, cl.5S, f.5S, 2S, 6P, 5HS, 2HS, 6HS | |||
| Lower short range sissy slap, Orphe's fastest poke. | |||
| 5K [ Mid ] 5K > cl.5S, f.5S, 2S, 6P, 5HS, 2HS, 6HS | |||
| Relatively fast kick that doesn't wiff crouchers. Not a bad move but not generally used over 2K. | |||
| 2K [ Low ] 2K > cl.5S, f.5S, 2S, 6P, 5HS, 2HS, 6HS | |||
| Fast low kick that's only a frame slower than 2P. This is the move you generally want to poke around with at closer ranges. The fact it hits low also makes it centric to Orphe's high/low game. | |||
| cl.5S [ Mid ] cl.5S > f.5S, 2S, 5HS, 2HS, 6HS | |||
| Good hitbox, but use is limited by the fact you need to be pretty close to use it. When not being used as chain filler, this move can be useful against people jumping while cornered. | |||
|
|
f.5S [ Mid, Jump ] f.5S > 5HS, 2HS, 6HS | ||
| Good range and jump cancel-ability make this move pretty important. This is a good move to use for both its GP qualities, as well as its range as a poking tool. | |||
|
|
2S [ Mid, Jump, Air Unblock ] 2S > 5HS, 2HS, 6HS | ||
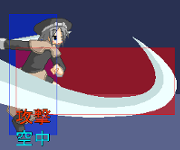
| One of Orphe's best normals. Anti air on both sides. Negative pushback on block and hit make it very centric to her blockstrings and combos as well. | |||
|
|
5HS [ Mid, Jump ] 5HS > 6HS | ||
| Another one of Orphe's best moves. The GP on 5HS is extra long compared to all the others, making it easy to use. The forward momentum and range (second hit) on this move are huge. Be wary of the long startup and EXTREMELY long recovery on this move though. If it misses for whatever reason you're in for a beating. | |||
| 2HS [ Low, Air Unblock ] 2HS > 6HS | |||
| Low hitting sweep with no range. It hits on both sides so you can use it against Aiwhen's teleport crossups. This move isn't really used much outside of for it's GP and in combos. |
Air Normals
| j.P [ High ] j.P > j.K, j.S, j.HS | |
| Not really an amazing move, primary use outside of combos / blockstrings is for close air-to-air situations. This move fails to combo into j.S or j.HS at higher prorations.
Good after a jumpin or IAD j.K because it hits high and increases frame advantage upon landing. | |
| j.K [ High, Jump ] j.K > j.P, j.S, j.HS | |
| Orphe's best downwards hitbox, generally used as a jumpin (from not-quite in your face range), or from an IAD.
This move can also work in air-to-air situations where you are actually at a weird enough angle for this move to hit. | |
| j.S [ High, Jump ] j.S > j.HS | |
| One of Orphe's best air normals, it has an amazing hitbox that makes it great for air-footsies.
Also your primary jumpin, unique in this sense because it's stronger when used from further away. Basically you shouldn't use this as a jump in if you are close enough for j.K. And you shouldn't have jumped in in the first place if you're too close for j.K to be reliable. | |
| j.HS [ High, Jump ] j.HS > N/A | |
| Similar to j.S this move is also great for air-footsies, it has even MORE range, and hits higher up. The difference in startup is very small, so you shouldn't be afraid to use this move in an air-to-air situation.
As an added bonus, this move has huge crossup-ability. In the air you can use this against someone who is air teching (i.e. after a j.236K(2)), and they will be forced to get hit or block no matter what way they tech. On the ground you can use this as a safe crossup. Because it doesn't hit down very far (even less so than j.S!) your aim is to crossup from the further distances to avoid getting hit by strong anti airs and such. |
Frame Data
Frame data is copied from the JP Wiki. Data is current as of version 0.5.
Normals
| Move | Startup | Duration | Recovery | Total | Attack Level | Grounded Frame Advantage | Aerial Frame Advantage |
|---|---|---|---|---|---|---|---|
| 5P | 9 | 5 | 27 *2 | 41 | 1 | -2 | -2 |
| 5K | 9 | 5 | 26 | 40 | 1 | -6 | -6 |
| cl.5S | 17 | 8 | 44 | 69 | 1, 2 | -12 | -17 |
| f.5S | 18 | 6 | 34 | 58 | 1, 2 | -2 | -7 |
| 5HS | 20 | 20 *4 | 60 | 100 | 1, 2 | -35 | -40 |
| 2P | 7 | 5 | 18 | 30 | 1 | 2 | 2 |
| 2K | 8 | 5 | 23 | 36 | 1 | -3 | -3 |
| 2S | 18 | 6 | 38 | 62 | 2 | -9 | -14 |
| 2HS | 23 | 3 | 45 | 71 | 2 | -13 | -18 |
| j.P | 8 | 3 | 33 *3 | 44 | 1 | -13 | -13 |
| j.K | 10 | 5 | 33 | 48 | 1 | -13 | -13 |
| j.S | 15 | 3 | 31 *3 | 49 | 1 | -11 | -11 |
| j.HS | 18 | 3 | 46 | 67 | 2 | -14 | -19 |
| 6HS | 39 | 4 | 46 | 89 | 3 | -10 | -15 |
| 6P | 22 | 10 | 32 | 64 | 1 | -22 | -22 |
Specials
| Move | Startup | Duration | Recovery | Total | Attack Level | Grounded Frame Advantage | Aerial Frame Advantage |
|---|---|---|---|---|---|---|---|
| 236P | 15 | - *5 | 50 | 65 | 2 | -2 | -7 |
| 236S | 19 | - *6 | 43 | 62 | 2 | -21 | -26 |
| 623H | 14 | 50 | 40 | 104 | 1 | -20 | -20 |
| 214S | 14 | 144 *7 | - | 158 | 2 | - | - |
| j236K | 21 | 15 *8 | 45 | 81 | 1 | -25 | -25 |
| 5O | 20 | 5 | 48 | 73 | 2 | -17 | -22 |
| 4O | 4 | 33 *9 | 44 | 81 | 2 | -43 *10 | - |
| 66 | 9 | - | 8 | 17 | 0 | 0 | 0 |
Finishing Skills
| Move | Startup | Duration | Recovery | Total | Attack Level | Grounded Frame Advantage | Aerial Frame Advantage |
|---|---|---|---|---|---|---|---|
| 2364S | 11 *11 | 80 *12 | 58 | 149 | 1, 2 | -27 | -32 |
| 214O | 20 *11 | 5 | 58 | 83 | 2 | -27 | -32 |
Notes
- *1: Guardpoint moves have their names colored bold pink
- *2: Decreased recovery on hit
- *3: Increased recovery on hit
- *4: 5F active, 10F in between hits, then 5F active
- *5: 4F active, 4F in between hits, then 55F active
- *6: 56F active
- *7: 2F active, 2F not active - repeats 36 times unless interrupted
- *8: 2F active, 8F in between hits, then 5F active
- *9: 3F active, 1F in between, 3F active, 5F in between, 3F active, 9F in between, 3F active, 3F in between, 3F active
- *10: Frame advantage is for if the flame is guarded at the first frame
- *11: 60F super flash
- *12: (3F active, 3F in between) times 12, then 3F inbetween followed by 5F active
