![]()

Duels of Fortune/Baron
Jump to navigation
Jump to search


Character Properties
Overview
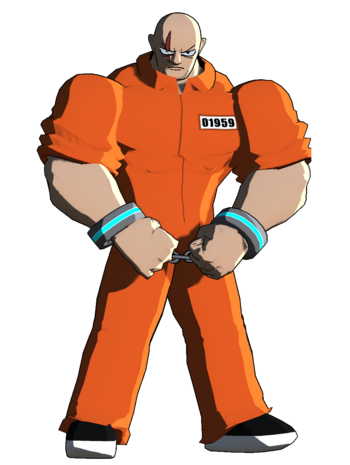
Baron Brightstar is Clyde's father and the biggest body in the game, taking his place as the slow but powerful grappler. Like any of character of this nature, Baron is built on extremes.
Baron's normals are massive and usually route into huge damage and great okizeme. Pokes like 5M, 4H, and 2[H] in particular have huge amounts of utility. Once he's in, his monstrous pressure starts. Baron has 3 command grabs between 4S~S (Orbital Grapple), 5S (Brightstar Bomber), and 624S (Grand Brightstar Bomber). 4S~S is somewhat niche. 5S has more uses due to an HKD and combo in the corner. 624S though is the showstopper with a blazing fast startup, good range, huge damage, and a combo starter/extender in the corner. Its only weakness is giving no knockdown in midscreen, but gaining the corner as Baron isn't difficult. These throws aren't Baron's only mixups either. Using his 2S (Meteor Cannon), Baron can threaten an armored unblockable, and with the right knockdowns, he can even set it up meaty. His defensive tools are also better than the norm. Baron's reversals are just as massive as he is, making spacing them out quite difficult. On top of that, his 2S doubles as a frame 2 armored option. While can lose to some things, the threat of it can force opponents to rethink their usual pressure. In addition, Grand Brightstar Bomber is fast enough to catch people playing too respective, especially if they're trying to bait reversal. His health being the highest in the game at 30000 further makes his defensive capabilities strong, as even beyond allowing him to survive more hits, it means he'll naturally build more burst and meter over the course of a round.
Baron though is a big body grappler and not without the flaws they come with. Baron has by far the weakest movement in the game, with no forward dash, air dashes, increased pre-jump, and slow walk speeds. This generally means he doesn't get to take the match at his pace, and instead has to play reactively to the opponent. This further ties in with how committal his primary neutral tools are. 2[H], 4H, 4S, and his jump, are all unsafe and not hard to react to for experienced players. His massive body doesn't do him any favors either, as he's open to unique pressure situations including an infinite blockstring in the corner for two characters. It also just means he has a tendency to get hit by things other characters could avoid like upwards angled projectiles. Possibly his biggest flaw though is his weakness to guard cancel reversals. As a big character, most of his normals have higher than average recovery. As a result, it's easier than normal for most characters to reactively guard cancel to punish him for trying to run his pressure. While this doesn't invalidate how strong and rewarding his offense is, especially since a blocked reversal can mean death, the dynamic and flow of how he does it completely changes the moment the opponent has enough meter to reversal.
Playstyle
| Baron armors his way into the opponent's face and mixes them with his terrifying command grabs. | |
| Pros | Cons |
|
|


Character Properties
| Health | 30000 |
| Backdash | 34F |
| Unique Movement | No Forward Dash No Air Dash Increased Pre-Jump (8F) |
| Fastest Attack | 2L (6F) |
Character Summary
Move list
- Command Normals
- 4H - Giant Tackle: An armored approach and Baron's main way of getting in.
- j.2H - Body Press: Baron falls straight down with a crossup hitbox, launching on contact with the ground.
- Special Moves
- 5S (Air OK) - Brightstar Bomber: A fairly bog-standard command grab that causes a hard knockdown.
- 4S - Supernova Lariat: Projectile invincible long range lariat. Has the following built-in strike/throw mix listed below.
- 4S->S - Orbital Grapple: A grab that slams the opponent into the other side of the screen.
- 2S - Meteor Cannon: An armored punch that can be charged up to 3 levels. At level 2, it crumples, and at level 3, it becomes unblockable. Can be dash canceled.
- 63214S - Grand Brightstar Bomber: The most damaging special in the game and a rewarding command grab. You can hold 6 or 4 to move slightly while above the screen.
- Supers
- 5SP - Star Breaker Slam: A highly damaging anti-air command grab.
- 2SP - Muscle Form: Red Supergiant: An install that increases damage dealt, decreases damage taken, and gives armor that can only be broken by high damage attacks.
Quick combo reference
5L > 5M > 5H > 5S: Easy combo for helping beginners. Put a brief description here.
Normal Moves
5L  |
|
|---|---|
Toggle Hitboxes Toggle Hitboxes
|
5M  You will learn to love this button You will learn to love this button
|
|
|---|---|
Toggle Hitboxes Toggle Hitboxes
|
5H  |
|
|---|---|
Toggle Hitboxes Toggle Hitboxes
|
2L  |
|
|---|---|
Toggle Hitboxes Toggle Hitboxes
|
2M  |
|
|---|---|
Toggle Hitboxes Toggle Hitboxes
|
2H   |
|
|---|---|
Toggle Hitboxes Toggle Hitboxes
|
j.L  |
|
|---|---|
Toggle Hitboxes Toggle Hitboxes
|
j.M   |
|
|---|---|
Toggle Hitboxes Toggle Hitboxes
|
j.H  |
|
|---|---|
Toggle Hitboxes Toggle Hitboxes
|
Command Normals
Giant Tackle 4H  |
|
|---|---|
Toggle Hitboxes Toggle Hitboxes
|
Body Press j.2H   |
|
|---|---|
Toggle Hitboxes Toggle Hitboxes
|
Universal Mechanics
Throw
Throw 6H  |
|
|---|---|
Toggle Hitboxes Toggle Hitboxes
|
Reversals
Reversal 5R  |
|
|---|---|
Toggle Hitboxes Toggle Hitboxes
|
Wakeup Reversal 5R on Wakeup  |
|
|---|---|
Toggle Hitboxes Toggle Hitboxes
|
Special Moves
Brightstar Bomber 5S  |
|
|---|---|
Toggle Hitboxes Toggle Hitboxes
|
Grand Brightstar Bomber 63214S  |
|
|---|---|
Toggle Hitboxes Toggle Hitboxes
|
Supernova Lariat 4S   |
|
|---|---|
Toggle Hitboxes Toggle Hitboxes
|
Orbital Grappler 4S~S  |
|
|---|---|
Toggle Hitboxes Toggle Hitboxes
|
Meteor Cannon 2S      |
|
|---|---|
Toggle Hitboxes Toggle Hitboxes
|
Air Brightstar Bomber j.S  |
|
|---|---|
Toggle Hitboxes Toggle Hitboxes
|
Super Move
Star Breaker Slam 5SP  Heavenly Baron Buster Heavenly Baron Buster
|
|
|---|---|
Toggle Hitboxes Toggle Hitboxes
|
Muscle Form: Red Supergiant 2SP  Spend 50 meter to win neutral Spend 50 meter to win neutral
|
|
|---|---|
Toggle Hitboxes Toggle Hitboxes
|
Strategy
Neutral
Describe how a character plays the neutral game. Add sub-categories if necessary, these should usually be on how you use a specific move.
Offense
Describe how a character runs their offense.
Defense
Describe how a character defends themselves when they're on the receiving end.
Additional Resources
Links to any additional resources like a tutorial video, delete category if there are none. If there aren't any but one gets made later, then re-add the category.
Additional Categories
Add any further categories as needed, just make sure they're worth a whole section.
Combos
General info on a character's combos, such as if they can always end a combo with a super as an ender rather than usual listed enders.
Combo Legend
| ||||||||||||||||||||||||||||||||||||||||||
| ||||||||||||||||||||||||||||||||||||||||||
Basic Combos
Easy combos for starting.
| Combo | Damage | Difficulty | Meter Spent | Position | Notes |
|---|---|---|---|---|---|
| 5L > 5M > 5H > 5S, Ender | X | Very Easy/Easy/Medium/Hard/Very Hard | 0/50/100 | Midscreen/Corner/Near Corner/From Corner |
Description of the combo. |
| Combo | Damage | Difficulty | Meter Spent | Position | Notes |
| 2L > 2M > 2H > 2S, Ender | X | Very Easy/Easy/Medium/Hard/Very Hard | 0/50/100 | Midscreen/Corner/Near Corner/From Corner |
Description of the combo. |
Advanced Combos
Harder combos that deal more damage or provide some other benefit.
| Combo | Damage | Difficulty | Meter Spent | Position | Notes |
|---|---|---|---|---|---|
| 5L > 5M > 5H > 5S, Ender | X | Very Easy/Easy/Medium/Hard/Very Hard | 0/50/100 | Midscreen/Corner/Near Corner/From Corner |
Description of the combo. |
| Combo | Damage | Difficulty | Meter Spent | Position | Notes |
| 2L > 2M > 2H > 2S, Ender | X | Very Easy/Easy/Medium/Hard/Very Hard | 0/50/100 | Midscreen/Corner/Near Corner/From Corner |
Description of the combo. |
X Combo Category
If a character has a specific kind of combo they do that has multiple variants, then you can make a new category for it. If they don't delete this.
| Combo | Damage | Difficulty | Meter Spent | Position | Notes |
|---|---|---|---|---|---|
| 5L > 5M > 5H > 5S, Ender | X | Very Easy/Easy/Medium/Hard/Very Hard | 0/50/100 | Midscreen/Corner/Near Corner/From Corner |
Description of the combo. |
| Combo | Damage | Difficulty | Meter Spent | Position | Notes |
| 2L > 2M > 2H > 2S, Ender | X | Very Easy/Easy/Medium/Hard/Very Hard | 0/50/100 | Midscreen/Corner/Near Corner/From Corner |
Description of the combo. |
Enders
List of combo enders a character has when there's multiple enders they can pick between, such as sacrificing oki for damage and vice-versa.
| Combo | Damage | Difficulty | Meter Spent | Position | Notes |
|---|---|---|---|---|---|
| 2H > 2S | X | Very Easy/Easy/Medium/Hard/Very Hard | 0/50/100 | Midscreen/Corner/Near Corner/From Corner |
Description of the ender. |
| Combo | Damage | Difficulty | Meter Spent | Position | Notes |
| 2H > 2SP | X | Very Easy/Easy/Medium/Hard/Very Hard | 0/50/100 | Midscreen/Corner/Near Corner/From Corner |
Description of the ender. |
Colors
_X_(Costume_Name)_Icon.png)
_X_(Costume_Name)_Colors.png)
Trivia
- Fun facts about the character. If it isn't redundant with something else said on the page, these can be pulled directly from the game.
Baron Wiki Roadmap
| 0% complete | |
|
|
| Page | Completed | To-do | Score |
|---|---|---|---|
| 0/25 | |||
| Move List | 0/25 | ||
| Strategy | 0/25 | ||
| Combos | 0/25 |