Samurai Shodown 3/Advanced Mechanics
Side Step/Circle Step Details
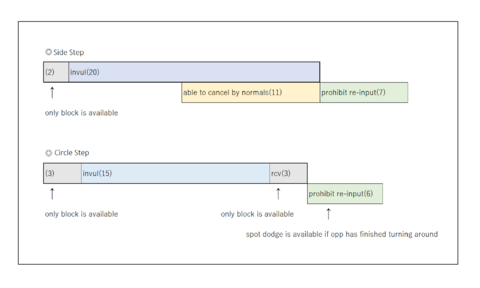
Side step has a total duration of 22 frames.
- There are two frames of startup which are not invulnerable, but do allow you to block
- Side step has full invulnerability for a total of 20 frames
- The final 11 frames of side step can be cancelled into normals
- After recovering from a side step, you may not input another circle step for 7 frames
Circle step has a total duration of 21 frames.
- There are three frames of startup which are not invulnerable, but do allow you to block
- Circle step has full invulnerability for a total of 15 frames
- There are three frames of recovery which are not invulnerable, but do allow you to block
- After recovering from a circle step, you may not input another circle step for 6 frames
- During these 6 frames, you may input a side step as long as your opponent has finished turning around
Throw Details
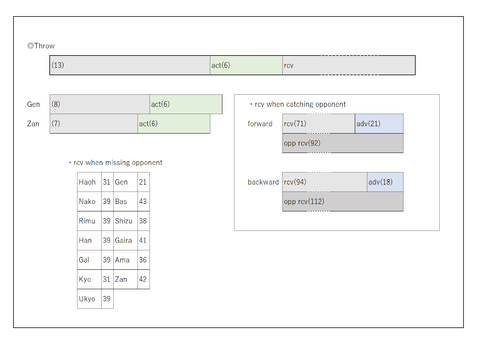
Throws in Samurai Shodown 3 have 14 frames of startup counting first impact frame.
There are, however, two exceptions to this.
- Genjuro's throw impacts on frame 9.
- Zankuro's throw impacts on frame 8.
All throws are active for 6 frames.
Forward throws grant +21 advantage frames, while back throws grant +18 advantage frames.
Characters all have different recovery animations when whiffing a throw. The length of each character's recovery animation (in frames) can be seen on the diagram below.
Deflect Mechanics
Deflects in Samurai Shodown 3 are not all made equal -- each character has a different deflect animation, which results in each character gaining a different number of advantage frames upon successfully deflecting an attack.
| Character | Deflect advantage |
|---|---|
| Haohmaru | +23 |
| Nakoruru | +29 |
| Rimururu | +32 |
| Hanzo | +22 |
| Galford | +22 |
| Kyoshiro | +25 |
| Ukyo | +30 |
| Genjuro | +25 |
| Basara | +25 |
| Shizumaru | +20 |
| Gaira | +30 |
| Amakusa | +26 |
| Zankuro | +19 |
On top of this, characters also have a unique "deflect disadvantage modifier" that further determines their stun time after having an attack deflected. For most characters, this modifier is ±0, meaning that there is no change to deflect advantage.
However, Genjuro, Basara, Zankuro and Kyoshiro all have non-zero deflect disadvantage modifiers.
| Character | Deflect disadvantage modifier |
|---|---|
| Genjuro | +8 |
| Basara | +8 |
| Zankuro | -1 |
| Kyoshiro | -8 |
This means that Genjuro and Basara are in deflect stun for 8 frames longer than everyone else, while Zankuro is in deflect stun for 1 frame less than everyone else, and Kyoshiro is in deflect stun for 8 frames less than everyone else.
Example 1: Haohmaru deflects an attack from Nakoruru. Haohmaru's deflect advantage is +23, and Nakoruru has a deflect disadvantage modifier of ±0. Therefore, Nakoruru suffers from 23f of deflect stun.
Example 2: Zankuro deflects an attack from Kyoshiro. Zankuro's deflect advantage is +19, and Kyoshiro has a deflect disadvantage modifier of -8. Therefore, Kyoshiro suffers from 11f of deflect stun.
Example 3: Rimururu deflects an attack from Genjuro. Rimururu's deflect advantage is +32, and Genjuro has a deflect disadvantage modifier of +8. Therefore, Genjuro suffers from 40f of deflect stun.
For further details on deflect, please refer to the Esoterics page.

