User:Fluury
How 2 Make Good Wiki Images 4 Lumina/UNI
This is my workflow for making images for the wikis of the games. No guarantee that this is the most efficient way of doing this; It's just how I do it.
The Basics
- Get a copy of Hanteichan (There are like 300 branches of this software, I use the one from this Google Drive by Fluid)
- Decompile the game (For UNI2, you can also just download the files directly from here, thanks Wishy!) (Process depends on the game, reference the FPAN Modding Wiki for further guidance)
- Open Hantei, File > Load HA6
- Navigate to the decompiled game folder and load the .ha6 file of the character you want to make images for. The .ha6 in question is typically within a folder called "chr0XX", with the XX being some number. If an order isn't known you might have to try different numbers until you find the character you want.
- File > Load CG, File > Load Parts, File > Load palette. Each of these are within the same folder you got the .ha6 from, and there is only one to choose from, so just load the 1 option you have for each of these.
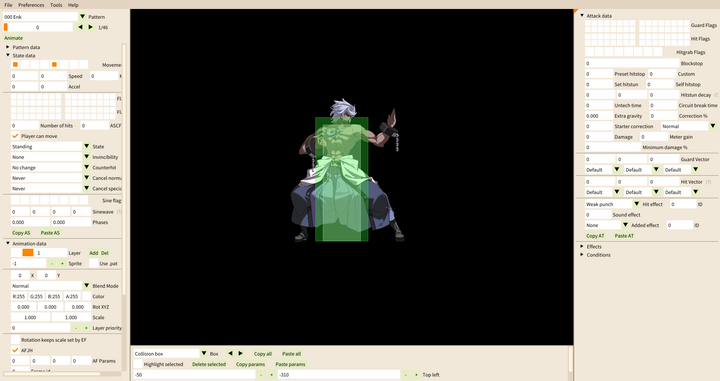
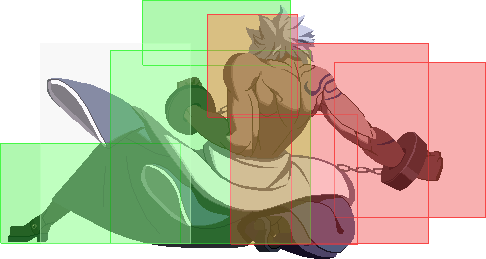
- If you did everything correctly, the character of your choice should now stand before you in fully colored glory:
- Navigate to the move you want to make images for. This can be done via the dropdown in the top-left or with the arrow keys (Down/Up)
- Navigate to the frame you want to display. You can do so with the arrow keys (Left/right), or with the image display top left.
- Hit (L) to turn off the grid. This only has to be done once per session.
- Hit (H) to turn off the hitboxes for now.
Making an Image Without Hitboxes
You will quickly notice that the moves do not have the FX over them which are typically displayed when performing the moves in-game. These are typically drawn disjointed from the base-sprite using specific blendmodes in-game to achieve, for example, a glowing effect. To display the move with its FX, we will have to manually find the FX and overlay it over the base sprite.
If you do not care about the FX and just want to quickly get something on, you can skip the following section and just hit [P] to export the image, then crop it and call it a day.
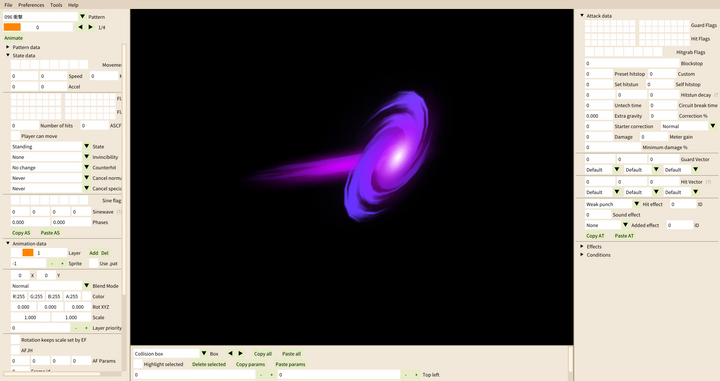
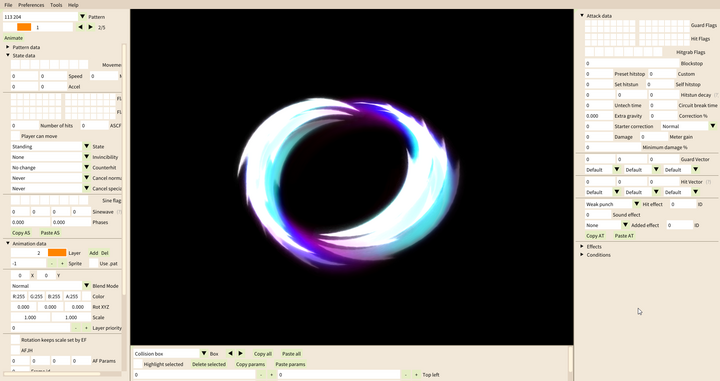
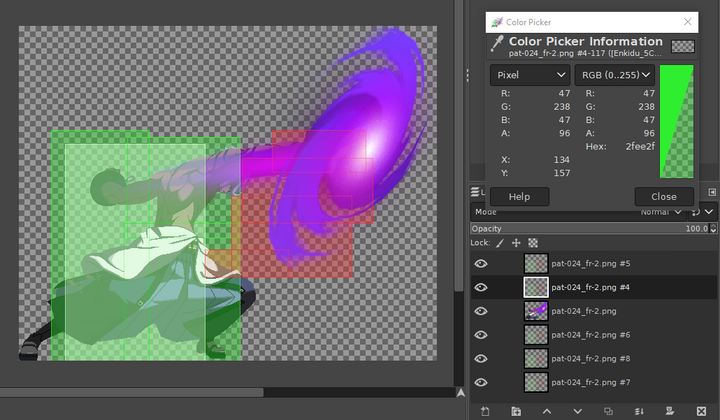
- Find the FX corresponding to the move you want to make images for and select the appropriate frame. It should look something like this:
- Sometimes, the FX can be within the same file/pattern as the base sprite. In that case, the FX can be found on a separate layer. Isolate it by setting the scale of the base sprite to 0.
- If there are no FX to be found, you did not load the Parts file. Load it under File > Load Parts.
- If the FX is to be found, but it is not colored, you did not load the Palette file. Load it under File > Load Palette.
There are now 2 ways you can go about doing this, each with different levels of control over how the end result will look, especially when combining it with drawing the Hitboxes later. Which one the correct one is depends on how much effort you are willing to invest/the FX in question.
Overlaying the FX within Hanteichan
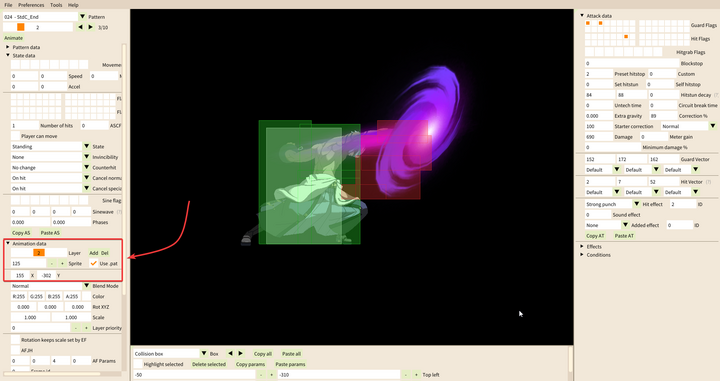
- Under Animation Data, note the sprite ID of the FX.
- Navigate back to the Move you want to make images for, and once again under Anim. Data, select Layer 2. Enter the Sprite ID of the FX. Check Use .pat.
- Reposition the FX using the X/Y variables so it looks like how it does in-game. Cross-reference with a screenshot of the move performed in-game is recommended.
- This will display the FX over the base sprite with full-opacity, which may or may not be how it looks like in-game. You decide how accurate you want this to be.
- Hit [P] to export the image.
- Open the Image Editor of your choice, I use GIMP.
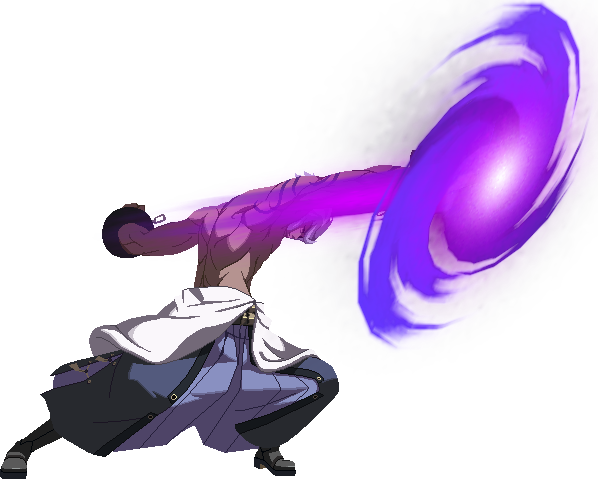
- Image > Crop to Content. Fine-tune the Cropping/Editing to your liking - the Crop may be inaccurate due to the FX having near-invisible pixels colored in. The less dead-space there is the better.
- Export the Image. Congratulations! You made a cool Image.
Getting a clean sample of the FX and overlaying it outside Hanteichan
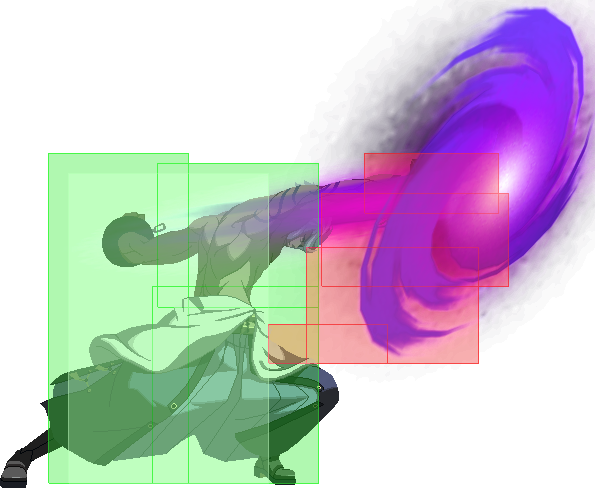
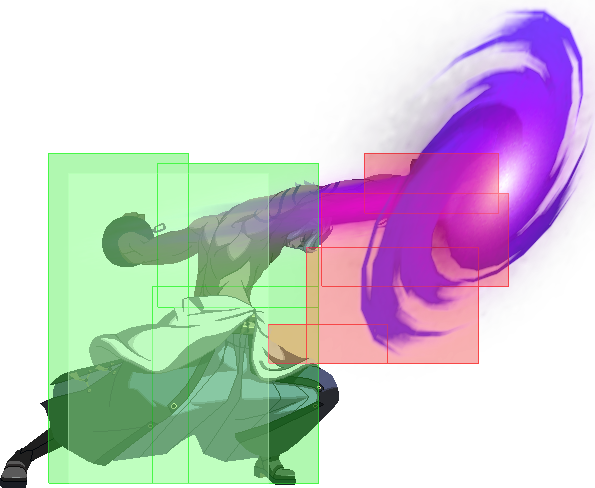
So what is the problem with the "Doing it directly within Hanteichan" method? Depending on the FX, the FX may be exported visually inaccurate to how it is in the game when having it exported via. Hanteichan, despite Hanteichan rendering it properly in the preview. Why it is that way, I don't know. Check out the difference below:
There are other advantages, especially when it comes to making images with Hitboxes, but this definitely takes more effort, so whether or not this is necessary depends on the FX, how it good it looks as is, and how much you give a shit.
- Navigate back to the frame of the move you want to make an image for, Hit [P] to export the image of the character as-is without the FX, then navigate back to the FX within Hantei.
- Set background color to Black (#000000, Can be done via. the Preferences Tab, only needs to be done once, depending on the color of the FX, may need a different BG Color)
- Take a screencap of it (Snipping Tool, ShareX etc.)
- Load it up in the Image Editor of your choice, I'm using GIMP for this.
- Find your Image Editor's respective "Color to Alpha" or equivalent option (In GIMP you can find it under the "Colors" Tab)
- Select Black (#000000) as the Color to replace, apply the change to the image. You now have a nice, clean sample of the FX.
- Export it as a stand-alone for future use.
- Open the image file of the move without the FX.
- Overlay the clean sample of the FX over the base sprite. Position it roughly in the same spot as it would be in-game. Cross-reference with a screenshot of how it looks in-game is recommended.
- Image > Crop to Content. Fine-tune the Cropping/Editing to your liking - the Crop may be inaccurate due to the FX having near-invisible pixels colored in. The less dead-space there is the better.
- Export the Image. Congratulations! You made a cool Image.
Making an Image With Hitboxes
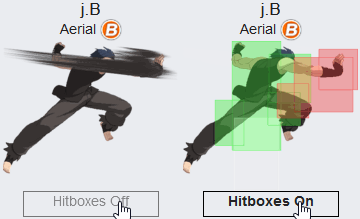
Now that we have our base image, we also need the Hitbox equivalent. You will quickly notice that by default, Hanteichan exports the boxes with an incredibly low opacity if they aren't over the sprite. This makes the boxes fairly hard to read, and is something you should fix before uploading the image to the wiki. We will fix this by simply having 5 individual copies of the Hitbox Image layered over each other, achieving an opacity of roughly 96 out of 255 while still having the base character pop-out nicely.
Depending on our method, this might be easy, annoying, or kinda hard.
- Hit [H] to enable Hitboxes again.
- Navigate to the frame you want to export.
No FX
Similarly to previously, you can just screw the FX and save yourself a lot of time and effort at the cost of a less accurate image. For some characters, this could even be desirable, in case the FX cause the Hitboxes to be hard to read, despite an increase in opacity. In that case, you just need to do the following:
- Hit [P] to export the image with the boxes
- Open it up in your Image Editor of choice. It's time to fix the low-hitbox opacity.
- Simply overlay the image over itself 4 times. The easiest way to do this is to do select the entire image (CTRL+A), copying it (CTRL+C) and then pasting it 4 times (CTRL+V 4 times).
You should now have much, much more readable boxes.
With FX: Within Hanteichan
- If you have done the previous step without the Hitbox images using the 'within Hanteichan' method, the FX should already be overlayed in this frame. If you have not done so, check that section and get the FX overlayed properly.
- Hit [P] to export the image with the boxes and the FX.
- Open it up in your Image Editor of choice.
- Simply overlay the image over itself 4 times. The easiest way to do this is to do select the entire image (CTRL+A), copying it (CTRL+C) and then pasting it 4 times (CTRL+V 4 times).
Depending on the FX... this *might* be fine. But it most likely isn't. This is because the alpha components of the FX are also overlaying, making them stand out and look unnatural compared to the image without the Hitboxes:
We can circumvent this issue by doing the following:
- Navigate Back to the image you exported.
- Under Anim. Data, go to the layer that has the FX you manually placed. Set its scaling to 0, hiding it.
- Export the image with [P] again. You should now have both the move with the hitboxes without the FX, and one with the hitboxes and with the FX.
- In your image editor of choice, do the following: Load up the image with the hitboxes and without the FX and overlay it over itself 3 times.
- Then, import the image with the FX and with the hitboxes, and overlay it over the current image so the boxes/character position lines up. In total, we have overlayed the image 5 times again, creating an appropiate alpha level (96), while keeping the FX only overlayed a single time, avoiding the janky look.
This will, most of the time, look pretty alright.
With FX: Manually using the clean sample
This step will require the clean sample of the FX. If you do not have it, navigate to the appropiate section of the guide on how to get it. We will structure/layer our image like so:
- Base character sprite
- FX
- Hitboxes
How to get the base character sprite you should know by now. Navigate to the frame and smash that [P] without Hitboxes active ([H]) button to get the frame. The clean sample of the FX you should have already. That only leaves getting a clean sample of the Hitboxes. To get one, we need to get rid of the character sprite before exporting the Hitboxes. This can easily be done under Anim Data, selecting the layer the character sprite is on and setting the scale to 0. If we need the sprite again, you can simply set the scaling back.
Export the Hitboxes with [P]. With our 3 ingredients, we can now make the image. Of course, if you have the base image+FX from the previous step without the Hitboxes already, you just need to position the Hitboxes accurately.
- Open your Image Editor of choice
- Import the base character sprite.
- Import the clean sample of the FX - position it in a way that is lines up with how it looks in-game.
- Import the Hitboxes - position them in a way that lines up with how Hanteichan displays them. Be very accurate with this - it's one thing to be sloppy with the FX placement, but you should definitely not upload misaligned Hitboxes to the wiki. An easy way of doing this is exporting the base character + hitboxes sprite, putting it on the layer behind, lining it up with the character sprite that has the FX, and then using that hitbox placement as a reference for the disjointed, sprite-less hitboxes.
- To still have the character pop-out, I recommend 2/3 copies of hitboxes layered over the character, and 2/3 behind. In total, it should still be 5.
Final Touches + Uploading
When cropping this image, its good practice to have it have the same dimensions and size as the image without the Hitboxes, as well as having the character in the exact same position. This way, when users switch between No Hitboxes/Hitboxes, the character will not shift positions, making a cross-reference much more visually pleasing.
Once you've done all of this, export your images. Title them something appropiate like 'GAME_CHARACTER_MOVE' or 'GAME_CHARACTER_MOVE_HITBOX' if it is a Hitbox.
For example, 'MBTL_Kohaku_2A' and 'MBTL_Kohaku_2A_Hitbox'.
Navigate to the [file Page] of Mizuumi. Follow the instructions there to upload your files.
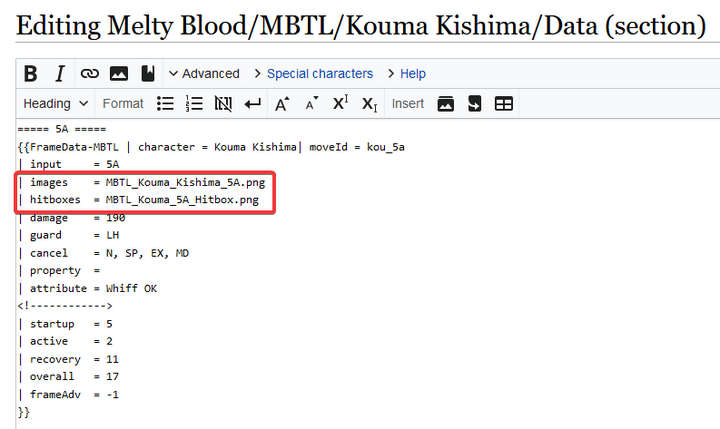
Once you have successfully uploaded them, all that's left is to embed them into the Data sections of the character's pages. Go to the Data page of your character, e.g. here is Enkidu's for example. You can find a link to it on the main overview page of your character. Click [Edit] on the corresponding Data table according to the move you made images for. Within the Template of the Data table, all that's left to do is to add references to the images you have uploaded. Reference them by their file name like so:
And you're done! Preview your change to make sure the file is displayed properly, then save. To make extra sure, navigate back to the main page and scroll down to really make sure it's alright - you might have to clear your Browser cache so the image gets displayed properly.
Congratulations! You added a good looking Preview Image with and without Hitboxes and generations of players to come will surely be thankful for your labor.
- The main page of your character may have hitboxes disabled, causing your newly added files to not show up/for there to not even be a "Show Hitboxes" Button. To add one, you will have to hit [Edit] on the table of the move in the overview page, and fill the entry under "hitboxes" with something like this: 'MoveDataCargoImage|en_5a|1|caption=|hitbox=yes', replacing the 'en_5a' with whatever the data table is called for your character. You can check other, more completed character wikis, as a reference, and if your character already has images but just not hitbox images, it will tell you the name you need to insert in the non-hitbox CargoImage reference.
- For any further questions or help, hop into the Mizuumi Discord and ask the folks there, or don't be shy to step by the MBTL PSA #wiki channel because that one apparently has just become a general wiki channel as well, not just for MBTL, wau
- For more information regarding Hanteichan, checkout the section on it in the very cool FPAN Modding Wiki.

