Big Bang Beat Revolve/Daigo: Difference between revisions
Jump to navigation
Jump to search


(→6B) |
|||
| Line 187: | Line 187: | ||
====== <font style="visibility:hidden" size="0">6B</font> ====== | ====== <font style="visibility:hidden" size="0">6B</font> ====== | ||
{{MoveData | {{MoveData | ||
|image= | |image=BBBR_Daigo_6B.png | ||
|caption= | |caption= | ||
|name=6B | |name=6B | ||
|data= | |data= | ||
{{AttackData-BBBR | {{AttackData-BBBR | ||
|damage= | |damage=400 | ||
|guard= | |guard=Low | ||
|property= | |property= | ||
|startup= | |startup= | ||
|active= | |active= | ||
|recovery= | |recovery= | ||
|advBlock= | |advBlock= | ||
|cancel=N, Sp, Su | |cancel=N, Sp, Su | ||
|description= | |description=A low stomp. This is a pretty decent low and is relatively fast. Definitely something worth using. | ||
}} | }} | ||
}} | }} | ||
Revision as of 11:13, 10 June 2024
 |
Under Construction
|

Introduction
Daigo is an up close brawler with a unique stock mechanic, where some moves give you a stock while others use it. Using this mechanic in a smart way leads to a very strong up close character, that can stick to the opponent like glue.
Daigo is a student at Makoto Academy. He's an acquaintance of Kongomaru Sanzou and his sister, Kongomaru Aya. Daigo also has a crush on Aya, but she does not reciprocate his feelings.
General Strategy
The goal with Daigo is to open up the opponent and end up with more stocks than you started with. Stocks give you access to Daigo's more powerful moves, and allow for much more damage. Stick to that opponent and keep the pressure up with his myriad of plus on block buttons, and try to build enough stocks to end the match.
Normal Moves
Standing Normals
5A
5A  |
|---|
5B
5B  |
|---|
5C
5C  |
|---|
Crouching Normals
2A
2A  |
|---|
2B
2B  |
|---|
2C
2C  |
|---|
Air Normals
jA
jA  |
|---|
jB
jB  |
|---|
jC
jC  |
|---|
Command Normals
6B
6B  |
|---|
Universal Mechanics
5D
B-Dash 5D  |
|---|
Throw
Throw 4/5AB  |
|---|
Big Bang Mode
Big Bang Mode ABC  |
|---|
Special Moves
236X
Napalm 236A/B/C  A/B versions A/B versions  C version C version
|
|---|
214A
Blow 214A  |
|---|
214B
Knuckle 214B  |
|---|
214C
Fang 214C |
|---|
j214X
Shoot j214A/B  |
|---|
623A
Dunk 623A  |
|---|
41236X
Slide 41236A/B/C  |
|---|
B-Power Arts
214D
Wild Fang 214D |
|---|
j214D
Wild Shoot j214D  |
|---|
j214D~22D
Wolf Shoot Chase j214D~22D |
|---|
Big Bang Break
41236ABC
Wolf Fang 41236ABC |
|---|
Combos
Combo Theory
- Combo damage varies from character to character, so all damage numbers come from testing on a full-health Rouga.
Midscreen
- 5B > 5C > 2C xx 214A xx 214B > 5B xx 214A xx dl.214B > 2C > 6A > dl.5C > j.B xx Boost > j.A > j.B xx j.214A (3747)
- A very strong meterless midscreen combo, for all intents and purposes Rouga's BNB. It will always send the opponent to the corner, and give you oki on the knockdown.
- 6B xx j.214A xx Boost > dl.j.B > 214A xx dl.214B > 5B xx 214A xx dl.214B > 2C > 6A > dl.5C > 6A xx *623A (2961)
- Good midscreen confirm off Rouga's overhead.
- 5B > 5C xx 2147D > *5C xx 214B > 2C xx 214A xx 214B > 2C > 6A > dl.5C > 6A xx *623A (5183)
- A very damaging combo midscreen that uses 1 meter. Just solid all around.
Corner
- 6B xx j.214A > 5C xx 214A xx dl.214B > 5B xx 214A xx dl.214B > 2C > 6A > dl.5C > 6A xx dl.623A (3589)
- Meterless corner combo for Rouga. This character has more damage than practically anyone else in the game, and this is a great example.
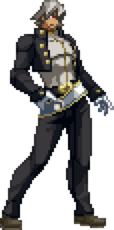
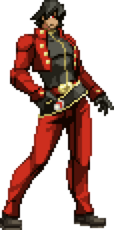
Colors
A Color

B Color

C Color

D Color
