Big Bang Beat Revolve/Daigo: Difference between revisions
Jump to navigation
Jump to search
No edit summary |
|||
| (30 intermediate revisions by 3 users not shown) | |||
| Line 1: | Line 1: | ||
{{WIP}} | {{WIP}} | ||
[[File:BBBR_Daigo_Portrait.png|thumb|right|<center><font size="4"><b>Daigo</b></font><br>'''Estimated Health (After Scaling): 11785'''</center>]] | |||
{{TOClimit|2}} | {{TOClimit|2}} | ||
==Introduction== | |||
'''Daigo''' is an up-close brawler with a unique {{NotationIcon-BBBR|DaigoStock}} '''Dragon Stock''' mechanic, where some moves give Stocks while others consume them. Using this mechanic in a smart way leads to a very strong close-range character, who can stick to the opponent like glue. | |||
===Lore=== | |||
Daigo Hotta is a student at Makoto Academy. He's an acquaintance of Sanzou Kongomaru and his sister, Aya (on whom he has a one-sided crush). | |||
== | ==General Strategy== | ||
Daigo is | The goal with Daigo is to open up the opponent and end up with more Stocks than you started with. Stocks give you access to Daigo's more powerful moves, and allow for much more damage. Stick to that opponent and keep the pressure up with his myriad of plus on block buttons, and try to build enough Stocks to end the match. | ||
==Normal Moves== | |||
===Standing Normals=== | |||
======<font style="visibility:hidden" size="0">5A</font>====== | |||
== Normal Moves == | |||
=== Standing Normals === | |||
====== <font style="visibility:hidden" size="0">5A</font> ====== | |||
{{MoveData | {{MoveData | ||
|image=BBBR_Daigo_5A.png | |image=BBBR_Daigo_5A.png | ||
|caption= | |caption= | ||
|name=5A | |name=5A | ||
|input={{NotationIcon-BBBR|A}} | |||
|data= | |data= | ||
{{AttackData-BBBR | {{AttackData-BBBR | ||
| Line 21: | Line 24: | ||
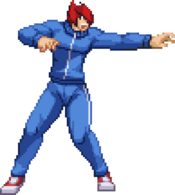
|guard=Mid | |guard=Mid | ||
|property= | |property= | ||
|startup= | |startup=5 | ||
|active= | |active= | ||
|recovery= | |recovery= | ||
|advBlock= | |advBlock=+2 | ||
|cancel=J, N, Sp, Su | |cancel=J, N, Sp, Su | ||
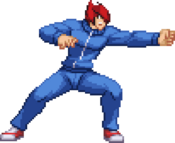
|description=A solid standard jab. It's air unblockable, but | |description=A solid standard jab. It's air-unblockable, but whiffs against crouching opponents, so keep that in mind when using this button. | ||
}} | }} | ||
}} | }} | ||
====== <font style="visibility:hidden" size="0">5B</font> ====== | ======<font style="visibility:hidden" size="0">5B</font>====== | ||
{{MoveData | {{MoveData | ||
|image=BBBR_Daigo_5B.png | |image=BBBR_Daigo_5B.png | ||
|caption= | |caption= | ||
|name=5B | |name=5B | ||
|input={{NotationIcon-BBBR|B}} | |||
|data= | |data= | ||
{{AttackData-BBBR | {{AttackData-BBBR | ||
| Line 40: | Line 44: | ||
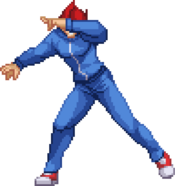
|guard=Mid | |guard=Mid | ||
|property= | |property= | ||
|startup= | |startup=8 | ||
|active= | |active= | ||
|recovery= | |recovery= | ||
|advBlock= | |advBlock=0 | ||
|cancel=J, N, Sp, Su | |cancel=J, N, Sp, Su | ||
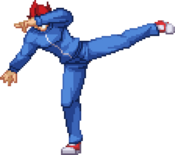
|description=This is also air unblockable, and has | |description=A side kick. This is also air-unblockable, and has great startup as well as good range. It's a pretty good normal for Daigo. | ||
}} | }} | ||
}} | }} | ||
====== <font style="visibility:hidden" size="0">5C</font> ====== | ======<font style="visibility:hidden" size="0">5C</font>====== | ||
{{MoveData | {{MoveData | ||
|image=BBBR_Daigo_5C.png | |image=BBBR_Daigo_5C.png | ||
|caption= | |caption= | ||
|name=5C | |name=5C | ||
|input={{NotationIcon-BBBR|C}} | |||
|data= | |data= | ||
{{AttackData-BBBR | {{AttackData-BBBR | ||
| Line 59: | Line 64: | ||
|guard=Mid | |guard=Mid | ||
|property= | |property= | ||
|startup= | |startup=11 | ||
|active= | |active= | ||
|recovery= | |recovery= | ||
|advBlock= | |advBlock=+1 | ||
|cancel=J, N, Sp, Su | |cancel=J, N, Sp, Su | ||
|description=A strong roundhouse. This is very strong and overall | |description=A strong roundhouse. This is very strong and overall very good normal, especially in combos because of its damage. | ||
}} | }} | ||
}} | }} | ||
=== Crouching Normals === | ===Crouching Normals=== | ||
====== <font style="visibility:hidden" size="0">2A</font> ====== | ======<font style="visibility:hidden" size="0">2A</font>====== | ||
{{MoveData | {{MoveData | ||
|image=BBBR_Daigo_2A.png | |image=BBBR_Daigo_2A.png | ||
|caption= | |caption= | ||
|name=2A | |name=2A | ||
|input={{NotationIcon-BBBR|2}}{{NotationIcon-BBBR|A}} | |||
|data= | |data= | ||
{{AttackData-BBBR | {{AttackData-BBBR | ||
| Line 79: | Line 85: | ||
|guard=Mid | |guard=Mid | ||
|property= | |property= | ||
|startup= | |startup=8 | ||
|active= | |active= | ||
|recovery= | |recovery= | ||
|advBlock= | |advBlock=+2 | ||
|cancel=N, Sp, Su | |cancel=N, Sp, Su | ||
|description=A fast low jab. | |description=A fast low jab. Deals higher damage than 5A, making it a pretty good normal to use as a close-range poke. | ||
}} | }} | ||
}} | }} | ||
====== <font style="visibility:hidden" size="0">2B</font> ====== | ======<font style="visibility:hidden" size="0">2B</font>====== | ||
{{MoveData | {{MoveData | ||
|image=BBBR_Daigo_2B.png | |image=BBBR_Daigo_2B.png | ||
|caption= | |caption= | ||
|name=2B | |name=2B | ||
|input={{NotationIcon-BBBR|2}}{{NotationIcon-BBBR|B}} | |||
|data= | |data= | ||
{{AttackData-BBBR | {{AttackData-BBBR | ||
| Line 98: | Line 105: | ||
|guard=Mid | |guard=Mid | ||
|property= | |property= | ||
|startup= | |startup=11 | ||
|active= | |active= | ||
|recovery= | |recovery= | ||
|advBlock= | |advBlock=-7 | ||
|cancel=J, N, Sp, Su | |cancel=J, N, Sp, Su | ||
|description=A crouching uppercut. | |description=A crouching uppercut. Moves forward and can be a decent anti-air, but overall not a great normal. | ||
}} | }} | ||
}} | }} | ||
====== <font style="visibility:hidden" size="0">2C</font> ====== | ======<font style="visibility:hidden" size="0">2C</font>====== | ||
{{MoveData | {{MoveData | ||
|image=BBBR_Daigo_2C.png | |image=BBBR_Daigo_2C.png | ||
|caption= | |caption= | ||
|name=2C | |name=2C | ||
|input={{NotationIcon-BBBR|2}}{{NotationIcon-BBBR|C}} | |||
|data= | |data= | ||
{{AttackData-BBBR | {{AttackData-BBBR | ||
| Line 117: | Line 125: | ||
|guard=Low | |guard=Low | ||
|property= | |property= | ||
|startup= | |startup=11 | ||
|active= | |active= | ||
|recovery= | |recovery= | ||
|advBlock= | |advBlock=+4 | ||
|cancel=N, Sp, Su | |cancel=N, Sp, Su | ||
|description=A low sweep. This is Daigo's only low | |description=A low sweep. This is Daigo's only crouching normal that hits low, and it's a pretty good sweep with good range (if a bit slow). | ||
}} | }} | ||
}} | }} | ||
=== Air Normals === | ===Air Normals=== | ||
====== <font style="visibility:hidden" size="0">jA</font> ====== | ======<font style="visibility:hidden" size="0">jA</font>====== | ||
{{MoveData | {{MoveData | ||
|image=BBBR_Daigo_jA.png | |image=BBBR_Daigo_jA.png | ||
|caption= | |caption= | ||
|name=jA | |name=jA | ||
|input=jump {{NotationIcon-BBBR|A}} | |||
|data= | |data= | ||
{{AttackData-BBBR | {{AttackData-BBBR | ||
| Line 137: | Line 146: | ||
|guard=High | |guard=High | ||
|property= | |property= | ||
|startup= | |startup=5 | ||
|active= | |active= | ||
|recovery= | |recovery= | ||
|advBlock= | |advBlock= | ||
|cancel=N, Sp, Su | |cancel=N, Sp, Su | ||
|description= A fast air jab. This button is best used as an air-to-air, as it doesn't have much combo potential and is an unreliable jump-in. | |description=A fast air jab. This button is best used as an air-to-air, as it doesn't have much combo potential and is an unreliable jump-in. | ||
}} | }} | ||
}} | }} | ||
====== <font style="visibility:hidden" size="0">jB</font> ====== | ======<font style="visibility:hidden" size="0">jB</font>====== | ||
{{MoveData | {{MoveData | ||
|image=BBBR_Daigo_jB.png | |image=BBBR_Daigo_jB.png | ||
|caption= | |caption= | ||
|name=jB | |name=jB | ||
|input=jump {{NotationIcon-BBBR|B}} | |||
|data= | |data= | ||
{{AttackData-BBBR | {{AttackData-BBBR | ||
| Line 156: | Line 166: | ||
|guard=High | |guard=High | ||
|property= | |property= | ||
|startup= | |startup=8 | ||
|active= | |active= | ||
|recovery= | |recovery= | ||
|advBlock= | |advBlock= | ||
|cancel=N, Sp, Su | |cancel=N, Sp, Su | ||
|description= A long reaching air kick. Another good air-to-air since it goes completely horizontal, and does decent damage. | |description=A long reaching air kick. Another good air-to-air since it goes completely horizontal, and does decent damage. | ||
}} | }} | ||
}} | }} | ||
====== <font style="visibility:hidden" size="0">jC</font> ====== | ======<font style="visibility:hidden" size="0">jC</font>====== | ||
{{MoveData | {{MoveData | ||
|image=BBBR_Daigo_jC.png | |image=BBBR_Daigo_jC.png | ||
|name=jC | |name=jC | ||
|input=jump {{NotationIcon-BBBR|C}} | |||
|data= | |data= | ||
{{AttackData-BBBR | {{AttackData-BBBR | ||
| Line 174: | Line 185: | ||
|guard=High | |guard=High | ||
|property= | |property= | ||
|startup= | |startup=10 | ||
|active= | |active= | ||
|recovery= | |recovery= | ||
|advBlock= | |advBlock= | ||
|cancel=N, Sp, Su | |cancel=N, Sp, Su | ||
|description= A kick up from the air. This is Daigo's best jump normal, and launches the opponent on hit for a full combo. | |description=A kick up from the air. This is Daigo's best jump normal, and launches the opponent on hit for a full combo. | ||
}} | }} | ||
}} | }} | ||
== Command Normals == | ==Command Normals== | ||
======<font style="visibility:hidden" size="0">6B</font>====== | |||
====== <font style="visibility:hidden" size="0">6B</font> ====== | |||
{{MoveData | {{MoveData | ||
|image= | |image=BBBR_Daigo_6B.png | ||
|caption= | |caption= | ||
|name=6B | |name=6B | ||
|subtitle=Foot Step | |||
|input={{NotationIcon-BBBR|6}}{{NotationIcon-BBBR|B}} | |||
|data= | |data= | ||
{{AttackData-BBBR | {{AttackData-BBBR | ||
|damage= | |damage=400 | ||
|guard= | |guard=Low | ||
|property= | |property= | ||
|startup= | |startup=14 | ||
|active= | |active= | ||
|recovery= | |recovery= | ||
|advBlock= | |advBlock=+1 | ||
|cancel=N, Sp, Su | |cancel=N, Sp, Su | ||
|description= | |description=A low stomp. This is a pretty decent low and is relatively fast. Definitely something worth using. | ||
}} | }} | ||
}} | }} | ||
====== <font style="visibility:hidden" size="0">Throw</font> ====== | ==Universal Mechanics== | ||
======<font style="visibility:hidden" size="0">Throw</font>====== | |||
{{MoveData | {{MoveData | ||
|image= | |image=BBBR_Daigo_ThrowWhiff.png | ||
|caption= | |caption= | ||
|name=Throw | |name=Throw | ||
|input=4 | |input={{NotationIcon-BBBR|5}}/{{NotationIcon-BBBR|4}}{{NotationIcon-BBBR|A}}{{NotationIcon-BBBR|B}} | ||
|data= | |data= | ||
{{AttackData-BBBR | {{AttackData-BBBR | ||
| Line 241: | Line 233: | ||
|advBlock= | |advBlock= | ||
|cancel=NC | |cancel=NC | ||
|description= | |description=Daigo grabs the opponent and hits them, causing a knockdown. Always a good option to trip up blocking opponents. | ||
}} | }} | ||
}} | }} | ||
====== <font style="visibility:hidden" size="0">Big Bang Mode</font> ====== | ======<font style="visibility:hidden" size="0">Big Bang Mode</font>====== | ||
{{MoveData | {{MoveData | ||
|image= | |image=BBBR_Daigo_BBM.png | ||
|caption= | |caption= | ||
|name=Big Bang Mode | |name=Big Bang Mode | ||
|input= | |input={{NotationIcon-BBBR|BBM}} | ||
|data= | |data= | ||
{{AttackData-BBBR | {{AttackData-BBBR | ||
| Line 261: | Line 253: | ||
|advBlock= | |advBlock= | ||
|cancel= | |cancel= | ||
|description=Universal Big Bang Mode activation. Requires 3 bars and can be done anytime you have control on the ground. Lasts for about 7 seconds. During Big Bang Mode, | |description=Universal Big Bang Mode activation. Requires 3 bars and can be done anytime you have control on the ground. Lasts for about 7 seconds. During Big Bang Mode, Daigo gains {{NotationIcon-BBBR|DaigoStock}} '''infinite Stocks''', allowing him to use his stronger moves a lot more. | ||
}} | }} | ||
}} | }} | ||
== Special Moves == | ==Special Moves== | ||
====== <font style="visibility:hidden" size="0"> | ======<font style="visibility:hidden" size="0">22A</font>====== | ||
{{MoveData | {{MoveData | ||
|image= | |image=BBBR_Daigo_22A.png | ||
| | |name=Fire Hurricane! | ||
| | |input={{NotationIcon-BBBR|22}}{{NotationIcon-BBBR|A}} | ||
| | |||
| | |||
|data= | |data= | ||
{{AttackData-BBBR | {{AttackData-BBBR | ||
|damage=600 | |||
|damage= | |guard=All | ||
|guard= | |||
|property= | |property= | ||
|startup= | |startup=24 | ||
|active= | |active= | ||
|recovery= | |recovery= | ||
|advBlock=- | |advBlock=-1 | ||
|cancel=J, Su | |cancel=J, Su | ||
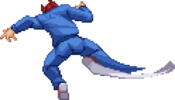
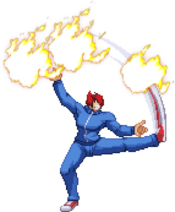
|description= | |description='''Gives {{NotationIcon-BBBR|DaigoStock}} 1 Stock on hit'''. A swinging kick. This will groundbounce an aerial opponent, making it a good combo tool. | ||
| | |||
}} | }} | ||
}} | }} | ||
====== <font style="visibility:hidden" size="0">214A</font> ====== | ======<font style="visibility:hidden" size="0">214A</font>====== | ||
{{MoveData | {{MoveData | ||
|image= | |image=BBBR_Daigo_214A.png | ||
|caption= | |caption= | ||
|name= | |name=Fire Savate! | ||
|input= | |input={{NotationIcon-BBBR|214}}{{NotationIcon-BBBR|A}} | ||
|data= | |data= | ||
{{AttackData-BBBR | {{AttackData-BBBR | ||
|damage=800 | |||
|damage= | |||
|guard=Mid | |guard=Mid | ||
|property= | |property= | ||
|startup= | |startup=18 | ||
|active= | |active= | ||
|recovery= | |recovery= | ||
|advBlock= | |advBlock=+1 | ||
|cancel= | |cancel= | ||
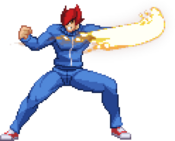
|description= | |description='''Gives {{NotationIcon-BBBR|DaigoStock}} 1 Stock on hit'''. A fiery roundhouse kick. It's not great but it can build Stocks in a pinch. | ||
}} | }} | ||
}} | }} | ||
====== <font style="visibility:hidden" size="0"> | ======<font style="visibility:hidden" size="0">623B</font>====== | ||
{{MoveData | {{MoveData | ||
|image= | |image=BBBR_Daigo_623A.png | ||
|caption= | |caption= | ||
|name= | |name=Fire Summer! | ||
|input= | |input={{NotationIcon-BBBR|623}}{{NotationIcon-BBBR|A}} (Air OK) | ||
|data= | |data= | ||
{{AttackData-BBBR | {{AttackData-BBBR | ||
|damage=1000 | |||
|damage= | |||
|guard=Mid | |guard=Mid | ||
|property= | |property= | ||
|startup= | |startup=11 | ||
|active= | |active= | ||
|recovery= | |recovery= | ||
|advBlock= | |advBlock=-11 | ||
|cancel= | |cancel= | ||
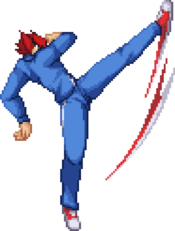
|description= | |description='''Gives {{NotationIcon-BBBR|DaigoStock}} 1 Stock on hit'''. A standard DP. This is a good reward for properly anti-airing, as you'll gain a Stock every time. | ||
}} | }} | ||
}} | }} | ||
====== <font style="visibility:hidden" size="0"> | ======<font style="visibility:hidden" size="0">236A</font>====== | ||
{{MoveData | {{MoveData | ||
|image= | |image=BBBR_Daigo_236A.png | ||
|caption= | |caption= | ||
|name= | |name=Fire Fist! | ||
|input= | |input={{NotationIcon-BBBR|236}}{{NotationIcon-BBBR|A}} | ||
|data= | |data= | ||
{{AttackData-BBBR | {{AttackData-BBBR | ||
|damage=900 | |||
|damage= | |||
|guard=Mid | |guard=Mid | ||
|property= | |property= | ||
|startup= | |startup=15 | ||
|active= | |active= | ||
|recovery= | |recovery= | ||
|advBlock=- | |advBlock=-19 | ||
|cancel=Su | |cancel=Su | ||
|description= | |description='''Gives {{NotationIcon-BBBR|DaigoStock}} 1 Stock on hit'''. Daigo steps forward and hits the opponent. Can be charged to delay the move and catch an opponent off-guard. It's decent, but nothing all that special. | ||
}} | }} | ||
}} | }} | ||
====== <font style="visibility:hidden" size="0"> | ======<font style="visibility:hidden" size="0">22C</font>====== | ||
{{MoveData | {{MoveData | ||
|image= | |image=BBBR_Daigo_22C.png | ||
|caption= | |caption= | ||
|name= | |name=Dragon Impact! | ||
|input= | |input={{NotationIcon-BBBR|22}}{{NotationIcon-BBBR|C}} | ||
|data= | |data= | ||
{{AttackData-BBBR | {{AttackData-BBBR | ||
|damage=1000 | |||
|damage= | |||
|guard=High | |guard=High | ||
|property= | |property= | ||
|startup= | |startup=22 | ||
|active= | |active= | ||
|recovery= | |recovery= | ||
|advBlock=0 | |advBlock=0 | ||
|cancel=Sp, Su | |cancel=Sp, Su | ||
|description=This | |description='''Costs {{NotationIcon-BBBR|DaigoStock}} 3 Stocks'''. A strong overhead kick. This will groundbounce the opponent on hit, allowing for combos. Doubles as a decent overhead, although it does cost a few Stocks. | ||
}} | }} | ||
}} | }} | ||
====== <font style="visibility:hidden" size="0"> | ======<font style="visibility:hidden" size="0">214C</font>====== | ||
{{MoveData | {{MoveData | ||
|image= | |image=BBBR_Daigo_214A.png | ||
|caption= | |caption= | ||
|name= | |name=Dragon Savate! | ||
|input= | |input={{NotationIcon-BBBR|214}}{{NotationIcon-BBBR|C}} | ||
|data= | |data= | ||
{{AttackData-BBBR | {{AttackData-BBBR | ||
|damage= | |damage=1500 | ||
|guard= | |guard=Mid | ||
|property= | |property= | ||
|startup= | |startup=13 | ||
|active= | |active= | ||
|recovery= | |recovery= | ||
|advBlock= | |advBlock=+6 | ||
|cancel= | |cancel= | ||
|description= | |description='''Costs {{NotationIcon-BBBR|DaigoStock}} 3 Stocks'''. Daigo does a powered up Savate. This is strong, and wallbounces on hit too, allowing for some very strong combos. | ||
}} | }} | ||
}} | }} | ||
====== <font style="visibility:hidden" size="0"> | ======<font style="visibility:hidden" size="0">623C</font>====== | ||
{{MoveData | {{MoveData | ||
|image= | |image=BBBR_Daigo_623A.png | ||
|name= | |name=Dragon Summer! | ||
|input= | |input={{NotationIcon-BBBR|623}}{{NotationIcon-BBBR|C}} (Air OK) | ||
|data= | |data= | ||
{{AttackData-BBBR | {{AttackData-BBBR | ||
|damage=1600 | |||
|damage= | |||
|guard=Mid | |guard=Mid | ||
|property= | |property= | ||
|startup= | |startup=6 | ||
|active= | |active= | ||
|recovery= | |recovery= | ||
|advBlock= | |advBlock=-6 | ||
|cancel= | |cancel=U | ||
|description= | |description='''Costs {{NotationIcon-BBBR|DaigoStock}} 3 Stocks'''. A powered up DP. This is a very strong option when you have the Stocks for it, and can even allow for combos afterwards. | ||
}} | }} | ||
}} | |||
======<font style="visibility:hidden" size="0">236C</font>====== | |||
{{MoveData | |||
|image=BBBR_Daigo_236A.png | |||
|name=Dragon Fist! | |||
|input={{NotationIcon-BBBR|236}}{{NotationIcon-BBBR|C}} | |||
|data= | |||
{{AttackData-BBBR | {{AttackData-BBBR | ||
|damage=1200 | |||
|damage= | |||
|guard=Mid | |guard=Mid | ||
|property= | |property= | ||
|startup= | |startup=14 | ||
|active= | |active= | ||
|recovery= | |recovery= | ||
|advBlock=- | |advBlock=-5 | ||
|cancel= | |cancel= | ||
|description= | |description='''Costs {{NotationIcon-BBBR|DaigoStock}} 3 Stocks'''. A powered up Fire Fist. A lot faster and stronger, and bounces for a combo, making it strong but pricey Stock-wise. | ||
}} | }} | ||
}} | }} | ||
======<font style="visibility:hidden" size="0">41236C</font>====== | |||
====== <font style="visibility:hidden" size="0"> | |||
{{MoveData | {{MoveData | ||
|image= | |image=BBBR_Daigo_41236C.png | ||
|name=Dragon Fire! | |||
|name= | |input={{NotationIcon-BBBR|41236}}{{NotationIcon-BBBR|C}}<br>(Air OK) | ||
|input= | |||
|data= | |data= | ||
{{AttackData-BBBR | {{AttackData-BBBR | ||
|damage= | |damage=1100 | ||
|guard= | |guard=Mid | ||
|property= | |property= | ||
|startup= | |startup=8 | ||
|active= | |active= | ||
|recovery= | |recovery= | ||
|advBlock= | |advBlock= | ||
|cancel= | |cancel= | ||
|description= | |description='''Costs {{NotationIcon-BBBR|DaigoStock}} 3 Stocks'''. A flying kick. This is a pretty strong move, like most that use Stocks. Wallbounces and can be cancelled in the air into a lot. | ||
}} | }} | ||
}} | }} | ||
====== <font style="visibility:hidden" size="0"> | ==B-Power Arts== | ||
======<font style="visibility:hidden" size="0">623D</font>====== | |||
{{MoveData | {{MoveData | ||
|image= | |image=BBBR_Daigo_623A.png | ||
|caption= | |caption= | ||
|name= | |name=Final Dragon Summer! | ||
|input= | |input={{NotationIcon-BBBR|623}}{{NotationIcon-BBBR|D}} (Air OK) | ||
|data= | |data= | ||
{{AttackData-BBBR | {{AttackData-BBBR | ||
|damage= | |damage=600+500+1000 | ||
|guard=Mid | |guard=Mid | ||
|property= | |property= | ||
|startup= | |startup=1+9 | ||
|active= | |active= | ||
|recovery= | |recovery= | ||
|advBlock= | |advBlock=-51 | ||
|cancel= | |cancel= | ||
|description= | |description='''Give {{NotationIcon-BBBR|DaigoStock}} 3 Stocks on hit'''. Daigo performs his DP thrice in a row. This is your best metered combo ender by far due to its Stock refund. Use this whenever you get the chance. | ||
}} | }} | ||
}} | }} | ||
====== <font style="visibility:hidden" size="0"> | ======<font style="visibility:hidden" size="0">41236D</font>====== | ||
{{MoveData | {{MoveData | ||
|image= | |image=BBBR_Daigo_41236C.png | ||
|caption= | |caption=Yes you read that damage right. | ||
|name= | |name=Final Dragon Fire! | ||
|input= | |input={{NotationIcon-BBBR|41236}}{{NotationIcon-BBBR|D}}<br>(Air OK) | ||
|data= | |data= | ||
{{AttackData-BBBR | {{AttackData-BBBR | ||
|damage= | |damage=3600 | ||
|guard= | |guard=Mid | ||
|property= | |property= | ||
|startup= | |startup=1+7 | ||
|active= | |active= | ||
|recovery= | |recovery= | ||
|advBlock= | |advBlock=-25 | ||
|cancel= | |cancel= | ||
|description= | |description='''Costs {{NotationIcon-BBBR|DaigoStock}} 9 Stocks'''. If you somehow have enough Stocks for this super, it's worth using, since it does the same damage as some Big Bang Breaks in the game. It will cost all your Stocks though, so it's best used as a round closer. | ||
}} | }} | ||
}} | }} | ||
== Big Bang Break == | ==Big Bang Break== | ||
====== <font style="visibility:hidden" size="0">41236ABC</font> ====== | ======<font style="visibility:hidden" size="0">41236ABC</font>====== | ||
{{MoveData | {{MoveData | ||
|image= | |image=BBBR_Daigo_236A.png | ||
|name= | |name=The Last Dragon | ||
|input= | |input={{NotationIcon-BBBR|BBB}} | ||
|data= | |data= | ||
{{AttackData-BBBR | {{AttackData-BBBR | ||
|damage= | |damage=3419 | ||
|guard=All | |guard=All | ||
|property= | |property= | ||
| Line 588: | Line 491: | ||
|advBlock= | |advBlock= | ||
|cancel= | |cancel= | ||
|description= | |description=Daigo does his Fire Fist across the stage, DPs, then launches into the air with an energy dragon. It scales hard for Daigo but is still a decent combo ender. Ends Big Bang Mode instantly. | ||
}} | }} | ||
}} | }} | ||
== Combos == | ==Combos== | ||
{| class="mw-collapsible mw-collapsed" width="100%" | |||
|+ style="white-space:nowrap; border:1px solid; padding:3px;" |'''Combo Legend''' | |||
|- | |||
|{{ComboLegend-BBBR}} | |||
|} | |||
===<u>Combo Theory</u>=== | ===<u>Combo Theory</u>=== | ||
:*Combo damage varies from character to character, so all damage numbers come from testing on a full-health Rouga. | :*Combo damage varies from character to character, so all damage numbers come from testing on a full-health Rouga. | ||
===<u>Midscreen</u>=== | ===<u>Midscreen</u>=== | ||
===<u>Corner</u>=== | ===<u>Corner</u>=== | ||
==Colors== | ==Colors== | ||
{{ColorGallery | filePrefix= | {{ColorGallery | filePrefix=BBBR_Daigo_Color_ | colors= | ||
{{ColorGallery/Color|1| text= A Color}} | {{ColorGallery/Color|1| text=A Color}} | ||
{{ColorGallery/Color|2| text= B Color}} | {{ColorGallery/Color|2| text=B Color}} | ||
{{ColorGallery/Color|3| text= C Color}} | {{ColorGallery/Color|3| text=C Color}} | ||
{{ColorGallery/Color|4| text= D Color}} | {{ColorGallery/Color|4| text=D Color}} | ||
}} | }} | ||
== BBBR Navigation == | ==BBBR Navigation== | ||
{{Navbox-BBBR}} | {{Navbox-BBBR}} | ||
[[Category:Daigo]] | |||
[[Category:Big Bang Beat Revolve]] | [[Category:Big Bang Beat Revolve]] | ||
Latest revision as of 09:49, 27 June 2024
Under Construction
|
Introduction
Daigo is an up-close brawler with a unique ![]() Dragon Stock mechanic, where some moves give Stocks while others consume them. Using this mechanic in a smart way leads to a very strong close-range character, who can stick to the opponent like glue.
Dragon Stock mechanic, where some moves give Stocks while others consume them. Using this mechanic in a smart way leads to a very strong close-range character, who can stick to the opponent like glue.
Lore
Daigo Hotta is a student at Makoto Academy. He's an acquaintance of Sanzou Kongomaru and his sister, Aya (on whom he has a one-sided crush).
General Strategy
The goal with Daigo is to open up the opponent and end up with more Stocks than you started with. Stocks give you access to Daigo's more powerful moves, and allow for much more damage. Stick to that opponent and keep the pressure up with his myriad of plus on block buttons, and try to build enough Stocks to end the match.
Normal Moves
Standing Normals
5A
5A
|
|---|
5B
5B
|
|---|
5C
5C
|
|---|
Crouching Normals
2A
2A
|
|---|
2B
2B
|
|---|
2C
2C
|
|---|
Air Normals
jA
jA
jump |
|---|
jB
jB
jump |
|---|
jC
jC
jump |
|---|
Command Normals
6B
6B
Foot Step |
|---|
Universal Mechanics
Throw
Throw
|
|---|
Big Bang Mode
Big Bang Mode
|
|---|
Special Moves
22A
Fire Hurricane!
|
|---|
214A
Fire Savate!
|
|---|
623B
Fire Summer!
|
|---|
236A
Fire Fist!
|
|---|
22C
Dragon Impact!
|
|---|
214C
Dragon Savate!
|
|---|
623C
Dragon Summer!
|
|---|
236C
Dragon Fist!
|
|---|
41236C
Dragon Fire!
(Air OK) |
|---|
B-Power Arts
623D
Final Dragon Summer!
|
|---|
41236D
Final Dragon Fire! (Air OK) Yes you read that damage right. Yes you read that damage right.
|
|---|
Big Bang Break
41236ABC
The Last Dragon
|
|---|
Combos
| |||||||||||||||||||||||||||||||||||||||||||||
Combo Theory
- Combo damage varies from character to character, so all damage numbers come from testing on a full-health Rouga.


