Help:Upload Wizard: Difference between revisions
Jump to navigation
Jump to search
(Cleared up wording on categorization) |
(Being more specific on step 6.) |
||
| (8 intermediate revisions by 3 users not shown) | |||
| Line 1: | Line 1: | ||
''Credits to Chao | ''Credits to Chao for allowing us to base this guide on the one they use at the [https://blazblue.wiki/wiki/Help:Upload_Wizard BlazBlue Wiki].'' | ||
<span style="color:red">{{big|Click [[Special:UploadWizard|here]] to access the Upload Wizard.}}</span> | <span style="color:red">{{big|Click [[Special:UploadWizard|here]] to access the Upload Wizard.}}</span> | ||
==What is the Upload Wizard?== | ==What is the Upload Wizard?== | ||
The Upload Wizard is a MediaWiki extension that allows you to upload multiple files simultaneously (current limit seems to be 50 images). It is primarily used for Wikimedia Commons, the media library associated with Wikipedia. Therefore, its only downside is that the extension is very picky on having the user provide a copyright source to their files. To aid users with the legalese, we'll provide a step by step guide on how to use the extension. | The Upload Wizard is a MediaWiki extension that allows you to upload multiple files simultaneously (current limit seems to be 50 images). It is primarily used for Wikimedia Commons, the media library associated with Wikipedia. Therefore, its only downside is that the extension is very picky on having the user provide a copyright source to their files. To aid users with the legalese, we'll provide a step by step guide on how to use the extension. For single files, the [[Special:Upload|regular MediaWiki upload tool]] is recommended. | ||
==Using the Upload Wizard== | ==Using the Upload Wizard== | ||
# Click next, you may also select to skip the first step in the future by checking the box. [[File:UWStep1.png| | # Click next, you may also select to skip the first step in the future by checking the box. | ||
# Select the files you want to upload [[File:UWStep2.png| | #: [[File:UWStep1.png|500px]] | ||
# | # Select the files you want to upload | ||
#: [[File:UWStep2.png|500px]] | |||
#* <span style="color:red">Important: make sure your filenames match the destination filenames on the wiki!</span> For most new wiki pages, filenames go: | |||
#: <pre>[Game abbreviation]_[Character Name]_[Normal/Special Move in Numpad].png</pre> | #: <pre>[Game abbreviation]_[Character Name]_[Normal/Special Move in Numpad].png</pre> | ||
# | #* e.g.: Normals/Specials: [[:File:Koihime Kanu 5A.png]], [[:File:MAAB Koume 236B.png]], [[:File:SS Darli 66D.png]] | ||
# | #* e.g.: Character Colors (usually have numerals at the end): [[:File:Wagner-9.png]], [[:File:DFCIMiyuki-1.png]] | ||
# | #* e.g.: Profile Images: [[:File:SS Kazuki Profile.png]] | ||
# Once you have selected the files, the extension will begin uploading them automatically. You must have JavaScript enabled for it to work properly. [[File:UWStep3.png| | # Once you have selected the files, the extension will begin uploading them automatically. You must have JavaScript enabled for it to work properly. | ||
#: [[File:UWStep3.png|500px]] | |||
# On the Release rights section, click on "These files are not my own work." | # On the Release rights section, click on "These files are not my own work." | ||
# Fill in the Source and Author fields. They correspond to the game and [[:Category:Developers|developer]] respectively. [[File:UWStep4.png| | # Fill in the Source and Author fields. They correspond to the game and [[:Category:Developers|developer]] respectively. | ||
# | #: [[File:UWStep4.png|500px]] | ||
# Type in <code><nowiki>{{Fair Use}}</nowiki></code> into the text box that appears. [[File:UWStep5.png| | # On the rights section, scroll down and click on the "Another reason not mentioned above" option | ||
# Type in <code><nowiki>{{Fair Use}}</nowiki></code> into the text box that appears. | |||
#: [[File:UWStep5.png|500px]] | |||
# The "Describe" section will prompt you for a Summary and a Date. These fields are mandatory. Just copying the filename title for the summary should suffice and the date can be simply the date of the upload. | # The "Describe" section will prompt you for a Summary and a Date. These fields are mandatory. Just copying the filename title for the summary should suffice and the date can be simply the date of the upload. | ||
#: Unfortunately, categorizing images using the "Categories" field doesn't work. The only workaround to add a category | #: Unfortunately, categorizing images using the "Categories" field doesn't work. The only workaround to add a category is to expand the dropdown menu at the bottom and manually enter <code><nowiki>[[Category:Game Name]]</nowiki></code> or <code><nowiki>[[Category:Character Name]]</nowiki></code> (when applicable) in the "Other information" box. | ||
# Once the mandatory fields have been populated, you may publish the images. | # If you are entering the same value for a field in all of your uploads, there is a very useful dropdown under the first upload ("Copy information to all uploads following") that will let you duplicate values used in the first upload for the rest of the uploads. | ||
# Once the mandatory fields have been populated, you may publish the images. The wizard will give a warning about not filling out the categories, but you can ignore that due to the Categories Field bug. | |||
[[Category:Help]] | |||
Latest revision as of 18:50, 1 June 2020
Credits to Chao for allowing us to base this guide on the one they use at the BlazBlue Wiki.
Click here to access the Upload Wizard.
What is the Upload Wizard?
The Upload Wizard is a MediaWiki extension that allows you to upload multiple files simultaneously (current limit seems to be 50 images). It is primarily used for Wikimedia Commons, the media library associated with Wikipedia. Therefore, its only downside is that the extension is very picky on having the user provide a copyright source to their files. To aid users with the legalese, we'll provide a step by step guide on how to use the extension. For single files, the regular MediaWiki upload tool is recommended.
Using the Upload Wizard
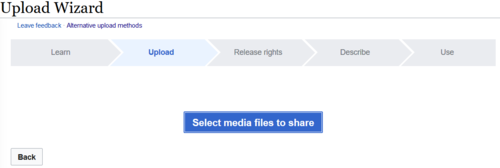
- Click next, you may also select to skip the first step in the future by checking the box.
- Select the files you want to upload
- Important: make sure your filenames match the destination filenames on the wiki! For most new wiki pages, filenames go:
[Game abbreviation]_[Character Name]_[Normal/Special Move in Numpad].png
- e.g.: Normals/Specials: File:Koihime Kanu 5A.png, File:MAAB Koume 236B.png, File:SS Darli 66D.png
- e.g.: Character Colors (usually have numerals at the end): File:Wagner-9.png, File:DFCIMiyuki-1.png
- e.g.: Profile Images: File:SS Kazuki Profile.png
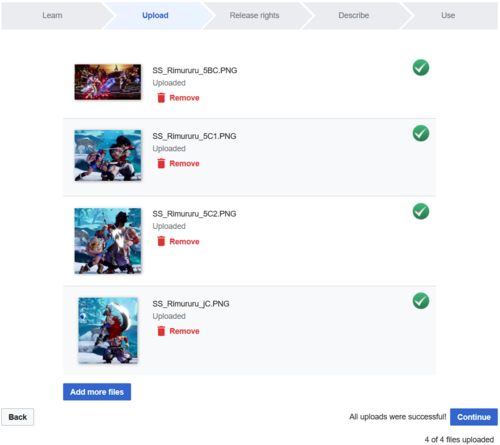
- Once you have selected the files, the extension will begin uploading them automatically. You must have JavaScript enabled for it to work properly.
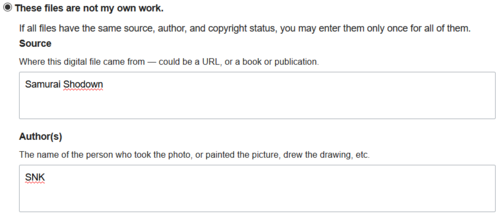
- On the Release rights section, click on "These files are not my own work."
- Fill in the Source and Author fields. They correspond to the game and developer respectively.
- On the rights section, scroll down and click on the "Another reason not mentioned above" option
- Type in
{{Fair Use}}into the text box that appears. - The "Describe" section will prompt you for a Summary and a Date. These fields are mandatory. Just copying the filename title for the summary should suffice and the date can be simply the date of the upload.
- Unfortunately, categorizing images using the "Categories" field doesn't work. The only workaround to add a category is to expand the dropdown menu at the bottom and manually enter
[[Category:Game Name]]or[[Category:Character Name]](when applicable) in the "Other information" box.
- Unfortunately, categorizing images using the "Categories" field doesn't work. The only workaround to add a category is to expand the dropdown menu at the bottom and manually enter
- If you are entering the same value for a field in all of your uploads, there is a very useful dropdown under the first upload ("Copy information to all uploads following") that will let you duplicate values used in the first upload for the rest of the uploads.
- Once the mandatory fields have been populated, you may publish the images. The wizard will give a warning about not filling out the categories, but you can ignore that due to the Categories Field bug.


