Big Bang Beat Revolve/Ren: Difference between revisions
Jump to navigation
Jump to search

No edit summary |
|||
| (7 intermediate revisions by 2 users not shown) | |||
| Line 1: | Line 1: | ||
{{WIP}} | {{WIP}} | ||
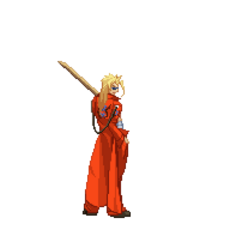
[[File:BBBR_Ren_Portrait.png|thumb|right|<center><font size="4"><b>Ren</b></font><br>'''Estimated Health (After Scaling): 12788'''</center>]] | |||
{{TOClimit|2}} | {{TOClimit|2}} | ||
==Introduction== | |||
'''Ren''' has solid tools for zoning with his long normals and 236X series of specials, and can play a strong defensive neutral. He really shines once he has the opponent in the corner, and he can blow you up very quickly with his setplay and powerful command grab. | |||
== | ===Lore=== | ||
Ren Idagawa | Ren Idagawa is the banchou of 750 Academy, as well as the leader of the Gokuren, a large biker gang. He plans to conquer Japan. | ||
== General Strategy == | ==General Strategy== | ||
WIP | |||
== Normal Moves == | ==Normal Moves== | ||
=== Standing Normals === | ===Standing Normals=== | ||
====== <font style="visibility:hidden" size="0">5A</font> ====== | ======<font style="visibility:hidden" size="0">5A</font>====== | ||
{{MoveData | {{MoveData | ||
|image=BBBR_Ren_5A.png | |image=BBBR_Ren_5A.png | ||
|input={{NotationIcon-BBBR|A}} | |||
|caption= | |caption= | ||
|name=5A | |name=5A | ||
| Line 30: | Line 33: | ||
}} | }} | ||
====== <font style="visibility:hidden" size="0">5B</font> ====== | ======<font style="visibility:hidden" size="0">5B</font>====== | ||
{{MoveData | {{MoveData | ||
|image=BBBR_Ren_5B.png | |image=BBBR_Ren_5B.png | ||
|input={{NotationIcon-BBBR|B}} | |||
|caption= | |caption= | ||
|name=5B | |name=5B | ||
| Line 49: | Line 53: | ||
}} | }} | ||
====== <font style="visibility:hidden" size="0">5C</font> ====== | ======<font style="visibility:hidden" size="0">5C</font>====== | ||
{{MoveData | {{MoveData | ||
|image=BBBR_Ren_5C.png | |image=BBBR_Ren_5C.png | ||
|caption= | |caption= | ||
|input={{NotationIcon-BBBR|C}} | |||
|name=5C | |name=5C | ||
|data= | |data= | ||
| Line 68: | Line 73: | ||
}} | }} | ||
=== Crouching Normals === | ===Crouching Normals=== | ||
====== <font style="visibility:hidden" size="0">2A</font> ====== | ======<font style="visibility:hidden" size="0">2A</font>====== | ||
{{MoveData | {{MoveData | ||
|image=BBBR_Ren_2A.png | |image=BBBR_Ren_2A.png | ||
|caption= | |caption= | ||
|input={{NotationIcon-BBBR|2}}{{NotationIcon-BBBR|A}} | |||
|name=2A | |name=2A | ||
|data= | |data= | ||
| Line 88: | Line 94: | ||
}} | }} | ||
====== <font style="visibility:hidden" size="0">2B</font> ====== | ======<font style="visibility:hidden" size="0">2B</font>====== | ||
{{MoveData | {{MoveData | ||
|image=BBBR_Ren_2B.png | |image=BBBR_Ren_2B.png | ||
|caption= | |caption= | ||
|name=2B | |name=2B | ||
|input={{NotationIcon-BBBR|2}}{{NotationIcon-BBBR|B}} | |||
|data= | |data= | ||
{{AttackData-BBBR | {{AttackData-BBBR | ||
| Line 107: | Line 114: | ||
}} | }} | ||
====== <font style="visibility:hidden" size="0">2C</font> ====== | ======<font style="visibility:hidden" size="0">2C</font>====== | ||
{{MoveData | {{MoveData | ||
|image=BBBR_Ren_2C.png | |image=BBBR_Ren_2C.png | ||
|caption= | |caption= | ||
|name=2C | |name=2C | ||
|input={{NotationIcon-BBBR|2}}{{NotationIcon-BBBR|C}} | |||
|data= | |data= | ||
{{AttackData-BBBR | {{AttackData-BBBR | ||
| Line 122: | Line 130: | ||
|advBlock=-12 | |advBlock=-12 | ||
|cancel=Sp, Su | |cancel=Sp, Su | ||
|description=Ren stands up and swings his sword upward. Air blockable and only cancellable into specials, so be careful using this as an anti-air. | |description=Ren stands up and swings his sword upward. Air-blockable and only cancellable into specials, so be careful using this as an anti-air. | ||
}} | }} | ||
}} | }} | ||
=== Air Normals === | ===Air Normals=== | ||
====== <font style="visibility:hidden" size="0">jA</font> ====== | ======<font style="visibility:hidden" size="0">jA</font>====== | ||
{{MoveData | {{MoveData | ||
|image=BBBR_Ren_jA.png | |image=BBBR_Ren_jA.png | ||
|caption= | |caption= | ||
|name=jA | |name=jA | ||
|input=jump {{NotationIcon-BBBR|A}} | |||
|data= | |data= | ||
{{AttackData-BBBR | {{AttackData-BBBR | ||
| Line 146: | Line 155: | ||
}} | }} | ||
====== <font style="visibility:hidden" size="0">jB</font> ====== | ======<font style="visibility:hidden" size="0">jB</font>====== | ||
{{MoveData | {{MoveData | ||
|image=BBBR_Ren_jB.png | |image=BBBR_Ren_jB.png | ||
|caption= | |caption= | ||
|name=jB | |name=jB | ||
|input=jump {{NotationIcon-BBBR|B}} | |||
|data= | |data= | ||
{{AttackData-BBBR | {{AttackData-BBBR | ||
| Line 165: | Line 175: | ||
}} | }} | ||
====== <font style="visibility:hidden" size="0">jC</font> ====== | ======<font style="visibility:hidden" size="0">jC</font>====== | ||
{{MoveData | {{MoveData | ||
|image=BBBR_Ren_jC.png | |image=BBBR_Ren_jC.png | ||
|caption= | |caption= | ||
|name=jC | |name=jC | ||
|input=jump {{NotationIcon-BBBR|C}} | |||
|data= | |data= | ||
{{AttackData-BBBR | {{AttackData-BBBR | ||
| Line 184: | Line 195: | ||
}} | }} | ||
== Command Normals == | ==Command Normals== | ||
====== <font style="visibility:hidden" size="0">6C</font> ====== | ======<font style="visibility:hidden" size="0">6C</font>====== | ||
{{MoveData | {{MoveData | ||
|image=BBBR_Ren_6C.png | |image=BBBR_Ren_6C.png | ||
|caption= | |caption= | ||
|name=Brawl Kick | |name=6C | ||
|input= | |subtitle=Brawl Kick | ||
|input={{NotationIcon-BBBR|6}}{{NotationIcon-BBBR|C}} | |||
|data= | |data= | ||
{{AttackData-BBBR | {{AttackData-BBBR | ||
| Line 201: | Line 213: | ||
|advBlock=-1 | |advBlock=-1 | ||
|cancel=J, Sp, Su | |cancel=J, Sp, Su | ||
|description=Ren does a strong forward kick. Jump cancellable on block, leaving you +19 if | |description=Ren does a strong forward kick. Jump-cancellable on block, leaving you +19 if done as early as possible. | ||
}} | }} | ||
}} | }} | ||
====== <font style="visibility:hidden" size="0">j2C</font> ====== | ======<font style="visibility:hidden" size="0">j2C</font>====== | ||
{{MoveData | {{MoveData | ||
|image=BBBR_Ren_j2C.png | |image=BBBR_Ren_j2C.png | ||
|caption= | |caption= | ||
|name=Strike | |name=j2C | ||
|input= | |subtitle=Strike | ||
|input=jump {{NotationIcon-BBBR|2}}{{NotationIcon-BBBR|C}} | |||
|data= | |data= | ||
{{AttackData-BBBR | {{AttackData-BBBR | ||
| Line 221: | Line 234: | ||
|advBlock= | |advBlock= | ||
|cancel=N | |cancel=N | ||
|description=Ren slams his hilt down onto the opponent. | |description=Ren slams his hilt down onto the opponent. Alters Ren's momentum. | ||
}} | }} | ||
}} | }} | ||
== Universal Mechanics == | ==Universal Mechanics== | ||
======<font style="visibility:hidden" size="0">Throw</font>====== | |||
====== <font style="visibility:hidden" size="0">Throw</font> ====== | |||
{{MoveData | {{MoveData | ||
|image=BBBR_Ren_ThrowWhiff.png | |image=BBBR_Ren_ThrowWhiff.png | ||
|caption= | |caption= | ||
|name=Throw | |name=Throw | ||
|input=4 | |input={{NotationIcon-BBBR|5}}/{{NotationIcon-BBBR|4}}{{NotationIcon-BBBR|A}}{{NotationIcon-BBBR|B}} | ||
|data= | |data= | ||
{{AttackData-BBBR | {{AttackData-BBBR | ||
| Line 248: | Line 259: | ||
}} | }} | ||
====== <font style="visibility:hidden" size="0">Big Bang Mode</font> ====== | ======<font style="visibility:hidden" size="0">Big Bang Mode</font>====== | ||
{{MoveData | {{MoveData | ||
|image=BBBR_Ren_BBM.png | |image=BBBR_Ren_BBM.png | ||
|caption= | |caption= | ||
|name=Big Bang Mode | |name=Big Bang Mode | ||
|input= | |input={{NotationIcon-BBBR|BBM}} | ||
|data= | |data= | ||
{{AttackData-BBBR | {{AttackData-BBBR | ||
| Line 268: | Line 279: | ||
}} | }} | ||
== Special Moves == | ==Special Moves== | ||
====== <font style="visibility:hidden" size="0">236A</font> ====== | ======<font style="visibility:hidden" size="0">236A</font>====== | ||
{{MoveData | {{MoveData | ||
|image=BBBR_Ren_236A.png | |image=BBBR_Ren_236A.png | ||
|caption= | |caption= | ||
|name=Empty Can | |name=Empty Can | ||
|input= | |input={{NotationIcon-BBBR|236}}{{NotationIcon-BBBR|A}} | ||
|data= | |data= | ||
{{AttackData-BBBR | {{AttackData-BBBR | ||
| Line 289: | Line 300: | ||
}} | }} | ||
====== <font style="visibility:hidden" size="0">236B</font> ====== | ======<font style="visibility:hidden" size="0">236B</font>====== | ||
{{MoveData | {{MoveData | ||
|image=BBBR_Ren_236B.png | |image=BBBR_Ren_236B.png | ||
|caption= | |caption= | ||
|name=Molotov Cocktail | |name=Molotov Cocktail | ||
|input= | |input={{NotationIcon-BBBR|236}}{{NotationIcon-BBBR|B}} | ||
|data= | |data= | ||
{{AttackData-BBBR | {{AttackData-BBBR | ||
| Line 309: | Line 320: | ||
}} | }} | ||
====== <font style="visibility:hidden" size="0">236C</font> ====== | ======<font style="visibility:hidden" size="0">236C</font>====== | ||
{{MoveData | {{MoveData | ||
|image=BBBR_Ren_236C.png | |image=BBBR_Ren_236C.png | ||
|caption= | |caption= | ||
|name=Concrete-block Wall | |name=Concrete-block Wall | ||
|input= | |input={{NotationIcon-BBBR|236}}{{NotationIcon-BBBR|C}} | ||
|data= | |data= | ||
{{AttackData-BBBR | {{AttackData-BBBR | ||
| Line 329: | Line 340: | ||
}} | }} | ||
====== <font style="visibility:hidden" size="0">623B</font> ====== | ======<font style="visibility:hidden" size="0">623B</font>====== | ||
{{MoveData | {{MoveData | ||
|image=BBBR_Ren_623B.png | |image=BBBR_Ren_623B.png | ||
|caption= | |caption= | ||
|name=I Won't Let You Get Away! | |name=I Won't Let You Get Away! | ||
|input= | |input={{NotationIcon-BBBR|623}}{{NotationIcon-BBBR|B}} | ||
|data= | |data= | ||
{{AttackData-BBBR | {{AttackData-BBBR | ||
| Line 349: | Line 360: | ||
}} | }} | ||
====== <font style="visibility:hidden" size="0">623C</font> ====== | ======<font style="visibility:hidden" size="0">623C</font>====== | ||
{{MoveData | {{MoveData | ||
|image=BBBR_Ren_623C.png | |image=BBBR_Ren_623C.png | ||
|caption= | |caption= | ||
|name=Fly Away! | |name=Fly Away! | ||
|input= | |input={{NotationIcon-BBBR|623}}{{NotationIcon-BBBR|C}} | ||
|data= | |data= | ||
{{AttackData-BBBR | {{AttackData-BBBR | ||
| Line 369: | Line 380: | ||
}} | }} | ||
====== <font style="visibility:hidden" size="0">214A</font> ====== | ======<font style="visibility:hidden" size="0">214A</font>====== | ||
{{MoveData | {{MoveData | ||
|image=BBBR_Ren_214A.png | |image=BBBR_Ren_214A.png | ||
|caption= | |caption= | ||
|name=Feint | |name=Feint | ||
|input= | |input={{NotationIcon-BBBR|214}}{{NotationIcon-BBBR|A}} | ||
|data= | |data= | ||
{{AttackData-BBBR | {{AttackData-BBBR | ||
|damage= | |damage=N/A | ||
|guard= | |guard=N/A | ||
|property=Invincible | |property=Invincible | ||
|startup= | |startup= | ||
| Line 389: | Line 400: | ||
}} | }} | ||
====== <font style="visibility:hidden" size="0">214X</font> ====== | ======<font style="visibility:hidden" size="0">214X</font>====== | ||
{{MoveData | {{MoveData | ||
|image=BBBR_Ren_214B.png | |image=BBBR_Ren_214B.png | ||
|caption= | |caption= | ||
|name=Tempering | |name=Tempering | ||
|input= | |input={{NotationIcon-BBBR|214}}{{NotationIcon-BBBR|B}}/{{NotationIcon-BBBR|C}} | ||
|data= | |data= | ||
{{AttackData-BBBR | {{AttackData-BBBR | ||
| Line 418: | Line 429: | ||
|advBlock=-9 | |advBlock=-9 | ||
|cancel=Su | |cancel=Su | ||
|description=Ren dashes forward with a strong shoulder charge. Causes untechable wallbounce on hit. | |description=Ren dashes forward with a strong shoulder charge. Causes an untechable wallbounce on hit. | ||
}} | }} | ||
{{AttackData-BBBR | {{AttackData-BBBR | ||
| Line 434: | Line 445: | ||
}} | }} | ||
== B-Power Arts == | ==B-Power Arts== | ||
====== <font style="visibility:hidden" size="0">236D</font> ====== | ======<font style="visibility:hidden" size="0">236D</font>====== | ||
{{MoveData | {{MoveData | ||
|image=BBBR_Ren_236D.png | |image=BBBR_Ren_236D.png | ||
|caption= | |caption= | ||
|name=Dance! | |name=Dance! | ||
|input= | |input={{NotationIcon-BBBR|236}}{{NotationIcon-BBBR|D}} | ||
|data= | |data= | ||
{{AttackData-BBBR | {{AttackData-BBBR | ||
| Line 451: | Line 462: | ||
|advBlock= | |advBlock= | ||
|cancel=NC | |cancel=NC | ||
|description=Ren throws three empty cans, two Molotov cocktails, and one | |description=Ren throws three empty cans, two Molotov cocktails, and one cinderblock. | ||
}} | }} | ||
}} | }} | ||
====== <font style="visibility:hidden" size="0">63214D</font> ====== | ======<font style="visibility:hidden" size="0">63214D</font>====== | ||
{{MoveData | {{MoveData | ||
|image=BBBR_Ren_ThrowWhiff.png | |image=BBBR_Ren_ThrowWhiff.png | ||
|caption=Headbutt | |caption=Headbutt | ||
|image2=BBBR_Ren_63214D.png | |image2=BBBR_Ren_63214D.png | ||
|caption2=GO TO HELL | |caption2=GO TO HELL<nowiki>!!</nowiki> | ||
|name=Headbutt | |name=Headbutt | ||
|input= | |input={{NotationIcon-BBBR|63214}}{{NotationIcon-BBBR|D}} | ||
|data= | |data= | ||
{{AttackData-BBBR | {{AttackData-BBBR | ||
|version=63214D | |version=63214D | ||
|subtitle=Headbutt | |||
|damage=800 | |damage=800 | ||
|guard=Unblockable | |guard=Unblockable | ||
| Line 478: | Line 490: | ||
{{AttackData-BBBR | {{AttackData-BBBR | ||
|version=63214D~C | |version=63214D~C | ||
|subtitle=GO TO HELL<nowiki>!!</nowiki> | |||
|damage={{Tooltip | text=3000/2400| hovertext=3000 with perfect timing, 2400 with poor timing.}} | |damage={{Tooltip | text=3000/2400| hovertext=3000 with perfect timing, 2400 with poor timing.}} | ||
|guard= | |guard= | ||
| Line 486: | Line 499: | ||
|advBlock= | |advBlock= | ||
|cancel=NC | |cancel=NC | ||
|description=Ren charges up his headbutt for a more powerful attack. | |description=Ren charges up his headbutt for a more powerful attack. The button has to tapped at the right timing (right as Ren is about to deal the headbutt) for it to work. | ||
}} | }} | ||
}} | }} | ||
====== <font style="visibility:hidden" size="0">623B~8D</font> ====== | ======<font style="visibility:hidden" size="0">623B~8D</font>====== | ||
{{MoveData | {{MoveData | ||
|image=BBBR_Ren_623C.png | |image=BBBR_Ren_623C.png | ||
|caption= | |||
|image2=BBBR_Ren_623B8D.png | |image2=BBBR_Ren_623B8D.png | ||
| | |caption2= | ||
|name=Fly! | |name=Fly! | ||
|input= | |input={{NotationIcon-BBBR|623}}{{NotationIcon-BBBR|B}}~{{NotationIcon-BBBR|8}}{{NotationIcon-BBBR|D}} | ||
|data= | |data= | ||
{{AttackData-BBBR | {{AttackData-BBBR | ||
|damage=100 | |damage=100+1500 (1330) | ||
|guard= | |guard= | ||
|property= | |property= | ||
| Line 511: | Line 525: | ||
}} | }} | ||
== Big Bang Break == | ==Big Bang Break== | ||
====== <font style="visibility:hidden" size="0">41236ABC</font> ====== | ======<font style="visibility:hidden" size="0">41236ABC</font>====== | ||
{{MoveData | {{MoveData | ||
|image=BBBR_Ren_ThrowWhiff.png | |image=BBBR_Ren_ThrowWhiff.png | ||
|name=You're Dead! | |name=You're Dead! | ||
|input= | |input={{NotationIcon-BBBR|BBB}} | ||
|data= | |data= | ||
{{AttackData-BBBR | {{AttackData-BBBR | ||
| Line 527: | Line 541: | ||
|advBlock= | |advBlock= | ||
|cancel= | |cancel= | ||
|description=Ren reaches out to grab the opponent. If he gets them, he launches into an autocombo that ends with an explosive j.2C. | |description=Ren reaches out to grab the opponent. If he gets them, he launches into an autocombo that ends with an explosive j.2C. Ends Big Band Mode instantly. | ||
}} | }} | ||
}} | }} | ||
== Combos == | ==Combos== | ||
{| class="mw-collapsible mw-collapsed" width="100%" | |||
|+ style="white-space:nowrap; border:1px solid; padding:3px;" |'''Combo Legend''' | |||
|- | |||
|{{ComboLegend-BBBR}} | |||
|} | |||
===<u>Combo Theory</u>=== | ===<u>Combo Theory</u>=== | ||
:*Combo damage varies from character to character, so all damage numbers come from testing on a full-health Rouga. | :*Combo damage varies from character to character, so all damage numbers come from testing on a full-health Rouga. | ||
===<u>Midscreen</u>=== | ===<u>Midscreen</u>=== | ||
:* '''5/2A > 5B > 5C > 2C > dl 214B > 5A > 2C > dl j.2C > 5B > 2C > dl j.2C > 5B > 5C > 2C > 623B''' ( | :* '''5/2A > 5B > 5C > 2C > dl 214B > 5A > 2C > dl j.2C > 5B > 2C > dl j.2C > 5B > 5C > 2C > 623B''' (3519) | ||
::* Your go-to midscreen BnB. Does good damage and gets you a hard knockdown. | ::* Your go-to midscreen BnB. Does good damage and gets you a hard knockdown. | ||
:* '''5/2A > 5B > 5C > 2C > dl 214B > 5A > 2C > dl j.2C > 5B > 2C > dl j.2C > 5B > 5C > 2C > 623B~8D''' (4108) | |||
:* '''5/2A > 5B > 5C > 2C > dl 214B > 5A > 2C > dl j.2C > 5B > 2C > dl j.2C > 5B > 5C > 2C > 623B~8D''' ( | ::* The same route as above, but spending a bar on 623B~8D to get 600 more damage and full-screen corner carry. | ||
::* The same route as above, but spending a bar on 623B~8D to get | |||
===<u>Corner</u>=== | ===<u>Corner</u>=== | ||
| Line 547: | Line 565: | ||
==Colors== | ==Colors== | ||
{{ColorGallery | filePrefix=BBBR_Ren_Color_ | colors= | {{ColorGallery | filePrefix=BBBR_Ren_Color_ | colors= | ||
{{ColorGallery/Color|1| text= A Color}} | {{ColorGallery/Color|1| text=A Color}} | ||
{{ColorGallery/Color|2| text= B Color}} | {{ColorGallery/Color|2| text=B Color}} | ||
{{ColorGallery/Color|3| text= C Color}} | {{ColorGallery/Color|3| text=C Color}} | ||
{{ColorGallery/Color|4| text= D Color}} | {{ColorGallery/Color|4| text=D Color}} | ||
}} | }} | ||
== BBBR Navigation == | ==BBBR Navigation== | ||
{{Navbox-BBBR}} | {{Navbox-BBBR}} | ||
[[Category:Ren]] | |||
[[Category:Big Bang Beat Revolve]] | [[Category:Big Bang Beat Revolve]] | ||
Latest revision as of 09:54, 27 June 2024
 |
Under Construction
|

Introduction
Ren has solid tools for zoning with his long normals and 236X series of specials, and can play a strong defensive neutral. He really shines once he has the opponent in the corner, and he can blow you up very quickly with his setplay and powerful command grab.
Lore
Ren Idagawa is the banchou of 750 Academy, as well as the leader of the Gokuren, a large biker gang. He plans to conquer Japan.
General Strategy
WIP
Normal Moves
Standing Normals
5A
5A  |
|---|
5B
5B  |
|---|
5C
5C  |
|---|
Crouching Normals
2A
2A  |
|---|
2B
2B  |
|---|
2C
2C  |
|---|
Air Normals
jA
jA jump  |
|---|
jB
jB jump  |
|---|
jC
jC jump  |
|---|
Command Normals
6C
6C Brawl Kick  |
|---|
j2C
j2C Strike jump  |
|---|
Universal Mechanics
Throw
Throw  |
|---|
Big Bang Mode
Big Bang Mode  |
|---|
Special Moves
236A
Empty Can  |
|---|
236B
Molotov Cocktail  |
|---|
236C
Concrete-block Wall  |
|---|
623B
I Won't Let You Get Away!  |
|---|
623C
Fly Away!  |
|---|
214A
Feint  |
|---|
214X
Tempering  |
|---|
B-Power Arts
236D
Dance!  |
|---|
63214D
Headbutt Headbutt Headbutt  GO TO HELL!! GO TO HELL!!
|
|---|
623B~8D
Fly!  |
|---|
Big Bang Break
41236ABC
You're Dead! |
|---|
Combos
| |||||||||||||||||||||||||||||||||||||||||||||


Combo Theory
- Combo damage varies from character to character, so all damage numbers come from testing on a full-health Rouga.
Midscreen
- 5/2A > 5B > 5C > 2C > dl 214B > 5A > 2C > dl j.2C > 5B > 2C > dl j.2C > 5B > 5C > 2C > 623B (3519)
- Your go-to midscreen BnB. Does good damage and gets you a hard knockdown.
- 5/2A > 5B > 5C > 2C > dl 214B > 5A > 2C > dl j.2C > 5B > 2C > dl j.2C > 5B > 5C > 2C > 623B~8D (4108)
- The same route as above, but spending a bar on 623B~8D to get 600 more damage and full-screen corner carry.
Corner
Colors
A Color

B Color

C Color

D Color
