 Sango (珊瑚)
Introduction
Is that the best you can do? You can't become a Demon Slayer without training more.
Character Voice: Houko Kuwashima
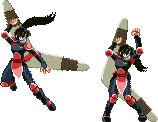
Sango is a strange hit-and-run type character, with very large (but slow) normals in the air and 'tricky' special moves. While she does have a few interesting and decent tools like j.S, 5SP and 2SP, her weaknesses massively overshadow her strengths; having consistently low damage, no good way of pressuring or forcing an opening, one of the worst projectiles in the game, no safe way to contest an opponent's pressure, and an incredibly situational super, it is very rough to get any results as Sango, and she is usually considered one of the worst characters in A Feudal Fairy Tale for these reasons.
| Strengths |
Weaknesses
|
- j.W and j.S are, by no contest, the largest jumping normals in the entire game
- Forwards Dash Attack has the same animation as j.S, being equally huge and a strangely great anti-air
- 5SP stays active for far, far longer than the animation would imply, and due to the backstep is useful for catching jump-in attempts
- Really big boomerang is cool
|
- 5W and 2W are incredibly slow for jabs, which makes Sango have to abuse her range with very few options up-close
- Has some of the longest startup aerials in the entire game, making air-to-air situations rather unfavorable
- Struggles in the corner/pressure due to significantly slower than average jabs and having no reversal options
- 6SP is one of the worst special moves and easily the worst projectile in the game, being massively unsafe on block and on hit no matter the distance
- Super is extremely situational and very rarely applicable for anything other than chip damage
- The disparity between the range on her normals can cause some chains to not work properly at all distances
- Can't consistently end combos with her specials; 5SP has too much startup to successfully hit from most Auto-Combos, 6SP can't hit at some ranges because of startup and is comically negative on hit, and 2SP is her best combo ender but its grounded hitbox is very short and hard to hit
- Very low average damage due to combo finish inconsistency and mediocre damage normals
|
Move List
Startup DOES NOT include the first active frame.
Moveset
Ground Normals
5W
|
| Damage
|
Startup
|
Active
|
Recovery
|
Frame Adv
|
Guard
|
Hitbox
|
|
|
|
|
|
|
High
Whiffs on crouchers
|
-
|
Sango "quickly" slashes upwards with her wrist blade. Her fastest move, though due to having 2 frames more start-up than most jabs in the game, it's not particularly useful for getting out of pressure.
|
|
2W
|
| Damage
|
Startup
|
Active
|
Recovery
|
Frame Adv
|
Guard
|
Hitbox
|
|
|
|
|
|
|
Low
|
-
|
Sango slashes with her wrist blade, but kneeling this time. Exact move as 5W, except it's now low.
|
|
5W-W-W
|
| Damage
|
Startup
|
Active
|
Recovery
|
Frame Adv
|
Guard
|
Hitbox
|
|
|
|
|
|
|
High
Whiffs on crouchers
|
-
|
A fast sword slice. This move would be pretty good if Sango could use it outside of an auto-combo, but it is unfortunately outshined by 2W-W-W because of being shorter ranged and missing on crouchers.
|
|
2W-W-W
|
| Damage
|
Startup
|
Active
|
Recovery
|
Frame Adv
|
Guard
|
Hitbox
|
|
|
|
|
|
|
|
-
|
Sango uses her Iron Chain to hit the enemy in the shins (ouch!). Her best move for comboing since she slides during it and the chain has gigantic range, but confirming into a special from it is very unreliable.
|
|
5S
|
| Damage
|
Startup
|
Active
|
Recovery
|
Frame Adv
|
Guard
|
Hitbox
|
|
|
|
|
|
|
|
-
|
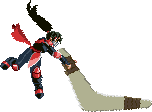
Sango bashes directly in front of her with Hiraikotsu. A decent ranged poke and her best combo starter, can cancel into itself and hit at near-max range. Very shoddy for pressuring, and has rather long recovery if it's not cancelled into something.
|
|
2S
|
| Damage
|
Startup
|
Active
|
Recovery
|
Frame Adv
|
Guard
|
Hitbox
|
|
|
|
|
|
|
|
-
|
Sango bashes directly in front of her with Hiraikotsu, while kneeling. This is the same move as 5S for the most part, but Hiraikotsu goes just slightly further, which can make some hit-confirms work better.
|
|
5S-S-S
|
| Damage
|
Startup
|
Active
|
Recovery
|
Frame Adv
|
Guard
|
Hitbox
|
|
|
|
|
|
|
|
-
|
A shockingly quick, incredibly long swing with Hiraikotsu.
|
|
2S-S-S
|
| Damage
|
Startup
|
Active
|
Recovery
|
Frame Adv
|
Guard
|
Hitbox
|
|
|
|
|
|
|
|
-
|
A kneeling swing with Hiraikotsu which somehow goes even further than the standing version.
|
|
Jump Normals
j.W
|
| Damage
|
Startup
|
Active
|
Recovery
|
Frame Adv
|
Guard
|
Hitbox
|
|
|
|
|
|
|
High/Air
|
-
|
Sango lashes out very far horizontally with her Iron Chain. This move can (emphasis on can) be used for sniping jump attempts, but its hitbox is sprite-perfect, meaning incredibly thin, and it'll frequently whiff if you're not dead accurate with the timing, not to mention that it covers nowhere below or above Sango while being used and has very long recovery in the air, meaning that an opponent could simply come under and just hit her out of it. This would more than likely be a great move in a different game.
|
|
j.S
|
| Damage
|
Startup
|
Active
|
Recovery
|
Frame Adv
|
Guard
|
Hitbox
|
|
|
|
|
|
|
High/Air
|
-
|
Sango does an axe swing with Hiraikotsu, covering a humongous area all above, in front, and below her. This is probably Sango's best move, as it can be confirmed off of pretty easily with 2SP or an auto-combo on the ground, and the sheer amount of space it covers. It has pretty long start-up though, so you may get hit in the air before she actually swings in an air-to-air situation.
|
|
Dash Attacks
Forward Dash Attack
|
| Damage
|
Startup
|
Active
|
Recovery
|
Frame Adv
|
Guard
|
Hitbox
|
|
|
|
|
|
|
|
-
|
Sango does an axe swing with Hiraikotsu while lunging forwards. Has almost the same animation as j.S, and as such, has the same colossal hitbox, making it shockingly good for hitting an opponent in the air while moving. It has very long start-up, but is somehow Sango's best pressure tool due to the range she can connect with it at being so long which usually makes it safe.
|
|
Backward Dash Attack
|
| Damage
|
Startup
|
Active
|
Recovery
|
Frame Adv
|
Guard
|
Hitbox
|
|
|
|
|
|
|
|
-
|
A quick sword slice while retreating. Self explanatory, but pretty fast and has good range.
|
|
Special Moves
5SP
毒粉; Dokufun (Poison Powder)
|
| Damage
|
Startup
|
Active
|
Recovery
|
Frame Adv
|
Guard
|
Hitbox
|
|
|
|
|
|
|
Low/High/Air
|
-
|
Sango jumps backwards, throwing a poison bomb where she once stood. This move is incredibly weird, as it has a number of strange quirks:
• If Sango is hit while she is hopping backwards, she will be put into a juggle state.
• The poison bomb's hitbox lingers for the entire animation, even when the animation shows it no longer having velocity (i.e; the smoke fading).
• If you somehow end up behind Sango while she is hopping backwards, she can be air-thrown.
This move is pretty good for catching careless jump-in attempts due to how comically long the hitbox on the poison lasts and its vertical range, but be very careful when using it as the first quirk listed can lead to a big punish if you're caught out while using it.
|
|
6SP
飛来骨; Hiraikotsu (Boomerang Bone) Yet this is her signature move.... Yet this is her signature move....
|
| Damage
|
Startup
|
Active
|
Recovery
|
Frame Adv
|
Guard
|
Hitbox
|
|
|
|
|
|
-21 (hit)
-43 (block)
|
Low/High/Air
|
-
|
The one. The only. The negative 30,000 years on hit boomerang. This move is horribly awfully terribly bad in almost every way, and you probably shouldn't use it ever.
The boomerang is a quite large, spinning projectile that knocks down the opponent on hit, but it's massively unsafe on block and very unsafe on hit no matter the distance or if it hits an aerial or grounded opponent. It has a hitbox on the way forward, and a hitbox on the way back, but only one can connect as if one connects, the other disables. This move can only kind of be used as a combo ender, but even then you are largely unsafe on hit.
If all of that wasn't bad enough, it is also one of the longer start-up fireballs/projectiles in the game and if Sango is hit out of the start-up, the projectile will not come out, so it's unable to trade.
|
|
2SP
投鎖獲; Tousakaku (Thrown Chain Seize) Please, refrain from jumping once more Please, refrain from jumping once more
|
| Damage
|
Startup
|
Active
|
Recovery
|
Frame Adv
|
Guard
|
Hitbox
|
|
|
|
|
|
|
Low/High/Air
|
-
|
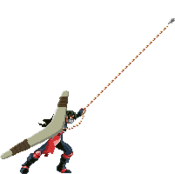
Sango whirls her Iron Chain before lashing it high into the air to attempt to latch onto the opponent. This is a very odd move, as it is solely intended to be an anti-air attack but it can easily be air-blocked on reaction due to its rather long start-up. However, this move is very useful as a combo ender since it has two hitboxes; one while starting up and Sango whirls her chain, and the other when she actually throws it, making it her optimal combo ender special. Hard to confirm into due to the first hitbox's short range. Does pretty good damage and knocks out a shard from the opponent on hit.
|
|
44SP
雲母; Kirara No escape, but at a cost not very combo-friendly, that she is. No escape, but at a cost not very combo-friendly, that she is. "This will settle it!" "This will settle it!"
|
| Damage
|
Startup
|
Active
|
Recovery
|
Frame Adv
|
Guard
|
Hitbox
|
|
|
|
|
|
|
|
-
|
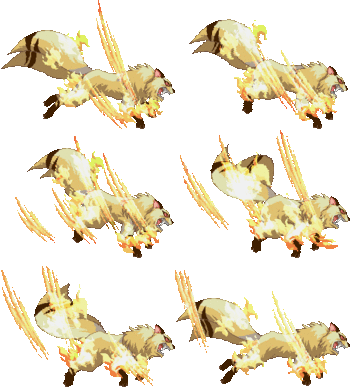
Sango calls upon her faithful Nekomata friend, Kirara, to transform and assault the opponent. Kirara is a gigantic moving, mid/aerial hitting hitbox that does good damage on hit, but doesn't do that much chip damage and Sango is stuck in an animation for most of the super, so she can be hit out of it (however, unlike 6SP it actually will trade since Kirara will come out even if Sango is hit, so it can be sorta useful for that).
There is practically no way to combo into this super, making its uses very very limited, but it is at minimum a decent way to guarantee chip damage from most places on the screen due to Kirara's hitbox being huge.
|
|
Strategy
Sango... unfortunately, does not have a very sound strategy/gameplan to play off of, and also practically no win condition as most of her tools just can't compare to the rest of the roster.
Your best shot at victory while playing as Sango is abusing your few extremely large moves; being j.S, Forward Dash Attack, 5SP and 2S. Try to not get too close, as air-dash left-right situations are nightmarish for Sango due to her very slow W attacks, and keep on your toes while poking and punishing any possible mistake the opponent makes the best you can. Use 44SP any time you have it, as it'll at worst do chip and keep the enemy away, and at best connects and does some actual decent damage.
Refrain from using 6SP as much as physically possible, unless you have to use it for some reason, like chipping a sliver of health to win the round.
Combos
