Mobile Suit Gundam: Ex Revue/Gundam: Difference between revisions
Jump to navigation
Jump to search
No edit summary |
No edit summary |
||
| Line 23: | Line 23: | ||
{{MoveData | {{MoveData | ||
|input=5A | |input=5A | ||
|image= | |image=GEXR_Gundam_5A.PNG | ||
|caption= | |caption= | ||
|data= | |data= | ||
{{AttackData- | {{AttackData-RE | ||
|damage= | |damage=7 | ||
|startup= | |startup=4 | ||
|active= | |active=4 | ||
|recovery= | |recovery=8 | ||
|frameAdv= | |frameAdv= | ||
|special cancel=Yes | |special cancel=Yes | ||
|guard=Mid | |guard=Mid | ||
|description= | |description=A sword thrust that can cancel into itself.<br>Whiffs on crouching characters and Dom & Acguy's walking animations. | ||
}} | }} | ||
}} | }} | ||
{{MoveData | {{MoveData | ||
|input=5B | |input=5B | ||
|image= | |image=GEXR_Gundam_5B | ||
|caption= | |caption= | ||
|data= | |data= | ||
{{AttackData- | {{AttackData-RE | ||
|damage= | |damage=19 | ||
|startup= | |startup=14 | ||
|active= | |active=9 | ||
|recovery= | |recovery=7 | ||
|frameAdv= | |frameAdv= | ||
|special cancel=Yes | |special cancel=Yes | ||
|guard=Mid | |guard=Mid | ||
|description= | |description=A downward sword slash. | ||
}} | }} | ||
}} | }} | ||
{{MoveData | {{MoveData | ||
|input=5C | |input=5C | ||
|image= | |image=GEXR_Gundam_5C-1.PNG | ||
|image2=GEXR_Gundam_5C-2.PNG | |||
|caption= | |caption= | ||
|data= | |data= | ||
{{AttackData- | {{AttackData-RE | ||
|damage= | |damage=27 | ||
|startup= | |startup=10 | ||
|active= | |active=2, 2 | ||
|recovery= | |recovery=23 | ||
|frameAdv= | |frameAdv= | ||
|special cancel= | |special cancel=No | ||
|guard=Mid | |guard=Mid | ||
|description= | |description=Gundam lunges a bit forward before swinging its sword upward. Has a quick and large first hitbox and the second hitbox can be somewhat used like an anti-air. | ||
}} | }} | ||
}} | }} | ||
{{MoveData | {{MoveData | ||
|input=2A | |input=2A | ||
|image= | |image=GEXR_Gundam_2A.PNG | ||
|caption= | |caption= | ||
|data= | |data= | ||
{{AttackData- | {{AttackData-RE | ||
|damage= | |damage=7 | ||
|startup= | |startup= | ||
|active= | |active= | ||
| Line 81: | Line 85: | ||
|frameAdv= | |frameAdv= | ||
|special cancel=Yes | |special cancel=Yes | ||
|guard= | |guard=Mid | ||
|description= | |description=Another sword thurst like 5A, but has more range than 5B. Still whiffs on Dom's walking animation. | ||
}} | }} | ||
}} | }} | ||
{{MoveData | {{MoveData | ||
|input=2B | |input=2B | ||
|image= | |image=GEXR_Gundam_2B.PNG | ||
|caption= | |caption= | ||
|data= | |data= | ||
{{AttackData- | {{AttackData-RE | ||
|damage= | |damage=22 | ||
|startup= | |startup= | ||
|active= | |active= | ||
| Line 98: | Line 103: | ||
|special cancel=Yes | |special cancel=Yes | ||
|guard=Low | |guard=Low | ||
|description= | |description=A low sweep kick that knocks down. | ||
}} | }} | ||
}} | }} | ||
{{MoveData | {{MoveData | ||
|input=2C | |input=2C | ||
|image= | |image=GEXR_Gundam_2C-1.PNG | ||
|image2=GEXR_Gundam_2C-2.PNG | |||
|image3=GEXR_Gundam_2C-3.PNG | |||
|caption= | |caption= | ||
|data= | |data= | ||
{{AttackData- | {{AttackData-RE | ||
|damage= | |damage=24 | ||
|startup= | |startup= | ||
|active= | |active= | ||
| Line 114: | Line 122: | ||
|special cancel=Yes | |special cancel=Yes | ||
|guard=Mid | |guard=Mid | ||
|description= | |description=A crouching anti-air. Similar animation to 623x | ||
}} | }} | ||
}} | }} | ||
==Proximity Normals== | ==Proximity Normals== | ||
{{MoveData | {{MoveData | ||
|input=cl. | |input=cl.5B | ||
|image= | |image=GEXR_Gundam_cl.B.PNG | ||
|caption= | |caption= | ||
|data= | |data= | ||
{{AttackData- | {{AttackData-RE | ||
|damage= | |damage=19 | ||
|startup= | |startup=6 | ||
|active= | |active= | ||
|recovery= | |recovery= | ||
|frameAdv= | |frameAdv= | ||
|special cancel=Yes | |special cancel=Yes | ||
|guard= | |guard=mid | ||
|description= | |description=A straight punch. A bit more reliable as a poke than 5A. | ||
}} | }} | ||
}} | }} | ||
{{MoveData | {{MoveData | ||
|input=cl. | |input=cl.5C | ||
|image= | |image=GEXR_Gundam_cl.C.PNG | ||
|caption= | |caption= | ||
|data= | |data= | ||
{{AttackData- | {{AttackData-RE | ||
|damage= | |damage=27 | ||
|startup= | |startup= | ||
|active= | |active= | ||
| Line 146: | Line 155: | ||
|frameAdv= | |frameAdv= | ||
|special cancel=Yes | |special cancel=Yes | ||
|guard= | |guard=mid | ||
|description= | |description=Upward sword slash. Not very useful as an anti-air since the hitbox is very close to Gundam's body. | ||
}} | }} | ||
}} | }} | ||
==Jumping | |||
==Jumping Normals== | |||
{{MoveData | {{MoveData | ||
|input=j.A | |input=j.A | ||
|image= | |image=GEXR_Gundam_j.A.PNG | ||
|caption= | |caption= | ||
|data= | |data= | ||
{{AttackData- | {{AttackData-RE | ||
|damage= | |damage=14 | ||
|startup= | |startup= | ||
|active= | |active= | ||
|recovery= | |recovery= | ||
|frameAdv= | |frameAdv= | ||
|special cancel= | |special cancel=No | ||
|guard=High | |guard=High | ||
|description= | |description=Gundam sticks out its foot. | ||
}} | }} | ||
}} | }} | ||
{{MoveData | {{MoveData | ||
|input=j.B | |input=j.B | ||
|image= | |image=GEXR_Gundam_j.B.PNG | ||
|caption= | |caption= | ||
|data= | |data= | ||
{{AttackData- | {{AttackData-RE | ||
|damage= | |damage=19 | ||
|startup= | |startup= | ||
|active= | |active= | ||
|recovery= | |recovery= | ||
|frameAdv= | |frameAdv= | ||
|special cancel= | |special cancel=No | ||
|guard=High | |guard=High | ||
|description= | |description=Air kick. Hitbox extends along Gundam's leg. | ||
}} | }} | ||
}} | }} | ||
{{MoveData | {{MoveData | ||
|input=j. | |input=j.C | ||
|image= | |image=GEXR_Gundam_j.C-1.PNG | ||
|image2=GEXR_Gundam_j.C-2.PNG | |||
|caption= | |caption= | ||
|data= | |data= | ||
{{AttackData- | {{AttackData-RE | ||
|damage= | |damage=24 | ||
|startup= | |startup= | ||
|active= | |active= | ||
|recovery= | |recovery= | ||
|frameAdv= | |frameAdv= | ||
|special cancel= | |special cancel=No | ||
|guard=High | |guard=High | ||
|description= | |description=Has two hitboxes: One that hits above Gundam and one long hitbox below that's good for crossups. | ||
}} | }} | ||
}} | }} | ||
{{MoveData | {{MoveData | ||
|input=j. | |input=j.2B | ||
|image= | |image=GEXR_Gundam_j.2B-Spin.gif | ||
|caption= | |image2=GEXR_Gundam_j.2B-1.PNG | ||
|image3=GEXR_Gundam_j.2B-2.PNG | |||
|caption=Speen | |||
|data= | |data= | ||
{{AttackData- | {{AttackData-RE | ||
|damage= | |damage=27 | ||
|startup= | |startup= | ||
|active= | |active= | ||
|recovery= | |recovery= | ||
|frameAdv= | |frameAdv= | ||
|special cancel= | |special cancel=No | ||
|guard=High | |guard=High | ||
|description= | |description=One of Gundam's notable approach tools. Gundam has no hitbox while it spins. Good for challenging air attacks , but is still vulnerable to anti-airs after the spin. Ends in an attack similar to j.C but slightly bigger. | ||
}} | }} | ||
}} | }} | ||
| Line 218: | Line 234: | ||
==Specials== | ==Specials== | ||
{{MoveData | {{MoveData | ||
|name=Beam Rifle | |||
|input=236x | |input=236x | ||
|image=GEXR_Gundam_236x.PNG | |||
|image= | |||
|caption= | |caption= | ||
|data= | |data= | ||
{{AttackData-GEXR | {{AttackData-GEXR | ||
|version=A version | |version=A version | ||
|damage= | |damage=17 | ||
|startup= | |startup= | ||
|active= | |active= | ||
| Line 236: | Line 252: | ||
{{AttackData-GEXR | {{AttackData-GEXR | ||
|version=B version | |version=B version | ||
|damage= | |damage=18 | ||
|startup= | |startup= | ||
|active= | |active= | ||
| Line 247: | Line 263: | ||
{{AttackData-GEXR | {{AttackData-GEXR | ||
|version=C version | |version=C version | ||
|damage= | |damage=19 | ||
|startup= | |startup= | ||
|active= | |active= | ||
| Line 254: | Line 270: | ||
|special cancel=No | |special cancel=No | ||
|guard=Mid | |guard=Mid | ||
|description= | |description=Average Fireball. The button pressed slightly increases the speed and damage dealt. | ||
}} | }} | ||
}} | }} | ||
{{MoveData | {{MoveData | ||
|name=Beam Saber | |||
|input=623x | |input=623x | ||
| | |image=GEXR_Gundam_DP_Startup.PNG | ||
| | |caption=First Hitbox | ||
| | |image2=GEXR_Gundam_DP_1.PNG | ||
|caption2=A Version | |||
|image3=GEXR_Gundam_DP_2.PNG | |||
|caption3=B Version | |||
|image4=GEXR_Gundam_DP_3.PNG | |||
|caption4=C Version | |||
|data= | |data= | ||
{{AttackData- | {{AttackData-RE | ||
|version=A version | |version=A version | ||
|damage= | |damage=27 | ||
|startup= | |startup= | ||
|active= | |active= | ||
| Line 272: | Line 295: | ||
|special cancel=No | |special cancel=No | ||
|guard=Mid | |guard=Mid | ||
|description= | |description=Single hit DP. Somehow does more damage than the B version. | ||
}} | }} | ||
{{AttackData- | {{AttackData-RE | ||
|version=B version | |version=B version | ||
|damage= | |damage=12 | ||
|startup= | |startup= | ||
|active= | |active= | ||
| Line 283: | Line 306: | ||
|special cancel=No | |special cancel=No | ||
|guard=Mid | |guard=Mid | ||
|description= | |description=Single hit DP. Does less damage than the A version, but has a slightly bigger hitbox and travels further. | ||
}} | }} | ||
{{AttackData- | {{AttackData-RE | ||
|version=C version | |version=C version | ||
|damage= | |damage=17, 15 | ||
|startup= | |startup= | ||
|active= | |active= | ||
| Line 294: | Line 317: | ||
|special cancel=No | |special cancel=No | ||
|guard=Mid | |guard=Mid | ||
|description= | |description=Two hit DP. Has the largest hitbox, travels the furthest, and deals the most damage. Best used as a combo ender. | ||
}} | }} | ||
}} | }} | ||
{{MoveData | {{MoveData | ||
|name=Double Beam Saber | |||
|input=214x | |input=214x | ||
|image=GEXR_Gundam_Tatsu-1.PNG | |||
|image= | |||
|caption= | |caption= | ||
|image2=GEXR_Gundam_Tatsu-2.PNG | |||
|caption2= | |||
|data= | |data= | ||
{{AttackData- | {{AttackData-RE | ||
|version=A version | |version=A version | ||
|damage= | |damage=14, 12 | ||
|startup= | |startup= | ||
|active= | |active= | ||
| Line 311: | Line 338: | ||
|frameAdv= | |frameAdv= | ||
|special cancel=No | |special cancel=No | ||
|guard=Mid | |guard=Mid, Low | ||
|description= | |description=Gundam's "Tatsu" Move. Gundam lacks a hurtbox during the startup dash. Hits two times: One blocked Mid, and one blocked Low. If only the second hit connects, it will deal the same damage as the first hitbox. <br> Travels an extremely short distance before attacking. | ||
}} | }} | ||
{{AttackData- | {{AttackData-RE | ||
|version=B version | |version=B version | ||
|damage= | |damage=17, 15 | ||
|startup= | |startup= | ||
|active= | |active= | ||
| Line 322: | Line 349: | ||
|frameAdv= | |frameAdv= | ||
|special cancel=No | |special cancel=No | ||
|guard=Mid | |guard=Mid, Low | ||
|description= | |description=Travels about half the screen before attacking | ||
}} | }} | ||
{{AttackData- | {{AttackData-RE | ||
|version=C version | |version=C version | ||
|damage= | |damage=19, 17 | ||
|startup= | |startup=17 | ||
|active= | |active= | ||
|recovery= | |recovery= | ||
|frameAdv= | |frameAdv= | ||
|special cancel=No | |special cancel=No | ||
|guard=Mid | |guard=Mid, Low | ||
|description= | |description=Travels almost fullscreen before attacking. If timed right, the invulnerability frames can dodge fireballs or oki attempts. <br>Due to how fast Gundam slides across the stage, this move completely whiffs on crouching opponents at any distance other than fullscreen. | ||
}} | }} | ||
}} | }} | ||
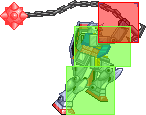
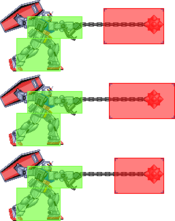
{{MoveData | {{MoveData | ||
|name=Gundam Hammer | |||
|input=41236x | |input=41236x | ||
| | |image=GEXR_Gundam_Gundam_Hammer-1.png | ||
| | |caption=Startup Hitbox | ||
| | |image2=GEXR_Gundam_Gundam_Hammer-2.png | ||
|caption2=1st, 2nd, and 3rd Ball Hitboxes | |||
|data= | |data= | ||
{{AttackData- | {{AttackData-RE | ||
|version=A version | |version=A version | ||
|damage= | |damage=12, 10, 9 | ||
|startup= | |startup= | ||
|active= | |active= | ||
| Line 352: | Line 382: | ||
|special cancel=No | |special cancel=No | ||
|guard=Mid | |guard=Mid | ||
|description= | |description=Eater of fireball inputs. Gundam pulls out a flail, hitting wit the hilt before whipping the chain and spiked ball. All three hits will combo if the startup hitbox connects. Startup hitbox whiffs on crouching opponents, making it easily whiff punished at close range. If only the ball hitboxes connect, it will deal the first two damage values.<br>Uses the 1st Ball Hitbox twice. Easiest to connect both hitboxes. | ||
}} | }} | ||
{{AttackData- | {{AttackData-RE | ||
|version=B version | |version=B version | ||
|damage= | |damage=14, 12, 11 | ||
|startup= | |startup= | ||
|active= | |active= | ||
| Line 363: | Line 393: | ||
|special cancel=No | |special cancel=No | ||
|guard=Mid | |guard=Mid | ||
|description= | |description=Uses the 1st and 2nd Ball Hitboxes. Has slightly more range than the A version and launches slightly further. | ||
}} | }} | ||
{{AttackData- | {{AttackData-RE | ||
|version=C version | |version=C version | ||
|damage= | |damage=19, 17, 15 | ||
|startup= | |startup=17 | ||
|active= | |active= | ||
|recovery= | |recovery= | ||
| Line 374: | Line 404: | ||
|special cancel=No | |special cancel=No | ||
|guard=Mid | |guard=Mid | ||
|description= | |description=Uses the 2nd and 3rd Ball Hitboxes. Hardest to connect both ball hitboxes due to the smaller hitbox. | ||
}} | }} | ||
}} | }} | ||
Revision as of 23:08, 1 September 2021
Overview
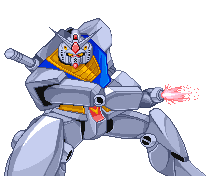
The RX-78-2 Gundam, or just Gundam, is the titular mobile suit and an icon in every sense of the word. Secretly built on Side 7 and Piloted by the Newtype Amuro Ray, the Gundam would turn the tide of the One Year War. In EX Revue, Gundam is a Shoto, an all-rounder with solid options for every situation. Gundam's biggest enemy during a fight can often wind up not being the other player, but rather the player's inputs. With an annoying amount of overlap between special move inputs, it's very easy to accidentally perform the wrong special in a pinch.
Playstyle
| Pros | Cons |
|
|
Normals
5A
|
|---|
5B
|
|---|
5C
|
|---|
2A
|
|---|
2B
|
|---|
2C
|
|---|
Proximity Normals
cl.5B
|
|---|
cl.5C
|
|---|
Jumping Normals
j.A
|
|---|
j.B
|
|---|
j.C
|
|---|
j.2B Speen Speen
|
|---|
Specials
Beam Rifle
236x |
|---|
Beam Saber 623x First Hitbox First Hitbox A Version A Version B Version B Version C Version C Version
|
|---|
Double Beam Saber
214x |
|---|
Gundam Hammer 41236x Startup Hitbox Startup Hitbox 1st, 2nd, and 3rd Ball Hitboxes 1st, 2nd, and 3rd Ball Hitboxes
|
|---|


