DracoFighter/Secret Characters/Fidget: Difference between revisions
No edit summary |
No edit summary |
||
| (3 intermediate revisions by the same user not shown) | |||
| Line 9: | Line 9: | ||
| '''Dash Time''' || 12 Frames | | '''Dash Time''' || 12 Frames | ||
|} | |} | ||
==Story== | ==Story== | ||
| Line 16: | Line 14: | ||
==Gameplay Overview== | ==Gameplay Overview== | ||
Fidget is an oppressive all-rounder with great mobility and quick projectiles. He has very little weaknesses, and can poke out the opponent in a variety of ways, before going in with one of his many approach options. | Fidget is an oppressive all-rounder with great mobility and quick projectiles. He has very little weaknesses, and can poke out the opponent in a variety of ways, before going in with one of his many approach options. He was designed to be a slightly more technical Draco, but whether this was successful is up for debate. | ||
{{ProConTable | {{ProConTable | ||
| Line 35: | Line 33: | ||
{{MoveData | {{MoveData | ||
|image=DracoFighterFidgetJab0.png | |image=DracoFighterFidgetJab0.png | ||
| | |image2=DracoFighterFidgetJab1.png | ||
| | |caption2=you'll be seeing this a lot | ||
|name= N-Attack | |name= N-Attack | ||
|input= 5A | |input= 5A | ||
| Line 72: | Line 70: | ||
{{MoveData | {{MoveData | ||
|image= | |image=DracoFighterFidgetFAttack1.png | ||
|caption= | |caption= | ||
|name= B-Attack | |name= B-Attack | ||
|input= 4A | |input= 4A | ||
|data= | |data= | ||
{{AttackData-DF | {{AttackData-DF | ||
|damage= | |damage=5 | ||
|startup= | |startup=12 | ||
|active= | |active=5 | ||
|faf= | |faf=25? | ||
|onhit=+ | |onhit=+8 (Launcher) | ||
|onblock=- | |onblock=-1? | ||
|description= | |description= | ||
Fidget does a tonfa uppercut, putting him into his Air stance around the peak of his jump. Very quick anti-air and great combo tool, but whiffs on standing opponents (the sole exception being Tusk due to his large hurtbox). This move can also be considered Fidget's neutral jump, since it has very low lag and makes him jump almost straight up. | |||
Exact frame data is difficult since the programmed number (FAF 30) is different from actual engine, which puts him into air stance once he starts falling (about frame 25). The in-game number of -6 on block has therefore been translated to an estimate of -1. | |||
}} | }} | ||
}} | }} | ||
{{MoveData | {{MoveData | ||
|image= | |image=DracoFighterFidgetNSpecial.png | ||
|caption= | |caption= | ||
|name= N-Special | |name= N-Special | ||
| Line 97: | Line 97: | ||
{{AttackData-DF | {{AttackData-DF | ||
|damage=10 | |damage=10 | ||
|startup= | |startup=10 | ||
|active= | |active=60 | ||
|faf=40 | |faf=40 | ||
|onhit=~ | |onhit=~-6 | ||
|onblock=~- | |onblock=~-11 | ||
|description= | |description= | ||
Fidget shoots a quick-moving fireball from his fist, traveling forward in a straight line. This fireball lasts a noticeably shorter amount of time than most projectiles, allowing him to pressure from only a bit further than mid-range. However, it's a very safe way to apply pressure from a distance. | |||
}} | }} | ||
}} | }} | ||
{{MoveData | {{MoveData | ||
|image= | |image=DracoFighterFidgetFly.png | ||
|caption2= have fun trying to touch him | |caption2= have fun trying to touch him | ||
|name= F-Special / B-Special | |name= F-Special / B-Special | ||
| Line 122: | Line 121: | ||
|onblock= -- | |onblock= -- | ||
|description= | |description= | ||
Fidget flies forward or backwards depending on the input. Notably, the backwards jump has both height and distance that's shorter than his forward jump, so he's not able to run away as easily. These can be used defensively as an escape, or offensively to force a mix-up situation. Air options are allowed a bit after you reach the peak of your jump, which is about 22 frames for a backwards jump and 26 frames for a forward jump. | |||
}} | }} | ||
}} | }} | ||
{{MoveData | {{MoveData | ||
|image= | |image=DracoFighterFidgetJab1.png | ||
|caption= | |caption=you'll be seeing this a lot | ||
|name= Air-Attack | |name= Air-Attack | ||
|input= j.A | |input= j.A | ||
|data= | |data= | ||
{{AttackData-DF | {{AttackData-DF | ||
|damage= | |damage=5 | ||
|startup= | |startup=10 | ||
|active= | |active=8 | ||
|faf=30 | |faf=30 | ||
|onhit= | |onhit=+11 (Launch) | ||
|onblock= | |onblock=+3 | ||
|description= | |description= | ||
Fidget swings his tonfa mid-air, which is a launcher that's plus on block, for some reason. Very good pressure tool, and guarantees an N-Attack on hit. Good combo tool when combined with B-Attack, and can even lead back into a B-Attack in certain situations. Very fun! | |||
}} | }} | ||
}} | }} | ||
{{MoveData | {{MoveData | ||
|image= | |image=DracoFighterFidgetNSpecial.png | ||
|caption= | |caption=had to be nerfed from akuma fireballs | ||
|name= Air-Special | |name= Air-Special | ||
|input= j.B | |input= j.B | ||
| Line 153: | Line 152: | ||
|damage=10 | |damage=10 | ||
|startup=20 | |startup=20 | ||
|active= | |active=60 | ||
|faf= | |faf=35 | ||
|onhit=~+ | |onhit=~+8 | ||
|onblock=~ | |onblock=~+3 | ||
|description= | |description= | ||
Fidget shoots a fireball in a straight line forwards. Mainly used to get yourself out of trouble due to the backwards momentum, but can also discourage opponents from jumping, as it acts as an active anti-air. | |||
}} | }} | ||
}} | }} | ||
{{MoveData | {{MoveData | ||
|image= | |image=DracoFighterFidgetGrab.png | ||
|caption= | |caption= | ||
|name= Air-Grab | |name= Air-Grab | ||
| Line 169: | Line 168: | ||
|data= | |data= | ||
{{AttackData-DF | {{AttackData-DF | ||
|damage= | |damage=3 | ||
|startup=12 | |startup=12 | ||
|active= | |active=16 | ||
|faf= | |faf=50 | ||
|onhit=-- | |onhit=-- | ||
|onblock=-- | |onblock=-- | ||
|description= | |description= | ||
Fidget's air mix-up, and identical to N-Grab. As it doesn't affect momentum, doing an Air-Special and cancelling it into a grab makes you have backwards momentum while grabbing. | |||
}} | }} | ||
}} | }} | ||
{{MoveData | {{MoveData | ||
|image= | |image=DracoFighterFidgetGrab.png | ||
|caption= | |caption= | ||
|name= N-Grab | |name= N-Grab | ||
|input= 5C | |input= 5C | ||
|data= | |data= | ||
{{AttackData-DF | {{AttackData-DF | ||
|damage= | |damage=3 | ||
|startup=12 | |startup=12 | ||
|active=16 | |active=16 | ||
|faf= | |faf=50 | ||
|onhit=-- | |onhit=-- | ||
|onblock=-- | |onblock=-- | ||
|description= | |description= | ||
Fidget grabs the opponent and knocks them into the air. Your main grab for combos, leads into the good stuff. | |||
}} | }} | ||
}} | }} | ||
{{MoveData | {{MoveData | ||
|image= | |image= | ||
|caption= | |caption= | ||
|name= F-Grab | |name= F-Grab | ||
|input= 6C | |input= 6C | ||
|data= | |data= | ||
{{AttackData-DF | {{AttackData-DF | ||
|damage= | |damage=3 | ||
|startup= | |startup=12 | ||
|active= | |active=16 | ||
|faf= | |faf=50 | ||
|onhit=-- | |onhit=-- | ||
|onblock=-- | |onblock=-- | ||
|description= | |description= | ||
Fidget has slight forward momentum while grabbing before throwing the opponent forward. Has fewer combo follow-ups, but still works decently. | |||
}} | }} | ||
}} | }} | ||
{{MoveData | {{MoveData | ||
|image= | |image= | ||
|caption= | |caption= | ||
|name= B-Grab | |name= B-Grab | ||
| Line 223: | Line 222: | ||
|data= | |data= | ||
{{AttackData-DF | {{AttackData-DF | ||
|damage= | |damage=3 | ||
|startup=12 | |startup=12 | ||
|active=16 | |active=16 | ||
|faf= | |faf=50 | ||
|onhit=-- | |onhit=-- | ||
|onblock=-- | |onblock=-- | ||
|description= | |description= | ||
Fidget throws the opponent backwards. Allows for combos. | |||
}} | }} | ||
}} | }} | ||
| Line 239: | Line 238: | ||
*'''Grab > (walk back) > F-Attack > B-Attack > Air-Attack > N-Attack''' - MAX Damage (40) | *'''Grab > (walk back) > F-Attack > B-Attack > Air-Attack > N-Attack''' - MAX Damage (40) | ||
*'''Grab > (walk forward) > B-Attack > Air-Attack > B-Attack > Air-Attack > N-Attack''' - (35) | |||
*'''Grab > B-Attack > Air-Special > F-Attack''' - (33) | |||
*'''Grab > F-Attack > N-Attack''' - (30) | |||
===F-Grab=== | |||
*'''F-Grab > B-Attack > Air-Special > F-Attack''' - MAX Damage (33) Only against wall, does not work against Plexie | |||
*'''F-Grab > F-Attack > N-Attack''' - (30) Doesn't work against Plexie unless she's on wall | |||
*'''F-Grab > (forward dash) > F-Attack''' - (18) Possible alternative against Plexie, tight dash timing | |||
===B-Grab=== | |||
*'''B-Grab > (walk to other side) > B-Attack > Air-Attack > B-Attack > Air-Attack > N-Attack''' - MAX Damage (35) | |||
*'''B-Grab > B-Attack > Air-Special > F-Attack''' - (33) | |||
*'''B-Grab > (walk to other side) > F-Attack > N-Attack''' - (30) | |||
===Air-Attack=== | |||
*'''Air-Attack > B-Attack > Air-Attack > N-Attack''' - MAX Damage (27) Doesn't work on Plexie, may require late hit depending on character; works on all characters if first hit is anti-air | |||
*'''Air-Attack > N-Attack''' - (17) | |||
===B-Attack=== | |||
B-Attack combos are very dependent on character jump height and the position you hit them, since (outside of Tusk) B-Attack can only hit aerial opponents. | |||
*'''B-Attack > Air-Special > F-Attack > N-Attack''' - MAX Damage (42) Could only get this to work on Tusk, grounded | |||
*'''B-Attack > B-Attack > Air-Special > F-Attack''' - (35) First hit is anti-air | |||
*'''B-Attack > Air-Attack > B-Attack > Air-Attack > N-Attack''' - (32) Could only get this to work on Tusk, grounded | |||
*'''B-Attack > B-Attack > Air-Attack > N-Attack''' - (27) First hit is anti-air, most consistent combo | |||
===F-Attack=== | |||
*'''F-Attack (second hit only) > B-Attack > Air-Attack > B-Attack > Air-Attack > N-Attack''' - MAX Damage (37) Only against wall | |||
*'''F-Attack (second hit only) > F-Attack > N-Attack''' - (32) | |||
*'''F-Attack > N-Attack''' - (27) Main F-Attack combo | |||
==Strategy== | ==Strategy== | ||
Fidget has 2 main areas of strength, which is at mid range and close range. At mid range he can pelt the opponent with projectiles and force a reaction, or patiently wait out a whiff and punish with a jump-in or F-Attack. Since his F-Attack is disjointed, it can punish some characters for using projectiles when timed well. At close range, his main mix-ups will be between N-Attack (which can essentially be spammed), B-Attack, and N-Grab. B-Attack can catch an escaping jump under pressure, but also allows Fidget to enter his flying stance and continue his pressure with Air-Attacks. N-Grab is the mix-up for opponents that stay blocking. | |||
At far range, Fidget can't exert much pressure, but should be able to find his way in by destroying projectiles with N-Attack or jumping over them. Whether close range or mid range is ideal for him depends on the opponent, but the general idea is to be at the range that your opponent is weakest at. | |||
{{Navbox-DF}} | {{Navbox-DF}} | ||
[[Category:DracoFighter]] | [[Category:DracoFighter]] | ||
Latest revision as of 13:28, 18 November 2022
| Fidget | |
|---|---|
| Health | 100 |
| Dash Time | 12 Frames |
Story
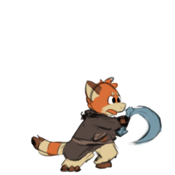
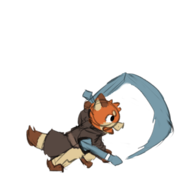
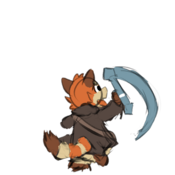
Fidget is a red panda-dragon born with fire powers, and trains every day to be a hero of legend. Assisting him is his bag, which essentially acts as a small pocket dimension where he fits adventuring gear for any situation. While it carries many weapons, he usually holds his main weapon of choice, a blue metal tonfa.
Gameplay Overview
Fidget is an oppressive all-rounder with great mobility and quick projectiles. He has very little weaknesses, and can poke out the opponent in a variety of ways, before going in with one of his many approach options. He was designed to be a slightly more technical Draco, but whether this was successful is up for debate.
| Strengths | Weaknesses |
|---|---|
|
|
Move List
Standing Normals
N-Attack 5A you'll be seeing this a lot you'll be seeing this a lot
|
|---|
F-Attack
6A |
|---|
B-Attack
4A |
|---|
N-Special
5B |
|---|
F-Special / B-Special 6B / 4B have fun trying to touch him have fun trying to touch him
|
|---|
Air-Attack j.A you'll be seeing this a lot you'll be seeing this a lot
|
|---|
Air-Special j.B had to be nerfed from akuma fireballs had to be nerfed from akuma fireballs
|
|---|
Air-Grab
j.C / j.A+B |
|---|
N-Grab
5C |
|---|
F-Grab
6C |
|---|
B-Grab
4C |
|---|
Combos
N-Grab / Air-Grab
- Grab > (walk back) > F-Attack > B-Attack > Air-Attack > N-Attack - MAX Damage (40)
- Grab > (walk forward) > B-Attack > Air-Attack > B-Attack > Air-Attack > N-Attack - (35)
- Grab > B-Attack > Air-Special > F-Attack - (33)
- Grab > F-Attack > N-Attack - (30)
F-Grab
- F-Grab > B-Attack > Air-Special > F-Attack - MAX Damage (33) Only against wall, does not work against Plexie
- F-Grab > F-Attack > N-Attack - (30) Doesn't work against Plexie unless she's on wall
- F-Grab > (forward dash) > F-Attack - (18) Possible alternative against Plexie, tight dash timing
B-Grab
- B-Grab > (walk to other side) > B-Attack > Air-Attack > B-Attack > Air-Attack > N-Attack - MAX Damage (35)
- B-Grab > B-Attack > Air-Special > F-Attack - (33)
- B-Grab > (walk to other side) > F-Attack > N-Attack - (30)
Air-Attack
- Air-Attack > B-Attack > Air-Attack > N-Attack - MAX Damage (27) Doesn't work on Plexie, may require late hit depending on character; works on all characters if first hit is anti-air
- Air-Attack > N-Attack - (17)
B-Attack
B-Attack combos are very dependent on character jump height and the position you hit them, since (outside of Tusk) B-Attack can only hit aerial opponents.
- B-Attack > Air-Special > F-Attack > N-Attack - MAX Damage (42) Could only get this to work on Tusk, grounded
- B-Attack > B-Attack > Air-Special > F-Attack - (35) First hit is anti-air
- B-Attack > Air-Attack > B-Attack > Air-Attack > N-Attack - (32) Could only get this to work on Tusk, grounded
- B-Attack > B-Attack > Air-Attack > N-Attack - (27) First hit is anti-air, most consistent combo
F-Attack
- F-Attack (second hit only) > B-Attack > Air-Attack > B-Attack > Air-Attack > N-Attack - MAX Damage (37) Only against wall
- F-Attack (second hit only) > F-Attack > N-Attack - (32)
- F-Attack > N-Attack - (27) Main F-Attack combo
Strategy
Fidget has 2 main areas of strength, which is at mid range and close range. At mid range he can pelt the opponent with projectiles and force a reaction, or patiently wait out a whiff and punish with a jump-in or F-Attack. Since his F-Attack is disjointed, it can punish some characters for using projectiles when timed well. At close range, his main mix-ups will be between N-Attack (which can essentially be spammed), B-Attack, and N-Grab. B-Attack can catch an escaping jump under pressure, but also allows Fidget to enter his flying stance and continue his pressure with Air-Attacks. N-Grab is the mix-up for opponents that stay blocking.
At far range, Fidget can't exert much pressure, but should be able to find his way in by destroying projectiles with N-Attack or jumping over them. Whether close range or mid range is ideal for him depends on the opponent, but the general idea is to be at the range that your opponent is weakest at.


