Fighting Vipers 2/HUD: Difference between revisions
Jump to navigation
Jump to search

(Created page with "== Fighting Vipers 2/HUD == center|720px '''1: Health''' - Life bar is displayed. '''2. Round wins''' – Yellow orb represents rounds won. '''3:...") |
No edit summary |
||
| Line 1: | Line 1: | ||
== Fighting Vipers 2/HUD == | == Fighting Vipers 2/HUD == | ||
[[Image:FV2_Help_HUD.png|center|720px]] | [[Image:FV2_Help_HUD.png|center|720px]] | ||
[[Image:FV2_Help_HUD_2.png|center]] | |||
'''1: Health''' - Life bar is displayed. | '''1: Health''' - Life bar is displayed. | ||
| Line 10: | Line 11: | ||
'''4: Top armor''' – Shows how the top-half of your armor is doing. The red means it’s broken. | '''4: Top armor''' – Shows how the top-half of your armor is doing. The red means it’s broken. | ||
'''5: | '''5: Bottom armor''' – Shows how the lower half of your armor is doing. | ||
'''6: SKO''' - Super K.O. is ready to be used. | |||
{{Navbox-FV2}} | {{Navbox-FV2}} | ||
[[Category:Fighting Vipers 2]] | [[Category:Fighting Vipers 2]] | ||
Latest revision as of 08:58, 30 August 2022
Fighting Vipers 2/HUD


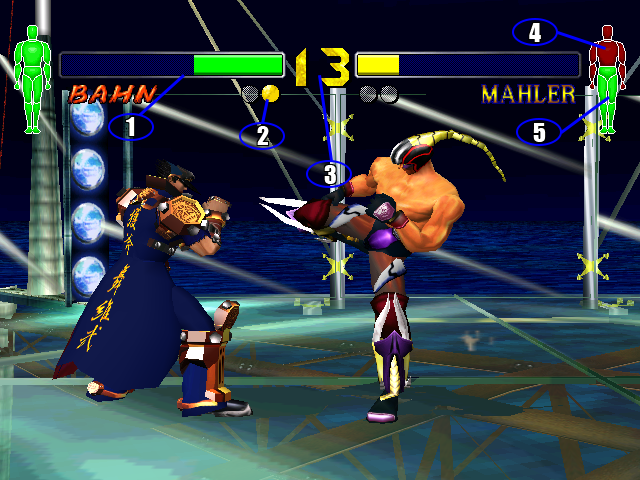
1: Health - Life bar is displayed.
2. Round wins – Yellow orb represents rounds won.
3: Timer – Shows how much time is left. 45 seconds is the default time given.
4: Top armor – Shows how the top-half of your armor is doing. The red means it’s broken.
5: Bottom armor – Shows how the lower half of your armor is doing.
6: SKO - Super K.O. is ready to be used.


