Rainbowcore Hypernova/Orange

From Mizuumi Wiki
Jump to navigation Jump to search
Intro

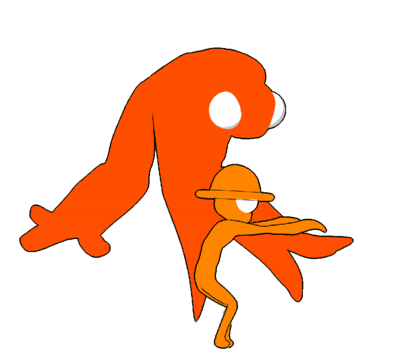
Orange is a puppet character, focused on playing around their summon (called Moe by the community) in neutral, combos, pressure, and defense. Moe lightly glides behind Orange at all times, matching their walk speed but never going faster or jumping. Orange's controls are literally split in two, with Orange themselves being controlled with the A buttons while Moe is controlled with the B buttons. Put together, the pair are able to put out solid damage, unreactable mixups or unblockables, and set up combo breakers to ensure the opponent is left helpless to the onslaught. You can even send Moe safely to zone while you sit fullscreen laughing at the opponents struggles to evade your fullscreen mixups and combos.

Where Orange struggles is when they get pinned down without Moe nearby. Since Moe only moves at Orange's walkspeed, it's quite easy to get separated just by moving around and trying to escape combos. This issue is exacerbated by the fact that Orange has to go through a small, vulnerable animation to make Moe move faster or attack, leaving them vulnerable. Orange's solo kit is a bit lackluster: they can't complete many combos, their fastest button is 4 frames, and many of their normals are awkward or just standard. If the opponent can force you away from Moe and run offense, Orange can be found in an extremely difficult spot.

Orange gives you the unique experience of playing two characters as one, and in reward for mastering an awkward kit, you get suffocating offense and mixup, or the best zoning potential in the game. Put in the time to learn Orange, and you'll become a powerhouse ready for any situation.

Pros Cons
  • Two is Better: Orange and Moe together are an extremely powerful duo. Since Moe naturally breaks combos, challenging their offense is difficult for a lot of characters.
  • Zoning: Moe's normals control great space, with anti-airs, high/low mixups, and the ability to chain normals together in multiple sequences. The opponent can't directly hit Moe either, allowing you to zone indefinitely and keep Orange themselves perfectly safe.
  • Mixup: Moe has an extremely fast low and fairly fast overhead, both of which can be enforced by Orange's own normals. Orange also has a command grab, meaning even opponents who can block everything aren't safe.
  • Solo Gameplay: Without Moe nearby, Orange themselves is quite weak, with an awkward kit that doesn't really work well. Keeping Moe where he needs to be is key.
  • Combos: Converting hits into big damage is reliant on having Moe in a good position. If Moe is in the wrong spot, getting much reward from your average hit is difficult or impossible.
  • Buttons: With the exception of j.2A, many of Orange's buttons are lackluster, being slow and lacking much range or good cancels.
RCHN Orange Name.PNG

RCHN Orange Idle.png
Stats

Health: = 780
Fastest Button: = 2A (4F)
Invincible Moves: = 623B, 632146B

Normals

5A
Damage Guard First Active Active Recovery On Hit On Block
20 Mid 6 - - Launch -11
  • Jump cancellable and cancels to all other normals, including Moe normals

Orange does a big slap that moves forward a bit. Slower than the average 5A at 6 frame startup, but the forward movement does give it a bit more range. Important to link into in combos as a launcher or relaunch tool, and your only real way to start combos when solo.


5B
Damage Guard First Active Active Recovery On Hit On Block
20 High - - - Launch +?
  • Slams at low percents

Moe slams their fist down with an overhead swing. Great to mix in with other grounded Moe buttons, and the high hitstun makes it useful for combo extensions or securing knockdowns for OTG extensions.


2A
Damage Guard First Active Active Recovery On Hit On Block
20 Low 4 - - Launch -9
  • Fastest normal

A little swipe at the opponents feet. Launching low, and your fastest button, making it your primary solo button for offense and defense. The main issue with 2A is the lack of safe and effective cancels afterwards. Since it can't chain into Moe normals, you usually have to enforce plus frames with 41236A/B or 236A/B, both of which require Moe to be nearby.


2B
Damage Guard First Active Active Recovery On Hit On Block
20 Low - - - Launch -?
  • Conserves Moe's momentum for following cancels

Moe slides along the ground with an active low. Stellar button, with a variety of uses: picking up combos, mixing with 5B, pushing Moe closer to the opponent or bringing them closer to Orange, and even setting it up on defense to break combos while you were holding downback. The main drawback here is that it isn't active for the full duration, and carries some hefty recovery. Should you whiff this, or choose to not cancel it, the opponent can abuse Moe being stuck in recovery to approach or run away.


j.A
Damage Guard First Active Active Recovery On Hit On Block
40 High 2 - - Launch Varies
  • Chains into other air buttons

A downward slap that mainly sees use in combos and pressure sequences. The launch is great, it does more damage than the average A normal, and it can even link into itself very consistently at most percents, allowing you to do some damaging solo combos. Since it cancels to other air normals, you can use it to set up double overheads with j.2A, or some funky pressure into high/low mix with j.B or j.2B.


j.B
FEED MOE!
FEED MOE!
Damage Guard First Active Active Recovery On Hit On Block
20 Mid - - - Launch -?
  • Slams at low percent

A pillar of a move that extends from the bottom to the top of the screen. A beast of a move for Orange to use in neutral, pressure, and offense, thanks largely to the massive hitbox. The forward movement makes it great as a bridge point from other Moe normals, especially when used during a shorthop, where you can land and threaten a strong high/low mixup with 5B/2B immediately. Another strong use of this move is countering projectile zoning by using it to safely delete projectiles and approaching behind it.

Command Normals

6A
Damage Guard First Active Active Recovery On Hit On Block
20 Mid 10 - - Knock Away -7
  • Listed as +2 in the in-game frame data tool

Likely your least useful button. 6A functions similar to a slower 5A with a bit more range and a different knockback angle. The extra range is very small, and it pays for this one upside with 4 extra frames of startup and much less utility. Rarely useful in any scenario.


6B
Damage Guard First Active Active Recovery On Hit On Block
20 Mid 2 - - -8 -11
  • Can only cancel to other Moe normals during recovery

A fast and long ranged poke that can be used to keep opponents who are close from approaching. Unfortunately, it can only cancel into other Moe normals/specials during recovery frames, limiting it as a pressure or combo tool. This can still set up delayed frametraps to catch movement and mashing however, so it isn't useless by any means.


j.2A
Damage Guard First Active Active Recovery On Hit On Block
20 High 2 - - Slam Varies
  • Unusually high hitstun and blockstun

A drill kick with an amazing hitbox. Great air-to-ground normal that can be hard or even impossible to directly challenge. Puts the opponent in a ton of hitstun or blockstun, allowing easy extensions and unmashable high/low mixups. Great in combos as well for the slam effect, and can even net solo knockdowns at some percents.


j.2B
Damage Guard First Active Active Recovery On Hit On Block
40 Mid 2 - - Knock Away +?
  • Highest damage Moe normal

Moe swipes upwards into the air. Knocks the opponent away, making it useful to gain some distance, or to swat the opponent towards Orange after Moe goes through them. Does more damage than other Moe normals as well, making it rewarding to combo into, but it isn't the easiest tool to fit into combos.

Special Moves

236A/B
A Damage Guard First Active Active Recovery On Hit On Block
20,20(20,20) Mid 2 - - Launch -7
B
1 Bar
Damage Guard First Active Active Recovery On Hit On Block
20,20(20,20) Mid 2 - - Launch -7
  • Data in parentheses is Moe's data
  • Drops the final hit incredibly often

Orange does two quick punches that launch upward, which Moe then copies to combo the opponent. The B version sends Moe flying forward. It is four hits total, but the fourth hit will often drop due to the third hit having higher knockback values, limiting the damage. This mostly sees use to end solo combos, or to get a high hitting attack out with Moe to stop double jumps. Theoretically this could be extremely plus on block, but Moe will often whiff over crouchers, leaving Orange punishable.


623A/B
A Damage Guard First Active Active Recovery On Hit On Block
20 Grab 2 - - Knock Away Grab
B
1 Bar
Damage Guard First Active Active Recovery On Hit On Block
60 Grab 2 - - Knock Away Grab
  • Can be used in combos, and will grab airborne opponents

Orange's only solo special, and a great one at that. This is a real command grab, adding a unique layer to their offense that most Rainbowcore characters don't get. It's incredibly useful in combos as well, where it can be EX Cancelled for extensions, or linked off of at high percents. Doing 623A > 623B is an incredibly common strategy to get great damage and avoid the sideswap for only one bar.


41236A/B
A Damage Guard First Active Active Recovery On Hit On Block
20(80) Mid 9 - - Knock Away(Launch) -20
B
1 Bar
Damage Guard First Active Active Recovery On Hit On Block
20(80) Mid 6 - - Knock Away(Launch) -14
  • Has a different knockback angle depending on whether Orange or Moe hits

A large sweep with a great hitbox that works wonders as a combo ender and extender. Even the meterless version does massive damage, and the launch gives simple and effective extensions, especially once it starts knocking down. Fullscreen combos will use this liberally.

Super

632146B
Damage Guard First Active Active Recovery On Hit On Block
20x10 Mid 2 - - Launch +?
  • Orange is invincible during the startup animation.

Moe starts spinning rapidly and rushes towards Orange, dealing damage on the way. Can hit up to a maximum of 7 times, and Orange can hit them while Moe is hitting them for even more damage. Great utility super for defense, and for calling Moe back when they get too far away. This also lets you run mixups on a blocking opponent for the entire animation, making it very useful as a meter dump during blockstrings or to call out reversals. Moe preserves their momentum when this move is activated, making for some funny scenarios where Moe shoots across the screen.


General
Controls
HUD
System
FAQ
Characters
Red
Orange
Yellow
Green
Blue
Indigo
Violet