Rainbowcore Hypernova/Orange: Difference between revisions
Callie Rose (talk | contribs) mNo edit summary |
Callie Rose (talk | contribs) No edit summary |
||
| Line 4: | Line 4: | ||
<div style="padding: 0px 5px; float:left;"> | <div style="padding: 0px 5px; float:left;"> | ||
{{Content Box|header={{Big|'''Intro'''}}|content= | {{Content Box|header={{Big|'''Intro'''}}|content= | ||
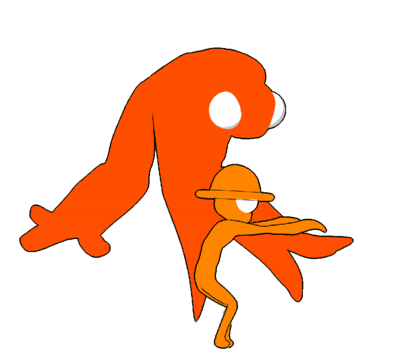
'''Orange''' is a puppet character, focused on playing around his summon (called '''Moe''' by the community) in neutral, combos, pressure, and defense. Moe lightly glides behind Orange at all times, matching their walk speed but never going faster or jumping. Orange's controls are literally split in two, with Orange themselves being controlled with the {{clr|1|'''A'''}} buttons while Moe is controlled with the {{clr|2|'''B'''}} buttons. Put together, the pair are able to put out solid damage, unreactable mixups or unblockables, and set up combo breakers to ensure the opponent is left helpless to the onslaught, or you can send Moe safely to zone while you sit fullscreen laughing at the opponents struggles to evade your fullscreen mixups and combos. | |||
Where Orange struggles is when they get pinned down without Moe nearby. Since Moe only moves at Orange's walkspeed, it's quite easy to get separated just by moving around and trying to escape combos. This issue is exacerbated by the fact that Orange has to go through a small, vulnerable animation to make Moe move faster or attack, leaving them vulnerable. Orange's solo kit is a bit lackluster: they can't complete many combos, her fastest button is 8 frames, and many of their normals are awkward or just standard. If the opponent can force you away from Moe and run offense, Orange can be found in an extremely difficult spot. | |||
Orange gives you the unique experience of playing two characters as one, and in reward for mastering an awkward kit, you get suffocating offense and mixup, or the best zoning potential in the game. Put in the time to learn Orange, and you'll become a powerhouse ready for any situation. | |||
}} | |||
{{StrengthsAndWeaknessesNoPlaystyle | |||
|pros= | |||
*'''Two is Better:''' Orange and Moe together are an extremely powerful duo. Since Moe naturally breaks combos, challenging their offense is difficult for a lot of characters. | |||
*'''Zoning:''' Moe's normals control great space, with anti-airs, high/low mixups, and the ability to chain normals together in multiple sequences. The opponent can't directly hit Moe either, allowing you to zone indefinitely and keep Orange himself perfectly safe. | |||
*'''Mixup:''' Moe has an extremely fast low and a fairly fast overhead, both of which can be enforced by Orange's own normals. Orange also has a command grab, meaning even opponents who can block everything aren't safe. | |||
|cons= | |||
*'''Solo Gameplay:''' Without Moe nearby, Orange themself is quite weak, with an awkward kit that doesn't really work well. Keeping Moe where he needs to be is key. | |||
*'''Combos:''' Converting hits into big damage is reliant on having Moe in a good position. If Moe is in the wrong spot, getting much reward from your average hit is difficult or impossible. | |||
*'''Buttons:''' With the exception of {{clr|1|'''j.2A'''}}, many of Orange's buttons are lackluster, being slow and lacking much range or good cancels. | |||
}} | }} | ||
</div> | </div> | ||
|content2= | |content2= | ||
{{Content Box|header=<center>[[File:RCHN_Orange_Name.PNG|frameless|150px]]</center>|content= | {{Content Box|header=<center>[[File:RCHN_Orange_Name.PNG|frameless|150px]]</center>|content= | ||
<center><div style="display:flex; overflow-x:hidden; justify-content: {{{portraitalign|center}}};">[[File:RCHN_Orange_Idle.png|frameless|400px]]</div></center> | <center><div style="display:flex; overflow-x:hidden; justify-content:center;{{{portraitalign|center}}};">[[File:RCHN_Orange_Idle.png|frameless|400px]]</div></center> | ||
}} | }} | ||
{{Content Box|header='''Stats'''|content= | |||
:'''Health:''' = 780 | |||
:'''Walk Speed:''' = | |||
:'''Run Speed:''' = | |||
:'''Fastest Button:''' = 2A (4F) | |||
}} | }} | ||
}} | }} | ||
== Normals == | == Normals == | ||
{{MoveData | {{MoveData | ||
Revision as of 11:06, 6 May 2023
Orange is a puppet character, focused on playing around his summon (called Moe by the community) in neutral, combos, pressure, and defense. Moe lightly glides behind Orange at all times, matching their walk speed but never going faster or jumping. Orange's controls are literally split in two, with Orange themselves being controlled with the A buttons while Moe is controlled with the B buttons. Put together, the pair are able to put out solid damage, unreactable mixups or unblockables, and set up combo breakers to ensure the opponent is left helpless to the onslaught, or you can send Moe safely to zone while you sit fullscreen laughing at the opponents struggles to evade your fullscreen mixups and combos.
Where Orange struggles is when they get pinned down without Moe nearby. Since Moe only moves at Orange's walkspeed, it's quite easy to get separated just by moving around and trying to escape combos. This issue is exacerbated by the fact that Orange has to go through a small, vulnerable animation to make Moe move faster or attack, leaving them vulnerable. Orange's solo kit is a bit lackluster: they can't complete many combos, her fastest button is 8 frames, and many of their normals are awkward or just standard. If the opponent can force you away from Moe and run offense, Orange can be found in an extremely difficult spot.
Orange gives you the unique experience of playing two characters as one, and in reward for mastering an awkward kit, you get suffocating offense and mixup, or the best zoning potential in the game. Put in the time to learn Orange, and you'll become a powerhouse ready for any situation.
| Pros | Cons |
|
|
Normals
5A
|
|---|
5B
|
|---|
2A
|
|---|
2B
|
|---|
j.A
|
|---|
j.B
|
|---|
Command Normals
6A
|
|---|
6B
|
|---|
j.2A
|
|---|
j.2B
|
|---|
Special Moves
236A/B
|
|---|
623A/B
|
|---|
41236A/B
|
|---|
Super
632146B
|
|---|

