User:Keysmash: Difference between revisions
No edit summary |
(first draft of ranger slayer pros and cons) |
||
| Line 24: | Line 24: | ||
=Ranger Slayer= | =Ranger Slayer= | ||
{{StrengthsAndWeaknesses | |||
| intro = '''The Ranger Slayer''' is a zoner with an outstandingly safe gameplan | |||
| pros = | |||
*'''Strong zoning''' - A dash-cancellable 5M and her unique arrow cancels give Kim very strong space control | |||
*'''Large safety''' - 4S makes her able to escape from many dicey situations and start zoning again | |||
| cons= | |||
*'''Weak damage''' - Kim's damage is nowhere near the peak of this game, needing difficult throw whiff cancels to consistently kill higher health characters | |||
*'''Lacking solo mix''' - Without the assistance of her partners, she can severely struggle to open the opponent up | |||
|tablewidth=80 | |||
}} | |||
==Overview== | ==Overview== | ||
Revision as of 09:05, 12 October 2022
Controls
Basic Notation
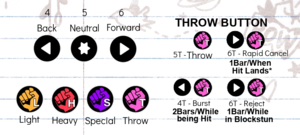
Tough Love Arena has simple controls, with only three directions and four attack buttons. All moves are described with a number and letter combination.
Examples:
- The Spices' Trip is abbreviated as 4L because it's performed by inputting back + light.
- The Carbs' Whip is called 5H since it's performed by pressing heavy + not pressing a directional input.
- Jump is performed with forward and special, so its notation is 6S.
Additional notes
- Notation always assumes you are facing right. When facing left, you will need to reverse the inputs.
- When a move can be performed with multiple input directions, it's usually notated like a standing move. For instance, carbs and meats only have one move mapped to the light button which is written as 5L.
- In addition to basic move notation, Rapid Cancel is commonly abbreviated as RC (instead of 6T) when notating combos.
- Also in combos, directions for cancels are only written out if they are different from the input preceding them.
Example: The carbs' heavy autocombo is written as 5HHH because you can simply press the heavy button three times, whereas Noodle comboing slap into whip splash is written as 5L6H because you need to hold forwards to get whip splash. - While cancels are notated as one string of letters and numbers, links and juggles will be signified by a space between the two moves.
Example: In the spice universal combo 5HL 5LHH 6S 6S 5HH you will link trip to flick (first space) and juggle two jumps as well as a sweep (second to fourth spaces). - Note that there will always be a space before and after a Rapid Cancel, even though you cancel into it as the name would suggest.
Universal Actions
To make TLA especially easy to learn for beginners, all characters share some moves. To learn about these, check Tough Love Arena/System.
Ranger Slayer
| The Ranger Slayer is a zoner with an outstandingly safe gameplan | |
| Pros | Cons |
|
|
Overview
Kim is one of the game's dedicated zoners. She shines in neutral due to her arrow cancels and dash cancellable 5M. However, she has generally weak solo mixup options paired with subpar damage.
Slayer requires a team that can help her enforce her zoning patterns and convert stray hits into big damage. For example, Scorpina complements Slayer quite well because her assist provides Kim with a gigantic fullscreen presence and you can tag into Scorpina for ToD combos.
Also look to setup sandwich situations by calling assist and doing 6S~L. When setting up pressure with Slayer, you will live and breathe this mixup, as it is quite potent while also doubling as a safe way to rotate characters.
Her assist is great for this too as she jumps backwards first before firing a volley of arrows, so you don't have to worry about tagging into a scramble.
With how she controls the screen, Slayer can go toe to toe in the neutral against many of the game's top tiers while having few truly poor matchups. That being said, she lacks significant payoff and struggles to open the opponent up. She's a character who needs a lot of help from her team, but contributes quite a bit as well, and is worth picking if you enjoy zoning or want an easy way to disengage from scramble situations.
Unique Mechanic: Nock Charge
Kim's 5S is a power-up move called Arrow Nock.
- You can store one nock charge at a time.
- Attempting to charge again when already powered up only regains you the same charge.
- Charge is expended whenever you use a move with arrows (that being: 5M, 4M, 6M, j.M, 4S, 6S~L and 6S~M) or use 6S~H.
- A nock charge powers up exactly one valid move.
- Nock charge allows 5M and 4M to do chip damage and increases fired arrow count on all arrow moves (see movelist for more details).
- 5S itself can be comboed into and out of with the right routes, giving you a much appreciated damage increase if you can fit in more arrow moves.
Ryu
Overview
Ryu is a grounded shoto adapted for the fast-paced gameplay of Battle for the Grid. He can control grounded space on point with Hadoukens in three variable speeds or backing up other characters with his amazing assist.
Ryu can consistenly kill characters from one hit even with somewhat limited resources, but he may struggle to land that hit due to his generally limited mix-up potential.
He can use both normal and zord meter very well and supplies a lot to his team through his double Hadouken assist, making him a strong character to play in the mid or anchor slot.
Pick Ryu if you want a basic character who deals lots of damage in flashy combos and adds great value to the team.
