![]()

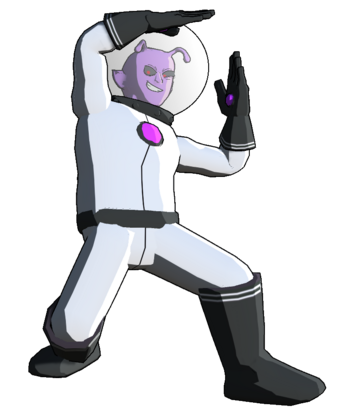
Duels of Fortune/Black Heart
Jump to navigation
Jump to search


Character Properties
Overview
Blackheart is Clyde's evil clone, and accordingly their toolkit is just as twisted as their personality. Blackheart has one of the most adaptable movesets in the game, with no glaring flaws, compounded by them also having possibly the strongest mixup game in the cast. Blackheart's movement is possibly the best set in the game, taking not only a low profile forward dash from Clyde, but also a low profile back dash, upwards air dashes, and specials like 4S and j.S that make them even harder to pin down. This combination makes Blackheart near impossible to keep out to any meaningful degree. This would be strong on its own but Blackheart's pokes are almost as strong too. Their 2M series lets them attack three different angles via inputting 1/2/3M, the longest of which 3M being capable of converting off hits from across the screen. Other large normals like 2H, 4H, and j.H are strong too, hitting opponents at ranges most can't easily contest. Adding to this is these normals' ability to convert into full damage and oki in almost every situation, which leads to Blackheart's powerful pressure and okizeme. Blackheart has a multitude of mixups, from basic high/lows using their 5H overhead and numerous lows, to left/rights employing 2H's unique ability to side switch on block, and even the somewhat gimmicky mixups of 5S and 5SP. If these were easy to reversal it wouldn't be that dangerous, but Blackheart's 4S has invincibility, allowing it to dodge and punish reversals with a level of consistency other characters wish they had. This all becomes especially deadly when 2SP is used, turning already threatening oki into one of the most dangerous situations in the game.
Blackheart does have minor issues, such as high recovery on their normals and subpar damage, but these can be circumvented by avoiding bigger mistakes.
Playstyle
| Blackheart employs their highly adaptive tool set to outmaneuver the opponent before going into powerful okizeme. | |
| Pros | Cons |
|
|


Character Properties
| Health | 24000 |
| Backdash | 31F Maximum |
| Unique Movement | Low Profile Forward Dash Low Profile Cancelable Back Dash Upwards Air Dash Upwards Cancelable Air Back Dash |
| Fastest Attack | 5L (6F) |
Unique Mechanic: Dashes
Blackheart's ground forward and backdash both low profile, in fact having a lower low profile than even Clyde's forward dash. That's not all that's unique about these dashes either. Blackheart's backdash is one of the only two cancelable backdashes in DoF, making it even less of a committment and allowing for some unique uses. This also means it can be canceled into a long jump like with forward dashes. And on long jumps, Black Heart's long jumps retain the small blob form until canceled into an attack, meaning their hurtbox is significantly smaller than a regular long jump. Combine these together and you get one of the hardest to deal with dashes in the game. Even beyond going past projectiles and such, they can go under things you wouldn't expect like Baron's command grabs and pokes that beat Clyde's forward dash like Shiverskull 5M.
Blackheart's air dashes are unique too. Rather than the usual straight horizontal angle, their airdashes have an upwards arcing angle. Like with other air dashes, you can alter the momentum and angle you come down at by canceling the air dash at different points, making for some very tricky jump arcs. On top of that, Blackheart's back air dash is the only cancelable air back dash in the game, lending it more use than its compatriots. Add in their air specials that alter their momentum with j.S and j.4S, and you get one of the hardest characters to anti-air in the game.
Character Summary
Move list
- Command Normals
- 4H - Surprise!: A long ranged poke that launches.
- j.2H - Head Over Heels: A posing kick that causes a hard knockdown.
- Special Moves
- 5S - Gelatinous Shadow: A built-in mixup. Do nothing to get an overhead. Hold S to get a projectile. Hold 2 to get a low.
- (j.)4S - Trick Punch: A backflip followed by a rushing punch. Hold S to just get the backflip. the backflip doesn't happen in air. Can be jump cancelled.
- (j.)2S - Violent Kicks: An air-invulnerable uppercut.
- j.S - Negative Fire: A rush of air-to-ground projectiles. Can be delayed by holding S.
- Supers
- 5SP - Til Death Do Us Part: A rushing command grab super. Can be angled as an anti-air with 8.
- 2SP - Heart Breaker: Summons a heart that creates a bunch of smaller projectiles.
Quick combo reference
5L > 5M > 5H > 5S: Easy combo for helping beginners. Put a brief description here.
Normal Moves
5L
|
|
|---|---|
Toggle Hitboxes Toggle Hitboxes
|
5M Caption Caption
|
|
|---|---|
Toggle Hitboxes Toggle Hitboxes
|
5H
|
|
|---|---|
Toggle Hitboxes Toggle Hitboxes
|
2L
|
|
|---|---|
Toggle Hitboxes Toggle Hitboxes
|
2M
|
|
|---|---|
Toggle Hitboxes Toggle Hitboxes
|
2H
|
|
|---|---|
Toggle Hitboxes Toggle Hitboxes
|
j.L
|
|
|---|---|
Toggle Hitboxes Toggle Hitboxes
|
j.M
|
|
|---|---|
Toggle Hitboxes Toggle Hitboxes
|
j.H
|
|
|---|---|
Toggle Hitboxes Toggle Hitboxes
|
Command Normals
Command Normal Name
4H |
|
|---|---|
Toggle Hitboxes Toggle Hitboxes
|
Universal Mechanics
Throw
Throw
6H |
|
|---|---|
Toggle Hitboxes Toggle Hitboxes
|
Reversals
Reversal
5R |
|
|---|---|
Toggle Hitboxes Toggle Hitboxes
|
Wakeup Reversal
5R on Wakeup |
|
|---|---|
Toggle Hitboxes Toggle Hitboxes
|
Burst
Burst
5B |
|
|---|---|
Toggle Hitboxes Toggle Hitboxes
|
Taunt
Only add this section if a character has a taunt with a hitbox or some other unique effect like Sylvan's cheat. Otherwise remove it.
Taunt
5T |
|
|---|---|
Toggle Hitboxes Toggle Hitboxes
|
Down Taunt
2T |
|
|---|---|
Toggle Hitboxes Toggle Hitboxes
|
Special Moves
Special Name
5S |
|
|---|---|
Toggle Hitboxes Toggle Hitboxes
|
Special Name
4S |
|
|---|---|
Toggle Hitboxes Toggle Hitboxes
|
Special Name
2S |
|
|---|---|
Toggle Hitboxes Toggle Hitboxes
|
Special Name
j.S |
|
|---|---|
Toggle Hitboxes Toggle Hitboxes
|
Super Move
Super Name 5SP Informative and maybe funny caption Informative and maybe funny caption
|
|
|---|---|
Toggle Hitboxes Toggle Hitboxes
|
Heart Breaker 2SP The Mix-Up Machine™ The Mix-Up Machine™
|
|
|---|---|
Toggle Hitboxes Toggle Hitboxes
|
Strategy
Neutral
Describe how a character plays the neutral game. Add sub-categories if necessary, these should usually be on how you use a specific move.
Offense
Describe how a character runs their offense.
Defense
Describe how a character defends themselves when they're on the receiving end.
Additional Resources
Links to any additional resources like a tutorial video, delete category if there are none. If there aren't any but one gets made later, then re-add the category.
Additional Categories
Add any further categories as needed, just make sure they're worth a whole section.
Combos
General info on a character's combos, such as if they can always end a combo with a super as an ender rather than usual listed enders.
Combo Legend
| ||||||||||||||||||||||||||||||||||||||||||
| ||||||||||||||||||||||||||||||||||||||||||
Basic Combos
Easy combos for starting.
| Combo | Damage | Difficulty | Meter Spent | Position | Notes |
|---|---|---|---|---|---|
| 5L > 5M > 5H > 5S, Ender | X | Very Easy/Easy/Medium/Hard/Very Hard | 0/50/100 | Midscreen/Corner/Near Corner/From Corner |
Description of the combo. |
| Combo | Damage | Difficulty | Meter Spent | Position | Notes |
| 2L > 2M > 2H > 2S, Ender | X | Very Easy/Easy/Medium/Hard/Very Hard | 0/50/100 | Midscreen/Corner/Near Corner/From Corner |
Description of the combo. |
Advanced Combos
Harder combos that deal more damage or provide some other benefit.
| Combo | Damage | Difficulty | Meter Spent | Position | Notes |
|---|---|---|---|---|---|
| 5L > 5M > 5H > 5S, Ender | X | Very Easy/Easy/Medium/Hard/Very Hard | 0/50/100 | Midscreen/Corner/Near Corner/From Corner |
Description of the combo. |
| Combo | Damage | Difficulty | Meter Spent | Position | Notes |
| 2L > 2M > 2H > 2S, Ender | X | Very Easy/Easy/Medium/Hard/Very Hard | 0/50/100 | Midscreen/Corner/Near Corner/From Corner |
Description of the combo. |
X Combo Category
If a character has a specific kind of combo they do that has multiple variants, then you can make a new category for it. If they don't delete this.
| Combo | Damage | Difficulty | Meter Spent | Position | Notes |
|---|---|---|---|---|---|
| 5L > 5M > 5H > 5S, Ender | X | Very Easy/Easy/Medium/Hard/Very Hard | 0/50/100 | Midscreen/Corner/Near Corner/From Corner |
Description of the combo. |
| Combo | Damage | Difficulty | Meter Spent | Position | Notes |
| 2L > 2M > 2H > 2S, Ender | X | Very Easy/Easy/Medium/Hard/Very Hard | 0/50/100 | Midscreen/Corner/Near Corner/From Corner |
Description of the combo. |
Enders
List of combo enders a character has when there's multiple enders they can pick between, such as sacrificing oki for damage and vice-versa.
| Combo | Damage | Difficulty | Meter Spent | Position | Notes |
|---|---|---|---|---|---|
| 2H > 2S | X | Very Easy/Easy/Medium/Hard/Very Hard | 0/50/100 | Midscreen/Corner/Near Corner/From Corner |
Description of the ender. |
| Combo | Damage | Difficulty | Meter Spent | Position | Notes |
| 2H > 2SP | X | Very Easy/Easy/Medium/Hard/Very Hard | 0/50/100 | Midscreen/Corner/Near Corner/From Corner |
Description of the ender. |
Colors
_X_(Costume_Name)_Icon.png)
_X_(Costume_Name)_Colors.png)
Trivia
- Fun facts about the character. If it isn't redundant with something else said on the page, these can be pulled directly from the game.
Black Heart Wiki Roadmap
| 0% complete | |
|
|
| Page | Completed | To-do | Score |
|---|---|---|---|
| 0/25 | |||
| Move List | 0/25 | ||
| Strategy | 0/25 | ||
| Combos | 0/25 |