![]()

Duels of Fortune/Clyde: Difference between revisions
Jump to navigation
Jump to search


Character Properties


No edit summary |
mNo edit summary |
||
| Line 48: | Line 48: | ||
|header=Unique Mechanic: Forward Dash | |header=Unique Mechanic: Forward Dash | ||
|content=Clyde's forward dash is unique, even compared to other run type dashes. Not only is it the fastest run in the game, but it low profiles and can side switch. As a result, it's probably his most important tool both in neutral and offense. The low profile is almost immediate (frame 2-3 after inputting dash) and while not especially low, it still goes under many projectiles and higher hitting pokes. When he side switches, any normals done will auto-correct to face the opponent, which creates Clyde's powerful left/right mixups. Additionally, Clyde has two unique command normals out of his dash with 4L and 6M. 4L is a partially invincible backdash that lets him bait out a reaction while not having to commit much. 6M is Clyde's biggest button, although it's still not especially big and is incredibly unsafe on block. These options make challenging his forward dash even scarier and builds up the mental stack. While one can be belligerent with it, making calculated use of his forward dash can allow Clyde to dominate the neutral game. | |content=Clyde's forward dash is unique, even compared to other run type dashes. Not only is it the fastest run in the game, but it low profiles and can side switch. As a result, it's probably his most important tool both in neutral and offense. The low profile is almost immediate (frame 2-3 after inputting dash) and while not especially low, it still goes under many projectiles and higher hitting pokes. When he side switches, any normals done will auto-correct to face the opponent, which creates Clyde's powerful left/right mixups. Additionally, Clyde has two unique command normals out of his dash with 4L and 6M. 4L is a partially invincible backdash that lets him bait out a reaction while not having to commit much. 6M is Clyde's biggest button, although it's still not especially big and is incredibly unsafe on block. These options make challenging his forward dash even scarier and builds up the mental stack. While one can be belligerent with it, making calculated use of his forward dash can allow Clyde to dominate the neutral game. | ||
[[File:DoF_Clyde_Dash_Hitbox.png|center| | [[File:DoF_Clyde_Dash_Hitbox.png|center|frameless]] | ||
}} | }} | ||
Revision as of 20:37, 5 January 2024
Overview
Give an overview of the char.
Playstyle
| Clyde relentlessly rushes in to overwhelm opponents with his fast buttons and left/rights. | |
| Pros | Cons |
|
|


Character Properties
| Health | 24000. |
| Prejump | XF. If we find it's universal then delete this. |
| Backdash | XF. Their backdash duration. |
| Unique Movement | Low Profile Side Switching Run |
| Fastest Attack | 5L (5F). |
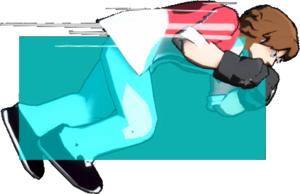
Unique Mechanic: Forward Dash
Clyde's forward dash is unique, even compared to other run type dashes. Not only is it the fastest run in the game, but it low profiles and can side switch. As a result, it's probably his most important tool both in neutral and offense. The low profile is almost immediate (frame 2-3 after inputting dash) and while not especially low, it still goes under many projectiles and higher hitting pokes. When he side switches, any normals done will auto-correct to face the opponent, which creates Clyde's powerful left/right mixups. Additionally, Clyde has two unique command normals out of his dash with 4L and 6M. 4L is a partially invincible backdash that lets him bait out a reaction while not having to commit much. 6M is Clyde's biggest button, although it's still not especially big and is incredibly unsafe on block. These options make challenging his forward dash even scarier and builds up the mental stack. While one can be belligerent with it, making calculated use of his forward dash can allow Clyde to dominate the neutral game.

Character Summary
Move List
- Command Normals
- 4H - Rushing Upper: Low profile, even lower than his dash, forward moving upper cut. Launcher that's good for combos, pressure, and defense.
- 4L While Dashing - Fake Out: Invincible back dash out of forward dash.
- 6M While Dashing - Rushing Straight: Large and fast normal exclusive to his dash. Uncancellable on block.
- Special Moves
- 5S - Heat Rush: A short ranged but high damage baarrage of strikes ending in a jump cancelable uppercut. Combo filler.
- 4S (Air OK) - Blazing Dash: Dash punch with three hits. Good for combos and occasionally for rushing in.
- 2S - Inferno Upper: Fast and high reward anti-air with invuln to air attacks, has an unfortunate tendency to trade.
- j.S - Meteor Slam: Dive punch. Primary combo ender but also a fast overhead that wallbounces in the corner.
- Supers
- 5SP - Eruption Fist: Fast super with a large anti-air hitbox. Air unblockable. Good combo ender and anti-air.
- 2SP - Brightstar Barrage: Clyde teleports behind the opponent to do an invincible strike. Somewhat slow.
- 2[SP] - Frontal Assault: Clyde teleports in front of the opponent without doing a strike.
Quick combo reference
5L > 5M > 4H > 9jc j.H, land 2M > 2S, land 2M > 5S > 9jc j.S: Easy corner to corner combo.
5L > 5M > 4H > 9jc j.H > j.4S, land 2M > 5S > 9jc j.4S, land 2M > 5H > 5SP: Corner bnb combo.
Normal Moves
5L   |
|
|---|---|
Toggle Hitboxes Toggle Hitboxes
|
5M Caption Caption
|
|
|---|---|
Toggle Hitboxes Toggle Hitboxes
|
5H
|
|
|---|---|
Toggle Hitboxes Toggle Hitboxes
|
2L
|
|
|---|---|
Toggle Hitboxes Toggle Hitboxes
|
2M
|
|
|---|---|
Toggle Hitboxes Toggle Hitboxes
|
2H
|
|
|---|---|
Toggle Hitboxes Toggle Hitboxes
|
j.L
|
|
|---|---|
Toggle Hitboxes Toggle Hitboxes
|
j.M
|
|
|---|---|
Toggle Hitboxes Toggle Hitboxes
|
j.H
|
|
|---|---|
Toggle Hitboxes Toggle Hitboxes
|
Command Normals
Command Normal Name
4H |
|
|---|---|
Toggle Hitboxes Toggle Hitboxes
|
Fake Out
(While Dashing) 4L |
|
|---|---|
Toggle Hitboxes Toggle Hitboxes
|
Command Normal Name (While Dashing) 6M   |
|
|---|---|
Toggle Hitboxes Toggle Hitboxes
|
Universal Mechanics
Throw
Throw
6H |
|
|---|---|
Toggle Hitboxes Toggle Hitboxes
|
Reversals
Reversal
5R |
|
|---|---|
Toggle Hitboxes Toggle Hitboxes
|
Wakeup Reversal
5R on Wakeup |
|
|---|---|
Toggle Hitboxes Toggle Hitboxes
|
Burst
Burst
5B |
|
|---|---|
Toggle Hitboxes Toggle Hitboxes
|
Taunt
Only add this section if a character has a taunt with a hitbox or some other unique effect like Sylvan's cheat. Otherwise remove it.
Taunt
5T |
|
|---|---|
Toggle Hitboxes Toggle Hitboxes
|
Down Taunt
2T |
|
|---|---|
Toggle Hitboxes Toggle Hitboxes
|
Special Moves
Special Name
5S |
|
|---|---|
Toggle Hitboxes Toggle Hitboxes
|
Special Name
4S |
|
|---|---|
Toggle Hitboxes Toggle Hitboxes
|
Special Name
2S |
|
|---|---|
Toggle Hitboxes Toggle Hitboxes
|
Special Name
j.S |
|
|---|---|
Toggle Hitboxes Toggle Hitboxes
|
Super Move
Super Name 5SP Informative and maybe funny caption Informative and maybe funny caption
|
|
|---|---|
Toggle Hitboxes Toggle Hitboxes
|
Super Name 2SP Informative and maybe funny caption Informative and maybe funny caption
|
|
|---|---|
Toggle Hitboxes Toggle Hitboxes
|
Strategy
Neutral
Describe how a character plays the neutral game. Add sub-categories if necessary, these should usually be on how you use a specific move.
Offense
Describe how a character runs their offense.
Defense
Describe how a character defends themselves when they're on the receiving end.
Additional Resources
Links to any additional resources like a tutorial video, delete category if there are none. If there aren't any but one gets made later, then re-add the category.
Additional Categories
Add any further categories as needed, just make sure they're worth a whole section.
Combos
General info on a character's combos, such as if they can always end a combo with a super as an ender rather than usual listed enders.
Combo Legend
| ||||||||||||||||||||||||||||||||||||||||||
| ||||||||||||||||||||||||||||||||||||||||||
Basic Combos
Easy combos for starting.
| Combo | Damage | Difficulty | Meter Spent | Position | Notes |
|---|---|---|---|---|---|
| 5L > 5M > 5H > 5S, Ender | X | Very Easy/Easy/Medium/Hard/Very Hard | 0/50/100 | Midscreen/Corner/Near Corner/From Corner |
Description of the combo. |
| Combo | Damage | Difficulty | Meter Spent | Position | Notes |
| 2L > 2M > 2H > 2S, Ender | X | Very Easy/Easy/Medium/Hard/Very Hard | 0/50/100 | Midscreen/Corner/Near Corner/From Corner |
Description of the combo. |
Advanced Combos
Harder combos that deal more damage or provide some other benefit.
| Combo | Damage | Difficulty | Meter Spent | Position | Notes |
|---|---|---|---|---|---|
| 5L > 5M > 5H > 5S, Ender | X | Very Easy/Easy/Medium/Hard/Very Hard | 0/50/100 | Midscreen/Corner/Near Corner/From Corner |
Description of the combo. |
| Combo | Damage | Difficulty | Meter Spent | Position | Notes |
| 2L > 2M > 2H > 2S, Ender | X | Very Easy/Easy/Medium/Hard/Very Hard | 0/50/100 | Midscreen/Corner/Near Corner/From Corner |
Description of the combo. |
X Combo Category
If a character has a specific kind of combo they do that has multiple variants, then you can make a new category for it. If they don't delete this.
| Combo | Damage | Difficulty | Meter Spent | Position | Notes |
|---|---|---|---|---|---|
| 5L > 5M > 5H > 5S, Ender | X | Very Easy/Easy/Medium/Hard/Very Hard | 0/50/100 | Midscreen/Corner/Near Corner/From Corner |
Description of the combo. |
| Combo | Damage | Difficulty | Meter Spent | Position | Notes |
| 2L > 2M > 2H > 2S, Ender | X | Very Easy/Easy/Medium/Hard/Very Hard | 0/50/100 | Midscreen/Corner/Near Corner/From Corner |
Description of the combo. |
Enders
List of combo enders a character has when there's multiple enders they can pick between, such as sacrificing oki for damage and vice-versa.
| Combo | Damage | Difficulty | Meter Spent | Position | Notes |
|---|---|---|---|---|---|
| 2H > 2S | X | Very Easy/Easy/Medium/Hard/Very Hard | 0/50/100 | Midscreen/Corner/Near Corner/From Corner |
Description of the ender. |
| Combo | Damage | Difficulty | Meter Spent | Position | Notes |
| 2H > 2SP | X | Very Easy/Easy/Medium/Hard/Very Hard | 0/50/100 | Midscreen/Corner/Near Corner/From Corner |
Description of the ender. |
Colors


Trivia
- Fun facts about the character. If it isn't redundant with something else said on the page, these can be pulled directly from the game.
Clyde Wiki Roadmap
| 100% complete | |
|
|
| Page | Completed | To-do | Score |
|---|---|---|---|
| 25/25 | |||
| Move List | 25/25 | ||
| Strategy | 25/25 | ||
| Combos | 25/25 |