![]()

Duels of Fortune/Derrick: Difference between revisions
Jump to navigation
Jump to search


Character Properties
| Line 20: | Line 20: | ||
|border=yes|tablewidth=102 | |border=yes|tablewidth=102 | ||
|flex_data=<tabber> | |flex_data=<tabber> | ||
|-| | |-|Karate Gi= | ||
[[File: | [[File:DoF_Derrick_Name.png|100px]] <br> | ||
[[File: | [[File:DoF_Derrick_profile.png|350px]] | ||
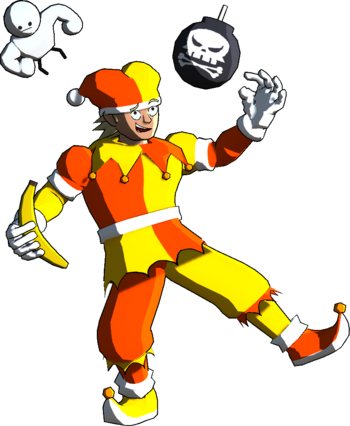
|-| | |-|Jester= | ||
[[File: | [[File:DoF_Derrick_Name.png|100px]] <br> | ||
[[File: | [[File:DoF_Derrick_profile_Jester.png|350px]] | ||
|-|Casual= | |||
[[File:DoF_Derrick_Name.png|100px]] <br> | |||
[[File:DoF_Derrick_profile_Casual.png|350px]] | |||
|-|Pilot= | |||
[[File:DoF_Derrick_Name.png|100px]] <br> | |||
[[File:DoF_Derrick_profile_Pilot.png|350px]] | |||
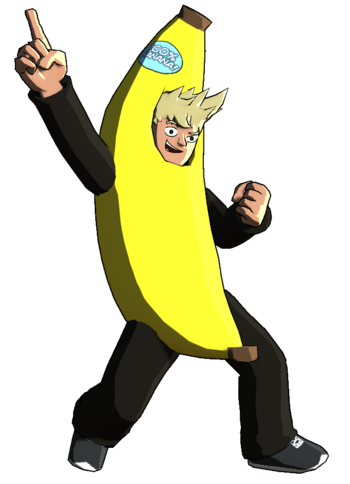
|-|Banana= | |||
[[File:DoF_Derrick_Name.png|100px]] <br> | |||
[[File:DoF_Derrick_profile_Banana.png|350px]] | |||
|-|Mummy= | |||
[[File:DoF_RagZ_Name.png|100px]] <br> | |||
[[File:DoF_Derrick_profile_Pilot.png|350px]] | |||
</tabber> <br> | </tabber> <br> | ||
| Line 37: | Line 49: | ||
<td style="width:25%; text-align: left; border-style: none none solid none;">'''''Unique Movement''''' <td style="width:48%; border-style: none none solid none; text-align: right;"><br> '''None''' | <td style="width:25%; text-align: left; border-style: none none solid none;">'''''Unique Movement''''' <td style="width:48%; border-style: none none solid none; text-align: right;"><br> '''None''' | ||
<tr> | <tr> | ||
<td style="text-align: left; border-style: none none none none;">'''''Fastest Attack''''' <td style="width:48%; border-style: none none none none; text-align: right;"><br> ''' | <td style="text-align: left; border-style: none none none none;">'''''Fastest Attack''''' <td style="width:48%; border-style: none none none none; text-align: right;"><br> '''5L (XF)''' | ||
</table> | </table> | ||
}} | }} | ||
| Line 43: | Line 55: | ||
{{FP Box | {{FP Box | ||
|header=Unique Mechanic: Item Throw | |header=Unique Mechanic: Item Throw | ||
|content=Using his '''2S''' (Junk Toss), Derrick can draw | |content=Using his '''2S''' (Junk Toss), Derrick can draw one of 10 different items which vary heavily in effect. There's no variance in how likely he is to draw them, so there's always a 10% chance of Derrick drawing any one item. The items and a brief description of their effects are below. For more details, view the individual item descriptions.<br> | ||
:'''Baseball''': Decently fast and straightforward projectile. | |||
:'''Buff Boy Plush''': Short ranged and slow moving projectile that deals 0 hitstun but gives a combo on block. | |||
:'''Magnet''': Short ranged projectile. Upon landing it generates projectiles above it for a short time. | |||
:'''Boomerang''': Fast projectile that goes in a straight line, comes back to hit a second time. | |||
:'''Bomb''': Moderate speed projectile that deals high damage and launches, explodes on its own after some time. | |||
:'''Hammer''': Slower, high damage projectile. Creates a low hitting shockwave upon hitting the ground. | |||
:'''Banana''': Moderate speed projectile that isn't active until it touches the ground. Causes characters to slip and get launched upon making contact. | |||
:'''Turtle Shell''': Fast projectile that bounces off opponents and the wall. Remains active for a long time and can hit many times. | |||
:'''Energy Drink''': Slow projectile that isn't active until it hits the ground. Characters who make contact with it once its active gain meter. | |||
:'''Dog Treat''': Fast projectile with low damage and hitstun. Upon reaching the ground, it loses its hitbox and after some time a dog that can hit the opponent runs across the screen. | |||
}} | }} | ||
Revision as of 22:40, 14 May 2024
Overview
Derrick is Shoto's goofball classmate and DoF's item throw character. Taking advantage of his excellent air movement and projectile game, Derrick sets the pace of a match until he can use his items to create an opening for his offense.
As an item throw character, Derrick naturally possesses an incredible neutral game. Almost all of his items from 2S (Junk Throw) are powerful projectiles. Furthermore, unlike most item throw characters, Derrick draws the item then chooses when and where to throw it, which with some items can allow him to immediately control the neutral state. His 5S (Dust Ball), both held and unheld helps give him the space he needs to draw for the right item. Adding to this is his excellent, with one of the fastest walk speeds in the game, fast dashes, and most importantly, his incredible air game. As well as possessing an amazing air dash, Derrick can mixup his air momentum via j.M, j.H, j.2H, j.2S, j.4S, and j.S/[S]. A mix of these options can make him downright impossible to anti-air and difficult to predict. Once he gets one of his stronger items, he can use it to get in and start running his offense. While limited, Derrick's offense is powerful enough to open up opponents. Items such as Buff Boy, the Hammer, and the Magnet, let him setup downright unfair setplay and 50/50s, all of which lead to full combos. This means that Derrick can range from having the weakest mixups in the game to its most powerful in the blink of an eye, forcing the opponent to stay aware of what item he currently has.
These incredible strengths aren't without flaw. As mentioned, Derrick's mixup is underwhelming when he doesn't have his stronger offensive items. His hit throw is notably worse than normal, with his regular grab only granting a hard knockdown instead of the usual combo (although it can be comboed off in specific situations). Additionally, he has no reliable ways to setup left rights, and his one means of high low, 4S (The Derrick "Special"), is more of a knowledge check once one understands how it functions. Furthermore, for all his good movement and projectiles, Derrick's actual normals are mediocre at best. Most are lacking in range, and more significantly, tend to have high amounts of recovery, making him easier to whiff punish. Even with these issues though, Derrick's ability to set the pace of the game and be a general nuisance in neutral makes him incredibly powerful.
Playstyle
| Derrick takes advantage of strong air movement, projectiles, and items to control the pace of the game. | |
| Pros | Cons |
|
|


Character Properties
| Health | 23000 |
| Backdash | XF |
| Unique Movement | None |
| Fastest Attack | 5L (XF) |
Unique Mechanic: Item Throw
Using his 2S (Junk Toss), Derrick can draw one of 10 different items which vary heavily in effect. There's no variance in how likely he is to draw them, so there's always a 10% chance of Derrick drawing any one item. The items and a brief description of their effects are below. For more details, view the individual item descriptions.
- Baseball: Decently fast and straightforward projectile.
- Buff Boy Plush: Short ranged and slow moving projectile that deals 0 hitstun but gives a combo on block.
- Magnet: Short ranged projectile. Upon landing it generates projectiles above it for a short time.
- Boomerang: Fast projectile that goes in a straight line, comes back to hit a second time.
- Bomb: Moderate speed projectile that deals high damage and launches, explodes on its own after some time.
- Hammer: Slower, high damage projectile. Creates a low hitting shockwave upon hitting the ground.
- Banana: Moderate speed projectile that isn't active until it touches the ground. Causes characters to slip and get launched upon making contact.
- Turtle Shell: Fast projectile that bounces off opponents and the wall. Remains active for a long time and can hit many times.
- Energy Drink: Slow projectile that isn't active until it hits the ground. Characters who make contact with it once its active gain meter.
- Dog Treat: Fast projectile with low damage and hitstun. Upon reaching the ground, it loses its hitbox and after some time a dog that can hit the opponent runs across the screen.
Character Summary
Move list
- Command Normals
- j.2H - Drop the Ball: A rolling attack that recoils upon hitting the opponent or the ground.
- 663H - Hair Style - Scissor Kick: A dashing launcher.
- Special Moves
- 5S (Air OK) - Pocket Dust!: A very short-ranged projectile that's safe on block.
- 5[S] (Air OK) - Dust Ball: Slower and stronger projectile that's plus on block and controls space.
- 4S (Air OK) - The Derrick "Special": An approaching barrage that ends with a low. Press 8 during it to transition into the overhead move Flailing Flight instead.
- 2S (Air OK) - Junk Pull: Derrick grabs an item that can be thrown with 6L or by holding 2S and picking a direction. Each of the 10 possible items have different effects.
- Supers
- 5SP - Panic Button: A giant rock comes out of the ground and hits low. Has a large amount of invincibility tied to it.
- 2SP - Trash to Treasure: An install that boosts the power of Derrick's items. If you aren't already holding an item, you will also pull one upon using this super.
Quick combo reference
5L > 5M > 2H > j.M > j.H > j.2S, OTG 2M > 4S: Basic combo that nets you both an item and hard knockdown.
Normal Moves
5L
|
|
|---|---|
Toggle Hitboxes Toggle Hitboxes
|
5M Caption Caption
|
|
|---|---|
Toggle Hitboxes Toggle Hitboxes
|
5H
|
|
|---|---|
Toggle Hitboxes Toggle Hitboxes
|
2L
|
|
|---|---|
Toggle Hitboxes Toggle Hitboxes
|
2M
|
|
|---|---|
Toggle Hitboxes Toggle Hitboxes
|
2H
|
|
|---|---|
Toggle Hitboxes Toggle Hitboxes
|
j.L
|
|
|---|---|
Toggle Hitboxes Toggle Hitboxes
|
j.M
|
|
|---|---|
Toggle Hitboxes Toggle Hitboxes
|
j.H
|
|
|---|---|
Toggle Hitboxes Toggle Hitboxes
|
Command Normals
Command Normal Name
4H |
|
|---|---|
Toggle Hitboxes Toggle Hitboxes
|
Universal Mechanics
Throw
Throw
6H |
|
|---|---|
Toggle Hitboxes Toggle Hitboxes
|
Reversals
Reversal
5R |
|
|---|---|
Toggle Hitboxes Toggle Hitboxes
|
Wakeup Reversal
5R on Wakeup |
|
|---|---|
Toggle Hitboxes Toggle Hitboxes
|
Burst
Burst
5B |
|
|---|---|
Toggle Hitboxes Toggle Hitboxes
|
Taunt
Only add this section if a character has a taunt with a hitbox or some other unique effect like Sylvan's cheat. Otherwise remove it.
Taunt
5T |
|
|---|---|
Toggle Hitboxes Toggle Hitboxes
|
Down Taunt
2T |
|
|---|---|
Toggle Hitboxes Toggle Hitboxes
|
Special Moves
Special Name
5S |
|
|---|---|
Toggle Hitboxes Toggle Hitboxes
|
Special Name
4S |
|
|---|---|
Toggle Hitboxes Toggle Hitboxes
|
Special Name
2S |
|
|---|---|
Toggle Hitboxes Toggle Hitboxes
|
Special Name
j.S |
|
|---|---|
Toggle Hitboxes Toggle Hitboxes
|
Super Move
Super Name 5SP Informative and maybe funny caption Informative and maybe funny caption
|
|
|---|---|
Toggle Hitboxes Toggle Hitboxes
|
Super Name 2SP Informative and maybe funny caption Informative and maybe funny caption
|
|
|---|---|
Toggle Hitboxes Toggle Hitboxes
|
Strategy
Neutral
Describe how a character plays the neutral game. Add sub-categories if necessary, these should usually be on how you use a specific move.
Offense
Describe how a character runs their offense.
Defense
Describe how a character defends themselves when they're on the receiving end.
Additional Resources
Links to any additional resources like a tutorial video, delete category if there are none. If there aren't any but one gets made later, then re-add the category.
Additional Categories
Add any further categories as needed, just make sure they're worth a whole section.
Combos
General info on a character's combos, such as if they can always end a combo with a super as an ender rather than usual listed enders.
Combo Legend
| ||||||||||||||||||||||||||||||||||||||||||
| ||||||||||||||||||||||||||||||||||||||||||
Basic Combos
Easy combos for starting.
| Combo | Damage | Difficulty | Meter Spent | Position | Notes |
|---|---|---|---|---|---|
| 5L > 5M > 5H > 5S, Ender | X | Very Easy/Easy/Medium/Hard/Very Hard | 0/50/100 | Midscreen/Corner/Near Corner/From Corner |
Description of the combo. |
| Combo | Damage | Difficulty | Meter Spent | Position | Notes |
| 2L > 2M > 2H > 2S, Ender | X | Very Easy/Easy/Medium/Hard/Very Hard | 0/50/100 | Midscreen/Corner/Near Corner/From Corner |
Description of the combo. |
Advanced Combos
Harder combos that deal more damage or provide some other benefit.
| Combo | Damage | Difficulty | Meter Spent | Position | Notes |
|---|---|---|---|---|---|
| 5L > 5M > 5H > 5S, Ender | X | Very Easy/Easy/Medium/Hard/Very Hard | 0/50/100 | Midscreen/Corner/Near Corner/From Corner |
Description of the combo. |
| Combo | Damage | Difficulty | Meter Spent | Position | Notes |
| 2L > 2M > 2H > 2S, Ender | X | Very Easy/Easy/Medium/Hard/Very Hard | 0/50/100 | Midscreen/Corner/Near Corner/From Corner |
Description of the combo. |
X Combo Category
If a character has a specific kind of combo they do that has multiple variants, then you can make a new category for it. If they don't delete this.
| Combo | Damage | Difficulty | Meter Spent | Position | Notes |
|---|---|---|---|---|---|
| 5L > 5M > 5H > 5S, Ender | X | Very Easy/Easy/Medium/Hard/Very Hard | 0/50/100 | Midscreen/Corner/Near Corner/From Corner |
Description of the combo. |
| Combo | Damage | Difficulty | Meter Spent | Position | Notes |
| 2L > 2M > 2H > 2S, Ender | X | Very Easy/Easy/Medium/Hard/Very Hard | 0/50/100 | Midscreen/Corner/Near Corner/From Corner |
Description of the combo. |
Enders
List of combo enders a character has when there's multiple enders they can pick between, such as sacrificing oki for damage and vice-versa.
| Combo | Damage | Difficulty | Meter Spent | Position | Notes |
|---|---|---|---|---|---|
| 2H > 2S | X | Very Easy/Easy/Medium/Hard/Very Hard | 0/50/100 | Midscreen/Corner/Near Corner/From Corner |
Description of the ender. |
| Combo | Damage | Difficulty | Meter Spent | Position | Notes |
| 2H > 2SP | X | Very Easy/Easy/Medium/Hard/Very Hard | 0/50/100 | Midscreen/Corner/Near Corner/From Corner |
Description of the ender. |
Colors
_X_(Costume_Name)_Icon.png)
_X_(Costume_Name)_Colors.png)
Trivia
- Fun facts about the character. If it isn't redundant with something else said on the page, these can be pulled directly from the game.
Derrick Wiki Roadmap
| 0% complete | |
|
|
| Page | Completed | To-do | Score |
|---|---|---|---|
| 0/25 | |||
| Move List | 0/25 | ||
| Strategy | 0/25 | ||
| Combos | 0/25 |