![]()

Duels of Fortune/Shoto: Difference between revisions
Jump to navigation
Jump to search


Character Properties
| Line 1: | Line 1: | ||
======<span style="visibility:hidden;font-size:0">Overview</span>====== | ======<span style="visibility:hidden;font-size:0">Overview</span>====== | ||
{{FP Overview-DoF | {{FP Overview-DoF | ||
|overview= | |overview=Shoto Kanji is a karateka from Master Locks' dojo and Derrick's classmate. While you might be expecting the more typical Ryu style shoto, Shoto takes more from Akuma, being a glass cannon with all the tools one could want at the risk of a lower health pool. Proper use of his full toolset can allow Shoto to control the game, with powerful neutral, offense, and defense. | ||
|intro= ''' | Accordingly to the glass-cannon shoto archetype, Shoto has all the tools he needs to win the neutral game. His movement speeds and dashes are all among the best in the game. letting him out maneuver most of the cast. He also has an incredible projectile game between his '''5S''' (Electric Ball) and '''5[S]''' (Electric Blast), powerful projectiles with that can be used in the air, have multiple angles, and good recovery. His normals too, while small besides '''5H''' and '''663H''' (Hair Style - Upper Cut), sport incredible frame data. He has multiple very slightly minus and even a plus on block normal, which when combined with proper staggers makes his blockstrings among the best in the game if not the best. Furthermore, his actual mixups are quite strong. '''4H''' (Axe Kick) is a decently fast overhead with huge reward on hit, his '''j.M''' and '''j.H''' are both large crossups, and you have to account for universal throw too, from which Shoto gets an excellent combo. Once he does get a hit with one of these options, his damage output is among the best in the game, capable of doing over well over 10K before adding meter. | ||
As a glass cannon though, he's not without his cracks. Shoto's health is 20000, the second lowest in the game. Against some characters, particularly ones like Baron, Johnson, and Red, he can find himself often dying in 2 and sometimes even 1 hit, a severe weakness to deal with. He also has rather stubby buttons, and while his projectile game usually more than makes up for them, he can struggle to contest some characters in the mid range. His defense is also a bit more on the subpar side due to a bad reversal and small abare buttons, but it's still quite solid, with his '''2S''' (Lightning Upper) being an incredibly fast and rewarding anti-air and having one of the fastest wakeup reversals. Taken altogether, Shoto is quite the powerful character as well as one of the easier ones to learn, but he does require considered play to avoid losing the game in one or two interactions. | |||
|intro= '''Shoto''' plays an amped up all-rounder game at the cost of low health. | |||
|pros= | |pros= | ||
* ''' | * '''Fast Movement''' - Shoto's movement speeds are all in the upper end of the cast, letting him navigate the screen quite proficiently. | ||
* '''Very Good Projectile Game''' - Between '''5S''' and '''5[S]''', Shoto has a very strong fireball game with multiple ways to mix up the angles and timings. | |||
* '''Amazing Frame Data''' - Most of Shoto's moves are quite fast and his normals have incredible on block data, giving him possibly the best staggers in the game. | |||
* '''Huge Damage Output''' - Shoto's combos are relatively easy, have massive carry, and more importantly, do massive damage. Helping this too is that many of his best combo starters are good pokes and mixup tools. | |||
* '''Solid Mixups''' - Shoto's '''4H''' is a very good overhead especially in conjunction with his '''2H''' being a heavy starter low. Then add in great crossups with '''j.M''' and '''j.H''' plus throw, and you get quite the impressive set of mixups. | |||
|cons= | |cons= | ||
* ''' | * '''Low Health''' - Shoto is tied for the lowest health in the game excluding Guy at 20000, meaning it's very realistic for him to die in 2 hits. | ||
* '''Small Normals''' - Outside of his '''5H''' and '''663H''', Shoto lacks range on his normals. Usually his movement and projectiles more than make up for this and they also all have best in class frame data, but his poking game is weak. | |||
|border=yes|tablewidth=102 | |border=yes|tablewidth=102 | ||
|flex_data=<tabber> | |flex_data=<tabber> | ||
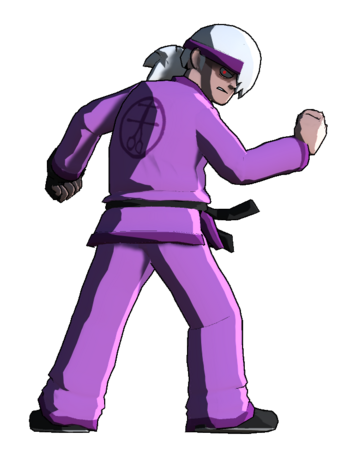
|-| | |-|Karate Gi= | ||
[[File: | [[File:DoF_Shoto_Name.png|100px]] <br> | ||
[[File: | [[File:DoF_Shoto_profile.png|350px]] | ||
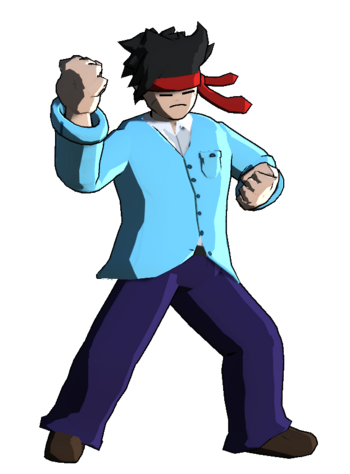
|-| | |-|Evil Gi= | ||
[[File: | [[File:DoF_Shin_Name.png|100px]] <br> | ||
[[File: | [[File:DoF_Shoto_profile_Evil_Gi.png|350px]] | ||
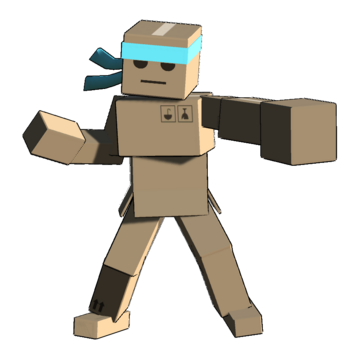
|-|Cardboard= | |||
[[File:DoF_Shin_Name.png|100px]] <br> | |||
[[File:DoF_Shoto_profile_Cardboard.png|350px]] | |||
|-|Doctor= | |||
[[File:DoF_Shoto_Name.png|100px]] <br> | |||
[[File:DoF_Shoto_profile_Doctor.png|350px]] | |||
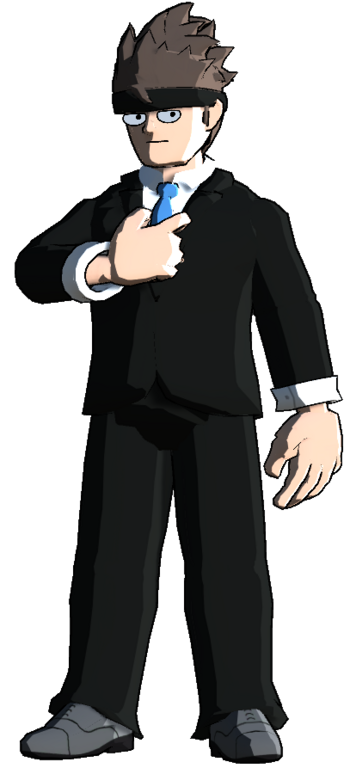
|-|Tidy Suit= | |||
[[File:DoF_Shoto_Name.png|100px]] <br> | |||
[[File:DoF_Shoto_profile_Tidy_Suit.png|350px]] | |||
|-|Hyperfighter= | |||
[[File:DoF_Shoto_Goto_Name.png|100px]] <br> | |||
[[File:DoF_Shoto_profile_Hyperfighter.png|350px]] | |||
</tabber> <br> | </tabber> <br> | ||
| Line 25: | Line 46: | ||
<tr> | <tr> | ||
<td style="text-align: left; border-style: none none solid none;">'''''Health''''' <td style="width:48%; border-style: none none solid none; text-align: right;"><br> '''20000''' | <td style="text-align: left; border-style: none none solid none;">'''''Health''''' <td style="width:48%; border-style: none none solid none; text-align: right;"><br> '''20000''' | ||
<tr> | |||
<td style="text-align: left; border-style: none none solid none;">'''''Ground Speed''''' <td style="width:48%; border-style: none none solid none; text-align: right;"><br> '''10''' | |||
<tr> | |||
<td style="text-align: left; border-style: none none solid none;">'''''Air Speed''''' <td style="width:48%; border-style: none none solid none; text-align: right;"><br> '''10''' | |||
<tr> | <tr> | ||
<td style="text-align: left; border-style: none none solid none;">'''''Backdash''''' <td style="width:48%; border-style: none none solid none; text-align: right;"><br> '''XF''' | <td style="text-align: left; border-style: none none solid none;">'''''Backdash''''' <td style="width:48%; border-style: none none solid none; text-align: right;"><br> '''XF''' | ||
<tr> | <tr> | ||
<td style="width:25%; text-align: left; border-style: none none solid none;">'''''Unique Movement''''' <td style="width:48%; border-style: none none solid none; text-align: right;"><br> ''' | <td style="width:25%; text-align: left; border-style: none none solid none;">'''''Unique Movement''''' <td style="width:48%; border-style: none none solid none; text-align: right;"><br> '''None''' | ||
<tr> | <tr> | ||
<td style="text-align: left; border-style: none none none none;">'''''Fastest Attack''''' <td style="width:48%; border-style: none none none none; text-align: right;"><br> ''' | <td style="text-align: left; border-style: none none none none;">'''''Fastest Attack''''' <td style="width:48%; border-style: none none none none; text-align: right;"><br> '''5L (XF)''' | ||
</table> | </table> | ||
}} | }} | ||
Revision as of 20:57, 16 May 2024
Overview
Shoto Kanji is a karateka from Master Locks' dojo and Derrick's classmate. While you might be expecting the more typical Ryu style shoto, Shoto takes more from Akuma, being a glass cannon with all the tools one could want at the risk of a lower health pool. Proper use of his full toolset can allow Shoto to control the game, with powerful neutral, offense, and defense.
Accordingly to the glass-cannon shoto archetype, Shoto has all the tools he needs to win the neutral game. His movement speeds and dashes are all among the best in the game. letting him out maneuver most of the cast. He also has an incredible projectile game between his 5S (Electric Ball) and 5[S] (Electric Blast), powerful projectiles with that can be used in the air, have multiple angles, and good recovery. His normals too, while small besides 5H and 663H (Hair Style - Upper Cut), sport incredible frame data. He has multiple very slightly minus and even a plus on block normal, which when combined with proper staggers makes his blockstrings among the best in the game if not the best. Furthermore, his actual mixups are quite strong. 4H (Axe Kick) is a decently fast overhead with huge reward on hit, his j.M and j.H are both large crossups, and you have to account for universal throw too, from which Shoto gets an excellent combo. Once he does get a hit with one of these options, his damage output is among the best in the game, capable of doing over well over 10K before adding meter.
As a glass cannon though, he's not without his cracks. Shoto's health is 20000, the second lowest in the game. Against some characters, particularly ones like Baron, Johnson, and Red, he can find himself often dying in 2 and sometimes even 1 hit, a severe weakness to deal with. He also has rather stubby buttons, and while his projectile game usually more than makes up for them, he can struggle to contest some characters in the mid range. His defense is also a bit more on the subpar side due to a bad reversal and small abare buttons, but it's still quite solid, with his 2S (Lightning Upper) being an incredibly fast and rewarding anti-air and having one of the fastest wakeup reversals. Taken altogether, Shoto is quite the powerful character as well as one of the easier ones to learn, but he does require considered play to avoid losing the game in one or two interactions.
Playstyle
| Shoto plays an amped up all-rounder game at the cost of low health. | |
| Pros | Cons |
|
|


Character Properties
| Health | 20000 |
| Ground Speed | 10 |
| Air Speed | 10 |
| Backdash | XF |
| Unique Movement | None |
| Fastest Attack | 5L (XF) |
Character Summary
Move list
- Command Normals
- 4H - Axe Kick: An advancing overhead, ground bounces and HKDs on air hit.
- 663H - Hair Style - Upper Cut: A fast anti-air launcher out of dash, resembles an EWGF.
- Special Moves
- 5S (Air OK) - Electric Ball: An arcing projectile that bounces off walls. Can be angled back with 4 on the ground.
- 5[S] (Air OK) - Electric Blast: A more standard multi-hit projectile. Can be angled upward with 8 on the ground or downward with 2 in the air.
- 4S (Air OK) - Storm Kicks: A series of plus on block approaching kicks that combo well.
- 2S - Lightning Upper: A strong and fast anti-air that leaves you actionable on hit. Very unsafe on block making it risky.
- Supers
- 5SP - Thunder Eclipse: A massive projectile that does high damage.
- 2SP - Omega Lightning Upper: A short ranged rising uppercut that you can combo out of.
Quick combo reference
5L > 5M > 5H > 5S: Easy combo for helping beginners. Put a brief description here.
Normal Moves
5L
|
|
|---|---|
Toggle Hitboxes Toggle Hitboxes
|
5M Caption Caption
|
|
|---|---|
Toggle Hitboxes Toggle Hitboxes
|
5H
|
|
|---|---|
Toggle Hitboxes Toggle Hitboxes
|
2L
|
|
|---|---|
Toggle Hitboxes Toggle Hitboxes
|
2M
|
|
|---|---|
Toggle Hitboxes Toggle Hitboxes
|
2H
|
|
|---|---|
Toggle Hitboxes Toggle Hitboxes
|
j.L
|
|
|---|---|
Toggle Hitboxes Toggle Hitboxes
|
j.M
|
|
|---|---|
Toggle Hitboxes Toggle Hitboxes
|
j.H
|
|
|---|---|
Toggle Hitboxes Toggle Hitboxes
|
Command Normals
Axe Kick
4H |
|
|---|---|
Toggle Hitboxes Toggle Hitboxes
|
Hair Style - Upper Cut 663H Dorya! Dorya!
|
|
|---|---|
Toggle Hitboxes Toggle Hitboxes
|
Universal Mechanics
Throw
Throw
6H |
|
|---|---|
Toggle Hitboxes Toggle Hitboxes
|
Reversals
Reversal
5R |
|
|---|---|
Toggle Hitboxes Toggle Hitboxes
|
Wakeup Reversal
5R on Wakeup |
|
|---|---|
Toggle Hitboxes Toggle Hitboxes
|
Burst
Burst
5B |
|
|---|---|
Toggle Hitboxes Toggle Hitboxes
|
Taunt
Only add this section if a character has a taunt with a hitbox or some other unique effect like Sylvan's cheat. Otherwise remove it.
Taunt
5T |
|
|---|---|
Toggle Hitboxes Toggle Hitboxes
|
Down Taunt
2T |
|
|---|---|
Toggle Hitboxes Toggle Hitboxes
|
Special Moves
Electric Ball
5S |
|
|---|---|
Toggle Hitboxes Toggle Hitboxes
|
Storm Kicks
4S |
|
|---|---|
Toggle Hitboxes Toggle Hitboxes
|
Lightning Upper
2S |
|
|---|---|
Toggle Hitboxes Toggle Hitboxes
|
Special Name
j.S |
|
|---|---|
Toggle Hitboxes Toggle Hitboxes
|
Super Move
Super Name 5SP Informative and maybe funny caption Informative and maybe funny caption
|
|
|---|---|
Toggle Hitboxes Toggle Hitboxes
|
Super Name 2SP Informative and maybe funny caption Informative and maybe funny caption
|
|
|---|---|
Toggle Hitboxes Toggle Hitboxes
|
Strategy
Neutral
Describe how a character plays the neutral game. Add sub-categories if necessary, these should usually be on how you use a specific move.
Offense
Describe how a character runs their offense.
Defense
Describe how a character defends themselves when they're on the receiving end.
Additional Resources
Links to any additional resources like a tutorial video, delete category if there are none. If there aren't any but one gets made later, then re-add the category.
Additional Categories
Add any further categories as needed, just make sure they're worth a whole section.
Combos
General info on a character's combos, such as if they can always end a combo with a super as an ender rather than usual listed enders.
Combo Legend
| ||||||||||||||||||||||||||||||||||||||||||
| ||||||||||||||||||||||||||||||||||||||||||
Basic Combos
Easy combos for starting.
| Combo | Damage | Difficulty | Meter Spent | Position | Notes |
|---|---|---|---|---|---|
| 5L > 5M > 5H > 5S, Ender | X | Very Easy/Easy/Medium/Hard/Very Hard | 0/50/100 | Midscreen/Corner/Near Corner/From Corner |
Description of the combo. |
| Combo | Damage | Difficulty | Meter Spent | Position | Notes |
| 2L > 2M > 2H > 2S, Ender | X | Very Easy/Easy/Medium/Hard/Very Hard | 0/50/100 | Midscreen/Corner/Near Corner/From Corner |
Description of the combo. |
Advanced Combos
Harder combos that deal more damage or provide some other benefit.
| Combo | Damage | Difficulty | Meter Spent | Position | Notes |
|---|---|---|---|---|---|
| 5L > 5M > 5H > 5S, Ender | X | Very Easy/Easy/Medium/Hard/Very Hard | 0/50/100 | Midscreen/Corner/Near Corner/From Corner |
Description of the combo. |
| Combo | Damage | Difficulty | Meter Spent | Position | Notes |
| 2L > 2M > 2H > 2S, Ender | X | Very Easy/Easy/Medium/Hard/Very Hard | 0/50/100 | Midscreen/Corner/Near Corner/From Corner |
Description of the combo. |
X Combo Category
If a character has a specific kind of combo they do that has multiple variants, then you can make a new category for it. If they don't delete this.
| Combo | Damage | Difficulty | Meter Spent | Position | Notes |
|---|---|---|---|---|---|
| 5L > 5M > 5H > 5S, Ender | X | Very Easy/Easy/Medium/Hard/Very Hard | 0/50/100 | Midscreen/Corner/Near Corner/From Corner |
Description of the combo. |
| Combo | Damage | Difficulty | Meter Spent | Position | Notes |
| 2L > 2M > 2H > 2S, Ender | X | Very Easy/Easy/Medium/Hard/Very Hard | 0/50/100 | Midscreen/Corner/Near Corner/From Corner |
Description of the combo. |
Enders
List of combo enders a character has when there's multiple enders they can pick between, such as sacrificing oki for damage and vice-versa.
| Combo | Damage | Difficulty | Meter Spent | Position | Notes |
|---|---|---|---|---|---|
| 2H > 2S | X | Very Easy/Easy/Medium/Hard/Very Hard | 0/50/100 | Midscreen/Corner/Near Corner/From Corner |
Description of the ender. |
| Combo | Damage | Difficulty | Meter Spent | Position | Notes |
| 2H > 2SP | X | Very Easy/Easy/Medium/Hard/Very Hard | 0/50/100 | Midscreen/Corner/Near Corner/From Corner |
Description of the ender. |
Colors
_X_(Costume_Name)_Icon.png)
_X_(Costume_Name)_Colors.png)
Trivia
- Fun facts about the character. If it isn't redundant with something else said on the page, these can be pulled directly from the game.
Shoto Wiki Roadmap
| 0% complete | |
|
|
| Page | Completed | To-do | Score |
|---|---|---|---|
| 0/25 | |||
| Move List | 0/25 | ||
| Strategy | 0/25 | ||
| Combos | 0/25 |