Tough Love Arena/Rice/Strategy: Difference between revisions
mNo edit summary |
No edit summary |
||
| Line 15: | Line 15: | ||
Rice wants to stay in control for most of the match. In neutral, they want to cover space in front of them with long range normal. Rice wants to stay in neutral most of the time if they can, so they want to have as much space as possible to work with while they zone their opponents out. | Rice wants to stay in control for most of the match. In neutral, they want to cover space in front of them with long range normal. Rice wants to stay in neutral most of the time if they can, so they want to have as much space as possible to work with while they zone their opponents out. | ||
==Neutral== | |||
== | |||
===Pokes=== | ===Pokes=== | ||
<gallery widths="340px" heights="180px" mode="nolines"> | <gallery widths="340px" heights="180px" mode="nolines"> | ||
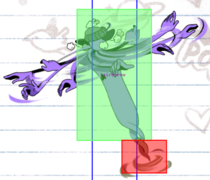
TLA Rice 5H Hitbox.png | TLA Rice 5H Hitbox.png | ||
</gallery> | </gallery> | ||
'''Whip:''' It has huge reach and is Rice’s most common poke due to its fast speed and modest recovery. It has a low hitbox making it prone to get jumped over. It’s useful for stuffing out and opponent walking forward, punishing whifs in neutral, and baiting out risky moves that beat it out (i.e. Jump Attack). It also has solid frame trap potential when cancelled into Swipe or Whip Pounce (when you want to approach). | |||
<gallery widths="340px" heights="180px" mode="nolines"> | <gallery widths="340px" heights="180px" mode="nolines"> | ||
TLA Rice 4H Hitbox.png | TLA Rice 4H Hitbox.png | ||
</gallery> | </gallery> | ||
'''Swipe:''' It has limited uses in neutral due to having large startup and recovery and how it never hits airborne opponents. Swipe’s main use for neutral comes from it being able to cancel from Whip to create an automatic frame trap, but it is occasionally useful as a timing mixup. | |||
''' | |||
<gallery widths="340px" heights="180px" mode="nolines"> | <gallery widths="340px" heights="180px" mode="nolines"> | ||
TLA Rice | TLA Rice 6S4 Hitbox.png | '''Drill''' | ||
</gallery> | </gallery> | ||
'''Drill:''' It’s good for starting offense during neutral due to its fast speed and frame advantage on block. Use it occasionally as a mixup to zoning with Whip | |||
===Anti Airs/Jump Punishes=== | |||
'''Slap''' is a very solid meterless anti air given the jump isn't spaced. | |||
'''Swat''' is HUGE, is Rice's most reliable anti air, and has better metered conversions compared to Slap. | |||
'''Whip''' is better for punishing jumps compared to Swat and Slap given you are spaced out far enough. | |||
'''Teleport''' can be a decent fail safe if you aren't confident with using Rice's anti airs or if you're looking to time out. | |||
==Pressure== | |||
Rice's pressure will be short and sweet without meter due to how Slap doesn't keep pressure very well. Their main tools for offense will be Slap, Swat, Drill, Swipe, and Throw. | |||
== | ===Slap Pressure=== | ||
Slap is one of Rice's few move that are plus on block and gives them solid strike throw pressure meterless. Due to the pushback on block, Rice gets a small amount of block pressure midscreen. Rice's main goal during their Slap pressure are to get a knockdown or reset to neutral where they are strong. Assuming Rice is able to land Slap at point blank range, they have a few option to pressure the opponent: | |||
'''Slap > Swipe''' is a useful frame trap to use if you suspect the opponent will mash. The second hit of Swipe will always lead to a knockdown on hit and Rice is only -2 if the opponent blocks. | |||
''' | '''Slap > Throw''' punishes reversals and the blocking. | ||
'''Slap > Walk back''' is Rice's safest option as the make not commitments and can reset to neutral given the opponent backs up as well. | |||
''' | '''Slap > Drill''' although has a large gap and loses to mashing, is hard to react to, keep the pressure, and gives Rice more strike-throw opportunities. | ||
'''Slap > Slap''' is only recommended when the opponent is in the corner due to how easy it is to walk outside of Slap range and whiff punish. | |||
=== | ===Whip Pressure=== | ||
Whip's ability to frame trap and long start up make it a useful tool for pressure in the close-midrange area, especially when Rice has meter. Whip Pounce and Swipe are the two follow options to Whip and are useful in different scenarios: | |||
''' | '''Swipe''' is a very good threat meterless due to how it is an automatic frame trap when cancelled out of Whip and how safe it is when the opponent blocks it. With meter Rice can hit confirm a full combo if the opponent gets hit by Swipe. Although the scenario doesn't come up often, point blank Whip does give Rice a similar strike throw opportunity to point blank Slap. | ||
'''Whip Pounce''' usually starts offense when Rice has meter. Due to how much Whip Pounce can be delayed, Rice can actively threaten Whip Pounce as a frame trap and hit confirm tool when combined with meter. Even if the opponent doesn't get hit by Whip Pounce, Rice slides a large distance forward and can immediately do strike-throw pressure with Slap afterwards. | |||
===Swat Pressure=== | |||
Rice can get decent pressure scenarios off of Swat due to them being +7 while the opponent is airborne. Midscreen, Rice has relatively safe rps versus the opponent considering Whip is always an option after Swat on hit and Rice is close enough to punish the opponent blocking with Drill, Throw, or Slap. With meter Rice can get some decent pressure off of using 5S > RC > 6S4 to create a reset scenario or set up solid oki: | |||
'' | Breakdown of the scenario ''Courtesy of Yung Hambo'' | ||
[[File:5S_RC_6S4.png]] | |||
Swat also gains much more utility in the corner due to Rice being able to combo into Slap right after Swat. Besides the raw damage and oki boost, Rice also has solid setplay they can use to pressure the opponent. After landing Swat on a cornered opponent, Rice can follow up with Slap and choose to cancel into Swipe for a meaty frame trap, not cancel Slap at all and go for a strike-throw scenario, or get a knockdown with Whip Splash. After Whip Splash, Rice has a frame kill with throw that they can use to get a very meaty Swipe or meaty throw on wakeup. See video supplement below: | |||
<youtube>8QKLOWbYOVQ</youtube> | |||
==Okizeme== | |||
Rice has okay oki in most cases. Most of the time Rice will only get a safejump, meaty Whip, or meaty Slap for oki. Drill is a good fakeout tool that Rice can use to throw off the opponent in a safejump scenario. In some cases Rice can set up a fully meaty Swipe as for oki, which is strong due to being able to combo meaty Swipe into Whip and the fact that Rice is still +2 afterwards. | |||
==Defense== | ==Defense== | ||
Rice can struggle more on defense due to their slow 5L, the fact that Teleport is solely a repositioning move with a large amount of endlag, and because they have the slowest 5H in the game. Rice will have to find windows to safely use Teleport to get out of pressure, spend meter the Reject the opponent away, or choose wisely to mash out when the opponent least expects it. Slap and Whip are Rice’s most useful abare options. Teleport will typically be the most useful when the opponent is right next to Rice since if they commit to a move while Rice Teleports out, they will be unable to continue their pressure in most cases. Be careful of the opponent reading Teleport or standing further away during pressure however. Reject is a solid reversal to use to reset to neutral with the only downside being it costs meter to use. | |||
==Fighting Rice== | |||
== | |||
Rice is a character that struggles the most one the opponent can get in and pressure them. You want to play a patient neutral and look for habits Rice has with Whip zoning while also walk and blocking them to the corner. When you do eventually get in on Rice, you can bully them for as long as they choose to not Teleport or Reject. Rice can also really struggle to make comebacks due to how little threat they have when they are close to max Whip range, especially when they don’t have meter. If you have a 200+ lifelead, consider forcing Rice to approach you and catch them actively trying to make up the life lead and look out specifically for Drill to keep Rice from getting a free approach. Whenever you are defending against Rice keep in mind that they are really only at their scariest when they are in range to threaten Slap > Swipe as a frame trap and get a full meterless conversion. | |||
==Resources== | ==Resources== | ||
| Line 161: | Line 104: | ||
[https://youtu.be/8QKLOWbYOVQ Rice Tech Video] | [https://youtu.be/8QKLOWbYOVQ Rice Tech Video] | ||
=Navigation= | ==Navigation== | ||
{{Navbox-TLA}} | {{Navbox-TLA}} | ||
Revision as of 05:40, 4 November 2022
 |
Under Construction
|
Disclaimer: This is a community written page and may contain opinions that not all players may agree with. Use at your own discretion.
Goals
Rice wants to stay in control for most of the match. In neutral, they want to cover space in front of them with long range normal. Rice wants to stay in neutral most of the time if they can, so they want to have as much space as possible to work with while they zone their opponents out.
Neutral
Pokes

Whip: It has huge reach and is Rice’s most common poke due to its fast speed and modest recovery. It has a low hitbox making it prone to get jumped over. It’s useful for stuffing out and opponent walking forward, punishing whifs in neutral, and baiting out risky moves that beat it out (i.e. Jump Attack). It also has solid frame trap potential when cancelled into Swipe or Whip Pounce (when you want to approach).

Swipe: It has limited uses in neutral due to having large startup and recovery and how it never hits airborne opponents. Swipe’s main use for neutral comes from it being able to cancel from Whip to create an automatic frame trap, but it is occasionally useful as a timing mixup.
Drill

Drill: It’s good for starting offense during neutral due to its fast speed and frame advantage on block. Use it occasionally as a mixup to zoning with Whip
Anti Airs/Jump Punishes
Slap is a very solid meterless anti air given the jump isn't spaced.
Swat is HUGE, is Rice's most reliable anti air, and has better metered conversions compared to Slap.
Whip is better for punishing jumps compared to Swat and Slap given you are spaced out far enough.
Teleport can be a decent fail safe if you aren't confident with using Rice's anti airs or if you're looking to time out.
Pressure
Rice's pressure will be short and sweet without meter due to how Slap doesn't keep pressure very well. Their main tools for offense will be Slap, Swat, Drill, Swipe, and Throw.
Slap Pressure
Slap is one of Rice's few move that are plus on block and gives them solid strike throw pressure meterless. Due to the pushback on block, Rice gets a small amount of block pressure midscreen. Rice's main goal during their Slap pressure are to get a knockdown or reset to neutral where they are strong. Assuming Rice is able to land Slap at point blank range, they have a few option to pressure the opponent:
Slap > Swipe is a useful frame trap to use if you suspect the opponent will mash. The second hit of Swipe will always lead to a knockdown on hit and Rice is only -2 if the opponent blocks.
Slap > Throw punishes reversals and the blocking.
Slap > Walk back is Rice's safest option as the make not commitments and can reset to neutral given the opponent backs up as well.
Slap > Drill although has a large gap and loses to mashing, is hard to react to, keep the pressure, and gives Rice more strike-throw opportunities.
Slap > Slap is only recommended when the opponent is in the corner due to how easy it is to walk outside of Slap range and whiff punish.
Whip Pressure
Whip's ability to frame trap and long start up make it a useful tool for pressure in the close-midrange area, especially when Rice has meter. Whip Pounce and Swipe are the two follow options to Whip and are useful in different scenarios:
Swipe is a very good threat meterless due to how it is an automatic frame trap when cancelled out of Whip and how safe it is when the opponent blocks it. With meter Rice can hit confirm a full combo if the opponent gets hit by Swipe. Although the scenario doesn't come up often, point blank Whip does give Rice a similar strike throw opportunity to point blank Slap.
Whip Pounce usually starts offense when Rice has meter. Due to how much Whip Pounce can be delayed, Rice can actively threaten Whip Pounce as a frame trap and hit confirm tool when combined with meter. Even if the opponent doesn't get hit by Whip Pounce, Rice slides a large distance forward and can immediately do strike-throw pressure with Slap afterwards.
Swat Pressure
Rice can get decent pressure scenarios off of Swat due to them being +7 while the opponent is airborne. Midscreen, Rice has relatively safe rps versus the opponent considering Whip is always an option after Swat on hit and Rice is close enough to punish the opponent blocking with Drill, Throw, or Slap. With meter Rice can get some decent pressure off of using 5S > RC > 6S4 to create a reset scenario or set up solid oki:
Breakdown of the scenario Courtesy of Yung Hambo

Swat also gains much more utility in the corner due to Rice being able to combo into Slap right after Swat. Besides the raw damage and oki boost, Rice also has solid setplay they can use to pressure the opponent. After landing Swat on a cornered opponent, Rice can follow up with Slap and choose to cancel into Swipe for a meaty frame trap, not cancel Slap at all and go for a strike-throw scenario, or get a knockdown with Whip Splash. After Whip Splash, Rice has a frame kill with throw that they can use to get a very meaty Swipe or meaty throw on wakeup. See video supplement below:
Okizeme
Rice has okay oki in most cases. Most of the time Rice will only get a safejump, meaty Whip, or meaty Slap for oki. Drill is a good fakeout tool that Rice can use to throw off the opponent in a safejump scenario. In some cases Rice can set up a fully meaty Swipe as for oki, which is strong due to being able to combo meaty Swipe into Whip and the fact that Rice is still +2 afterwards.
Defense
Rice can struggle more on defense due to their slow 5L, the fact that Teleport is solely a repositioning move with a large amount of endlag, and because they have the slowest 5H in the game. Rice will have to find windows to safely use Teleport to get out of pressure, spend meter the Reject the opponent away, or choose wisely to mash out when the opponent least expects it. Slap and Whip are Rice’s most useful abare options. Teleport will typically be the most useful when the opponent is right next to Rice since if they commit to a move while Rice Teleports out, they will be unable to continue their pressure in most cases. Be careful of the opponent reading Teleport or standing further away during pressure however. Reject is a solid reversal to use to reset to neutral with the only downside being it costs meter to use.
Fighting Rice
Rice is a character that struggles the most one the opponent can get in and pressure them. You want to play a patient neutral and look for habits Rice has with Whip zoning while also walk and blocking them to the corner. When you do eventually get in on Rice, you can bully them for as long as they choose to not Teleport or Reject. Rice can also really struggle to make comebacks due to how little threat they have when they are close to max Whip range, especially when they don’t have meter. If you have a 200+ lifelead, consider forcing Rice to approach you and catch them actively trying to make up the life lead and look out specifically for Drill to keep Rice from getting a free approach. Whenever you are defending against Rice keep in mind that they are really only at their scariest when they are in range to threaten Slap > Swipe as a frame trap and get a full meterless conversion.
Resources
Off the Grain - TLA Rice Guide