Tough Love Arena/Noodle/Strategy
< Tough Love Arena | Noodle
Jump to navigation
Jump to search
Strategy
- This section is subject to changing due to new strategies/discoveries.
- Take this matchup advice with a grain of salt as how a character "should be played" is largely subjective and this character lacks a large amount of competitive expertise.
Goals
Noodle wants to stay in control for most of the match. In neutral, they want to cover space in front of them with long range normals and a stationary projectile. Whenever they get a knockdown, Noodle wants to loop setplay and push the opponents to the corner. Once Noodle has the opponent in the corner, they will try to keep the corner pressure until they win the round.
Neutral
Pokes
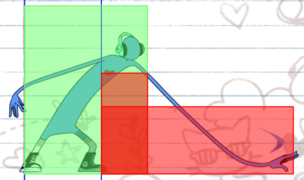
Whip

- Whip is the longest ranged heavy attack in the game and Noodle’s most common poke due to its fast speed and modest recovery.
- Whip has a very low hitbox, so Jump can be used preemptively to beat out Whip.
- Use it to stuff out opponents who try to walk forward, to punish whiffs in neutral, or to bait out risky options like Jump Attack in neutral.
- Very hard to hit confirm especially at tipper Whip range, so save cancelling into Whip Pounce for clear whiff punishes.
- Whip Pounce is a risky but good mixup to use when the opponent tries to take space or counterattack right after blocking Whip.
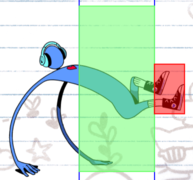
Trample

- Trample is a solid burst option counterpart to Whip.
- It acts very similar to Whip Pounce in that it leaves Noodle minus and right next to the opponent if they block the move. The move also effectively is a slower version of Sweep and Whip at their respective tipper ranges.
- Trample however has the benefits of being very easy to hit confirm off of with meter, is faster than Whip leading to better counter poke opportunities, and leaves Noodle plus if they hit the opponent unlike Whip.
- Trample is a good mixup to Whip in neutral when the opponent is well in Whip’s range.
Other Options
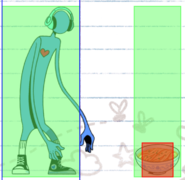
Soup

- Soup is a somewhat niche neutral tool due to how its usefulness is dependent on what tools the opponent has and that it has a significant amount of endlag (taking into account Soup’s actual startup as well). However, Soup is potent when Noodle has time and space to set it up.
- Soup is useful for wasting the opponent’s time during neutral. It acts like a wall since in most cases the opponent either has to Jump over Soup, Attack Soup itself, or wait out Soup entirely, all of which can be punished in their respective ways.
- Jump can be punished with a regular anti air or if the spacing is correct, Soup can anti air the Jump automatically.
- Attacking Soup gives Noodle a prime opening to whiff punish with Whip or Trample.
- Waiting out Soup wastes a large amount of time (4 seconds) and allows Noodle to shimmy for meter, try to plant another Soup, or gain space.
- With the right setup and right execution, Soup is a dreadful tool to deal with in neutral.
Shimmy
- Having a bar of meter on deck lets Noodle convert any hit they get into a Whip Splash knockdown, makes their pressure overall better, and lets Noodle reset to neutral with Reject if they need to.
- Shimmying is a useful counterpart to poking when the opponent is afraid of inching forward due to Whip and Trample or if they want to go for a risky option to punish Whip and Trample specifically.
Anti Airs/Jump Punishes
_Hitbox.png)
- Slap is one of Noodle's most rewarding anti airs versus a close Jump and if the opponent is in the corner. Due to it's fast startup and amount of active frames Slap is a reliable anti air to rely on most of the time. Keep in mind that spaced Jumps will be able to outrange Slap, so a different anti air will have to be used.
_Hitbox.png)
- Frenzy is a very consistent anti air that nets a relatively low amount of reward meterless. Frenzy has a similar anti air timing to Slap but can cover spaced Jumps and has lower reward compared to Slap.
- Trample gives Noodle the least amount of reward as it trades with Jump out right but is useful in scenarios where the opponent has low health. Noodle even in frame advantage with the opponent and a small distance away from the opponent after the trade.
- Soup takes the most amount of time to setup but gives noodle the best reward by far and is very easy to follow up. If noodle blocks a jump attack while Soup is close enough to them, Noodle essentially trades with the blockstun animation while the opponent gets hit by Soup and can get a full combo into a knockdown.
- Whip is useful for whiff punishing Jumps that are spaced out far enough. Be wary of the extended hurtbox and the low hitbox of Whip when trying to whiff punish Jump as it can lead to Noodle getting a bad trade with Jump or get hit with Jump outright.
Offense
Okizeme
Soup Setplay
- Soup gives Noodle many useful options to pressure the opponent as long as Noodle has time to setup Soup.
- Useful setups to know:
- After landing a point blank Whip Splash, place a Soup behind the opponent with a bit of room between Noodle and the opponent. Then use Whip > Whip Pounce on block as soon as possible. This gives Noodle a free approach with the added bonus of chip. You can also choose to not use Whip Pounce at all to keep Soup on the field and make Reject > Soup a threat versus counterpoking.
- After landing any spaced Whip Splash, place a Soup on top of the opponent then place one Soup right in front of Noodle. Noodle gets some free chip and a Soup on the field for free.
- After landing a Whip Splash in the corner, instantly place two Soups down, Noodle gets a ton of plus frames and extra chip, the opponent’s options for dealing with this pressure are mostly limited to waiting it out, and there are a ton of mixup Noodle could go for: placing a third Soup after, delaying the second Soup to create a frame trap delaying the second Soup long enough to grab, etc.
- After landing a relatively close Whip Splash, place a Soup on top of the opponent, then Jump. A less safe way of getting an approach but it has to be called out with a read and Noodle gets more frame advantage and better positioning.
Safe Jump
- Meaty Safe Jump can be used to be safe versus every reversal on wakeup and gives Noodle a decent amount of frame advantage
- A Non-meaty Safe Jump is useful versus Garlic specifically since they can’t escape the Jump attack with Backflip as long as the Jump attack is spaced. Can be paired up with Soup during a knockdown scenario to create a free approach for Noodle
- A Non-meaty Spaced Safe Jump gives Noodle access to the second hit of Slap as a frame trap option, puts Noodle at a comfortable range to avoid being grabbed if they don’t want to commit to the rps scenario, and puts Noodle at the perfect range to threaten a grab or shimmy since their grab range is relatively the same range as every 5L
Meaties
- Meaty 5L lets Noodle link into another Slap for a combo if the opponent mashes on wakeup, safe to use versus armor as only the second hit of Slap actually hits the armor, and Noodle can do a Slap that barely misses the opponent on wakeup to get a fake out into a grab
- Meaty Trample can be hard to time but gives Noodle free Chip and plus frames to continue their offense. Not safe versus Armor or Parry on wakeup.
5L Block Pressure
- Every character can walk outside the second 5L of point blank 5L > 5L on block midscreen. Noodle can use 5L to punish sitting still, 5H or 4H to catch the opponent trying to whiff punish the second 5L, or Grab if the opponent chooses to not swing at all.
- 5L > 5L on block from point blank is guaranteed in the corner. After the first 5L Noodle can choose to 5L again to punish mashing or standing still, Trample to punish Backflip or a Parry, or walk back to punish a reversal. After the second 5L Noodle can walk up 5L to extend pressure, walk back Trample/Whip to punish a Sweep mash, immediately Trample to punish a Heavy Punch mash, etc.
Whip rekka pressure
- Noodle has to consecutive follow ups (Whip Pounce and Whip Splash) to Whip that can both be delayed to include frame traps
- Whip Pounce can be used to force the opponents to stay in place more often during Whip zoning.
- Whip Splash is a useful threat with meter that can punish opponents who commonly mash after Whip Pounce. Noodle can use the threat of Whip Splash to get a throw or steal their turn with 5H.
Possible 7 frame gap cancelled into Whip Pounce
Possible 5 frame gap cancelled into Whip Splash

Defense

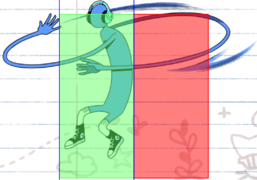
Frenzy
_Hitbox.png)
- Frenzy is a high risk, high reward armored reversal that is best used with caution. Preferably use it when Noodle has meter since they get significantly better conversion off of Frenzy > RC opposed to Raw Frenzy.
Slap
Trample
- Slap and Trample useful for stuffing out an opponent’s overextensions during their block pressure, if you suspect the opponent will try to grab, or if you want to steal your turn back. Be sure to condition the opponent to not expect mashing first.

Reject

- Reject lets Noodle stop the opponent’s block pressure at the cost of one bar of meter. Vary Reject timings to make sure the opponent is not ready for the neutral reset and can't bait out your Reject.
Burst

- Use Burst when you expect the opponent’s combo will kill or if you have a big enough life lead to gain back that meter in no time if you get hit again, otherwise save your meter for Rapid and Reject. Vary your Burst timings to make sure you don’t get hard punished for getting Burst baited.
- Blocking will cause your opponent to eventually push themselves too far away to continue their block pressure. Blocking is useful to bait out overextensions versus opponents who want to keep up the pressure, and with enough conditioning, you can start to mash at certain points during their block pressure.
Counter Strategy
Soup Counterplay
- Have a baseline understanding of options versus Soup
- Prep/Serve Soup has 40 Frames of endlag, not to mention that Soup takes nearly a second to have an active hitbox once it’s placed down. At the very least a Jump to predict Prep/Serve Soup can be useful to discourage Noodle from using the move in neutral.
- Same thing also applies to Noodle’s corner pressure. Don’t be too afraid of swinging versus Noodle when they have to delay Serving Soup to place it on top of you
- Know that 5L or a spaced out 5H are good options for getting rid of Soup semi safely. If Noodle isn’t looking for those options specifically in neutral, it will be hard for them to get a full on whiff punish on reaction. Use this in conjunction with Jump Attack, waiting, and shimmying to make Soup less effective in neutral.
- Only Parries can’t go through Soup. There are plenty of moves to eat through Soup or avoid it if Noodle uses it for pressure (i.e. Chop, Dash, Frenzy). Figure out what setups those moves are useful in during Noodle’s pressure.
Positioning
- Push Noodle to the corner
- Noodle wants to corner their opponent as they get more damage off of their knockdowns and get more options to pressure the opponent.
- Try to walk down Noodle as they zone you out. If you force them to give up space, you will eventually corner them and limit their ability to zone you out.
- Generally, Noodle is weaker the closer they are to their opponent as they are more limited in how they can use Soup and how they can use Whip.
Resources