Introduction
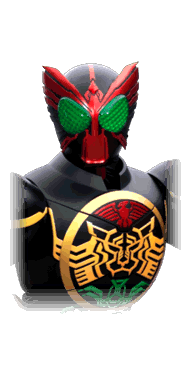 Kamen Rider OOO
Kamen Rider OOO (pronounced Os) counts the medals one two and three.
OOO has many forms and playstyles. Most of these fight at close range, whether as a quick striker or a defensive powerhouse, but he also has access to forms with more ranged options and unique harrassment tools. Wherever and however he plans to fight, it's going to be pretty nasty when he hits you thanks to his wide selection of powerful combos and oki options.
In this variation, OOO is an extremely versatile character who can swap his three Core Medals at will from a large pool of options, with his three slots corresponding to his head, body, and legs. This allows him to change every aspect of his moveset piece by piece, on the fly. This might sound like a lot to grasp and... well, it is.
After choosing this style, OOO is presented with a unique menu, through which OOO chooses which three sets of Core Medals he uses in the match. These are chosen by Combo Form, of which there are 5:
- TaJaDor Combo (Red Combo) is based on birds. Unique to this Combo Form, OOO has access to a Flight Mode Rider Art with an unblockable follow-up, and a tracking projectile 5S.
- LaToraTa Combo (Yellow Combo) is based on big cats. OOO's speediest Combo Form, it allows him to move forward the quickest.
- GataKiriBa Combo (Green Combo) is based on insects. Unique to this Combo Form, OOO gains a Super Jump Rider Art with a one-of-a-kind fastfall follow-up.
- ShaUTa Combo (Blue Combo) is based on sea creatures. It features long range whip attacks.
- SaGoZou Combo (Gray Combo) is based on large mammals. Unique to this Combo Form, OOO gains Super Armor at all times, as well as the Earthquake Rider Art.
TaToBa Combo (Red/Yellow/Green) is a bit of a special case. It can be considered OOO's "base form," and he always carries the medals to access TaToBa whether or not you choose their associated combos.
The easiest way to conceptualize OOO's moveset is by primarily thinking of the Combo Forms. Because the full Combo Forms also gain bonuses or new tools altogether, they're likely what you'll spend most of your time playing with. As such, this page will detail the Combo Form movesets primarily, though we encourage you to have fun mixing and matching!
It's also worth noting up front that SaGoZou's Super Armor is very weird. While some attacks will arbitrarily break the armor, SaGoZou cannot be knocked down, and normals which would launch or knock down instead put OOO into grounded hitstun. As such, it makes a lot of normal combos drop, but it also enables character-specific combos (including infinites) against SaGoZou.
Playstyle
 Kamen Rider OOO (Form Change) switches medals to freely customize his moveset, including Combo Forms with unique tools. Kamen Rider OOO (Form Change) switches medals to freely customize his moveset, including Combo Forms with unique tools. |
| Pros |
Cons |
- Extreme Flexibility: OOO can essentially pull whatever parts he wants from 3-5 movesets at any given time. Even just sticking to Combo Forms gives him up to 4 distinct movesets that offer a wide range of options.
- Multiple Infinite Combos: TaToBa Combo and ShaUTa Combo both have very practical infinites.
- Huge Range of Unique Tools: For example, TaJaDor Combo has access to an unblockable during its Flight Mode Rider Art, and SaGoZou Combo is the only character in the game with Super Armor at all times as well as one of the rare characters to have an Earthquake Rider Art.
- Invulnerable Form Change: Because OOO has invulnerable frames while transforming, he can create opportunities by causing his opponent's attacks to whiff unexpectedly.
|
- Complicated Form Change Menuing: Quickly changing forms with OOO is difficult, since you have to juggle medals while fighting. It's not uncommon to slip a little on your inputs and accidentally change the wrong medal, then go to fix it and transform all over again.
- Can't Have Everything At Once: Because you can't hide what you're doing with the Core Medals and the transformation is lengthy, OOO effectively has to declare which of his tools he's going to be using ahead of time. This does not function as a handicap, but limits his ability to respond to a situation by switching to the perfect form for that situation.
|
In this variation, OOO discards all that complicated Core Medal stuff for access to his BuraKaWani Combo, a powerful form utilizing a unique set of Core Medals based on reptiles.
When choosing a Power Up Style, OOO's base form is always TaToBa Combo.
One of OOO's two available Power Up forms, BuraKaWani offers powerful strings and high ground speed. It also features a counter-type special move, which can be very useful for defense.
Playstyle
|
Kamen Rider OOO (BuraKaWani Combo) slithers into close range and obliterates his opponents. |
| Pros |
Cons |
- Infinite Combo: TaToBa Combo, OOO's base form in this Style, has an infinite combo. This especially helps a lot for building the meter required to activate Power Up.
- Ridiculous Damage: BuraKaWani's strings build a lot of meter and deal massive damage. They can be made even more deadly by using Power Up as a cancel to reset damage scaling.
- Speed: BuraKaWani has exceedingly quick movement on the ground, as well as a unique Zig Zag Dash Rider Art to cover a lot of distance while evading attacks.
- Power Up Style: Power Up Style characters universally are able to refresh their Guard Gauge and damage scaling by transforming.
|
- Reliant on In-Fighting: This form of OOO goes all-in on point-blank combat, and may have a hard time if he can't get or stay in, or against characters who run away effectively.
- Inconsistent Rider Art: BuraKaWani's Rider Art is unique and allows OOO to cover a lot of distance quickly and safely, but its follow-up often whiffs completely, and because it leaves OOO airborne and very low to the ground, he isn't able to immediately start attacking with other means.
|
In this variation, OOO discards all that complicated Core Medal stuff for access to his PuToTyra Combo, a powerful form utilizing a unique set of Core Medals based on dinosaurs.
When choosing a Power Up Style, OOO's base form is always TaToBa Combo.
In this Power Up form, OOO goes berserk, gaining powerful unblockables and an armored roar attack that crumples the opponent.
Playstyle
|
Kamen Rider OOO (PuToTyra Combo) uses the power of dinosaurs to do unblockables. |
| Pros |
Cons |
- Infinite Combo: TaToBa Combo, OOO's base form in this Style, has an infinite combo. This especially helps a lot for building the meter required to activate Power Up.
- High Damage: Though PuToTyra doesn't deal quite as much damage as BuraKaWani, it's plenty strong in its own right, dealing lots of damage in single hits.
- Difficult to Contest: Thanks to Flight Mode and a retreating armored attack, attacking into PuToTyra is very difficult. It's common for in-fighters to really struggle with PuToTyra.
- Power Up Style: Power Up Style characters universally are able to refresh their Guard Gauge and damage scaling by transforming.
|
- Struggles with Runaway: PuToTyra's tools excel at making life difficult for opponents who want to attack him, but he can struggle to deal with strong ranged options.
|
Form Select
Move List
Normal Moves
Tatoba 5LLLL
5LLLL
|
| Version
|
Damage
|
Guard
|
Startup
|
Active
|
Recovery
|
Block Adv.
|
Hit Adv.
|
| 5L
|
-
|
Y
|
-
|
-
|
-
|
-
|
-
|
| 5LL
|
-
|
Y
|
-
|
-
|
-
|
-
|
-
|
| 5LLL
|
-
|
Y
|
-
|
-
|
-
|
-
|
-
|
| 5LLLL
|
-
|
Y
|
-
|
-
|
-
|
-
|
-
|
A double-kick that knocks the opponent away on its second hit.
|
|
Tatoba 5LHH
5LHH
|
| Version
|
Damage
|
Guard
|
Startup
|
Active
|
Recovery
|
Block Adv.
|
Hit Adv.
|
| 5L
|
-
|
Y
|
-
|
-
|
-
|
-
|
-
|
| 5LH
|
-
|
Y
|
-
|
-
|
-
|
-
|
-
|
String filler that uses the same attack as 5H.
|
| 5LHH
|
-
|
Y
|
-
|
-
|
-
|
-
|
-
|
A double kick with lengthy hitstun and recovery. Notably, leaves the opponent standing.
|
|
Tatoba dLLL
dLLL
|
| Version
|
Damage
|
Guard
|
Startup
|
Active
|
Recovery
|
Block Adv.
|
Hit Adv.
|
| dL
|
-
|
Y
|
-
|
-
|
-
|
-
|
-
|
|
|
| dLL
|
-
|
Y
|
-
|
-
|
-
|
-
|
-
|
A downward swipe. This attack has enough hitstun to wait for the string to end and link another dL, enabling TaToBa's infinite combo.
|
| dLLL
|
-
|
Y
|
-
|
-
|
-
|
-
|
-
|
A stab that reliably combos from dLL, and crumples the opponent on hit. This comes out if you tried to link another dL too early, and allows you to just end your combo with a special normally.
|
|
Tatoba dLHH
dLHH
|
| Version
|
Damage
|
Guard
|
Startup
|
Active
|
Recovery
|
Block Adv.
|
Hit Adv.
|
| dL
|
-
|
Y
|
-
|
-
|
-
|
-
|
-
|
|
|
| dLH
|
-
|
Y
|
-
|
-
|
-
|
-
|
-
|
A hopping double kick. Launches the opponent, and can be followed up with a Combo Jump into its aircombo follow-up string, jLHS. This combo jump happens very late relative to the attack, so it's a little awkward.
|
| dLHH
|
-
|
Y
|
-
|
-
|
-
|
-
|
-
|
An alternative ender. Knocks the opponent away on hit.
|
|
Tatoba 5HHH
5HHH
|
| Version
|
Damage
|
Guard
|
Startup
|
Active
|
Recovery
|
Block Adv.
|
Hit Adv.
|
| 5H
|
-
|
Y
|
-
|
-
|
-
|
-
|
-
|
OOO sways backwards, then lunges with a stab. A slightly awkward normal to attack with, but can be used to make an opponent's attack whiff and counterhit them.
|
| 5HH
|
-
|
Y
|
-
|
-
|
-
|
-
|
-
|
A downward swipe follow-up. A notably useful string as it has enough hitstun to link into dL.
|
| 5HHH
|
-
|
Y
|
-
|
-
|
-
|
-
|
-
|
A hopping double kick that launches the opponent. Might be useful as a frametrap if your opponent blocked 5HH, but it's best to avoid this when 5HH hits in favor of the more advanced link combo.
|
|
Tatoba dHHH
dHHH
|
| Version
|
Damage
|
Guard
|
Startup
|
Active
|
Recovery
|
Block Adv.
|
Hit Adv.
|
| dH
|
-
|
Y
|
-
|
-
|
-
|
-
|
-
|
|
|
| dHH
|
-
|
Y
|
-
|
-
|
-
|
-
|
-
|
OOO stabs the opponent, using the same attack as 5H.
|
| dHHH
|
-
|
Y
|
-
|
-
|
-
|
-
|
-
|
A downward swipe that knocks the opponent away on hit.
|
|
Special Moves
Tatoba 5S
Medajaribur Slash
5S
|
| Damage
|
Guard
|
Startup
|
Active
|
Recovery
|
Block Adv.
|
Hit Adv.
|
| -
|
Y
|
-
|
-
|
-
|
-
|
-
|
OOO casually slots some medals into the Medajaribur, then slashes and fires a wave forward. Tons of startup, no tracking, and tons of recovery. In a pinch it can be useful to have a projectile, but I wouldn't count on it.
Among Combo Forms, this attack only appears for the TaToBa Combo. It can be transferred to mix-and-match forms through the red medal in the head slot, unlike the unique 5S that replaces this for TaJaDor Combo.
|
|
Tatoba DS
Rapid Slash
any direction + S
|
| Damage
|
Guard
|
Startup
|
Active
|
Recovery
|
Block Adv.
|
Hit Adv.
|
| -
|
Y
|
-
|
-
|
-
|
-
|
-
|
After a brief wind-up, OOO runs forward with his claws and slashes. OOO's preferred special ender, since it reliably combos from dLLL's crumple. Not especially useful in neutral due to its lengthy animation and recovery time.
|
|
Tatoba JS
Diving Kick
jS
|
| Damage
|
Guard
|
Startup
|
Active
|
Recovery
|
Block Adv.
|
Hit Adv.
|
| -
|
Y
|
-
|
-
|
-
|
-
|
-
|
|
|
|
Universal Mechanics
Tatoba Throw
Throw
4H
|
| Damage
|
Guard
|
Startup
|
Active
|
Recovery
|
Block Adv.
|
Hit Adv.
|
| -
|
N
|
-
|
-
|
-
|
-
|
-
|
|
|
|
Tatoba Dash Action
Dash Action Air Dash Air Dash
|
| Damage
|
Guard
|
Startup
|
Active
|
Recovery
|
Block Adv.
|
Hit Adv.
|
| -
|
N/A
|
-
|
-
|
-
|
-
|
-
|
OOO airdashes. A generic mobility tool. Costs .5 stocks of the Rider Gauge.
|
|
Tatoba Rider Art
Rider Art Super Jump Super Jump
|
| Damage
|
Guard
|
Startup
|
Active
|
Recovery
|
Block Adv.
|
Hit Adv.
|
| -
|
N/A
|
-
|
-
|
-
|
-
|
-
|
A standard Super Jump-type Rider Art. Costs .5 stocks of the Rider Gauge.
|
|
Tatoba Style Action
Style Action
|
| Damage
|
Guard
|
Startup
|
Active
|
Recovery
|
Block Adv.
|
Hit Adv.
|
| -
|
N/A
|
-
|
-
|
-
|
-
|
-
|
Kamen Rider OOO (Form Change) is able to use the Style Action inputs to switch out his Core Medals. He's able to fiddle with his Core Medals at any time, but can only complete a transformation when he goes to neutral.
- Style Action Left switches which medal is set in the left-most slot. This slot affects the Head, and his neutral special attacks.
- Style Action Up switches which medal is set in the middle slot. This slot affects the Body, any normals which use OOO's arms, and his directional special attacks.
- Style Action Right switches which medal is set in the right-most slot. This slot affects the Legs, any normals which use OOO's legs, and his air special attacks.
- Style Action Down locks in any changes you've made, turning OOO fully invincible for the duration of the transformation. If this is done during hitstun, OOO will transform once his hitstun ends.
|
|
Combos
- dLL > [dLL] repeat xN > dLLL > dS
- TaToBa's infinite combo, with a special ender. This will never deal 100% damage due to damage scaling, so it can be helpful to get a special ender to cut off the opponent's red life.
- You can reliably combo into Rider Finale instead of dS, as well.
- 5HH > [dLL] repeat xN > dLLL > dS
- A 5HH starter into the infinite combo.
Move List
Normal Moves
Tajador 5LLLL
5LLLL
|
| Version
|
Damage
|
Guard
|
Startup
|
Active
|
Recovery
|
Block Adv.
|
Hit Adv.
|
| 5L
|
-
|
Y
|
-
|
-
|
-
|
-
|
-
|
|
|
| 5LL
|
-
|
Y
|
-
|
-
|
-
|
-
|
-
|
| 5LLL
|
-
|
Y
|
-
|
-
|
-
|
-
|
-
|
| 5LLLL
|
-
|
Y
|
-
|
-
|
-
|
-
|
-
|
Launches the opponent on hit.
|
|
Tajador 5LHH
5LHH
|
| Version
|
Damage
|
Guard
|
Startup
|
Active
|
Recovery
|
Block Adv.
|
Hit Adv.
|
| 5L
|
-
|
Y
|
-
|
-
|
-
|
-
|
-
|
|
|
| 5LH
|
-
|
Y
|
-
|
-
|
-
|
-
|
-
|
A hopping knee that advances farther than 5L.
|
| 5LHH
|
-
|
Y
|
-
|
-
|
-
|
-
|
-
|
A double kick with lengthy hitstun and recovery. Notably, leaves the opponent standing.
|
|
Tajador dLLL
dLLL
|
| Version
|
Damage
|
Guard
|
Startup
|
Active
|
Recovery
|
Block Adv.
|
Hit Adv.
|
| dL
|
-
|
Y
|
-
|
-
|
-
|
-
|
-
|
A quick advancing side kick. Advances quite far.
|
| dLL
|
-
|
Y
|
-
|
-
|
-
|
-
|
-
|
| dLLL
|
-
|
Y
|
-
|
-
|
-
|
-
|
-
|
Knocks the opponent away on hit.
|
|
Tajador dLHH
dLHH
|
| Version
|
Damage
|
Guard
|
Startup
|
Active
|
Recovery
|
Block Adv.
|
Hit Adv.
|
| dL
|
-
|
Y
|
-
|
-
|
-
|
-
|
-
|
A quick advancing side kick. Advances quite far.
|
| dLH
|
-
|
Y
|
-
|
-
|
-
|
-
|
-
|
A hopping double kick. Launches the opponent, and can be followed up with a Combo Jump into its aircombo follow-up string, jLHS. A useful combo option for TaJaDor.
|
| dLHH
|
-
|
Y
|
-
|
-
|
-
|
-
|
-
|
An alternative ender. Knocks the opponent away on hit.
|
|
Tajador 5HHHH
5HHHH
|
| Version
|
Damage
|
Guard
|
Startup
|
Active
|
Recovery
|
Block Adv.
|
Hit Adv.
|
| 5H
|
-
|
Y
|
-
|
-
|
-
|
-
|
-
|
A spinning backfist with good range.
|
| 5HH
|
-
|
Y
|
-
|
-
|
-
|
-
|
-
|
| 5HHH
|
-
|
Y
|
-
|
-
|
-
|
-
|
-
|
A high kick with notably long hitstun. Using this hitstun, OOO can either link a 5L or RC and combo into dSSS.
|
| 5HHHH
|
-
|
Y
|
-
|
-
|
-
|
-
|
-
|
A painfully slow punch that knocks the opponent away on hit.
|
|
Tajador dHHHH
dHHHH
|
| Version
|
Damage
|
Guard
|
Startup
|
Active
|
Recovery
|
Block Adv.
|
Hit Adv.
|
| dH
|
-
|
Y
|
-
|
-
|
-
|
-
|
-
|
A stationary spinning high kick.
|
| dHH
|
-
|
Y
|
-
|
-
|
-
|
-
|
-
|
|
|
| dHHH
|
-
|
Y
|
-
|
-
|
-
|
-
|
-
|
|
|
| dHHHH
|
-
|
Y
|
-
|
-
|
-
|
-
|
-
|
A dashing punch, and the most useful part of this string, with many helpful properties. Has very very short recovery, making it fairly safe to throw out. Advances very far very quickly, making it an excellent point to RC to cover ground.
Launches the opponent on hit, and will combo to dL meterlessly, though its follow-ups will not juggle.
|
|
Special Moves
Tajador 5S
Kujaku Phaser
5S
|
| Damage
|
Guard
|
Startup
|
Active
|
Recovery
|
Block Adv.
|
Hit Adv.
|
| -
|
Y
|
-
|
-
|
-
|
-
|
-
|
OOO poses and then uses the power of the peacock to fire seven homing feathers of light. It can be risky due to its lengthy animation, but is an excellent projectile to pressure the opponent from a distance.
|
|
Tajador DS
Tajaspinner
any direction + S
|
| Damage
|
Guard
|
Startup
|
Active
|
Recovery
|
Block Adv.
|
Hit Adv.
|
| -
|
Y
|
-
|
-
|
-
|
-
|
-
|
OOO shoots a fireball directly forward. A projectile rekka, this can be repeated up to 3 times total, dealing a pretty silly amount of damage if it hits on its own. Can also be a useful combo ender for the TaJaDor Combo.
|
|
Tajador JS
Prominence Drop
jS
|
| Damage
|
Guard
|
Startup
|
Active
|
Recovery
|
Block Adv.
|
Hit Adv.
|
| -
|
Y
|
-
|
-
|
-
|
-
|
-
|
In most ways, a standard divekick. However, this one also stalls in the air for a little bit before diving, and then dives at a very steep angle. Can be useful to catch an opponent unaware.
|
|
Universal Mechanics
Tajador Throw
Throw
4H
|
| Damage
|
Guard
|
Startup
|
Active
|
Recovery
|
Block Adv.
|
Hit Adv.
|
| -
|
N
|
-
|
-
|
-
|
-
|
-
|
|
|
|
Tajador Dash Action
Dash Action Air Dash Air Dash
|
| Damage
|
Guard
|
Startup
|
Active
|
Recovery
|
Block Adv.
|
Hit Adv.
|
| -
|
N/A
|
-
|
-
|
-
|
-
|
-
|
OOO airdashes. A generic mobility tool. Costs .5 stocks of Rider Gauge.
|
|
Tajador Rider Art
Rider Art
Flight Mode
|
| Damage
|
Guard
|
Startup
|
Active
|
Recovery
|
Block Adv.
|
Hit Adv.
|
| -
|
N/A
|
-
|
-
|
-
|
-
|
-
|
Upon pressing Rider Art, OOO enters Flight Mode until the button is released. While hovering, the Rider Gauge slowly drains, and OOO has access to moves exclusive to Flight Mode. Requires (but does not consume) 1 stock of Rider Gauge to initiate.
|
|
Tajador Rider Art L
L during Flight Mode
|
| Damage
|
Guard
|
Startup
|
Active
|
Recovery
|
Block Adv.
|
Hit Adv.
|
| -
|
Y
|
-
|
-
|
-
|
-
|
-
|
A horizontal swipe with a dead zone underneath OOO. Mostly outclassed by RA H for this purpose.
|
|
Tajador Rider Art H
H during Flight Mode
|
| Damage
|
Guard
|
Startup
|
Active
|
Recovery
|
Block Adv.
|
Hit Adv.
|
| -
|
Y
|
-
|
-
|
-
|
-
|
-
|
An axe kick that reliably hits the whole space underneath OOO during Flight Mode.
|
|
Tajador Rider Art S
S during Flight Mode
|
| Damage
|
Guard
|
Startup
|
Active
|
Recovery
|
Block Adv.
|
Hit Adv.
|
| -
|
N
|
-
|
-
|
-
|
-
|
-
|
OOO dives and fires a volley of fireballs, starting a cinematic if the first fireball connects. An unblockable attack that deals a lot of damage. As an added benefit, its long travel distance and multiple hits tend to make it safer than other moves of this type even when it whiffs.
|
|
Tajador Style Action
Style Action
|
| Damage
|
Guard
|
Startup
|
Active
|
Recovery
|
Block Adv.
|
Hit Adv.
|
| -
|
N/A
|
-
|
-
|
-
|
-
|
-
|
Kamen Rider OOO (Form Change) is able to use the Style Action inputs to switch out his Core Medals. He's able to fiddle with his Core Medals at any time, but can only complete a transformation when he goes to neutral.
- Style Action Left switches which medal is set in the left-most slot. This slot affects the Head, and his neutral special attacks.
- Style Action Up switches which medal is set in the middle slot. This slot affects the Body, any normals which use OOO's arms, and his directional special attacks.
- Style Action Right switches which medal is set in the right-most slot. This slot affects the Legs, any normals which use OOO's legs, and his air special attacks.
- Style Action Down locks in any changes you've made, turning OOO fully invincible for the duration of the transformation. If this is done during hitstun, OOO will transform once his hitstun ends.
|
|
Combos
- A basic string RC to end in TaJaDor's dS for high damage. This is higher damage than doing an extended combo with TaJaDor, so it's usually what you'll want to go for.
- 5HHH > 5LLLL
- 5HHH > 5LLL > RC > 5HHH > RC > dS,dS,dS
- 5HHH > Rider Finale
- Link combo starters from 5HHH. TaJaDor suffers from very poor damage scaling, so doing an extended combo without Rider Finale is usually a bad idea.
- Stalling with the link combo can be useful to push for Climax Time while the opponent cannot burst, and then follow up with a Rider Finale.
Move List
Normal Moves
Latorata 5LLLL
5LLLL
|
| Version
|
Damage
|
Guard
|
Startup
|
Active
|
Recovery
|
Block Adv.
|
Hit Adv.
|
| 5L
|
-
|
Y
|
-
|
-
|
-
|
-
|
-
|
| 5LL
|
-
|
Y
|
-
|
-
|
-
|
-
|
-
|
| 5LLL
|
-
|
Y
|
-
|
-
|
-
|
-
|
-
|
| 5LLLL
|
-
|
Y
|
-
|
-
|
-
|
-
|
-
|
A backflip kick that launches the opponent.
|
|
Latorata 5LHH
5LHH
|
| Version
|
Damage
|
Guard
|
Startup
|
Active
|
Recovery
|
Block Adv.
|
Hit Adv.
|
| 5L
|
-
|
Y
|
-
|
-
|
-
|
-
|
-
|
| 5LH
|
-
|
Y
|
-
|
-
|
-
|
-
|
-
|
An axe kick that groundbounces the opponent.
|
| 5LHH
|
-
|
Y
|
-
|
-
|
-
|
-
|
-
|
A backflip kick that launches the opponent.
|
|
Latorata dLL
dLL
|
| Version
|
Damage
|
Guard
|
Startup
|
Active
|
Recovery
|
Block Adv.
|
Hit Adv.
|
| dL
|
-
|
Y
|
-
|
-
|
-
|
-
|
-
|
A quick advancing side kick. Advances quite far.
|
| dLL
|
-
|
Y
|
-
|
-
|
-
|
-
|
-
|
Launches the opponent on hit. Also advances quite far, making this string an excellent advancing option, though it has quite a bit of recovery as well.
|
|
Latorata dLHH
dLHH
|
| Version
|
Damage
|
Guard
|
Startup
|
Active
|
Recovery
|
Block Adv.
|
Hit Adv.
|
| dL
|
-
|
Y
|
-
|
-
|
-
|
-
|
-
|
A quick advancing side kick. Advances quite far.
|
| dLH
|
-
|
Y
|
-
|
-
|
-
|
-
|
-
|
A hopping double kick. Launches the opponent, and can be followed up with a Combo Jump into its aircombo follow-up string, jLHS. A useful combo option for LaToraTa, especially since LaToraTa's jS has more advantage on hit than most.
|
| dLHH
|
-
|
Y
|
-
|
-
|
-
|
-
|
-
|
An alternative ender. Knocks the opponent away on hit. Will often whiff under the opponent near the wall due to its forward movement.
|
|
Latorata 5HHHH
5HHHH
|
| Version
|
Damage
|
Guard
|
Startup
|
Active
|
Recovery
|
Block Adv.
|
Hit Adv.
|
| 5H
|
-
|
Y
|
-
|
-
|
-
|
-
|
-
|
OOO sways backwards, then lunges with a stab. A slightly awkward normal to attack with, but can be used to make an opponent's attack whiff and counterhit them.
|
| 5HH
|
-
|
Y
|
-
|
-
|
-
|
-
|
-
|
A downward swipe follow-up. A notably useful string as it has enough hitstun to link into all of LaToraTa's other normals. It also has enough hitstun to RC and combo into 5S.
|
| 5HHH
|
-
|
Y
|
-
|
-
|
-
|
-
|
-
|
An axe kick that groundbounces the opponent.
|
| 5HHHH
|
-
|
Y
|
-
|
-
|
-
|
-
|
-
|
A lifting claw slash. Launches the opponent on ground hit, though it's intended to juggle as part of the string.
|
|
Latorata dHHHH
dHHHH
|
| Version
|
Damage
|
Guard
|
Startup
|
Active
|
Recovery
|
Block Adv.
|
Hit Adv.
|
| dH
|
-
|
Y
|
-
|
-
|
-
|
-
|
-
|
An advancing knee. Has a lot of forward movement and is fairly quick. Launches the opponent on hit.
|
| dHH
|
-
|
Y
|
-
|
-
|
-
|
-
|
-
|
|
|
| dHHH
|
-
|
Y
|
-
|
-
|
-
|
-
|
-
|
Another downward swipe. If this hits a grounded opponent, it has enough hitstun to link into 5L, dL or dH. This can be a very useful combo starter for LaToraTa at long range, where dH will whiff its first hit and allow you to approach.
|
| dHHHH
|
-
|
Y
|
-
|
-
|
-
|
-
|
-
|
A spinning high kick that knocks the opponent away on hit.
|
|
Special Moves
Latorata 5S
Mane Attack
5S
|
| Damage
|
Guard
|
Startup
|
Active
|
Recovery
|
Block Adv.
|
Hit Adv.
|
| -
|
Y
|
-
|
-
|
-
|
-
|
-
|
OOO proudly displays his lion's mane, shocking the opponent so that they get crumpled unless they shield their eyes. A fairly difficult move to use in neutral due to its slow startup and long recovery, though its 360 degree hitbox can be useful.
Where this move shines is that it removes 2 full stocks of Rider Gauge on hit. It does this even if it's comboed into, so it's good to use this when possible.
On hit, it's possible to follow up with a string, Rider Art Follow-up, or dS (though this is a very tight link).
|
|
Latorata DS
Rapid Slash
any direction + S
|
| Damage
|
Guard
|
Startup
|
Active
|
Recovery
|
Block Adv.
|
Hit Adv.
|
| -
|
Y
|
-
|
-
|
-
|
-
|
-
|
|
Latorata JS
Assault Dash
jS
|
| Damage
|
Guard
|
Startup
|
Active
|
Recovery
|
Block Adv.
|
Hit Adv.
|
| -
|
Y
|
-
|
-
|
-
|
-
|
-
|
A notably strong diving attack. It goes at a steep enough angle to hit an opponent even from fullscreen when used from the peak of the jump. This move also boasts shorter recovery and a higher launch than most jS divekicks in Super Climax Heroes, making it fairly rewarding in terms of momentum on hit, though it's usually still punishable.
|
|
Universal Mechanics
Latorata Throw
Throw
4H
|
| Damage
|
Guard
|
Startup
|
Active
|
Recovery
|
Block Adv.
|
Hit Adv.
|
| -
|
N
|
-
|
-
|
-
|
-
|
-
|
|
|
|
Latorata Dash Action
Dash Action Air Dash Air Dash
|
| Damage
|
Guard
|
Startup
|
Active
|
Recovery
|
Block Adv.
|
Hit Adv.
|
| -
|
N/A
|
-
|
-
|
-
|
-
|
-
|
OOO airdashes. A generic mobility tool. Costs .5 stocks of the Rider Gauge.
|
|
Latorata Rider Art
Rider Art High Speed Dash High Speed Dash
|
| Damage
|
Guard
|
Startup
|
Active
|
Recovery
|
Block Adv.
|
Hit Adv.
|
| -
|
N/A
|
-
|
-
|
-
|
-
|
-
|
A slightly unusual High Speed Dash-type Rider Art that runs in a curve rather than straight forward. Costs .5 stocks of the Rider Gauge. Has access to a follow-up by pressing Rider Art or Special Attack at no additional cost.
The unique trajectory of this Rider Art makes it more evasive, though it takes longer to reach its full distance. At point-blank range, OOO will run in circles around the opponent, making some attacks whiff.
This Rider Art Follow-up is a blockable strike that starts a cinematic. It's fairly quick and damaging, but punishable on block, so be careful. It is very useful in combos and as a whiff punish.
|
|
Latorata Style Action
Style Action
|
| Damage
|
Guard
|
Startup
|
Active
|
Recovery
|
Block Adv.
|
Hit Adv.
|
| -
|
N/A
|
-
|
-
|
-
|
-
|
-
|
Kamen Rider OOO (Form Change) is able to use the Style Action inputs to switch out his Core Medals. He's able to fiddle with his Core Medals at any time, but can only complete a transformation when he goes to neutral.
- Style Action Left switches which medal is set in the left-most slot. This slot affects the Head, and his neutral special attacks.
- Style Action Up switches which medal is set in the middle slot. This slot affects the Body, any normals which use OOO's arms, and his directional special attacks.
- Style Action Right switches which medal is set in the right-most slot. This slot affects the Legs, any normals which use OOO's legs, and his air special attacks.
- Style Action Down locks in any changes you've made, turning OOO fully invincible for the duration of the transformation. If this is done during hitstun, OOO will transform once his hitstun ends.
|
|
Combos
- 5LLL > RC > 5HH > RC > 5S > dS
- 5LLL > RC > 5HH > RC > 5S > Rider Art Follow-up
- A combo that bridges from 5L into 5S. Although it's costly relative to the damage dealt, the opponent will lose a lot of Rider Gauge from 5S hitting them.
- 5HH > 5LLL > RC > 5HH > RC > 5S > dS
- (dH)HH > 5LLL > RC > 5HH > RC > 5S > dS
- LaToraTa's link starter combo examples.
- The first hit of dHHH launches, so this link starter only works if the first hit of the string whiffs or is blocked.
Move List
Normal Moves
Gatakiriba 5LLLL
5LLLL
|
| Version
|
Damage
|
Guard
|
Startup
|
Active
|
Recovery
|
Block Adv.
|
Hit Adv.
|
| 5L
|
-
|
Y
|
-
|
-
|
-
|
-
|
-
|
| 5LL
|
-
|
Y
|
-
|
-
|
-
|
-
|
-
|
| 5LLL
|
-
|
Y
|
-
|
-
|
-
|
-
|
-
|
| 5LLLL
|
-
|
Y
|
-
|
-
|
-
|
-
|
-
|
Knocks the opponent away on hit.
|
|
Gatakiriba 5LHH
5LH
|
| Version
|
Damage
|
Guard
|
Startup
|
Active
|
Recovery
|
Block Adv.
|
Hit Adv.
|
| 5L
|
-
|
Y
|
-
|
-
|
-
|
-
|
-
|
| 5LH
|
-
|
Y
|
-
|
-
|
-
|
-
|
-
|
A headbutt followed by a slash. Knocks the opponent away on hit.
|
|
Gatakiriba dLL
dLL
|
| Version
|
Damage
|
Guard
|
Startup
|
Active
|
Recovery
|
Block Adv.
|
Hit Adv.
|
| dL
|
-
|
Y
|
-
|
-
|
-
|
-
|
-
|
| dLL
|
-
|
Y
|
-
|
-
|
-
|
-
|
-
|
Knocks the opponent away on hit.
|
|
Gatakiriba dLHH
dLHH
|
| Version
|
Damage
|
Guard
|
Startup
|
Active
|
Recovery
|
Block Adv.
|
Hit Adv.
|
| dL
|
-
|
Y
|
-
|
-
|
-
|
-
|
-
|
A quick advancing side kick. Advances quite far.
|
| dLH
|
-
|
Y
|
-
|
-
|
-
|
-
|
-
|
A hopping double kick. Launches the opponent, and can be followed up with a Combo Jump into its aircombo follow-up string, jLHS.
|
| dLHH
|
-
|
Y
|
-
|
-
|
-
|
-
|
-
|
An alternative ender. Doesn't change the opponent's momentum very much on hit. Will often whiff under the opponent near the wall due to its forward movement.
|
|
Gatakiriba 5HHHHH
5HHHHH
|
| Version
|
Damage
|
Guard
|
Startup
|
Active
|
Recovery
|
Block Adv.
|
Hit Adv.
|
| 5H
|
-
|
Y
|
-
|
-
|
-
|
-
|
-
|
An advancing side slash that begins a slash-walking string. A useful starter for GataKiriBa, which is otherwise pretty limited on combos.
|
| 5HH
|
-
|
Y
|
-
|
-
|
-
|
-
|
-
|
|
|
| 5HHH
|
-
|
Y
|
-
|
-
|
-
|
-
|
-
|
A double kick. String filler.
|
| 5HHHH
|
-
|
Y
|
-
|
-
|
-
|
-
|
-
|
A backhanded slash. String filler.
|
| 5HHHHH
|
-
|
Y
|
-
|
-
|
-
|
-
|
-
|
A twirling 3-hit slash. Only the third hit knocks the opponent away, so you can RC before the third hit to continue the combo with this string.
|
|
Gatakiriba dHHHH
dHHHH
|
| Version
|
Damage
|
Guard
|
Startup
|
Active
|
Recovery
|
Block Adv.
|
Hit Adv.
|
| dH
|
-
|
Y
|
-
|
-
|
-
|
-
|
-
|
|
|
| dHH
|
-
|
Y
|
-
|
-
|
-
|
-
|
-
|
|
|
| dHHH
|
-
|
Y
|
-
|
-
|
-
|
-
|
-
|
A hopping double kick that launches the opponent.
|
| dHHHH
|
-
|
Y
|
-
|
-
|
-
|
-
|
-
|
A headbutt followed by a slash. Does not change the opponent's trajectory on hit, and has enough hitstun to link 5L from it if the previous hit whiffs or is blocked.
|
|
Special Moves
Gatakiriba 5S
Head Attack
5S
|
| Damage
|
Guard
|
Startup
|
Active
|
Recovery
|
Block Adv.
|
Hit Adv.
|
| -
|
Y
|
-
|
-
|
-
|
-
|
-
|
OOO does a Psycho Crusher on loan from M. Bison. Travels fullscreen, but it's pretty unsafe on block and has no tracking whatsoever. Will also go through the opponent when blocked up close. Can be useful either as a combo ender or to guard crush the opponent.
|
|
Gatakiriba DS
Spinning Slash
any direction + S
|
| Damage
|
Guard
|
Startup
|
Active
|
Recovery
|
Block Adv.
|
Hit Adv.
|
| -
|
Y
|
-
|
-
|
-
|
-
|
-
|
OOO rises up in a tornado, and then dives. A multi-hit attack that launches initially, and leaves the opponent standing if only its latter parts hit. Unsafe on block, but can be useful for guard crushing the opponent.
Unfortunately, this attack is also air techable if it launches, making it potentially unsafe on hit.
|
|
Gatakiriba JS
Diving Kick
jS
|
| Damage
|
Guard
|
Startup
|
Active
|
Recovery
|
Block Adv.
|
Hit Adv.
|
| -
|
Y
|
-
|
-
|
-
|
-
|
-
|
A pretty standard divekick.
|
|
Universal Mechanics
Gatakiriba Throw
Throw
4H
|
| Damage
|
Guard
|
Startup
|
Active
|
Recovery
|
Block Adv.
|
Hit Adv.
|
| -
|
N
|
-
|
-
|
-
|
-
|
-
|
OOO's throw. GataKiriBa can do a dS to cross up when throwing the opponent into the wall.
|
|
Gatakiriba Dash Action
Dash Action Air Dash Air Dash
|
| Damage
|
Guard
|
Startup
|
Active
|
Recovery
|
Block Adv.
|
Hit Adv.
|
| -
|
N/A
|
-
|
-
|
-
|
-
|
-
|
OOO airdashes. A generic mobility tool. Costs .5 stocks of Rider Gauge.
|
|
Gatakiriba Rider Art
Rider Art Super Jump Super Jump
|
| Damage
|
Guard
|
Startup
|
Active
|
Recovery
|
Block Adv.
|
Hit Adv.
|
| -
|
N/A
|
-
|
-
|
-
|
-
|
-
|
A Super Jump-type Rider Art with a twist. For some reason, if you hold the Rider Art button, GataKiriBa fastfalls and repeats this Rider Art. This gives GataKiriBa a genuinely unique movement option among the cast.
|
|
Gatakiriba Style Action
Style Action
|
| Damage
|
Guard
|
Startup
|
Active
|
Recovery
|
Block Adv.
|
Hit Adv.
|
| -
|
N/A
|
-
|
-
|
-
|
-
|
-
|
Kamen Rider OOO (Form Change) is able to use the Style Action inputs to switch out his Core Medals. He's able to fiddle with his Core Medals at any time, but can only complete a transformation when he goes to neutral.
- Style Action Left switches which medal is set in the left-most slot. This slot affects the Head, and his neutral special attacks.
- Style Action Up switches which medal is set in the middle slot. This slot affects the Body, any normals which use OOO's arms, and his directional special attacks.
- Style Action Right switches which medal is set in the right-most slot. This slot affects the Legs, any normals which use OOO's legs, and his air special attacks.
- Style Action Down locks in any changes you've made, turning OOO fully invincible for the duration of the transformation. If this is done during hitstun, OOO will transform once his hitstun ends.
|
|
Combos
- [5HHHHH(7) > RC] > repeat xN > 5S
- GataKiriBa's RC loop. Meter positive enough to hit the meter gain limit at 50 hits, but doesn't deal great damage. Consider ending after one or two RCs.
- GataKiriBa's only link starter is very strange and requires all but the last hit of the dHHHH string to whiff. Not especially useful, but noteworthy because of how limited GataKiriBa's combos can be.
Move List
Normal Moves
Shauta 5LLL
5LLL
|
| Version
|
Damage
|
Guard
|
Startup
|
Active
|
Recovery
|
Block Adv.
|
Hit Adv.
|
| 5L
|
-
|
Y
|
-
|
-
|
-
|
-
|
-
|
An advancing jab, and a pretty good one at that.
|
| 5LL
|
-
|
Y
|
-
|
-
|
-
|
-
|
-
|
|
|
| 5LLL
|
-
|
Y
|
-
|
-
|
-
|
-
|
-
|
OOO steps and whips in front of him. Very long range, but also very long duration. Knocks the opponent away on hit.
|
|
Shauta 5LHH
5LHH
|
| Version
|
Damage
|
Guard
|
Startup
|
Active
|
Recovery
|
Block Adv.
|
Hit Adv.
|
| 5L
|
-
|
Y
|
-
|
-
|
-
|
-
|
-
|
An advancing jab, and a pretty good one at that.
|
| 5LH
|
-
|
Y
|
-
|
-
|
-
|
-
|
-
|
A spinning high kick. An excellent string due to its short recovery and plentiful hitstun, allowing OOO to link another 5L and enabling ShaUTa's infinite combo.
|
| 5LHH
|
-
|
Y
|
-
|
-
|
-
|
-
|
-
|
OOO steps and whips in front of him. Very long range, but also very long duration. Knocks the opponent away on hit.
|
|
Shauta dLLL
dLLL
|
| Version
|
Damage
|
Guard
|
Startup
|
Active
|
Recovery
|
Block Adv.
|
Hit Adv.
|
| dL
|
-
|
Y
|
-
|
-
|
-
|
-
|
-
|
A quick advancing side kick.
|
| dLL
|
-
|
Y
|
-
|
-
|
-
|
-
|
-
|
|
|
| dLLL
|
-
|
Y
|
-
|
-
|
-
|
-
|
-
|
A hopping double-kick that knocks the opponent away on hit.
|
|
Shauta dLHH
dLHH
|
| Version
|
Damage
|
Guard
|
Startup
|
Active
|
Recovery
|
Block Adv.
|
Hit Adv.
|
| dL
|
-
|
Y
|
-
|
-
|
-
|
-
|
-
|
A quick advancing side kick.
|
| dLH
|
-
|
Y
|
-
|
-
|
-
|
-
|
-
|
A hopping double kick. Launches the opponent, and can be followed up with a Combo Jump into its aircombo follow-up string, jLHS.
|
| dLHH
|
-
|
Y
|
-
|
-
|
-
|
-
|
-
|
An alternative ender. Knocks the opponent away on hit.
|
|
Shauta 5HHH
5HHH
|
| Version
|
Damage
|
Guard
|
Startup
|
Active
|
Recovery
|
Block Adv.
|
Hit Adv.
|
| 5H
|
-
|
Y
|
-
|
-
|
-
|
-
|
-
|
A whip attack that has quite a bit of range.
|
| 5HH
|
-
|
Y
|
-
|
-
|
-
|
-
|
-
|
A spinning high kick. Slightly unfortunate string filler, as it does not combo from a long range 5H. However, it does link into 5L on hit, making it a viable combo starter.
|
| 5HHH
|
-
|
Y
|
-
|
-
|
-
|
-
|
-
|
Knocks the opponent away on hit.
|
|
Shauta dHHH
dHHH
|
| Version
|
Damage
|
Guard
|
Startup
|
Active
|
Recovery
|
Block Adv.
|
Hit Adv.
|
| dH
|
-
|
Y
|
-
|
-
|
-
|
-
|
-
|
|
|
| dHH
|
-
|
Y
|
-
|
-
|
-
|
-
|
-
|
A quick advancing side kick.
|
| dHHH
|
-
|
Y
|
-
|
-
|
-
|
-
|
-
|
A whip strike. The most notable part of this string, it has barely any recovery, making it okay to swing with at a range.
|
|
Special Moves
Shauta 5S
Shachi Sonar
5S
|
| Damage
|
Guard
|
Startup
|
Active
|
Recovery
|
Block Adv.
|
Hit Adv.
|
| -
|
Y
|
-
|
-
|
-
|
-
|
-
|
OOO fires a water ball in a straight line. A straightforward and pretty good projectile.
|
|
Shauta DS
Voltam Whip
any direction + S
|
| Damage
|
Guard
|
Startup
|
Active
|
Recovery
|
Block Adv.
|
Hit Adv.
|
| -
|
Y
|
-
|
-
|
-
|
-
|
-
|
Channeling the power of the electric eel, OOO whips his opponent, crumpling them on hit. This can be a useful mid-range option thanks to its reach and damage.
|
|
Shauta JS
OctoPunish
jS
|
| Damage
|
Guard
|
Startup
|
Active
|
Recovery
|
Block Adv.
|
Hit Adv.
|
| -
|
Y
|
-
|
-
|
-
|
-
|
-
|
A standard diving attack.
|
|
Universal Mechanics
Shaut Throw
Throw
4H
|
| Damage
|
Guard
|
Startup
|
Active
|
Recovery
|
Block Adv.
|
Hit Adv.
|
| -
|
N
|
-
|
-
|
-
|
-
|
-
|
|
|
|
Shauta Dash Action
Dash Action
|
| Damage
|
Guard
|
Startup
|
Active
|
Recovery
|
Block Adv.
|
Hit Adv.
|
| -
|
N/A
|
-
|
-
|
-
|
-
|
-
|
OOO airdashes. A generic mobility tool that can be useful in conjunction with ShaUTa's Rider Art. Costs .5 stocks of Rider Gauge.
|
|
Shauta Rider Art
Rider Art
Zig-Zag Dash
|
| Damage
|
Guard
|
Startup
|
Active
|
Recovery
|
Block Adv.
|
Hit Adv.
|
| -
|
N/A
|
-
|
-
|
-
|
-
|
-
|
A Zig-Zag Dash type Rider Art with a twist. OOO turns into a water ball and zig-zags before jumping into the air, allowing him free air actions once he jumps. Costs .5 stocks of Rider Gauge.
|
|
Shauta Style Action
Style Action
|
| Damage
|
Guard
|
Startup
|
Active
|
Recovery
|
Block Adv.
|
Hit Adv.
|
| -
|
N/A
|
-
|
-
|
-
|
-
|
-
|
Kamen Rider OOO (Form Change) is able to use the Style Action inputs to switch out his Core Medals. He's able to fiddle with his Core Medals at any time, but can only complete a transformation when he goes to neutral.
- Style Action Left switches which medal is set in the left-most slot. This slot affects the Head, and his neutral special attacks.
- Style Action Up switches which medal is set in the middle slot. This slot affects the Body, any normals which use OOO's arms, and his directional special attacks.
- Style Action Right switches which medal is set in the right-most slot. This slot affects the Legs, any normals which use OOO's legs, and his air special attacks.
- Style Action Down locks in any changes you've made, turning OOO fully invincible for the duration of the transformation. If this is done during hitstun, OOO will transform once his hitstun ends.
|
|
Combos
- [5LH] > repeat xN > RC > dS > 5S
- [5LH] > repeat xN > Rider Finale
- ShaUTa's infinite combo, with a special ender.
- ShaUTa is also able to link Rider Finale rather than continue the infinite combo.
Move List
Normal Moves
Sagozou 5LLLL
5LLLL
|
| Version
|
Damage
|
Guard
|
Startup
|
Active
|
Recovery
|
Block Adv.
|
Hit Adv.
|
| 5L
|
-
|
Y
|
-
|
-
|
-
|
-
|
-
|
|
|
| 5LL
|
-
|
Y
|
-
|
-
|
-
|
-
|
-
|
A quick punch. Has notably low recovery for a SaGoZou normal.
|
| 5LLL
|
-
|
Y
|
-
|
-
|
-
|
-
|
-
|
OOO repeats the first axe handle, but with a groundbounce.
|
| 5LLLL
|
-
|
Y
|
-
|
-
|
-
|
-
|
-
|
OOO stomps, knocking the opponent down on hit.
|
|
Sagozou 5LH
5LH
|
| Version
|
Damage
|
Guard
|
Startup
|
Active
|
Recovery
|
Block Adv.
|
Hit Adv.
|
| 5L
|
-
|
Y
|
-
|
-
|
-
|
-
|
-
|
|
|
| 5LH
|
-
|
Y
|
-
|
-
|
-
|
-
|
-
|
A two-hit lift into double axe handle. Knocks the opponent down on hit.
|
|
Sagozou dLL
dLL
|
| Version
|
Damage
|
Guard
|
Startup
|
Active
|
Recovery
|
Block Adv.
|
Hit Adv.
|
| dL
|
-
|
Y
|
-
|
-
|
-
|
-
|
-
|
|
|
| dLL
|
-
|
Y
|
-
|
-
|
-
|
-
|
-
|
OOO stomps a second time, crumpling the opponent on hit.
|
|
Sagozou dLHH
dLHH
|
| Version
|
Damage
|
Guard
|
Startup
|
Active
|
Recovery
|
Block Adv.
|
Hit Adv.
|
| dL
|
-
|
Y
|
-
|
-
|
-
|
-
|
-
|
|
|
| dLH
|
-
|
Y
|
-
|
-
|
-
|
-
|
-
|
A hopping double kick. Launches the opponent, and can be followed up with a Combo Jump. An extremely uncharacteristic and awkward normal for SaGoZou, since this is the only Combo Jump in the game with no aircombo follow-up string.
|
| dLHH
|
-
|
Y
|
-
|
-
|
-
|
-
|
-
|
An alternative ender. Doesn't change the opponent's momentum much on hit.
|
|
Sagozou 5HHH
5HHH
|
| Version
|
Damage
|
Guard
|
Startup
|
Active
|
Recovery
|
Block Adv.
|
Hit Adv.
|
| 5H
|
-
|
Y
|
-
|
-
|
-
|
-
|
-
|
|
|
| 5HH
|
-
|
Y
|
-
|
-
|
-
|
-
|
-
|
|
|
| 5HHH
|
-
|
Y
|
-
|
-
|
-
|
-
|
-
|
A two-hit lift into double axe handle. Groundbounces the opponent on hit.
|
|
Sagozou dHHH
dHHH
|
| Version
|
Damage
|
Guard
|
Startup
|
Active
|
Recovery
|
Block Adv.
|
Hit Adv.
|
| dH
|
-
|
Y
|
-
|
-
|
-
|
-
|
-
|
|
|
| dHH
|
-
|
Y
|
-
|
-
|
-
|
-
|
-
|
|
|
| dHHH
|
-
|
Y
|
-
|
-
|
-
|
-
|
-
|
OOO headbutts in front of him. Crumples the opponent on hit.
|
|
Special Moves
Sagozou 5S
Launcher
5S
|
| Damage
|
Guard
|
Startup
|
Active
|
Recovery
|
Block Adv.
|
Hit Adv.
|
| -
|
Y
|
-
|
-
|
-
|
-
|
-
|
OOO thrusts his rhino's horn forward, then swings his head upward. SaGoZou's typical special ender since it's faster than dS.
|
|
Sagozou DS
Bagoon Pressure
any direction + S
|
| Damage
|
Guard
|
Startup
|
Active
|
Recovery
|
Block Adv.
|
Hit Adv.
|
| -
|
Y
|
-
|
-
|
-
|
-
|
-
|
OOO winds up for a long time and then fires his gauntlets forward. A projectile that deals a lot of damage, but is extremely slow to activate and recover.
|
|
Sagozou JS
Diving Kick
jS
|
| Damage
|
Guard
|
Startup
|
Active
|
Recovery
|
Block Adv.
|
Hit Adv.
|
| -
|
Y
|
-
|
-
|
-
|
-
|
-
|
OOO changes his momentum and stomps with his feet. Knocks the opponent down on hit.
|
|
Rider Art and Dash Action
Sagozou Throw
Throw
4H
|
| Damage
|
Guard
|
Startup
|
Active
|
Recovery
|
Block Adv.
|
Hit Adv.
|
| -
|
N
|
-
|
-
|
-
|
-
|
-
|
|
|
|
Sagozou Dash Action
Dash Action Guard Dash Guard Dash
|
| Damage
|
Guard
|
Startup
|
Active
|
Recovery
|
Block Adv.
|
Hit Adv.
|
| -
|
N/A
|
-
|
-
|
-
|
-
|
-
|
OOO runs forward with a shield that guards against projectile attacks. This slowly depletes the Guard Gauge as it is used.
|
|
Sagozou Rider Art
Rider Art
Earthquake
|
| Damage
|
Guard
|
Startup
|
Active
|
Recovery
|
Block Adv.
|
Hit Adv.
|
| -
|
N
|
-
|
-
|
-
|
-
|
-
|
OOO stomps and causes an unblockable Earthquake in a circle around himself. On hit, the opponent is stunned for a set duration.
|
|
Sagozou Style Action
Style Action
|
| Damage
|
Guard
|
Startup
|
Active
|
Recovery
|
Block Adv.
|
Hit Adv.
|
| -
|
N/A
|
-
|
-
|
-
|
-
|
-
|
Kamen Rider OOO (Form Change) is able to use the Style Action inputs to switch out his Core Medals. He's able to fiddle with his Core Medals at any time, but can only complete a transformation when he goes to neutral.
- Style Action Left switches which medal is set in the left-most slot. This slot affects the Head, and his neutral special attacks.
- Style Action Up switches which medal is set in the middle slot. This slot affects the Body, any normals which use OOO's arms, and his directional special attacks.
- Style Action Right switches which medal is set in the right-most slot. This slot affects the Legs, any normals which use OOO's legs, and his air special attacks.
- Style Action Down locks in any changes you've made, turning OOO fully invincible for the duration of the transformation. If this is done during hitstun, OOO will transform once his hitstun ends.
|
|
Combos
- dLL > Rider Art > Gauge Charge > 5S
- dHHH > Rider Art > Gauge Charge > 5S
- Any of SaGoZou's crumples can combo into Earthquake, restanding the opponent. This buys a lot of time for SaGoZou to charge meter and become meter positive, and then still end in a special.
- dLL > Rider Art > Gauge Charge > dHHH > Rider Finale
- It is also possible to link any of SaGoZou's crumples into Rider Finale.
Move List
Normal Moves
Burakawani 5LLLHH
5LLLHH
|
| Version
|
Damage
|
Guard
|
Startup
|
Active
|
Recovery
|
Block Adv.
|
Hit Adv.
|
| 5L
|
-
|
Y
|
-
|
-
|
-
|
-
|
-
|
A stepping side kick. One of BuraKaWani's many quick buttons.
|
| 5LL
|
-
|
Y
|
-
|
-
|
-
|
-
|
-
|
|
|
| 5LLL
|
-
|
Y
|
-
|
-
|
-
|
-
|
-
|
A spinning high kick. Has a mashable stagger, so it's not advisable to end the string here.
|
| 5LLLH
|
-
|
Y
|
-
|
-
|
-
|
-
|
-
|
A side kick. A useful string as a combo starter or filler.
|
| 5LLLHH
|
-
|
Y
|
-
|
-
|
-
|
-
|
-
|
OOO leaps into the air and snaps his legs like the jaws of an alligator. Knocks the opponent away on hit.
|
|
Burakawani 4/6LLL
4/6LLL
|
| Version
|
Damage
|
Guard
|
Startup
|
Active
|
Recovery
|
Block Adv.
|
Hit Adv.
|
| 4/6L
|
-
|
Y
|
-
|
-
|
-
|
-
|
-
|
A stepping low kick. A very quick attack with great reach.
|
| 4/6LL
|
-
|
Y
|
-
|
-
|
-
|
-
|
-
|
A hopping double kick. Launches the opponent on hit.
|
| 4/6LLL
|
-
|
Y
|
-
|
-
|
-
|
-
|
-
|
A high thrust kick that knocks the opponent away on hit.
|
|
Burakawani 4/6LLH
4/6LLH
|
| Version
|
Damage
|
Guard
|
Startup
|
Active
|
Recovery
|
Block Adv.
|
Hit Adv.
|
| 4/6L
|
-
|
Y
|
-
|
-
|
-
|
-
|
-
|
A stepping low kick. A very quick attack with great reach.
|
| 4/6LL
|
-
|
Y
|
-
|
-
|
-
|
-
|
-
|
A hopping double kick. Launches the opponent on hit.
|
| 4/6LLH
|
-
|
Y
|
-
|
-
|
-
|
-
|
-
|
OOO does a side-swipe. Knocks the opponent away on hit.
|
|
Burakawani 2/8LL
2/8LL
|
| Version
|
Damage
|
Guard
|
Startup
|
Active
|
Recovery
|
Block Adv.
|
Hit Adv.
|
| 2/8L
|
-
|
Y
|
-
|
-
|
-
|
-
|
-
|
|
|
| 2/8LL
|
-
|
Y
|
-
|
-
|
-
|
-
|
-
|
OOO punches towards the floor. Knocks the opponent down on hit. Has quite a lot of blockstun, so it's safer than it looks.
|
|
Burakawani 5HHH
5HHH
|
| Version
|
Damage
|
Guard
|
Startup
|
Active
|
Recovery
|
Block Adv.
|
Hit Adv.
|
| 5H
|
-
|
Y
|
-
|
-
|
-
|
-
|
-
|
A spinning backfist. One of BuraKaWani's fastest attacks, with a lot of forward movement.
|
| 5HH
|
-
|
Y
|
-
|
-
|
-
|
-
|
-
|
OOO does a three-hit punching combo in front of him. A useful combo filler due to its massive damage.
|
| 5HHH
|
-
|
Y
|
-
|
-
|
-
|
-
|
-
|
A lunging straight punch that knocks the opponent away on hit.
|
|
Burakawani 6HHH
6HHH
|
| Version
|
Damage
|
Guard
|
Startup
|
Active
|
Recovery
|
Block Adv.
|
Hit Adv.
|
| 6H
|
-
|
Y
|
-
|
-
|
-
|
-
|
-
|
A stationary three-hit punching combo that throws a high, middle, and then low punch in rapid succession.
|
| 6HH
|
-
|
Y
|
-
|
-
|
-
|
-
|
-
|
A follow-up straight punch. A notable link combo starter for BuraKaWani, this can recover and link into 5L, 4/6L, or even 5H.
|
| 6HHH
|
-
|
Y
|
-
|
-
|
-
|
-
|
-
|
OOO does a side-swipe. Knocks the opponent away on hit.
|
|
Burakawani 2/8HH
2/8HH
|
| Version
|
Damage
|
Guard
|
Startup
|
Active
|
Recovery
|
Block Adv.
|
Hit Adv.
|
| 2/8H
|
-
|
Y
|
-
|
-
|
-
|
-
|
-
|
A two-hit advancing punch combo.
|
| 2/8HH
|
-
|
Y
|
-
|
-
|
-
|
-
|
-
|
A lunging hook punch that knocks the opponent away on hit.
|
|
Special Moves
Burakawani 5S
Cappello Brush
5S
|
| Damage
|
Guard
|
Startup
|
Active
|
Recovery
|
Block Adv.
|
Hit Adv.
|
| -
|
Y
|
-
|
-
|
-
|
-
|
-
|
OOO swings a cobra around from his head, hitting multiple times. Crumples on hit, allowing follow-ups. A useful combo filler that allows follow-ups, including a link into Rider Finale, and can even be useful in neutral if you really need a move with a lot of active frames.
|
|
Burakawani DS
Counter Punch
any direction + S
|
| Damage
|
Guard
|
Startup
|
Active
|
Recovery
|
Block Adv.
|
Hit Adv.
|
| -
|
N/A
|
-
|
-
|
-
|
-
|
-
|
OOO turtles up, and if he is attacked, he counters. Very quick to start up. A useful defensive option.
|
|
Burakawani JS
Waninglide
jS
|
| Damage
|
Guard
|
Startup
|
Active
|
Recovery
|
Block Adv.
|
Hit Adv.
|
| -
|
Y
|
-
|
-
|
-
|
-
|
-
|
A divekick using the jaws of the alligator. Deals a shocking amount of damage, but is otherwise a standard divekick. Unsafe if blocked.
|
|
Universal Mechanics
Burakawani Throw
Throw
4H
|
| Damage
|
Guard
|
Startup
|
Active
|
Recovery
|
Block Adv.
|
Hit Adv.
|
| -
|
N
|
-
|
-
|
-
|
-
|
-
|
BuraKaWani's throw does a unique animation and a little bit of extra damage. It's otherwise about the same as OOO's normal throw. When throwing the opponent into the wall, using Rider Art will land OOO on the other side of the opponent.
|
|
Burakawani Dash Action
Dash Action Guard Dash Guard Dash
|
| Damage
|
Guard
|
Startup
|
Active
|
Recovery
|
Block Adv.
|
Hit Adv.
|
| -
|
N/A
|
-
|
-
|
-
|
-
|
-
|
OOO runs forward with a shield that guards against projectile attacks. This slowly depletes the Guard Gauge as it is used.
|
|
Burakawani Rider Art
Rider Art Zig-Zag Dash (Variant) Zig-Zag Dash (Variant)
|
| Damage
|
Guard
|
Startup
|
Active
|
Recovery
|
Block Adv.
|
Hit Adv.
|
| -
|
Y
|
-
|
-
|
-
|
-
|
-
|
A unique version of the Zig-Zag Dash type Rider Art. OOO slithers along the ground and then leaps up into the air. Costs .5 stocks of the Rider Gauge.
Has access to a follow-up by pressing Rider Art or Special Attack at no additional cost. This strikes from the leap, and starts a cinematic on hit. This rarely hits because this Rider Art's trajectory usually sends you flying somewhere that isn't towards the opponent. That being said, it's very safe on whiff, and it deals a lot of damage when it does hit.
|
|
Burakawani Style Action
Style Action
|
| Damage
|
Guard
|
Startup
|
Active
|
Recovery
|
Block Adv.
|
Hit Adv.
|
| -
|
N/A
|
-
|
-
|
-
|
-
|
-
|
By pressing Style Action, OOO transforms into his reptile-based form, BuraKaWani Combo, at the cost of 3 stocks of the Rider Gauge. Doing so also refreshes damage scaling and the Guard Gauge.
While already in BuraKaWani Combo, Style Action transforms back into OOO's TaToBa Combo at no cost. Doing so also refreshes damage scaling and the Guard Gauge.
|
|
Combos
- 5S > jS
- 5S > Rider Finale
- 5S > (5H)H > RC + Rider Finale
- 5S > Style Action (TaToBa) > dS
- BuraKaWani gets a multitude of useful follow-ups from 5S. These all do incredible damage, so choose the right follow-up for the situation.
- 6HH > 5HH > RC > 5S > jS
- 6HH > 5HH > RC > 6HH > 5HH > RC > 5S > jS
- BuraKaWani's standard link combo. Doing more than one RC loop scales the damage very hard, so it's often best to get a special ender early.
- This RC loop is meter positive for the first rep, but 6H will whiff one of its three hits after 5HH RC, making it just barely meter negative. This also means that it is always meter positive during Climax Time.
- 6HH > 5HH > Style Action (TaToBa) > 2LL > 2LL > 2LLL > Climax Time > Rider Finale
- A very fast touch of death combo example that requires no Rider Gauge to start, besides being already powered up.
- BuraKaWani's damage is very high, so it's extremely easy to freestyle similar touch of death combos just by mixing and matching individually damaging combo parts.
Move List
Normal Moves
Putotyra 5LLLL
5LLLL
|
| Version
|
Damage
|
Guard
|
Startup
|
Active
|
Recovery
|
Block Adv.
|
Hit Adv.
|
| 5L
|
-
|
Y
|
-
|
-
|
-
|
-
|
-
|
OOO swings his arm downward in place.
|
| 5LL
|
-
|
Y
|
-
|
-
|
-
|
-
|
-
|
An advancing elbow strike.
|
| 5LLL
|
-
|
Y
|
-
|
-
|
-
|
-
|
-
|
OOO swings his other arm downward.
|
| 5LLLL
|
-
|
Y
|
-
|
-
|
-
|
-
|
-
|
A lunging palm that knocks the opponent away on hit.
|
|
Putotyra 5LHH
5LHH
|
| Version
|
Damage
|
Guard
|
Startup
|
Active
|
Recovery
|
Block Adv.
|
Hit Adv.
|
| 5L
|
-
|
Y
|
-
|
-
|
-
|
-
|
-
|
OOO swings his arm downward in place.
|
| 5LH
|
-
|
Y
|
-
|
-
|
-
|
-
|
-
|
An uppercut that launches the opponent. Can be followed up with a Combo Jump into its aircombo follow-up string, jLHS.
Can also follow up meterlessly by juggling into 5S.
|
| 5LHH
|
-
|
Y
|
-
|
-
|
-
|
-
|
-
|
An alternative ender. Knocks the opponent away on hit.
|
|
Putotyra 4/6LLLLL
4/6LLLLL
|
| Version
|
Damage
|
Guard
|
Startup
|
Active
|
Recovery
|
Block Adv.
|
Hit Adv.
|
| 4/6L
|
-
|
Y
|
-
|
-
|
-
|
-
|
-
|
A lunging straight punch.
|
| 4/6LL
|
-
|
Y
|
-
|
-
|
-
|
-
|
-
|
| 4/6LLL
|
-
|
Y
|
-
|
-
|
-
|
-
|
-
|
| 4/6LLLL
|
-
|
Y
|
-
|
-
|
-
|
-
|
-
|
| 4/6LLLLL
|
-
|
Y
|
-
|
-
|
-
|
-
|
-
|
Knocks the opponent away on hit.
|
|
Putotyra 4/6LH
4/6LH
|
| Version
|
Damage
|
Guard
|
Startup
|
Active
|
Recovery
|
Block Adv.
|
Hit Adv.
|
| 4/6L
|
-
|
Y
|
-
|
-
|
-
|
-
|
-
|
A lunging straight punch.
|
| 4/6LH
|
-
|
Y
|
-
|
-
|
-
|
-
|
-
|
A body blow that crumples the opponent on hit.
|
|
Putotyra 2/8LL
2/8LL
|
| Version
|
Damage
|
Guard
|
Startup
|
Active
|
Recovery
|
Block Adv.
|
Hit Adv.
|
| 2/8L
|
-
|
Y
|
-
|
-
|
-
|
-
|
-
|
A spinning backhand. A notably fast advancing normal.
|
| 2/8LL
|
-
|
Y
|
-
|
-
|
-
|
-
|
-
|
A downward punch that knocks the opponent away on hit.
|
|
Putotyra 2/8LHH
2/8LHH
|
| Version
|
Damage
|
Guard
|
Startup
|
Active
|
Recovery
|
Block Adv.
|
Hit Adv.
|
| 2/8L
|
-
|
Y
|
-
|
-
|
-
|
-
|
-
|
A spinning backhand. A notably fast advancing normal.
|
| 2/8LH
|
-
|
Y
|
-
|
-
|
-
|
-
|
-
|
|
|
| 2/8LHH
|
-
|
Y
|
-
|
-
|
-
|
-
|
-
|
An axe uppercut that launches the opponent on hit.
|
|
Putotyra 5HHHH
5HHHH
|
| Version
|
Damage
|
Guard
|
Startup
|
Active
|
Recovery
|
Block Adv.
|
Hit Adv.
|
| 5H
|
-
|
Y
|
-
|
-
|
-
|
-
|
-
|
|
|
| 5HH
|
-
|
Y
|
-
|
-
|
-
|
-
|
-
|
An axe chop that advances very far forward.
|
| 5HHH
|
-
|
Y
|
-
|
-
|
-
|
-
|
-
|
| 5HHHH
|
-
|
Y
|
-
|
-
|
-
|
-
|
-
|
A tail strike. Knocks the opponent away on hit.
|
|
Putotyra 6HHH
6HHH
|
| Version
|
Damage
|
Guard
|
Startup
|
Active
|
Recovery
|
Block Adv.
|
Hit Adv.
|
| 6H
|
-
|
Y
|
-
|
-
|
-
|
-
|
-
|
|
|
| 6HH
|
-
|
Y
|
-
|
-
|
-
|
-
|
-
|
An axe swipe follow-up. Can whiff unless 6H was executed very close.
|
| 6HHH
|
-
|
Y
|
-
|
-
|
-
|
-
|
-
|
A tail strike. Knocks the opponent away on hit.
|
|
Putotyra 2/8HHH
2/8HHH
|
| Version
|
Damage
|
Guard
|
Startup
|
Active
|
Recovery
|
Block Adv.
|
Hit Adv.
|
| 2/8H
|
-
|
Y
|
-
|
-
|
-
|
-
|
-
|
|
|
| 2/8HH
|
-
|
Y
|
-
|
-
|
-
|
-
|
-
|
OOO does a quick toe kick. Has notably short recovery time.
|
| 2/8HHH
|
-
|
Y
|
-
|
-
|
-
|
-
|
-
|
A downward axe chop. Groundbounces the opponent on hit.
|
|
Special Moves
Putotyra 5S
Grand Of Rage
5S
|
| Damage
|
Guard
|
Startup
|
Active
|
Recovery
|
Block Adv.
|
Hit Adv.
|
| -
|
N
|
-
|
-
|
-
|
-
|
-
|
OOO punches the floor, dealing an unblockable stun to a nearby opponent, and restanding them if they were in a juggle state. If successful, he runs in and then follows up with a cinematic finisher.
When used against a crumpled opponent, it is possible that OOO will run in, and then not reach the opponent, and thus simply stop after dashing in. It's possible to pick up a combo from this, and this enables PuToTyra's infinite combo.
|
|
Putotyra DS
Cold Wave
any direction + S
|
| Damage
|
Guard
|
Startup
|
Active
|
Recovery
|
Block Adv.
|
Hit Adv.
|
| -
|
Y
|
-
|
-
|
-
|
-
|
-
|
OOO hops backward while blasting the opponent with a frigid gust. A retreating attack with armor, a lot of active frames, and a wide range, plus it crumples the opponent on hit for a follow-up, usually 5S. It can be very difficult for some characters to punish this attack, and very dangerous for them to attack if you're willing to fish with it.
|
|
Putotyra JS
Tail Attack
jS
|
| Damage
|
Guard
|
Startup
|
Active
|
Recovery
|
Block Adv.
|
Hit Adv.
|
| -
|
Y
|
-
|
-
|
-
|
-
|
-
|
A diving attack with a very good hitbox. Unsafe on block or whiff.
|
|
Universal Mechanics
Putotyra Throw
Throw
4H
|
| Damage
|
Guard
|
Startup
|
Active
|
Recovery
|
Block Adv.
|
Hit Adv.
|
| -
|
N
|
-
|
-
|
-
|
-
|
-
|
PuToTyra's throw does a unique animation and then roars uselessly. This makes it less advantaged on hit, but it deals more damage to make up for it.
|
|
Putotyra Dash Action
Dash Action Air Dash Air Dash
|
| Damage
|
Guard
|
Startup
|
Active
|
Recovery
|
Block Adv.
|
Hit Adv.
|
| -
|
N/A
|
-
|
-
|
-
|
-
|
-
|
OOO airdashes. A generic mobility tool. Costs .5 stocks of the Rider Gauge.
|
|
Putotyra Rider Art
Rider Art Flight Mode Flight Mode
|
| Damage
|
Guard
|
Startup
|
Active
|
Recovery
|
Block Adv.
|
Hit Adv.
|
| -
|
Y
|
-
|
-
|
-
|
-
|
-
|
Upon pressing Rider Art, OOO enters Flight Mode until the button is released. While hovering, the Rider Gauge slowly drains, and OOO has access to moves exclusive to Flight Mode. Requires (but does not consume) 1 stock of Rider Gauge to initiate.
|
|
Putotyra Rider Art L
L During Flight Mode
|
| Damage
|
Guard
|
Startup
|
Active
|
Recovery
|
Block Adv.
|
Hit Adv.
|
| -
|
Y
|
-
|
-
|
-
|
-
|
-
|
|
Rider Art H
H During Flight Mode
|
| Damage
|
Guard
|
Startup
|
Active
|
Recovery
|
Block Adv.
|
Hit Adv.
|
| -
|
Y
|
-
|
-
|
-
|
-
|
-
|
|
Putotyra Rider Art S
S During Flight Mode
|
| Damage
|
Guard
|
Startup
|
Active
|
Recovery
|
Block Adv.
|
Hit Adv.
|
| -
|
N
|
-
|
-
|
-
|
-
|
-
|
OOO swoops at a shallow angle. An unblockable attack that launches a cinematic on contact.
|
|
Putotyra Style Action
Style Action
|
| Damage
|
Guard
|
Startup
|
Active
|
Recovery
|
Block Adv.
|
Hit Adv.
|
| -
|
N/A
|
-
|
-
|
-
|
-
|
-
|
By pressing Style Action, OOO transforms into his dinosaur-based berzerk form, PuToTyra Combo, at the cost of 3 stocks of the Rider Gauge. Doing so also refreshes damage scaling and the Guard Gauge.
While already in PuToTyra Combo, Style Action transforms back into OOO's TaToBa Combo at no cost. Doing so also refreshes damage scaling and the Guard Gauge.
|
|
Combos
- dS > 5S
- dS > run forward > Rider Finale
- PuToTyra's standard follow-up from dS. These deal plenty of damage without doing anything fancy.
- [dS > walk back > 5S (partial)] > repeat xN
- PuToTyra's infinite combo. Requires some amount of open space behind PuToTyra.
- The trick to getting a partial connect of 5S is that the opponent crumples into the edge of 5S's hitbox. When hit this way, the opponent will be restood slightly outside of the 5S range, allowing this link.
Navigation
| General
|
|
|
Showa
|
| Kamen Rider
|
|
| Kamen Rider V3
|
|
| Kamen Rider Amazon
|
|
| Kamen Rider BLACK (RX)
|
|
|
Heisei Phase 1
|
| Kamen Rider Kuuga
|
|
| Kamen Rider Agito
|
|
| Kamen Rider Ryuki
|
|
| Kamen Rider 555
|
|
| Kamen Rider Blade
|
|
| Kamen Rider Hibiki
|
|
| Kamen Rider Kabuto
|
|
| Kamen Rider Den-O
|
|
| Kamen Rider Kiva
|
|
| Kamen Rider Decade
|
|
|
Heisei Phase 2
|
| Kamen Rider W
|
|
| Kamen Rider OOO
|
|
| Kamen Rider Fourze
|
|
| Kamen Rider Wizard
|
|


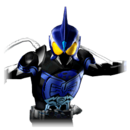
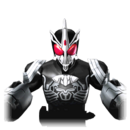
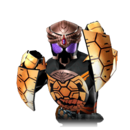
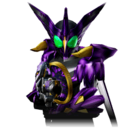