|
|
| Line 12: |
Line 12: |
| | pros = | | | pros = |
| * '''Powerful Neutral:''' V3 has two distinct special moves that advance and attack safely, making it easy for him to muscle in and whiff punish opponents. | | * '''Powerful Neutral:''' V3 has two distinct special moves that advance and attack safely, making it easy for him to muscle in and whiff punish opponents. |
| * '''Riderman:''' V3's striker, Riderman, gives him regular access to powerful unblockable setups and combo extensions. | | * '''Riderman:''' V3's striker gives him regular access to powerful unblockable setups and combo extensions. |
| |cons = | | |cons = |
| * '''Short Ranged Normals:''' While his attacks are good for other reasons, V3 can have a hard time attacking with them at middle ranges. | | * '''Short Ranged Normals:''' While his attacks are good for other reasons, V3 can have a hard time attacking with them at middle ranges. |
Revision as of 09:07, 17 June 2024
Introduction
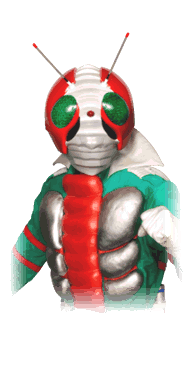 Kamen Rider V3
Kamen Rider V3 is the first version of Kamen Rider with a GUI that really caught on.
V3 excels at playing steady neutral and whiff punishing the opponent using his range of advancing specials and fast normals. Normally, that would be pretty nice, but not quite enough to make a character really strong. Thankfully, V3 brought backup.
V3 is the only Showa-era Kamen Rider who uses the Support Attack style. His striker summons Riderman to fire an unblockable hookshot, which V3 is able to reliably exploit to extend his damage and create unblockable setups.
Playstyle
 Kamen Rider V3 fights straightforwardly with fast attacks, backed by an unblockable assist. Kamen Rider V3 fights straightforwardly with fast attacks, backed by an unblockable assist. |
| Pros |
Cons |
- Powerful Neutral: V3 has two distinct special moves that advance and attack safely, making it easy for him to muscle in and whiff punish opponents.
- Riderman: V3's striker gives him regular access to powerful unblockable setups and combo extensions.
|
- Short Ranged Normals: While his attacks are good for other reasons, V3 can have a hard time attacking with them at middle ranges.
- Guard Gauge: V3 has to use his Guard Gauge carefully. If he's Guard Crushed, he's in serious trouble, since Riderman isn't reliable for buying time.
|
Form Select
Move List
Normal Moves
5LLL
5LLL
|
| Version
|
Damage
|
Guard
|
Startup
|
Active
|
Recovery
|
Block Adv.
|
Hit Adv.
|
| 5L
|
-
|
Y
|
-
|
-
|
-
|
-
|
-
|
An extremely fast elbow. Short range, but a notably quick attack that can be used for punishing and link combos.
|
| 5LL
|
-
|
Y
|
-
|
-
|
-
|
-
|
-
|
A two-hit stepping punch and elbow combination.
|
| 5LLL
|
-
|
Y
|
-
|
-
|
-
|
-
|
-
|
A kick that knocks the opponent away diagonally on hit.
|
|
5LH
5LHH
|
| Version
|
Damage
|
Guard
|
Startup
|
Active
|
Recovery
|
Block Adv.
|
Hit Adv.
|
| 5L
|
-
|
Y
|
-
|
-
|
-
|
-
|
-
|
An extremely fast elbow. Short range, but a notably quick attack that can be used for punishing and link combos.
|
| 5LH
|
-
|
Y
|
-
|
-
|
-
|
-
|
-
|
A two-hit step and uppercut. One of V3's launcher strings which can be followed up with a Combo Jump into its aircombo followup string, jLHS. This aircombo string uses a special version of jS that has a larger hit count and deals substantial damage.
This launcher string is one of V3's key tools. It's safe on block, links meterlessly into 5S or 6S, and while it isn't airtight, the opponent can't walk out of the string on block.
Being impossible to walk out of on block means that this string is also useful as a setup into V3's Riderman striker, forcing the opponent to guard cancel in order to avoid the unblockable, or take a bunch of damage.
|
| 5LHH
|
-
|
Y
|
-
|
-
|
-
|
-
|
-
|
An alternate ender for this launcher string. Knocks the opponent away on hit. This sees almost no use since V3 can link 5S from his launcher string.
|
|
4/6LL
4/6LL
|
| Version
|
Damage
|
Guard
|
Startup
|
Active
|
Recovery
|
Block Adv.
|
Hit Adv.
|
| 4/6L
|
-
|
Y
|
-
|
-
|
-
|
-
|
-
|
|
|
| 4/6LL
|
-
|
Y
|
-
|
-
|
-
|
-
|
-
|
A kick that knocks the opponent away diagonally on hit.
|
|
4/6LHH
4/6LHH
|
| Version
|
Damage
|
Guard
|
Startup
|
Active
|
Recovery
|
Block Adv.
|
Hit Adv.
|
| 4/6L
|
-
|
Y
|
-
|
-
|
-
|
-
|
-
|
|
|
| 4/6LH
|
-
|
Y
|
-
|
-
|
-
|
-
|
-
|
An elbow and punch two-hit sequence. The opponent can't walk out of this string on block, making it an excellent point to call Riderman as a combo or unblockable setup.
|
| 4/6LHH
|
-
|
Y
|
-
|
-
|
-
|
-
|
-
|
A final punch that knocks the opponent away on hit.
|
|
2/8LLL
2/8LLL
|
| Version
|
Damage
|
Guard
|
Startup
|
Active
|
Recovery
|
Block Adv.
|
Hit Adv.
|
| 2/8L
|
-
|
Y
|
-
|
-
|
-
|
-
|
-
|
An awkward low kick. Has very short range and slow startup.
|
| 2/8LL
|
-
|
Y
|
-
|
-
|
-
|
-
|
-
|
An elbow followup that recovers very quickly. This string can link into 5L.
|
| 2/8LLL
|
-
|
Y
|
-
|
-
|
-
|
-
|
-
|
A double-kick that knocks the opponent away diagonally on hit.
|
|
2/8LH
2/8LH
|
| Version
|
Damage
|
Guard
|
Startup
|
Active
|
Recovery
|
Block Adv.
|
Hit Adv.
|
| 2/8L
|
-
|
Y
|
-
|
-
|
-
|
-
|
-
|
An awkward low kick. Has very short range and slow startup.
|
| 2/8LH
|
-
|
Y
|
-
|
-
|
-
|
-
|
-
|
A double-kick that knocks the opponent away diagonally on hit.
|
|
5HHH
5HHH
|
| Version
|
Damage
|
Guard
|
Startup
|
Active
|
Recovery
|
Block Adv.
|
Hit Adv.
|
| 5H
|
-
|
Y
|
-
|
-
|
-
|
-
|
-
|
A double-kick. Has enough hitstun to link into 5L.
|
| 5HH
|
-
|
Y
|
-
|
-
|
-
|
-
|
-
|
A two-hit step and uppercut. V3's other launcher string, this can be followed up with a Combo Jump into its aircombo followup string, jLHS. This aircombo string uses a special version of jS that has a larger hit count and deals substantial damage.
This version of the launcher string deals substantially more damage and allows all the same link followups as 5LH, but is much worse on block since the opponent can walk out of the string and force it to whiff.
|
| 5HHH
|
-
|
Y
|
-
|
-
|
-
|
-
|
-
|
An alternate ender for this launcher string. Knocks the opponent away on hit. This sees almost no use since V3 can link 5S from his launcher string.
|
|
6HH
6HH
|
| Version
|
Damage
|
Guard
|
Startup
|
Active
|
Recovery
|
Block Adv.
|
Hit Adv.
|
| 6H
|
-
|
Y
|
-
|
-
|
-
|
-
|
-
|
A two-hit elbow into punch sequence. This normal is fairly good for its range and speed, as well as locking the opponent down while you call Riderman for an unblockable setup.
|
| Version
|
Damage
|
Guard
|
Startup
|
Active
|
Recovery
|
Block Adv.
|
Hit Adv.
|
| 6HH
|
-
|
Y
|
-
|
-
|
-
|
-
|
-
|
A lunging punch that knocks the opponent away on hit. The opponent can sidewalk out of this string, so it's best to avoid this followup on block, but it's okay on hit.
|
|
2/8HH
2/8HH
|
| Version
|
Damage
|
Guard
|
Startup
|
Active
|
Recovery
|
Block Adv.
|
Hit Adv.
|
| 2/8H
|
-
|
Y
|
-
|
-
|
-
|
-
|
-
|
A two-hit double stepping knee. This string has a ton of recovery, and is very unsafe on block. It is still quite fast and has a lot of range compared to most of V3's normals.
Unlike most of V3's normals which are very useful even without calling Riderman, this one is very potent for locking the opponent down, but requires Riderman coverage to be safe. From 2/8H on block, Riderman can become an airtight blockstring, and on hit, Riderman is very easy to hitconfirm into.
|
| 2/8HH
|
-
|
Y
|
-
|
-
|
-
|
-
|
-
|
A very delayed sweep kick that launches the opponent on hit. Fully untechable, so you can use this to connect Riderman or RC into a special.
|
|
jL
jL
|
| Damage
|
Guard
|
Startup
|
Active
|
Recovery
|
Block Adv.
|
Hit Adv.
|
| -
|
Y
|
-
|
-
|
-
|
-
|
-
|
V3 holds his knee out. Stays active until landing.
jH is identical to this attack.
|
|
Special Moves
5S
V3 Dengeki Chop
5S
|
| Damage
|
Guard
|
Startup
|
Active
|
Recovery
|
Block Adv.
|
Hit Adv.
|
| -
|
Y
|
-
|
-
|
-
|
-
|
-
|
V3 steps forward and chops down with lightning flowing through his hand.
A key poking and pressure tool for V3, this move starts up and recovers very quickly, and is safe on block. It deals a fair amount of damage and knocks the opponent down on hit. Overall, a very strong low-risk tool that you can use very often to directly attack the opponent.
|
|
DS
V3 Kaiten Kick
Any direction + S
|
| Damage
|
Guard
|
Startup
|
Active
|
Recovery
|
Block Adv.
|
Hit Adv.
|
| -
|
Y
|
-
|
-
|
-
|
-
|
-
|
V3 does a flipping kick. This attack is safe on block, and covers a lot of distance.
In combos, Kaiten Kick also does slightly more damage than Dengeki Chop (5S), and both are capable of connecting in most of the same places. However, it is often a little more difficult to use successfully due to its slower startup and longer travel distance.
|
|
JS
V3 Spinning Kick
jS
|
| Damage
|
Guard
|
Startup
|
Active
|
Recovery
|
Block Adv.
|
Hit Adv.
|
| -
|
Y
|
-
|
-
|
-
|
-
|
-
|
V3 spins in the air, then divekicks at a very shallow angle. Very unsafe on block.
V3 stalls his momentum while spinning, so in spite of its favorable angle, it can be difficult to aim. A useful tool for combos and punishing, but difficult to use in neutral. It can also be useful to dodge attacks while hanging in the air.
|
|
Universal Mechanics
Throw
Throw
4H
|
| Damage
|
Guard
|
Startup
|
Active
|
Recovery
|
Block Adv.
|
Hit Adv.
|
| -
|
N
|
-
|
-
|
-
|
-
|
-
|
V3's throw. This throw has an untechable knockdown, and following up with an OTG Dengeki Chop (5S) or Kaiten Kick (dS) is guaranteed near the wall.
|
|
Dash Action
Dash Action Air Dash Air Dash
|
| Damage
|
Guard
|
Startup
|
Active
|
Recovery
|
Block Adv.
|
Hit Adv.
|
| -
|
N/A
|
-
|
-
|
-
|
-
|
-
|
V3 airdashes. A generic mobility tool. Costs .5 stocks of the Rider Gauge.
|
|
Rider Art
Rider Art Finisher Mode Finisher Mode
|
| Damage
|
Guard
|
Startup
|
Active
|
Recovery
|
Block Adv.
|
Hit Adv.
|
| -
|
N/A
|
-
|
-
|
-
|
-
|
-
|
When pressing Rider Art, V3 instantly causes a screen freeze, enters Finisher Mode, and the belt icon in the UI begins to spin. When leaving the Rider Art screen freeze, V3 has some invulnerable frames, and it is possible to cause your opponent's attack to whiff. During Finisher Mode, V3's next special attack that hits will gain a damage boost, and some special attacks freeze the action while the narrator describes the attack. This costs 1 stock of the Rider Gauge.
In non-tournament play, V3 also has access to the Finisher Mode Cancel bug. This is triggered by inputting Rider Art followed by throw (4H) within a 1-2f window. When executed this way, the cinematic camera will trigger, but rather than posing, V3 will instead execute a throw and recover early. This has a number of effects on the match, most notably:
- Briefly time-stops the opponent in whatever state they were in when the Rider Art activated.
- If they were grounded, your throw attempt is guaranteed, but can still be teched by your opponent.
- If your opponent was not holding back to block before the superfreeze, an otherwise blockable strike will become unblockable. For V3, V3 Kaiten Kick (dS) can be used as a safe unblockable with decent range.
- The match is stuck in a "superfrozen" state until another superfreeze occurs or the round ends. During this state, some effects will become invisible, and some affected moves will behave improperly.
In practical terms, V3 has good specials for getting an unblockable with Finisher Mode Cancel, but Riderman's hitbox will stop functioning properly and it can no longer hit the opponent until Finisher Mode Cancel is ended.
Be careful when using any of this, as Finisher Mode Cancel is banned in tournament play.
|
|
Style Action
Style Action Support Attack Support Attack
|
| Damage
|
Guard
|
Startup
|
Active
|
Recovery
|
Block Adv.
|
Hit Adv.
|
| -
|
N
|
-
|
-
|
-
|
-
|
-
|
V3 calls Riderman, who fires an unblockable hookshot, staggering the opponent, then pulling them in for a hard knockdown. This costs 2 stocks of the Rider Gauge, or 4 stocks when executed from hitstun.
Riderman is an indispensible tool for V3. He opens up unblockable setups, extends combos, and can even stop the opponent's aggression in a pinch by forcing them to evade Riderman.
When following up on Riderman, V3 should try to use a Dengeki Chop (5S) while the opponent reels from the hookshot hit but before Riderman pulls the opponent in. Then, after Riderman pulls, land either an OTG 5S or dS.
In pressure, V3 can use any of his airtight strings, for example 5LH, to lock down the opponent while calling Riderman and get an unblockable setup.
|
|
Combos
- 5LH > 5S/dS
- 5LH > Style Action (Riderman) > 5S > Riderman hits > 5S
- 5LH > Rider Finale
- Combos from V3's launcher string.
- 5H > 5LH > 5S
- 2/8LL > 5LH > 5S
- V3's ground link combos. Of these two starters, 5H deals a lot more damage. You can also link Rider Finale from any grounded link starter.
- 2/8H > RC > 5H > 5LH > 5S
- 6H > RC > 5H > 5LH > 5S
- Combos using advancing normals to start a combo, then RC into a link combo.
- 4/6LH > Style Action (Riderman) > 5S > 5S
- 6H > Style Action (Riderman) > 5S > 5S
- 2/8H > Style Action (Riderman) > 5S > 5S
- Other Riderman combos from a ground string that recover with enough time to get two specials.
- From 4/6LH, call Riderman as the third hit connects.
- From 6H, call Riderman immediately after pressing 6H.
- From 2/8H, call Riderman after the second hit connects.
Navigation
| General
|
|
|
Showa
|
| Kamen Rider
|
|
| Kamen Rider V3
|
|
| Kamen Rider Amazon
|
|
| Kamen Rider BLACK (RX)
|
|
|
Heisei Phase 1
|
| Kamen Rider Kuuga
|
|
| Kamen Rider Agito
|
|
| Kamen Rider Ryuki
|
|
| Kamen Rider 555
|
|
| Kamen Rider Blade
|
|
| Kamen Rider Hibiki
|
|
| Kamen Rider Kabuto
|
|
| Kamen Rider Den-O
|
|
| Kamen Rider Kiva
|
|
| Kamen Rider Decade
|
|
|
Heisei Phase 2
|
| Kamen Rider W
|
|
| Kamen Rider OOO
|
|
| Kamen Rider Fourze
|
|
| Kamen Rider Wizard
|
|

