|
|
| Line 1: |
Line 1: |
| [[File:IS_Sora_Logo.png|250px]] | | [[File:IS_Sora_Logo.png|250px]] |
| | |
|
| |
|
| '''Virtuous Pure Idol''' - ''Sonnant Seiso Setplay'' | | '''Virtuous Pure Idol''' - ''Sonnant Seiso Setplay'' |
| | {{TOClimit|2}} |
| ==Introduction== | | ==Introduction== |
| {{Content Box|content= | | {{Content Box|content= |
| Line 38: |
Line 40: |
| }} | | }} |
| }} | | }} |
| {{TOClimit|2}}
| |
|
| |
|
| ==Normal Moves== | | ==Normal Moves== |
Revision as of 15:56, 10 May 2023

Virtuous Pure Idol - Sonnant Seiso Setplay
Introduction
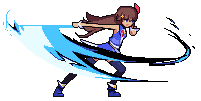
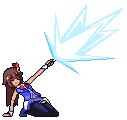
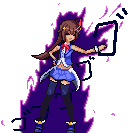
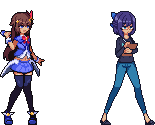
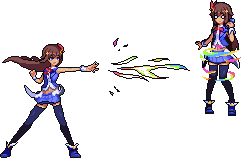
Sora Tokino is an idol who sets the stage with her musical lockdown. She orchestrates her array of musical projectiles to set up safe approach opportunities and enforce 'respect' from her kouhai.
- Sora is capable of good keepout and space control through moves such as 5M, 6M, and the note projectiles. 6L and 2H are strong anti airs making it very hard to get in on her. Off of a HKD however, she turns into a setplay monster capable of opening you up with oppresive pressure and multiple high/low and left/right mixups anywhere on screen.
236M is a meterless projectile which gives big plus frames on block. It can be crouched midscreen.
22H costs 1 Bar of meter, but summons A-chan to lock them down, giving you time to run a free 50/50 mixup anywhere on screen, or set notes so that you can run even more mixups after. A-chan can be destroyed if hit though, so just throwing out 22H isn't a very good idea.
j.L is also a 9 frame overhead which you can cancel into off of any jump cancelable move like 2M. It doesn't give a combo on hit, but there are setups off of a HKD that lets you confirm it off of a note detonate or certain assists.
All her oki leads to mixup/pressure and she is rewarded with loopable oki when guessing right.
She has the best control over her airdrift in the game which enables ambigous left/right mixups.
Soras combos grant both high Super Chat and Meter Gain, and since her resourceless combos already enable strong setups, most will go into assists for conversions, pressure and neutral utility.
In exchange for her good neutral and pressure, she is weak on defense due to her slow buttons and lack of access to an invincible reversal. When being pressured, she generally has to block and wait it out.
She has lower damage than the rest of the cast.
A lot of her strongest oki and combo routes are locked behind execution barriers.
Playstyle
 Sora is a setplay zoner that locks down the opponent with her musical prowess. Sora is a setplay zoner that locks down the opponent with her musical prowess.
|
| Strengths |
Weaknesses
|
- Anti-Airs: Has an incredibly large and safe anti-air with 6L that gatlings into 2H for an air unblockable.
- Vortex: Can set up Re:Play on knockdown which forces the opponent to guess on every wakeup due to the variable detonation timing, instant overheads, and ambiguous cross-ups she can do.
- Space Control: If Sora is able to set up Re:Play traps from afar she can control the pace of the game with On Stage! and detonations.
- Reflect: 22M can reflect projectiles, forcing opponents to be wary of using them as counter-zoning.
|
- Low Damage: Has some of the lowest damage in the cast, relying on her oki to reset and chip away at the opponents health.
- Weak Defense: Sora's only invincible reversal is locked behind meter, and her fastest normal is 6F of startup.
- Some Assembly Required: Requires a knockdown to set up and get her gameplan going. Her combos and projectile usage can also heavily vary depending on the opponent's position and your note placements.
|
Normal Moves
Standing Normals
5L
5L
|
| Damage
|
Guard
|
Startup
|
Active
|
Recovery
|
Adv. on Block
|
Adv. on Hit
|
Invulnerability
|
| 25
|
Mid
|
6
|
3
|
-
|
-2
|
-
|
None
|
Your go-to stagger pressure button; safer than 2L and prorates less.
|
|
5M
5M
|
| Damage
|
Guard
|
Startup
|
Active
|
Recovery
|
Adv. on Block
|
Adv. on Hit
|
Invulnerability
|
| 50
|
Mid
|
9
|
2
|
-
|
-9
|
-
|
None
|
One of Sora's best poking tools in neutral. Can confirm into both 6M and sometimes 2H, depending on the spacing.
|
|
5H
5H
|
| Damage
|
Guard
|
Startup
|
Active
|
Recovery
|
Adv. on Block
|
Adv. on Hit
|
Invulnerability
|
| 90
|
Mid
|
9
|
8
|
-
|
-5
|
-
|
None
|
A grounded "combo filler" button. You wont be pressing this much outside of combos.
|
|
Crouching Normals
2L
2L
|
| Damage
|
Guard
|
Startup
|
Active
|
Recovery
|
Adv. on Block
|
Adv. on Hit
|
Invulnerability
|
| 25
|
Mid
|
6
|
2
|
-
|
-3
|
-
|
None
|
Another stagger pressure normal. Also a go-to starter. Being slightly more minus than 5L, it makes up for it with slightly more range.
|
|
2M
2M
|
| Damage
|
Guard
|
Startup
|
Active
|
Recovery
|
Adv. on Block
|
Adv. on Hit
|
Invulnerability
|
| 48
|
Mid
|
10
|
4 (4) 2
|
-
|
-7
|
-
|
None
|
A multihitting normal. Jump cancelable on block and hit. Mainly used to IOH with j.L off of the first hit.
|
|
2H
2H
|
| Damage
|
Guard
|
Startup
|
Active
|
Recovery
|
Adv. on Block
|
Adv. on Hit
|
Invulnerability
|
| 85
|
Mid
|
13
|
6
|
-
|
-15
|
-
|
None
|
The God Button. This normal does it all. While it is Sora's main combo extension, it is also air unblockable, making it her best antiair next to 6L, which is only good because it gatlings into 2H. Jump cancelable on block or hit, this normal will also be frequently used in blockstrings and to catch people jumping out of Sora's pressure.
|
|
3H
3H
|
| Damage
|
Guard
|
Startup
|
Active
|
Recovery
|
Adv. on Block
|
Adv. on Hit
|
Invulnerability
|
| 95
|
Low
|
11
|
3
|
-
|
-15
|
-
|
None
|
The universal sweep. With its long range, this will primarily be used to end combos and set up 214M Okizeme. Hitting aerial opponents with it will take some getting used to, however, as its vertical range is minimal. 3H also has utility as the "low" option in unreactable high/low note setups, as it can be gatlinged from any normal.
|
|
Jumping Normals
j.L
j.L
|
| Damage
|
Guard
|
Startup
|
Active
|
Recovery
|
Adv. on Block
|
Adv. on Hit
|
Invulnerability
|
| 30
|
High
|
6
|
5
|
-
|
-
|
-
|
None
|
Sora's go-to instant overhead option with her note pressure. Prorates actually extremely well and is also confirmable with certain collabs.
|
|
j.M
j.M
|
| Damage
|
Guard
|
Startup
|
Active
|
Recovery
|
Adv. on Block
|
Adv. on Hit
|
Invulnerability
|
| 50
|
High
|
10
|
4
|
-
|
-
|
-
|
None
|
Sora's horizontally gigantic air-to-air. With its thin hitbox, however, you will often find it being low-profiled if used while landing.
|
|
j.H
j.H
|
| Damage
|
Guard
|
Startup
|
Active
|
Recovery
|
Adv. on Block
|
Adv. on Hit
|
Invulnerability
|
| 75
|
High
|
11
|
3
|
-
|
-
|
-
|
None
|
Sora's staple cross-up button. With a decent horizontal, cross-up, and vertical hitbox, this is Sora's main air button if the opponent is on the ground. If an aerial opponent is hit by j.H, it will cause a soft knockdown state.
|
|
Command Normals
6L
6L Step and Go! Step and Go!
|
| Damage
|
Guard
|
Startup
|
Active
|
Recovery
|
Adv. on Block
|
Adv. on Hit
|
Invulnerability
|
| 40
|
Mid
|
6
|
3
|
-
|
-
|
-
|
None
|
The second God Button. This move is heavily disjointed both vertically and horizontally. In the air, 6L jails into 2H for an air unblockable setup. Of all the L normals, this is the safest at -1. The downside? 6L whiffs on crouchers and standing Ayame.
|
|
6M
6M VFX-Calibur - Strike Air VFX-Calibur - Strike Air
|
| Damage
|
Guard
|
Startup
|
Active
|
Recovery
|
Adv. on Block
|
Adv. on Hit
|
Invulnerability
|
| 100
|
Mid
|
15
|
6
|
-
|
-
|
-
|
None
|
The third God Button. This move is more disjointed than some characters entire movesets. 6M is used to control space in neutral as well as confirming off of 5M into a 22L safe jump. This move is also used in corner loops like 5M 6M 22M. A warning, however, as it has even more recovery than 5M and can easily be jumped over.
|
|
6H
6H Tokino Soda Tokino Soda
|
| Damage
|
Guard
|
Startup
|
Active
|
Recovery
|
Adv. on Block
|
Adv. on Hit
|
Invulnerability
|
| 95
|
High
|
21
|
12
|
-
|
-
|
-
|
None
|
Soda-chan is actaully Sora's best starter. Confirming with either collab or note, 6H can easily devastate a health bar. With an insane 21 frame startup, this move is faster than the UOH and is almost unreactable.
|
|
Universal Mechanics
Throw
Throw
L+M
|
| Damage
|
Guard
|
Startup
|
Active
|
Recovery
|
Adv. on Block
|
Adv. on Hit
|
Invulnerability
|
| 140
|
-
|
7
|
2
|
-
|
-
|
-
|
None
|
Sora's throw. Only Okizeme is 236L note. It is, however, significantly scarier in the corner because of Sora's loopable plus frames there.
|
|
Overhead
Overhead
M+H
|
| Damage
|
Guard
|
Startup
|
Active
|
Recovery
|
Adv. on Block
|
Adv. on Hit
|
Invulnerability
|
| 60
|
High
|
25
|
3
|
-
|
-
|
-
|
None
|
Do not use this move. Like ever. Not because it's bad. But because why use it when Sora has two other quicker and more rewarding overhead options. If you have a note set up already or plan to use assist, please simply j.L or 6H instead. This being said, however, UOH can still be used to throw bait and as an extra normal in niche corner routes, despite atrocious damage and proration.
|
|
Special Attacks
214X
Re:Play
214X Go my children, and hold down the neutral. Go my children, and hold down the neutral.
|
| Version
|
Damage
|
Guard
|
Startup
|
Active
|
Recovery
|
Adv. on Block
|
Adv. on Hit
|
Invulnerability
|
| L (Stationary)
|
80
|
Mid
|
-
|
-
|
-
|
-
|
-
|
None
|
When first inputted, Stationary Re:Play will travel a set distance quickly before stopping. It will automatically detonate after ten seconds if not manually detonated with a second 214L input. Its primary use is within combos, either as an extension or a meaty auto-detonation on the opponents wakeup.
|
| Version
|
Damage
|
Guard
|
Startup
|
Active
|
Recovery
|
Adv. on Block
|
Adv. on Hit
|
Invulnerability
|
| M (Travelling)
|
80
|
Mid
|
-
|
-
|
-
|
-
|
-
|
None
|
When first inputted, Travelling Re:Play will slowly move across the stage until it auto-detonates after five seconds or is manually detonated with a second 214M input. Its primary use is after 3H HKD to set up note Okizeme. It also has uses in triple 214x routing.
|
| Version
|
Damage
|
Guard
|
Startup
|
Active
|
Recovery
|
Adv. on Block
|
Adv. on Hit
|
Invulnerability
|
| H (Role:Play)
|
120
|
Mid
|
-
|
-
|
-
|
-
|
-
|
None
|
Role:Play is quite similar to Re:Play (Travelling); Role:Play is comprable in travel time, speed, and autodetonation timing. However, unlike Re:Play (Travelling), Role:Play will detonate on hit or block. Point blank this move is minus, so do not expect free plus frames. While awfully unexplored, this move may have potential in some tricky matchups.
|
|
236X
On Stage!
236X
|
| Version
|
Damage
|
Guard
|
Startup
|
Active
|
Recovery
|
Adv. on Block
|
Adv. on Hit
|
Invulnerability
|
| L (Low)
|
46 (2 hits)
|
Mid
|
23
|
-
|
-
|
-7
|
-3
|
None
|
On Stage! (Low) is a slow, horizontal, forward-moving projectile. It will primarily be used to control space in the mid-screen during neutral. Sora will be trying to condition jump-ins with this move or use it to approach and run your pressure. Due to its long startup, this move is rarely used in combo pieces with the exception of 2H > 236L or 214x auto-detonate > 236L. Furthermore, On Stage! (Low), has two hits due to having 2 hitboxes, one at the top of the note, and one at the bottom. This means if it hits correctly, it will outright beat one-hit projectiles and trade with two-hit projectiles, nullifying them both. However, if the opponents projectile hits only one hitbox (usually the top one), it will lose to 2 hit projectiles.
|
| Version
|
Damage
|
Guard
|
Startup
|
Active
|
Recovery
|
Adv. on Block
|
Adv. on Hit
|
Invulnerability
|
| M (High)
|
54 (3 hits)
|
Mid
|
15
|
-
|
-
|
+3
|
-3
|
None
|
On Stage! (High) is a fast forward-moving projectile that controls the space in front of Sora at a 45° angle. In combination with On Stage! (Low), these moves will make up a majority of Sora's keep-away game. On block, point blank, this move is +3, allowing Sora to continue her pressure. However, mid-screen, this move often whiffs on crouchers so its best pressure uses come in the corner. In the corner, Sora can loop On Stage! (High) plus frames by microdashing after this move: 2L > 2M (1hit) > 236M > 66 > 2L... This pressure is safe if ideally executed (with the exception of DPs). HOWEVER, for unknown reasons, on grounded hit, this move is -3. This means if the opponent wants to escape from your looping + frames, simply get hit by On Stage! (High) and take your turn back. Within combos, 236M makes up a majority of combo pieces and theory. Some include: 2H > 236M, 2M > 236M, 6L > 236M, or 6M > 236M.
|
| Version
|
Damage
|
Guard
|
Startup
|
Active
|
Recovery
|
Adv. on Block
|
Adv. on Hit
|
Invulnerability
|
| H (Parallel Time)
|
93 (3 hits)
|
Mid
|
-
|
-
|
-
|
-
|
-
|
None
|
Parallel Time is a slow-moving multi-hitting projectile. Point blank, on both hit an block, the move is significantly minus. Therefore, Sora will only ever use this move full-screen as a safe approach. Similar to On Stage! (Low), with three hits, Parallel Time will beat out one and two-hitting projectiles while trading with three-hitting ones. Other than a unique approach tool, Sora will hardly use this move.
|
|
22X
22X 22L 22L 22M 22M 22H 22H
|
| Version
|
Damage
|
Guard
|
Startup
|
Active
|
Recovery
|
Adv. on Block
|
Adv. on Hit
|
Invulnerability
|
| L (A-ssist!)
|
-
|
-
|
-
|
-
|
-
|
-
|
-
|
None
|
Sora leaps into the air with the help of A-Chan. The only real use of this move is confirming off of 6M. 6M > 22L > dl j.H is a left/right safejump from pokes like 5M. The distance of which 6M hits will determine whether Sora hits cross-up or same-side. If, for some reason, you ever press 22S, Sora can Superchat Cancel into 22L to safejump.
|
| Version
|
Damage
|
Guard
|
Startup
|
Active
|
Recovery
|
Adv. on Block
|
Adv. on Hit
|
Invulnerability
|
| M (A-egis Reflector!)
|
27
|
Mid
|
9
|
-
|
-
|
0
|
+6
|
None
|
A-egis Reflector! is one of Sora's most unique moves. Firstly, A-Chan acts as a reflector, able to redirect projectiles back to the opponents. This ability is particularly helpful in some grueling matchups like Aki. Combo-wise, while lackluster mid-screen, A-egis Reflector! is the core part of 5M > 6M > 22M loops in the corner. On block, A-egis reflector is 0, meaning it's an effective reset and a safe way to end pressure mid-screen. 22M also has some utility in scramble situations and on defense, considering A-Chan never goes away, even if hit.
|
| Version
|
Damage
|
Guard
|
Startup
|
Active
|
Recovery
|
Adv. on Block
|
Adv. on Hit
|
Invulnerability
|
| H (A-nnotations!)
|
15 (per hit)
|
Mid
|
-
|
-
|
-
|
-
|
-
|
None
|
A-nnotations! summons A-Chan with her trusty clipboard and pen. A-Chan slowly walks forward, travelling a preset distance if uninterrupted. While moving, A-Chan is a constant hitbox, at max doing 4 hits of 15 damage individually. If the opponent is forced to block A-Chan, they are extremely susceptible to Sora's high/low and left/right mix-ups. However, because A-Chan will disappear if she receives any damage whatsoever, Sora's best options to set A-nnotations! is off a hard knockdown from 3H or Superchat cancelling off of point-blank 236M. Next to 236S, this is Sora's main and most ideal way to spend meter.
|
|
Super Star Attacks
236S
Blue Sky Symphony
236S
|
| Damage
|
Guard
|
Startup
|
Active
|
Recovery
|
Adv. on Block
|
Adv. on Hit
|
Invulnerability
|
| -
|
-
|
-
|
-
|
-
|
-
|
-
|
None
|
|
214S
Rakka-Chan
22S
|
| Damage
|
Guard
|
Startup
|
Active
|
Recovery
|
Adv. on Block
|
Adv. on Hit
|
Invulnerability
|
| -
|
-
|
-
|
-
|
-
|
-
|
-
|
None
|
|
Combos
Mid-screen
| Combo
|
Difficulty
|
Damage
|
Cost
|
Meter Gain
|
Location
|
- Your optimal BNB.
- Works anywhere but will do less damage in the corner.
- Replace the first 5H with 6L if 2L hits far.
- Starting with 5L works, and does more damage.
- Video
|
Corner
| Combo
|
Difficulty
|
Damage
|
Cost
|
Meter Gain
|
Location
|
- Has great damage and meter gain, and leads into her best oki.
- Has a higher execution requirement (4 microdashes)
- Video
|
Matchups
- Vs. Aki
- Matchup advice goes here.
- Vs. Ayame
- Matchup advice goes here.
- Vs. Botan
- Matchup advice goes here.
- Vs. Coco
- Matchup advice goes here.
- Vs. Fubuki
- Matchup advice goes here.
- Vs. Korone
- Matchup advice goes here.
- Vs. Sora
- Matchup advice goes here.
- Vs. Suisei
- Matchup advice goes here.
- Vs. Kiara Off-Collab
- Matchup advice goes here.
Setplay
External Resources
Colors
Navigation
| The Game
|
|
| The Battle System
|
|
| Idols
|
|
| Collabs
|
|


