Idol Showdown/Suisei Hoshimachi: Difference between revisions
m (→Colors: added references to colors, color 2 might be towa but not totally sure) |
(→22S) |
||
| (429 intermediate revisions by 20 users not shown) | |||
| Line 1: | Line 1: | ||
{{Version-IS|4.0.6}} | |||
[[File:IS_Suisei_Logo.png|250px]] | [[File:IS_Suisei_Logo.png|250px]] | ||
'''Stellar Stylish Idol''' - ''Saikou Pressure'' | '''Stellar Stylish Idol''' - ''Saikou Pressure'' <br> | ||
{{ | '''Difficulty''' - ★★★☆☆☆ | ||
{{CharacterIntro-IS|char= Suisei | |||
|hp=1000 | |||
|backdash=16F (1~10F {{Property-IS|grab}} Invuln) | |||
|walkspeed=[[Idol_Showdown/Game_Data#Ground_Movement_Data|Average]] | |||
|intro= | |||
==Introduction== | ==Introduction== | ||
{{ | {{Content Box|content={{Text-IS | ||
|entext= Suisei is a rushdown setplay character who excels at locking her opponent down with powerful okizeme and strong mixup tools. | |||
In neutral, she has a few strong normals like {{input|2M}}, a really useful low poke that can be converted off into a full combo - albeit requiring meter outside of point blank range - and 5M being so plus on hit it can link back into {{input|5L}}. While she can have a hard time approaching her opponent, {{input|236L}} and {{input|j.236X}} are solid tools - with {{input|236L}} leading to a scary strike/throw situation even on block - and {{input|3M}} can slide below some projectiles. Her {{input|214L/M}} can disrupt the offense of more melee-focused characters, with the M version mostly useful for zoning purposes and 214L being a great way to get back your turn even if the opponent gets close. On top of that, {{input|214H}} is a great way to force your way in against cornered opponents. Having a 5f command grab makes her strike/throw game scary to deal with.<br/> | |||
However, it's when she gets in that Suisei really shines. Her {{input|214H}} can also eat through reversals and by varying the time at which the Orb ({{input|214H}}) hits, various mixup options open to her - high/low, crossup/no crossup, meaty/throw.<br/> | |||
On the flipside, when forced to play defensive Suisei doesn't have many options outside of blocking and trying to punish any unsafe string from her opponent. Furthermore, her lack of long range projectiles or invulnerable approaches - outside of the projectile invulnerability of {{input|22H}}, which is not always a viable option - makes it hard for Suisei to deal with heavy zoning without spending meter for collabs. | |||
|jptext= すいせいはガン攻めとセットプレイのファイターだ。 | |||
}} | |||
{{CharacterPickReasons | |||
|intro=[[File:IS_Suisei_head.png|link=]] | |intro=[[File:IS_Suisei_head.png|link=]] | ||
'''Suisei''' is a | '''Suisei''' is a rushdown setplay character with explosive high risk, high reward neutral skip tools and powerful projectile okizeme. Boasting great normals for stagger pressure, and an amazing command grab, she's a close range killer who's no slouch at the midrange game either. | ||
|pros= | |pros= | ||
*'''Incredible Okizeme''': | *'''Incredible Okizeme''': {{input|214L}} when fully charged is extremely advantageous on block and reversal-safe, allowing you to do pretty much whatever you want on the opponent’s wakeup when used in proper setups. | ||
*'''Deadly Mix-ups''': When using said | *'''Deadly Mix-ups''': When using said {{input|214L}} setups, you get a high/low while still remaining on the offensive. And even if they survive your setplay, you still have a command grab for them to worry about. | ||
*'''Well-Rounded Offense''': 2L is perfect for tick throws and stagger pressure. Both options lead to great reward. Her command grab gives her oki, and | *'''Well-Rounded Offense''': {{input|2L}} is perfect for tick throws and stagger pressure. Both options lead to great reward. Her command grab gives her decent oki, and she gets her best mixups off almost every hit with {{input|22M}} ender. | ||
*''' | *''' Unique Cancel Options''': Suisei uniquely has access to a metered dash cancel technique called Idol Step that improves both her combo and pressure game. | ||
*'''Good Meter Build Potential''': When optimized, Suisei’s combos give her | *'''Good Meter Build Potential''': When optimized, Suisei’s combos give her a decent amount of bar to use and abuse her plethora of powerful metered options. | ||
|cons= | |cons= | ||
*''' | *'''Blocking''': Other than system mechanics and a 5f jab, Suisei is completely lacking in defensive tools. {{input|236H}} is a f10 armored reversal which isn't commonly used due to most pokes beating it before the armor even becomes active. Once on the backfoot, it's difficult for her to get out without taking huge risks. | ||
*''' | *'''Struggling Against Zoning''': While she isn’t lacking in tools to force her way through neutral, characters with strong projectiles and full screen presence are very problematic for her. | ||
*''' | *'''Dependence on Resources''': While her oki is still decent without Superchat cancelled {{input|214L}}, she can’t guarantee a true 50/50 and beat reversals at the same time without it. She also needs bar for Idol Step cancels. | ||
| | |width=100 | ||
}} | |||
===Recommended Collabs=== | |||
'''Note''': This sections only purpose to help guide new players towards assists that are generally considered useful for the character, and is subject to change as the game develops more. Don't be afraid to pick and try something else! | |||
* [[File:IS_Kiara_Icon.png|40px]] '''[[Idol Showdown/Collabs#Kiara|Kiara]]''' | |||
:*Kiara is arguably one of the best collab choices for Suisei. Kiara provides anti-zoning utility for Suisei, who struggles greatly against characters that stay outside of her optimal range while throwing projectiles. Her off-collab lets Suisei ignore most projectiles for 6 seconds for a chance to approach. On top of that, Kiara's Call In acts as a great reversal which Suisei is in desperate need of and also works as a good lockdown tool for a high/low mix. | |||
* [[File:IS_Roboco_Icon.png|40px]] '''[[Idol Showdown/Collabs#Roboco|Roboco]]''' | |||
:*Roboco is one of the most well-rounded collab choices for Suisei. While her missiles are not particularly impactful on her due to her oki game being already solid, having 3 bars max SC is pretty useful to convert into the standard routing from alternative starters, and for her damage routes. But where Robo really shines is with her {{input|214S}}, the beam. This fullscreen super compensates for Suisei's lack of long range attacks, and can be used as a guaranteed punish against projectiles, giving Suisei a straightforward way to get out of zoning situations. It is also possible to use it defensively to stop the opponent's pressure, and offensively to combo off it for >600 damage routes. | |||
* [[File:IS_Miko_Icon.png|40px]] '''[[Idol Showdown/Collabs#Miko|Miko]]''' | |||
:*Suisei's business partner, Miko, trades neutral utility for strong collabs on offense and defense that are easy to use. Miko's tripping collab can force opponents off of you and back to neutral. If they get stuck blocking, it complements Suisei's already powerful strike/throw game. Her lava bucket collab can be used after {{input|236L}} to lock opponents down for mix-ups. The lava won't let you convert off of any hits on its own, but it gives you time to sneak in some damage and also set up a fully charged {{input|214[L]}} into a real high/low threat. You can even fully charge {{input|22S}} if you're feeling cheeky (though you won't gain SC for it). | |||
}} | |||
}} | }} | ||
| Line 24: | Line 49: | ||
=== Standing Normals === | === Standing Normals === | ||
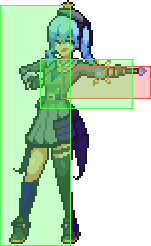
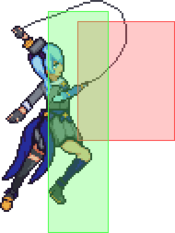
====== <font style="visibility:hidden" size="0">5L</font> ====== | ====== <font style="visibility:hidden" size="0">5L</font> ====== | ||
{{MoveData | {{MoveData-IS | ||
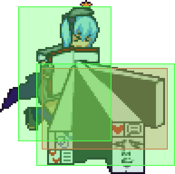
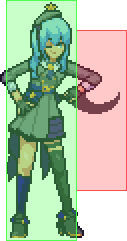
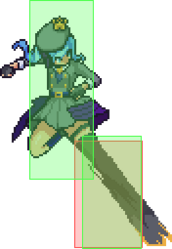
|image=IS_Suisei_5L.png | |image=IS_Suisei_5L.png | ||
|hitbox=IS_Suisei_5L_hitbox.png | |||
|caption= | |caption= | ||
|name=5L | |name=5L | ||
| Line 32: | Line 58: | ||
|damage=35 | |damage=35 | ||
|guard=Mid | |guard=Mid | ||
|startup= | |startup=5 | ||
|active= | |active=3 | ||
|recovery= | |recovery=11 | ||
|advHit=+ | |advHit=+1 | ||
|advBlock=- | |advBlock=-2 | ||
|description= | |description= | ||
* No self-gatling | |||
Suisei's fastest normal. More range than {{input|2L}}, moves her forward. | |||
* Very high hitbox compared to other jabs, making it prone to getting low profiled by many moves. | |||
}} | }} | ||
}} | }} | ||
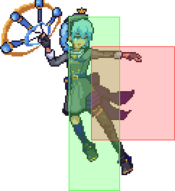
====== <font style="visibility:hidden" size="0">5M</font> ====== | ====== <font style="visibility:hidden" size="0">5M</font> ====== | ||
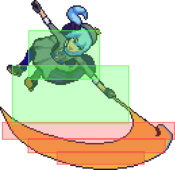
{{MoveData | {{MoveData-IS | ||
|image=IS_Suisei_5M.png | |image=IS_Suisei_5M.png | ||
|hitbox=IS_Suisei_5M_hitbox.png | |||
|caption=Dab | |caption=Dab | ||
|name=5M | |name=5M | ||
|data= | |data= | ||
{{AttackData-IS | {{AttackData-IS | ||
|damage=50 | |damage=50 | ||
|guard=Mid | |guard=Mid | ||
|startup= | |startup=7 | ||
|active= | |active=5 | ||
|recovery= | |recovery=13 | ||
|advHit=+5 | |advHit=+5 | ||
|advBlock=-4 | |||
|advBlock= | |description= | ||
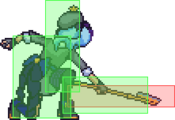
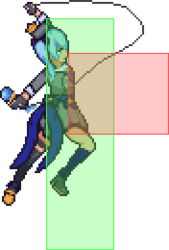
Great button. A high hitting advancing mid that whiffs on crouching opponents at longer ranges. Surprisingly active. Links back into {{input|5L}} for high meter build loops. Incredible for stagger pressure. | |||
|description= | * The high hitbox for this move is gigantic, covering Suisei's entire arm without exposing any of her hurtbox. Great panic anti-air even if it is air blockable. | ||
A high hitting advancing mid that whiffs on crouching opponents at longer ranges. Surprisingly active. | |||
The | |||
}} | }} | ||
}} | }} | ||
====== <font style="visibility:hidden" size="0">5H</font> ====== | ====== <font style="visibility:hidden" size="0">5H</font> ====== | ||
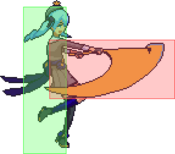
{{MoveData | {{MoveData-IS | ||
|image=IS_Suisei_5H.png | |image=IS_Suisei_5H.png | ||
|hitbox=IS_Suisei_5H_hitbox.png | |||
|caption= | |caption= | ||
|name=5H | |name=5H | ||
| Line 75: | Line 101: | ||
|damage=90 | |damage=90 | ||
|guard=Mid | |guard=Mid | ||
|startup= | |startup=14 | ||
|active= | |active=2 | ||
|recovery= | |recovery=25 | ||
|advHit= | |advHit=0 | ||
|advBlock=- | |advBlock=-5 | ||
|description= Chunky horizontal axe swing. | |description= Chunky horizontal axe swing. Has an absurd amount of blockstun which lets Suisei cancel into almost any special gapless. High damage makes it useful combo fodder. | ||
* Has really good forward advance, making it great tool for whiff punishing. | |||
}} | }} | ||
}} | }} | ||
| Line 86: | Line 113: | ||
=== Crouching Normals === | === Crouching Normals === | ||
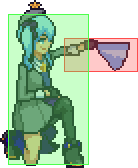
====== <font style="visibility:hidden" size="0">2L</font> ====== | ====== <font style="visibility:hidden" size="0">2L</font> ====== | ||
{{MoveData | {{MoveData-IS | ||
|image=IS_Suisei_2L.png | |image=IS_Suisei_2L.png | ||
|hitbox=IS_Suisei_2L_hitbox.png | |||
|caption= | |caption= | ||
|name=2L | |name=2L | ||
| Line 94: | Line 122: | ||
|damage=30 | |damage=30 | ||
|guard=Low, Air Unblockable | |guard=Low, Air Unblockable | ||
|startup= | |startup=6 | ||
|active= | |active=2 | ||
|recovery= | |recovery=12 | ||
|advHit=+ | |advHit=+1 | ||
|advBlock= | |advBlock=-2 | ||
|description=Incredibly stubby jab. Mostly inferior to 5L for abare purposes, but | |description= | ||
* Self-Gatling Count: 2 | |||
Incredibly stubby jab. Mostly inferior to 5L for abare purposes, but having self-gatling makes it useful for tick throwing. Forces standing on hit, making combos more consistent. | |||
}} | }} | ||
}} | }} | ||
====== <font style="visibility:hidden" size="0">2M</font> ====== | ====== <font style="visibility:hidden" size="0">2M</font> ====== | ||
{{MoveData | {{MoveData-IS | ||
|image=IS_Suisei_2M.png | |image=IS_Suisei_2M.png | ||
|hitbox=IS_Suisei_2M_hitbox.png | |||
|caption=Your best friend in neutral | |caption=Your best friend in neutral | ||
|name=2M | |name=2M | ||
| Line 112: | Line 143: | ||
|damage=60 | |damage=60 | ||
|guard=Low, Air Unblockable | |guard=Low, Air Unblockable | ||
|startup= | |startup=10 | ||
|active= | |active=4 | ||
|recovery= | |recovery=14 | ||
|advHit= | |advHit=-3 | ||
|advBlock=- | |advBlock=-6 | ||
|description= | |description=Amazing low poke thats quite fast for its range. Suisei's lack of good low commitment pokes other than this make her very reliant on it. | ||
}} | }} | ||
}} | }} | ||
====== <font style="visibility:hidden" size="0">2H</font> ====== | ====== <font style="visibility:hidden" size="0">2H</font> ====== | ||
{{MoveData | {{MoveData-IS | ||
|image=IS_Suisei_2H.png | |image=IS_Suisei_2H.png | ||
|hitbox=IS_Suisei_2H_hitbox.png | |||
|caption= | |caption= | ||
|name=2H | |name=2H | ||
| Line 130: | Line 162: | ||
|damage=85 | |damage=85 | ||
|guard=Mid, Air Unblockable | |guard=Mid, Air Unblockable | ||
|startup= | |startup=10 | ||
|active= | |active=3 | ||
|recovery= | |recovery=29 | ||
|advHit= | |advHit=0 | ||
|advBlock=- | |advBlock=-16 | ||
|description=Air unblockable launcher. Not much horizontal range compared to other | |invul= (5~12) {{Property-IS|head}} | ||
|description=Air unblockable launcher. Not much horizontal range compared to other 2Hs making it harder to use consistently as an anti-air. | |||
}} | }} | ||
}} | }} | ||
====== <font style="visibility:hidden" size="0">3H</font> ====== | ====== <font style="visibility:hidden" size="0">3H</font> ====== | ||
{{MoveData | {{MoveData-IS | ||
|image=IS_Suisei_3H.png | |image=IS_Suisei_3H.png | ||
|hitbox=IS_Suisei_3H_hitbox.png | |||
|caption= | |caption= | ||
|name=3H | |name=3H | ||
| Line 148: | Line 182: | ||
|damage=100 | |damage=100 | ||
|guard=Low, Air Unblockable | |guard=Low, Air Unblockable | ||
|startup= | |startup=13 | ||
|active= | |active=3 | ||
|recovery= | |recovery=16 | ||
|advHit=+41 | |advHit=+41 | ||
|advBlock=- | |advBlock=-8 | ||
|description=Short sweep. Hard Knockdown. | |description=Short sweep. Hard Knockdown. | ||
}} | }} | ||
| Line 159: | Line 193: | ||
=== Jumping Normals === | === Jumping Normals === | ||
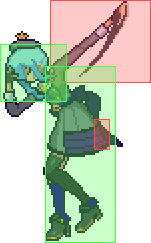
====== <font style="visibility:hidden" size="0">j.L</font> ====== | ====== <font style="visibility:hidden" size="0">j.L</font> ====== | ||
{{MoveData | {{MoveData-IS | ||
|image=IS_Suisei_jL.png | |image=IS_Suisei_jL.png | ||
|hitbox=IS_Suisei_jL_hitbox.png | |||
|caption= | |caption= | ||
|name=j.L | |name=j.L | ||
| Line 167: | Line 202: | ||
|damage=25 | |damage=25 | ||
|guard=High | |guard=High | ||
|startup= | |startup=7 | ||
|active= | |active=5 | ||
|recovery= | |recovery=Until Landing + 2 | ||
|advHit= | |advHit= | ||
|advBlock= | |advBlock= | ||
|description=Standard | |description=Standard j.L. Mostly used for instant overheads - it can be confirmed into a full combo during 214H/214[L] oki or by using assists, for example j.L > Kiara Call In. | ||
}} | }} | ||
}} | }} | ||
====== <font style="visibility:hidden" size="0">j.M</font> ====== | ====== <font style="visibility:hidden" size="0">j.M</font> ====== | ||
{{MoveData | {{MoveData-IS | ||
|image=IS_Suisei_jM.png | |image=IS_Suisei_jM.png | ||
|hitbox=IS_Suisei_jM_hitbox.png | |||
|caption= | |caption= | ||
|name=j.M | |name=j.M | ||
| Line 185: | Line 221: | ||
|damage=55 | |damage=55 | ||
|guard=High | |guard=High | ||
|startup= | |startup=9 | ||
|active= | |active=4 | ||
|recovery= | |recovery=Until Landing + 3 | ||
|advHit= | |advHit= | ||
|advBlock= | |advBlock= | ||
|description= Strictly horizontal gunshot. Wallbounces on hit, enables combo extensions in the corner but hurts its utility as an air to air. | |description= Strictly horizontal gunshot. Wallbounces on hit, enables combo extensions in the corner but hurts its utility as an air to air. | ||
* Hits most standing opponents if done near landing. Can be cancelled into j.S against some characters for a slow double overhead that is +2 on block at best (Does not work against Korone, Fubuki, Ayame and Pekora). | |||
* Outright whiffs against a standing Ayame. | |||
}} | }} | ||
}} | }} | ||
====== <font style="visibility:hidden" size="0">j.H</font> ====== | ====== <font style="visibility:hidden" size="0">j.H</font> ====== | ||
{{MoveData | {{MoveData-IS | ||
|image=IS_Suisei_jH.png | |image=IS_Suisei_jH.png | ||
|hitbox=IS_Suisei_jH_hitbox.png | |||
|caption= | |caption= | ||
|name=j.H | |name=j.H | ||
| Line 203: | Line 242: | ||
|damage=90 | |damage=90 | ||
|guard=High | |guard=High | ||
|startup= | |startup=10 | ||
|active= | |active=4 | ||
|recovery= | |recovery=Until Landing + 4 | ||
|advHit= | |advHit= | ||
|advBlock= | |advBlock= | ||
|description=A | |description=A {{input|j.H}} with an ok crossup hitbox. Your main jump-in most of the time. | ||
}} | }} | ||
}} | }} | ||
| Line 216: | Line 255: | ||
{{MoveData | {{MoveData | ||
|image=IS_Suisei_3M.png | |image=IS_Suisei_3M.png | ||
|caption= | |hitbox=IS_Suisei_3M_hitbox.png | ||
|name= | |caption=You got this trying to input dash 2M, didn't you? | ||
|name=Kakero | |||
|input={{NotationIcon-IS|3}} '''+''' {{NotationIcon-IS|m}} | |||
|data= | |data= | ||
{{AttackData-IS | {{AttackData-IS | ||
|damage=50 | |damage=50 | ||
|guard=Low | |guard=Low,Air Unblockable | ||
|startup= | |startup=12 | ||
|active= | |active=8 | ||
|recovery= | |recovery=16 | ||
|advHit=- | |advHit=-6 | ||
|advBlock=- | |advBlock=-10 | ||
|description=Low profile slide, goes under most mid height fireballs. | |description=Low profile slide, goes under most mid height fireballs and some mid height normals during active frames. Combos into {{input|236L}} on hit. Despite being a slide it does not have meaningful variable frame data. | ||
* Shifts Suisei's hurtbox backwards, making it useful for dodging Korone's and Fubuki's {{input|22H}} on reaction. | |||
}} | }} | ||
}} | }} | ||
| Line 234: | Line 276: | ||
{{MoveData | {{MoveData | ||
|image=IS_Suisei_6H.png | |image=IS_Suisei_6H.png | ||
|hitbox=IS_Suisei_6H_hitbox.png | |||
|caption=Sui-ssor Kick! | |caption=Sui-ssor Kick! | ||
|name= | |name=Starry Jet | ||
|input={{NotationIcon-IS|6}} '''+''' {{NotationIcon-IS|h}} | |||
|data= | |data= | ||
{{AttackData-IS | {{AttackData-IS | ||
|damage=95 | |damage=95 | ||
|guard=Mid | |guard=Mid | ||
|startup= | |startup=19 | ||
|active= | |active=3 | ||
|recovery= | |recovery=17 | ||
|advHit=+ | |advHit=0~+2 | ||
|advBlock=- | |advBlock=-4~-2 | ||
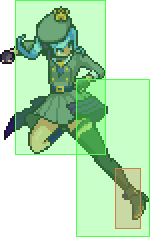
|description=Not an overhead. Wallbounces on | |description=Not an overhead. Wallbounces on standing hit when touching the corner. Being an advancing normal it's very useful for combo conversions and if hit late, it can combo into {{input|5L}}. | ||
* Being an advancing normal, and being able to cancel so late into its long recovery frames, this move is surprisingly good in blockstrings. With enough conditioning, you can even throw people after this move. | |||
}} | }} | ||
}} | }} | ||
=== <font style="visibility:hidden" size="0">Throw</font> === | === Universal Mechanics === | ||
====== <font style="visibility:hidden" size="0">Throw</font> ====== | |||
{{MoveData | {{MoveData | ||
|image=IS_Suisei_LM.png | |image=IS_Suisei_LM.png | ||
|hitbox=IS_Suisei_LM_hitbox.png | |||
|caption= | |caption= | ||
|name=Throw | |name=Throw | ||
|input= | |input={{NotationIcon-IS|l}} '''+''' {{NotationIcon-IS|m}} '''or''' {{NotationIcon-IS|g}} | ||
|data= | |data= | ||
{{AttackData-IS | {{AttackData-IS | ||
|damage=160 | |damage=160 | ||
|guard= | |guard= | ||
|startup= | |startup=7 | ||
|active= | |active=2 | ||
|recovery= | |recovery=31 | ||
|advHit=+31 | |advHit=+31 | ||
|advBlock= | |advBlock= | ||
|description=While it may seem pointless to ever consider normal throw over her command grab, it has | |description= | ||
*Total Frames: 39 | |||
While it may seem pointless to ever consider normal throw over her command grab, it has about less than half as much recovery on whiff in comparison. This makes it a much safer option against opponents who have shown you they are willing to gamble on jumping out of your strings to escape it. Can be kara'd off of 5M with 6/4M~L plink to increase its range. | |||
}} | }} | ||
}} | }} | ||
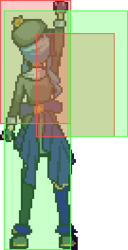
=== <font style="visibility:hidden" size="0">Overhead</font> === | ====== <font style="visibility:hidden" size="0">Overhead</font> ====== | ||
{{MoveData | {{MoveData | ||
|image=IS_Suisei_MH.png | |image=IS_Suisei_MH.png | ||
|caption= | |hitbox=IS_Suisei_MH_hitbox.png | ||
|caption= When the universal overhead frame data is in fact, universal | |||
|name=Overhead | |name=Overhead | ||
|input= | |input={{NotationIcon-IS|m}} '''+''' {{NotationIcon-IS|h}} | ||
|data= | |data= | ||
{{AttackData-IS | {{AttackData-IS | ||
|damage=60 | |damage=60 | ||
|guard=High | |guard=High | ||
|startup= | |startup=23 | ||
|active= | |active=3 | ||
|recovery= | |recovery=19 | ||
|advHit= | |advHit=+2 | ||
|advBlock=- | |advBlock=-3 | ||
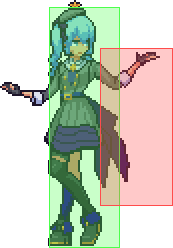
|description=Universal standing overhead. | |invul= (6~36) {{Property-IS|grab}} | ||
|description= | |||
*Links into {{input|5M}} after Counterhit. | |||
Universal standing overhead. Can be kara'd into using {{input|2H}} making {{input|5H}} > {{input|UOH}} a frametrap. | |||
Can also be used in certain combo routes. | |||
}} | |||
}} | |||
====== <font style="visibility:hidden" size="0">Superchat Reversal</font> ====== | |||
{{MoveData | |||
|image=IS_Suisei_6H.png | |||
|hitbox=IS_Suisei_SCR_hitbox.png | |||
|caption= | |||
|name=Superchat Reversal | |||
|input=(blocking) {{NotationIcon-IS|6}} '''+''' {{NotationIcon-IS|m}} '''+''' {{NotationIcon-IS|h}} | |||
|data= | |||
{{AttackData-IS | |||
|damage=0 | |||
|guard=Mid | |||
|startup=16 | |||
|active=2 | |||
|recovery=23 | |||
|advHit=0 | |||
|advBlock=-10 | |||
|invul= (1~17) {{Property-IS|full}} | |||
|description= | |||
*Superchat Reversal | |||
}} | }} | ||
}} | }} | ||
| Line 293: | Line 368: | ||
{{MoveData | {{MoveData | ||
|image=IS_Suisei_236L.png | |image=IS_Suisei_236L.png | ||
|hitbox=IS_Suisei_236L_hitbox.png | |||
|caption= | |caption= | ||
|name=Wicked Slice | |name=Wicked Slice | ||
|input= | |input={{NotationIcon-IS|236}} '''+''' {{NotationIcon-IS|l}} | ||
|data= | |data= | ||
{{AttackData-IS | {{AttackData-IS | ||
|damage=65 | |damage=65 | ||
|guard=Mid | |guard=Mid | ||
|startup= | |startup=13 | ||
|active= | |active=5 | ||
|recovery= | |recovery=14 | ||
|advHit=+ | |advHit=-1~+3 | ||
|advBlock=- | |advBlock=-5~-1 | ||
|description=Big horizontal, advancing axe swing | |description= | ||
* Grants 3 superchats on use | |||
Big horizontal, advancing axe swing that is minus on block even at max range. Decent counterpoke. Quite fast for its large range. Cancelled with 22S~6, it allows for a strike/throw or you can cancel with 22S~4 to be in a safer spot. | |||
}} | }} | ||
}} | }} | ||
| Line 312: | Line 390: | ||
{{MoveData | {{MoveData | ||
|image=IS_Suisei_236M.png | |image=IS_Suisei_236M.png | ||
|caption= | |hitbox=IS_Suisei_236M_hitbox.png | ||
|caption=Greed Sever! | |||
|name=Starry Slice | |name=Starry Slice | ||
|input= | |input={{NotationIcon-IS|236}} '''+''' {{NotationIcon-IS|m}} | ||
|data= | |data= | ||
{{AttackData-IS | {{AttackData-IS | ||
|damage=161 (80 | |damage=161(80, 81) | ||
|guard=High | |guard=High | ||
|startup= | |startup=23 | ||
|active= | |active=5 (first hit) | ||
|recovery= | |recovery=Until Landing + 13 | ||
|advHit=+30 | |advHit=+30 | ||
|advBlock=- | |advBlock=-10 | ||
|description= Advancing airborne overhead that knocks down on hit and high profiles lows. Very unsafe on block | |description= | ||
* Grants 2 superchats on use | |||
Advancing airborne overhead that knocks down on hit and high profiles lows. Very unsafe on block even with a cancel. Amazing damage potential as a combo starter. | |||
* Can be SSC'd to jS to attempt to make it plus on block, but this is a knowledge check as there's a gap between the two where you can DP or even 2H on some characters. | |||
}} | }} | ||
}} | }} | ||
| Line 331: | Line 413: | ||
{{MoveData | {{MoveData | ||
|image=IS_Suisei_236H.png | |image=IS_Suisei_236H.png | ||
|hitbox=IS_Suisei_236H_hitbox.png | |||
|caption= | |caption= | ||
|name=Heart Harvest | |name=Heart Harvest | ||
|input= | |input={{NotationIcon-IS|236}} '''+''' {{NotationIcon-IS|h}} | ||
|data= | |data= | ||
{{AttackData-IS | {{AttackData-IS | ||
|damage= | |damage=125, 30, 24 (ground)<br>125 (air) | ||
|guard=Mid | |guard=Mid | ||
|startup= | |startup=15 | ||
|active= | |active=6 (first hit) | ||
|recovery= | |recovery=17 | ||
|advHit=+6(ground) | |advHit=+6(ground) | ||
+76(air) | +76(air) | ||
|advBlock=- | |advBlock=-13 | ||
|invul=(10~20) {{Property-IS|Super Armor}} | |||
|description= | |description= | ||
* Costs 1 Star Meter and grants 5 superchats on use | |||
Has two versions depending on if the opponent was hit grounded or airborne. | Has two versions depending on if the opponent was hit grounded or airborne. | ||
* Grounded opponents are sideswapped on hit, but is generally not useful for the price as the opponent can tech. | |||
* Airborne opponents are bounced off the wall back into Suisei, making for a good combo ender or extender if you have excess meter you're willing to spend. You have enough time for Charge lvl 2 fireball oki, or the option to SCC into 214H assuming you have 2 meter. | |||
* Having Super Armor adds an extra usage of being a reversal, however the Armor activates too late to see common use. | |||
}} | }} | ||
}} | }} | ||
| Line 355: | Line 441: | ||
{{MoveData | {{MoveData | ||
|image=IS_Suisei_236G.png | |image=IS_Suisei_236G.png | ||
|hitbox=IS_Suisei_236G_hitbox.png | |||
|caption= | |caption= | ||
|name=Tetromino Transhumanism | |name=Tetromino Transhumanism | ||
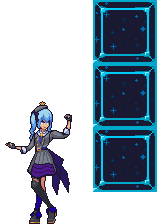
|input= | |input={{NotationIcon-IS|236}} '''+''' {{NotationIcon-IS|g}} | ||
|data= | |data= | ||
{{AttackData-IS | {{AttackData-IS | ||
|damage= | |damage=200(15, 185) | ||
|guard= | |guard= | ||
|startup= | |startup=5 | ||
|active= | |active=2 | ||
|recovery= | |recovery=55 | ||
|advHit=+67 (HKD) | |||
|advHit=+ | |||
|advBlock= | |advBlock= | ||
|invul= (1~4) {{Property-IS|grab}} | |||
|description= | |description= | ||
A command grab that leaves the opponent directly in front of Suisei. Faster startup and better knockdown | * Grants 5 superchats on use | ||
A command grab that leaves the opponent directly in front of Suisei in hard knockdown state. Faster startup and better knockdown than regular throw, but with significantly more recovery. | |||
}} | }} | ||
}} | }} | ||
| Line 376: | Line 464: | ||
{{MoveData | {{MoveData | ||
|image=IS_Suisei_214LM.png | |image=IS_Suisei_214LM.png | ||
|hitbox=IS_Suisei_214LM_hitbox.png | |||
|caption= | |caption= | ||
|name=Stellar Medley | |name=Stellar Medley | ||
|input | |input={{NotationIcon-IS|214}} '''+''' {{NotationIcon-IS|l}} '''/''' {{NotationIcon-IS|m}} | ||
|description= | |||
A versatile, downwards-angled projectile that can be charged up to level 3 to improve its frame advantage. The light and medium versions cover separate angles. The frame advantage it offers makes it both a somewhat reliable pressure tool and meterless okizeme tool as well. In blockstrings, as long as the startup plays out and the comet is spawned, opponents that mash on Suisei will be hit out of their combo, as it does not go away on hit. Suisei’s best move to whiff in order to build superchat meter. | |||
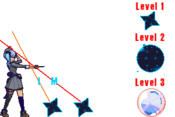
* {{input|214L}} is Suisei's main oki tool. Spending 1 bar of Superchat to cancel into a fully charged {{input|214L}} after {{input|22M}} allows Suisei to run her mix without the risk of reversals, and provides enough blockstun for Suisei to stay plus even if her mix gets blocked. It has better frame advantage when charged than its medium counterpart, but the less horizontal angle of the projectile makes it difficult to utilize in neutral. Grants 3 superchats on use. | |||
* {{input|214M}} has more horizontal range, making it the closest thing Suisei has to a zoning tool. Has a niche in oki as a fake out as the opponent usually expects {{input|214L}}. Less frame advantage than the L version, making it unsafe when used at point blank range. Also grants 3 superchats on use. | |||
|data= | |data= | ||
{{AttackData-IS | {{AttackData-IS | ||
| Line 384: | Line 477: | ||
|damage=65 | |damage=65 | ||
|guard=Mid | |guard=Mid | ||
|startup= | |startup=13~52 | ||
|active= | |active= | ||
|recovery= | |recovery=21 | ||
|advHit= | |advHit= | ||
|advBlock= | |advBlock=-3~ | ||
|description= | |description= | ||
}} | }} | ||
{{AttackData-IS | {{AttackData-IS | ||
|version=214L (close/level 2) | |version=214L (close/level 2) | ||
|damage= | |damage=25x3 | ||
|guard=Mid | |guard=Mid | ||
|startup= | |startup=60~83 | ||
|active= | |active= | ||
|recovery= | |recovery=20 | ||
|advHit= | |advHit= | ||
|advBlock=+31 | |advBlock=+31 | ||
| Line 404: | Line 497: | ||
{{AttackData-IS | {{AttackData-IS | ||
|version=214L (close/level 3) | |version=214L (close/level 3) | ||
|damage= | |damage=25x5 | ||
|guard=Mid | |guard=Mid | ||
|startup= | |startup=86~98 | ||
|active= | |active= | ||
|recovery= | |recovery=9 | ||
|advHit= | |advHit= | ||
|advBlock=+21~+72 | |advBlock=+21~+72 | ||
| Line 417: | Line 510: | ||
|damage=30 | |damage=30 | ||
|guard=Mid | |guard=Mid | ||
|startup= | |startup=11f~39f | ||
|active= | |active= | ||
|recovery= | |recovery=26 | ||
|advHit= | |advHit= | ||
|advBlock= | |advBlock=-8~ | ||
|description= | |description= | ||
}} | }} | ||
{{AttackData-IS | {{AttackData-IS | ||
|version=214M (far/level 2) | |version=214M (far/level 2) | ||
|damage= | |damage=25x3 | ||
|guard=Mid | |guard=Mid | ||
|startup= | |startup=57~80 | ||
|active= | |active= | ||
|recovery= | |recovery=25 | ||
|advHit= | |advHit= | ||
|advBlock=+25~+28 | |advBlock=+25~+28 | ||
| Line 437: | Line 530: | ||
{{AttackData-IS | {{AttackData-IS | ||
|version=214M (far/level 3) | |version=214M (far/level 3) | ||
|damage= | |damage=25x5 | ||
|guard=Mid | |guard=Mid | ||
|startup= | |startup=85~109 | ||
|active= | |active= | ||
|recovery= | |recovery=7 | ||
|advHit= | |advHit= | ||
|advBlock=+24~+70 | |advBlock=+24~+70 | ||
| Line 451: | Line 544: | ||
{{MoveData | {{MoveData | ||
|image=ISD_Suisei_214H.png | |image=ISD_Suisei_214H.png | ||
|caption= | |hitbox=ISD_Suisei_214H_hitbox.png | ||
|caption=Go my child, and hold down the neutral | |||
|name=STELLAR into the GALAXY | |name=STELLAR into the GALAXY | ||
|input= | |input={{NotationIcon-IS|214}} '''+''' {{NotationIcon-IS|h}} | ||
|data= | |data= | ||
{{AttackData-IS | {{AttackData-IS | ||
|damage= | |damage=20x3 | ||
|guard=Mid | |guard=Mid | ||
|startup= | |startup=42, projectile hits on 50~159 | ||
|active= | |active= | ||
|recovery= | |recovery=0 | ||
|advHit= | |advHit= | ||
|advBlock=+ | |advBlock=+54 | ||
|description= | |description= | ||
* Costs 1 Star Meter and grants 4 superchats on use | |||
Incredibly oppressive projectile that eats wakeup reversals and enables Suisei's best mixups. If you really are tired of playing neutral you can spend the bar just to walk your opponent down with it backing you up as it travels forward with Suisei. Works as an alternative oki option when Suisei doesn't have superchat to cancel into a fully charged {{input|214L}}. | |||
* The orb spawns almost directly above Suisei, | * Has a projectile durability of 1x3 | ||
* The orb spawns almost directly above Suisei, near where 2H launches the opponent in the corner. You can use the orb as an attempt to catch teching into buttons or as a combo extender in the corner because of this, but it's generally not worth the meter. | |||
}} | }} | ||
}} | }} | ||
| Line 473: | Line 568: | ||
{{MoveData | {{MoveData | ||
|image=IS_Suisei_22L.png | |image=IS_Suisei_22L.png | ||
|hitbox=IS_Suisei_22L_hitbox.png | |||
|caption= | |caption= | ||
|name=Hoshispin (Horizontal) | |name=Hoshispin (Horizontal) | ||
|input= | |input={{NotationIcon-IS|2}} {{NotationIcon-IS|2}} '''+''' {{NotationIcon-IS|l}} | ||
|data= | |data= | ||
{{AttackData-IS | {{AttackData-IS | ||
|damage=106 (20 | |damage=106(20, 86) | ||
|guard=Air Unblockable | |guard=Air Unblockable | ||
|startup= | |startup=5 | ||
|active= | |active=8 | ||
|recovery= | |recovery=18(hit) | ||
20(whiff) | |||
|advHit=~+55 | |advHit=~+55 | ||
|advBlock= | |advBlock= | ||
|description= Horizontal air unblockable hitgrab. Staple combo tool. | |description= | ||
* Grants 4 superchats on use | |||
Horizontal air unblockable hitgrab. Staple combo tool. | |||
* Causes a ground bounce the first time it's used in a combo | |||
* 5 frames of startup makes it a great anti air on reaction | |||
* Holding 66 before landing allows Suisei to instantly dash the moment you land making it possible to cross under opponent and continue your combo with {{input|5M}} or {{input|2M}} | |||
}} | }} | ||
}} | }} | ||
| Line 493: | Line 594: | ||
{{MoveData | {{MoveData | ||
|image=IS_Suisei_22M.png | |image=IS_Suisei_22M.png | ||
|hitbox=IS_Suisei_22M_hitbox.png | |||
|caption= | |caption= | ||
|name=Hoshispin (Vertical) | |name=Hoshispin (Vertical) | ||
|input= | |input={{NotationIcon-IS|2}} {{NotationIcon-IS|2}} '''+''' {{NotationIcon-IS|m}} | ||
|data= | |data= | ||
{{AttackData-IS | {{AttackData-IS | ||
|damage= | |damage=94(0, 94) | ||
|guard=Air Unblockable | |guard=Air Unblockable | ||
|startup= | |startup=8 | ||
|active= | |active=16 | ||
|recovery= | |recovery=12(hit) | ||
28(whiff) | |||
|advHit=+59 | |advHit=+59 | ||
|advBlock= | |advBlock= | ||
|description= Vertical air unblockable hitgrab that leads to a lengthy hard knockdown. Staple combo ender. | |description= | ||
* Grants 5 superchats on use | |||
Vertical air unblockable hitgrab that leads to a lengthy hard knockdown. Staple combo ender. Superchat cancelling into max charge {{input|214L}} allows Suisei to be massively plus and run her mixup relatively risk-free. | |||
* Causes a very small ground bounce, which can be followed up on by certain specials such as 236L or 236H by using a Superchat Cancel. It's not recommended to do this though, as the small amount of extra damage is generally not worth your meter or the loss of okizeme potential. | |||
}} | }} | ||
}} | }} | ||
| Line 513: | Line 618: | ||
{{MoveData | {{MoveData | ||
|image=IS_Suisei_22H.png | |image=IS_Suisei_22H.png | ||
|hitbox=IS_Suisei_22H_hitbox.png | |||
|caption= | |caption= | ||
|name=Psycho Hoshispin | |name=Psycho Hoshispin | ||
|input= | |input={{NotationIcon-IS|2}} {{NotationIcon-IS|2}} '''+''' {{NotationIcon-IS|h}} | ||
|data= | |data= | ||
{{AttackData-IS | {{AttackData-IS | ||
|damage=119 ( | |damage=119(25, 94) | ||
|guard= | |guard= | ||
|startup= | |startup=20 | ||
|active= | |active=2 | ||
|recovery= | |recovery=12(hit) | ||
52(whiff) | |||
|advHit=+ | |advHit=+59 | ||
|advBlock= | |advBlock= | ||
|invul= (1~46) {{Property-IS|projectile}} | |||
|description= | |description= | ||
* Costs 1 Star Meter and grants 5 superchats on use | |||
* Projectile invulnerable | * Projectile invulnerable | ||
Makes for a | Makes for a gimmicky reversal against some projectile-based oki, but its primary use is helping you blow through mid-range zoning. | ||
* Does not have superfreeze and quite fast, making it a decent mixup option from a distance | |||
* Reward on hit is the same as 22M | |||
}} | }} | ||
}} | }} | ||
| Line 536: | Line 645: | ||
{{MoveData | {{MoveData | ||
|image=IS_Suisei_22S.png | |image=IS_Suisei_22S.png | ||
|caption= | |hitbox=IS_Suisei_22S_hitbox.png | ||
|caption=The true power of this move lies in its dash cancel | |||
|name=Selfish of a Rough Stone | |name=Selfish of a Rough Stone | ||
|input= | |input={{NotationIcon-IS|2}} {{NotationIcon-IS|2}} '''+''' {{NotationIcon-IS|s}} | ||
|data= | |data= | ||
{{AttackData-IS | {{AttackData-IS | ||
|damage= | |damage=5, 45 (per comet) | ||
|guard=Mid | |guard=Mid | ||
|startup= | |startup= | ||
| Line 549: | Line 659: | ||
|advBlock= | |advBlock= | ||
|description= | |description= | ||
* | * Costs 1 Star Meter and grants 3 superchats on use during startup but doesn't use superchat to cancel from a special. | ||
* Has three stages. Upon reaching the third stage, Suisei summons 5 comets from the sky. | * Progressively builds more superchats if not cancelled, starting with three instances of 5 superchats, going into three instances of 10 superchats, and ending with 1 superchat. | ||
* Has three stages. Upon reaching the third stage, Suisei summons 5 comets from the sky starting from the edge of the screen. | |||
** Comet summon is highly impractical due to its slow startup, long charge time and low damage. You'll either need an assist that puts the opponent in long blockstun (such as Miko) or have them stand still for 4 full seconds total to pull this off. | |||
* Can be canceled into a forward or backdash at any point during the animation and retain the current charge level. | * Can be canceled into a forward or backdash at any point during the animation and retain the current charge level. | ||
** The forward dash can additionally be canceled into any other singular normal, key word singular. Said move | ** The forward dash can additionally be canceled into any other singular normal, key word singular. Said move cannot be cancelled into other normals or specials, so if you want to continue pressure or combo you must {{input|2L}} and be 0 on block or {{input|2H}} > jump cancel. | ||
** Can be canceled into from other specials. 22S~6 can be as a way to use Star Power rather than a SCC to continue your turn or combo after moves like 236L. | ** Can be canceled into from other specials. {{input|22S~6}} can be as a way to use Star Power rather than a SCC to continue your turn or combo after moves like {{input|236L}}. | ||
** This is commonly referred to as "Idol Step" | ** This is commonly referred to as "Idol Step" | ||
** 22S~[6] takes 12f before the dash cancel itself. | ** {{input|22S~[6]}} takes 12f before the dash cancel itself. | ||
** 5H/2M > 22S~[6] > 5M is a true blockstring. | ** {{input|5H/2M > 22S~[6] > 5M}} is a true blockstring. | ||
* When doing {{input|22S}} without a star meter required this results into cancelling any action you were doing previously into a {{input|22M}} | |||
A short tech video by Frexia about 22S cancel: https://youtu.be/C6HOGX38Mdc. Do note the section on 5M is outdated. | ** Has the same restriction as mentioned meaning you wont be able to get {{input|214[L]}} oki | ||
** Results in some moves which don't have an oki without resources, namely {{input|236M}} and {{input|236H}} to get one resulting in having extra damage and better situation no matter the resources | |||
A short tech video by Frexia about 22S cancel: https://youtu.be/C6HOGX38Mdc. Do note the section on {{input|5M}} is outdated. | |||
}} | }} | ||
}} | }} | ||
| Line 565: | Line 679: | ||
{{MoveData | {{MoveData | ||
|image=IS_Suisei_jS.png | |image=IS_Suisei_jS.png | ||
|hitbox=IS_Suisei_jS_hitbox.png | |||
|caption=Bandit Revolver! | |caption=Bandit Revolver! | ||
|name=Stellar Slice | |name=Stellar Slice | ||
|input= | |input='''Air Only''' {{NotationIcon-IS|s}} | ||
|data= | |data= | ||
{{AttackData-IS | {{AttackData-IS | ||
|damage=85 | |damage=85 | ||
|guard=High | |guard=High | ||
|startup= | |startup=26 | ||
|active= | |active=6 | ||
|recovery= | |recovery=Until Landing + (0~6) | ||
|advHit=+ | |advHit=+3~+17 | ||
|advBlock= | |advBlock=-7~+7 | ||
|description= | |description= | ||
* Grants 3 superchats on use | |||
* Using L, M or H for this move will not affect its properties in any way. There is only one version of the move, but it can be done using any of the attack buttons for some reason. | * Using L, M or H for this move will not affect its properties in any way. There is only one version of the move, but it can be done using any of the attack buttons for some reason. | ||
* | * Use the simple input (j.S) in order to do this move instantly off the ground. | ||
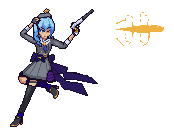
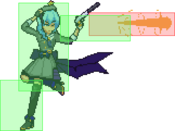
A forward moving axe attack that looks similar to her 236M. Overhead that gives you a full combo on hit. Plus on block when buffered during jump startup (2f window) or hitting with the late active frames. When done low to the ground it's a fantastic approach option, functioning like an instant airdash. Good combo fodder too. Overall a very strong move. | |||
Something fairly unique about this move is that it has variable landing recovery depending on the height that it was executed at. Near the ground, it has the guaranteed landing recovery of 6 frames, but when used midway through a jump or at the apex of a jump, it can have anywhere between 0 and 6 frames of landing recovery. If the special is executed at a height where the total frames of the move exceed 47, its landing recovery will be replaced with a new animation that lasts 2 frames. If the special is executed at a height where its total frames are exactly 47 as Suisei touches the ground, then landing recovery will be 0 frames and no additional animation will play. | |||
Short list of frame advantage on block situations as there is a total variance of 15 frames | |||
* Near-apex height j.S early active: -7 | |||
* Near-apex height j.S latest active: -1 | |||
* Middle height j.S early active: -4 | |||
* Middle height j.S latest active: +2 | |||
* Instant air j.S early active: +1 | |||
* Instant air j.S latest active: +7 | |||
}} | }} | ||
}} | }} | ||
| Line 587: | Line 713: | ||
{{MoveData | {{MoveData | ||
|name=SPACE for Virtual GHOST | |name=SPACE for Virtual GHOST | ||
|input= | |input={{NotationIcon-IS|236}} '''+''' {{NotationIcon-IS|s}} | ||
|image= | |image=IS_Suisei_236S_ground.png | ||
|hitbox=IS_Suisei_236S_ground_hitbox.png | |||
|caption= | |caption= | ||
|data= | |data= | ||
{{AttackData-IS | {{AttackData-IS | ||
|damage= | |damage=300(280, 20) | ||
|guard= | |guard= | ||
|startup= | |startup=8 | ||
|active= | |active=8 | ||
|recovery= | |recovery=26 | ||
|advHit= | |advHit=65 | ||
|advBlock= | |advBlock= | ||
|description= | |invul= | ||
|description= | |||
* Costs 2 Star Meter and grants 4 superchats on use. | |||
* Command grab with a long range dash. No superfreeze on startup makes it unreactable at close range. | |||
* Side switches on hit, meaning it can be confirmed into a combo without extra resources if done while in corner. | |||
}} | }} | ||
}} | }} | ||
{{MoveData | {{MoveData | ||
|name=SPACE for Virtual GHOST | |name=SPACE for Virtual GHOST | ||
|input= | |input={{NotationIcon-IS|214}} '''+''' {{NotationIcon-IS|s}} | ||
|image= | |image=IS_Suisei_236S_air.png | ||
|hitbox=IS_Suisei_236S_air_hitbox.png | |||
|caption= | |caption= | ||
|data= | |data= | ||
{{AttackData-IS | {{AttackData-IS | ||
|damage= | |damage=300(280, 20) | ||
|guard= | |guard=Air Unblockable | ||
|startup= | |startup=8 | ||
|active= | |active=28 | ||
|recovery= | |recovery=10+4L | ||
|advHit= | |advHit=65 | ||
|advBlock= | |advBlock= | ||
| | |invul= | ||
|description= | |||
* Minimum damage: 142 | |||
* Costs 2 Star Meter and grants 4 superchats on use. | |||
Anti-air command grab. High minimum damage makes it a good combo ender. Can be done raw to catch the opponent jumping, however {{input|22L}} serves as a better anti-air. | |||
* Side switches on hit, meaning it can be confirmed into a combo without extra resources if done while in corner. | |||
| | |||
* | |||
* | |||
* | |||
}} | }} | ||
}} | }} | ||
==Colors== | ==Colors== | ||
| Line 941: | Line 761: | ||
{{ColorGallery/Color|1| text= Original Outfit}} | {{ColorGallery/Color|1| text= Original Outfit}} | ||
{{ColorGallery/Color|2| text= Cosplay 1<hr>{{Small|Anemachi}}}} | {{ColorGallery/Color|2| text= Cosplay 1<hr>{{Small|Anemachi}}}} | ||
{{ColorGallery/Color|3| text= Cosplay 2}} | {{ColorGallery/Color|3| text= Cosplay 2<hr>{{Small|Tokoyami Towa (Hololive)}}}} | ||
{{ColorGallery/Color|4| text= Cosplay 3<hr>{{Small|Nanashi Mumei (Hololive)}}}} | {{ColorGallery/Color|4| text= Cosplay 3<hr>{{Small|Nanashi Mumei (Hololive)}}}} | ||
{{ColorGallery/Color|5| text= Cosplay 4<hr>{{Small|Alternate Outfit}}}} | {{ColorGallery/Color|5| text= Cosplay 4<hr>{{Small|Alternate Outfit}}}} | ||
{{ColorGallery/Color|6| text= Cosplay 5<hr>{{Small|Inui Toko (Nijisanji)}}}} | {{ColorGallery/Color|6| text= Cosplay 5<hr>{{Small|Inui Toko (Nijisanji)}}}} | ||
{{ColorGallery/Color|7| text= Cosplay 6<hr>{{Small|Sion Eltnam Atlasia (Melty Blood)}}}} | {{ColorGallery/Color|7| text= Cosplay 6<hr>{{Small|Sion Eltnam Atlasia (Melty Blood)}}}} | ||
{{ColorGallery/Color|8| text= Cosplay 7<hr>{{Small|Kazama Iroha (Hololive)}}}} | |||
{{ColorGallery/Color|9| text= Cosplay 8<hr>{{Small|Sakura Miko (Hololive)}}}} | |||
{{ColorGallery/Color|10| text= Cosplay 9<hr>{{Small|OG Outfit (Origin)}}}} | |||
{{ColorGallery/Color|11| text= Cosplay 10<hr>{{Small|Template Outfit (Origin)}}}} | |||
}} | }} | ||
==Navigation== | ==Navigation== | ||
{{CharacterSubnav-IS}} | |||
{{Navbox-IS}} | {{Navbox-IS}} | ||
[[Category:Suisei Hoshimachi]] | [[Category:Suisei Hoshimachi]] | ||
[[Category:Idol Showdown]] | [[Category:Idol Showdown]] | ||
Latest revision as of 14:58, 18 June 2024
Stellar Stylish Idol - Saikou Pressure
Difficulty - ★★★☆☆☆
Introduction
In neutral, she has a few strong normals like 2M, a really useful low poke that can be converted off into a full combo - albeit requiring meter outside of point blank range - and 5M being so plus on hit it can link back into 5L. While she can have a hard time approaching her opponent, 236L and j.236X are solid tools - with 236L leading to a scary strike/throw situation even on block - and 3M can slide below some projectiles. Her 214L/M can disrupt the offense of more melee-focused characters, with the M version mostly useful for zoning purposes and 214L being a great way to get back your turn even if the opponent gets close. On top of that, 214H is a great way to force your way in against cornered opponents. Having a 5f command grab makes her strike/throw game scary to deal with.
However, it's when she gets in that Suisei really shines. Her 214H can also eat through reversals and by varying the time at which the Orb (214H) hits, various mixup options open to her - high/low, crossup/no crossup, meaty/throw.

Suisei is a rushdown setplay character with explosive high risk, high reward neutral skip tools and powerful projectile okizeme. Boasting great normals for stagger pressure, and an amazing command grab, she's a close range killer who's no slouch at the midrange game either. |
| Pick if you like | Avoid if you dislike |
|---|---|
|
|
Recommended Collabs
Note: This sections only purpose to help guide new players towards assists that are generally considered useful for the character, and is subject to change as the game develops more. Don't be afraid to pick and try something else!
- Kiara is arguably one of the best collab choices for Suisei. Kiara provides anti-zoning utility for Suisei, who struggles greatly against characters that stay outside of her optimal range while throwing projectiles. Her off-collab lets Suisei ignore most projectiles for 6 seconds for a chance to approach. On top of that, Kiara's Call In acts as a great reversal which Suisei is in desperate need of and also works as a good lockdown tool for a high/low mix.
- Roboco is one of the most well-rounded collab choices for Suisei. While her missiles are not particularly impactful on her due to her oki game being already solid, having 3 bars max SC is pretty useful to convert into the standard routing from alternative starters, and for her damage routes. But where Robo really shines is with her 214S, the beam. This fullscreen super compensates for Suisei's lack of long range attacks, and can be used as a guaranteed punish against projectiles, giving Suisei a straightforward way to get out of zoning situations. It is also possible to use it defensively to stop the opponent's pressure, and offensively to combo off it for >600 damage routes.
- Suisei's business partner, Miko, trades neutral utility for strong collabs on offense and defense that are easy to use. Miko's tripping collab can force opponents off of you and back to neutral. If they get stuck blocking, it complements Suisei's already powerful strike/throw game. Her lava bucket collab can be used after 236L to lock opponents down for mix-ups. The lava won't let you convert off of any hits on its own, but it gives you time to sneak in some damage and also set up a fully charged 214[L] into a real high/low threat. You can even fully charge 22S if you're feeling cheeky (though you won't gain SC for it).
Moves
Standing Normals
5L
5L
|
|
|---|---|
Toggle Hitboxes Toggle Hitboxes
|
5M
5M Dab Dab
|
|
|---|---|
Toggle Hitboxes Toggle Hitboxes
|
5H
5H
|
|
|---|---|
Toggle Hitboxes Toggle Hitboxes
|
Crouching Normals
2L
2L
|
|
|---|---|
Toggle Hitboxes Toggle Hitboxes
|
2M
2M Your best friend in neutral Your best friend in neutral
|
|
|---|---|
Toggle Hitboxes Toggle Hitboxes
|
2H
2H
|
|
|---|---|
Toggle Hitboxes Toggle Hitboxes
|
3H
3H
|
|
|---|---|
Toggle Hitboxes Toggle Hitboxes
|
Jumping Normals
j.L
j.L
|
|
|---|---|
Toggle Hitboxes Toggle Hitboxes
|
j.M
j.M
|
|
|---|---|
Toggle Hitboxes Toggle Hitboxes
|
j.H
j.H
|
|
|---|---|
Toggle Hitboxes Toggle Hitboxes
|
Command Normals
3M
You got this trying to input dash 2M, didn't you? You got this trying to input dash 2M, didn't you?
|
|
|---|---|
Toggle Hitboxes Toggle Hitboxes
|
6H
Sui-ssor Kick! Sui-ssor Kick!
|
|
|---|---|
Toggle Hitboxes Toggle Hitboxes
|
Universal Mechanics
Throw
Toggle Hitboxes Toggle Hitboxes
|
|---|
Overhead
When the universal overhead frame data is in fact, universal When the universal overhead frame data is in fact, universal
|
|
|---|---|
Toggle Hitboxes Toggle Hitboxes
|
Superchat Reversal
Toggle Hitboxes Toggle Hitboxes
|
|---|
Special Attacks
236L
Toggle Hitboxes Toggle Hitboxes
|
|---|
236M
Greed Sever! Greed Sever!
|
|
|---|---|
Toggle Hitboxes Toggle Hitboxes
|
236H
Toggle Hitboxes Toggle Hitboxes
|
|---|
236G
Toggle Hitboxes Toggle Hitboxes
|
|---|
214L/M
Toggle Hitboxes Toggle Hitboxes
|
|---|
214H
Go my child, and hold down the neutral Go my child, and hold down the neutral
|
|
|---|---|
Toggle Hitboxes Toggle Hitboxes
|
22L
Toggle Hitboxes Toggle Hitboxes
|
|---|
22M
Toggle Hitboxes Toggle Hitboxes
|
|---|
22H
Toggle Hitboxes Toggle Hitboxes
|
|---|
22S
The true power of this move lies in its dash cancel The true power of this move lies in its dash cancel
|
|
|---|---|
Toggle Hitboxes Toggle Hitboxes
|
j.S
Bandit Revolver! Bandit Revolver!
|
|
|---|---|
Toggle Hitboxes Toggle Hitboxes
|
Super Star Attack
Toggle Hitboxes Toggle Hitboxes
|
|---|
Toggle Hitboxes Toggle Hitboxes
|
|---|
Colors
Anemachi
Tokoyami Towa (Hololive)
Nanashi Mumei (Hololive)
Alternate Outfit
Inui Toko (Nijisanji)
Sion Eltnam Atlasia (Melty Blood)
Kazama Iroha (Hololive)
Sakura Miko (Hololive)
OG Outfit (Origin)
Template Outfit (Origin)


