Acceleration of Suguri 2/Suguri
Introduction
Series protagonist. As such, she has a "hero" playing style. In other words, she's got a good balance of melee and ranged attacks. She can cancel some of her attacks very quickly and easily.
Overview
Suguri is what people usually consider an allrounder type of character which excels the most at midrange. Suguri performs well in most situations and doesn't really suffer from any unbeatable matchups.
Suguri has a lot of tools in her kit all of which allow you to play her however you want essentially, she performs equally well both played aggressive and defensive in most matchups, giving you a lot more freedom when it comes to approaching a matchup.
Her main gimmick however are her Sword Waves which act as a disjointed melee essentially. These are the core of Suguri's character and your ability to make use of them will heavily affect how well you perform on her.
Difficulty: Easy
Suguri is probably among the most beginner friendly characters, with a very versatile kit, good speed and only 4 instead of the usual 5 hyper options to worry about. Due to her archetype as an allrounder she can perform well in any matchup and never sits at a disadvantage huge enough to actually heavily struggle, making her perfect for learning the game and getting used to its mechanics. Even though Suguri is easy to get into however she's actually very hard to fully master, requiring very good spacing to make the best use out of her Sword Waves, so sticking with her is actually very rewarding.
Gameplan
Farming Meter
Suguri’s best meter farming tools are her rockets (Hold and Tap wB) such as as Charge Shot(Hold wA). rockets usually provide some level of poke/pressure while Charge Shot can act as some level of denial to some more reckless approaches.
Usually if you want to gain a meter lead you concentrate more on Charge Shot due to the before mentioned meter negativity of rockets. Using rockets only more if they act as some level of clear or if your opponent is being very spammy with their own clear type attack(like Sakis wA) to prevent them from feeding meter to your opponent.
Playing Agressive
Suguri has a fairly good offensive game with a variety of ways to set up hits and apply pressure to her opponent
As mentioned in her description: Suguri excels the most at midrange so you want to stay around just the outside of her melee range to Sword Wave(SPwA(ranged)) whenever you can. Knowing this, you usually want to sit around that range and work with rockets and Sword Waves to setup hits.
You can also work with neutral hyper to cut someone off and get your set up that way.
Using Hold wB from a distance and engaging together with it can also work out quite well but can also backfire more heavily due to the rng based movement of that attack. You can also use Hold wB rockets just like Tap ones to cut someone off and confirm from that.
Just closing in on someone with Sword Waves is also a very decent way to get hits in, their clear allows you to just slash through any ballistics your opponent might throw your way and the fact that you can move between them allows you to dodge any sort of lasers. You generally want to close in on someone near the “edges” of the circle.
Another thing you can do with Sword Waves is to threaten someone by shooting out a single Sword Wave and then try to read in which direction they'll dash away and cut them off by using the mini hops you can perform between Waves to get in front of them
Playing Defensive
Outside of her fairly solid offensive potential Suguri also does perfectly fine defensively. Essentially all of her tools work just as well in defense as they do in offense.
She can use her Tap wA laser to quickly deny any melee approaches or punish attacks with long animations and or recovery lag.
Using Sword Waves to deny incoming approaches works as well but you shouldn't be too obvious with it due to them being punishable if read with a half shield.
Lastly her rockets, mainly her hold wB rockets, provide quite the nice wall to hide behind while farming decent meter and also chunking quite nicely on confirm. Be sure to also not go too hard on these except they are used as clear due to their aforementioned meter feed.
Normal Moves
WA
Beam Rifle
- WA [Beam]
- Damage: 180
- Ammo Use: 25%
- Single shot of a beam rifle. Same as Sora's.
Charge Rifle
- Hold WA [Beam]
- Damage: 120+70×4
- Ammo Use: 0%
- A multi-hitting rifle shot. Charge time is about .5 seconds, less damage than Sora's. Once charged you can not dash.
Beam Rifle (Rapid Fire)
- Dash + WA [Beam]
- Damage: 120×3
- Ammo Use: 15%×3
- A 3 shot beam rifle spread.
WB
Missile (Homing)
- WB [Ballistic]
- Damage: 180×n
- Ammo Use: 8%×4
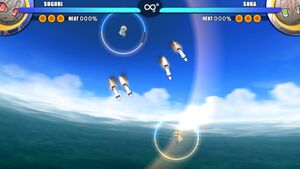
- Fires four homing missiles.
Missile (Wandering)
- Hold WB [Ballistic]
- Damage: 250×n
- Ammo Use: 10%×7
- Fires a spread of seven missiles forward. The missiles will abruptly change direction randomly during flight.
SP
Sword
- Short Range SP + WA [Direct]
- Damage: 180+60+120
- Ammo Use: 0%
- Suguri three hit melee combo, she has an alternate target combo with SA, SA, A, B.
Sword Arrow
- Long Range SP + WA [Direct]
- Damage: (80×n)×3
- Ammo Use: 25%×3
- Suguri fires up to three ungrazeable sword waves. Very good coverage and range. The waves can hit multiple times.
Sword Break
- SP + WB [Direct]
- Damage: 90×5
- Ammo Use: 0%
- Suguri lunges forth with her sword. The maximum range is about 3/4ths of the field but in reality you really want to use this close range, if at all.
Hyper Attacks
Hyper A: Hyper Rifle
- Hyper [Direct]
- Damage: 60×12
- Forward laser beam barrage. Can be dash cancelled after the beam appears to carry the the hyper's invulnerability over to her melee attacks.
Hyper B: Hyper Arrow
- WB + Hyper [Direct]
- Damage: 120×n
- A larger version of Sword Arrow. Has the same range but in practicality the effective range is less because of the knockback, you don't want to waste the wave on a single hit at the tip.
Hyper C: Hyper Sword
- SP + Hyper [Direct]
- Damage: 720
- A rushing charge stab with Suguri's sword.
Accel Hyper: Accel Burst
- SP + WB + Hyper [Direct]
- Damage: Red beams 50×n, Blue blast 70×n
- A huge blue laser explodes at the opponent, at the same time four red lasers on the edges appear and converge. The blue laser will not inflict any damage, only knockback. Maximum damage is 24 hits from the blue blast, 1680 maximum.
Combos
Meterless
- SPwA(3 Hit)
- SPwA(2 Hit) > wA > SPwB
- Tap wA > Dash Cancel > SPwA(2 Hit)> wA > SPwB
- Fairly simple confirm from Tap wA, you should however keep Suguri’s rather short melee range in mind when you decide if you want to go for this or not
- Tap wA > Dash Cancel > dwA
- Ranged follow up to Tap wA, generally speaking there shouldn't be too many situations where Tap wA confirms and you cant follow up with melee, but this works as somewhat of an alternative for when there are
- SPwA(Ranged) x3 > Dash Cancel > SPwA(3 Hit)
- Standard confirm from Sword Waves, for optimal damage you want to move towards your opponent with your Waves
Meter
Special Hyper should be your go-to if your opponent has equal or more meter than you, its rather quick damage does not allow your opponent to shield out of it, essentially guaranteeing at least 720 damage on confirm.
- SPwA(2 Hit) > SP.Hyper
- Most simple confirm into Special Hyper
- SPwA(2 Hit) > wA > SPwB > SP.Hyper
- Confirm also works from Suguris charge shot combo
- SPwA(Ranged) x3 > SP.Hyper
- Confirm off Sword Waves, requires you to be close enough after your 3rd sword wave for Special Hyper to connect
If your opponent however has no meter to spare in order to shield out its advised to go for Neutral Hyper instead. It's important to note however that Neutral Hyper can fail near walls and push people out its hitbox early on.
- SpwA(Ranged)x3 > N.Hyper > Dash Cancel > Short Delay SpwA(2 Hit) > wA > SPwB
- Fairly strong confirm from Sword Waves, can be a bit tricky to get used to due to the delay needed to perform Suguri’s charge shot combo, if you find yourself having difficulty doing it; just following up with the normal SPwA(3 Hit) is also an option.
- SPwA(2 Hit) > wA > N.Hyper > Dash Cancel > SpwA(2 Hit) > wA > SpwB
- Neutral Hyper confirm from a stray melee hit


