Kirby Fighters 2/Stages: Difference between revisions
Waffles ns (talk | contribs) |
(→Key) |
||
| (48 intermediate revisions by 4 users not shown) | |||
| Line 1: | Line 1: | ||
==Introduction== | ==Introduction== | ||
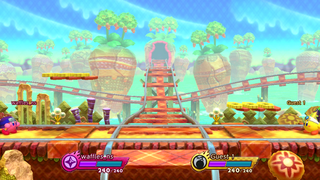
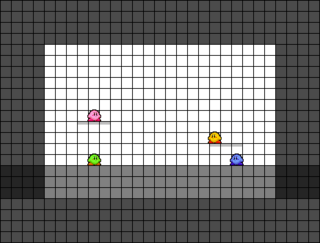
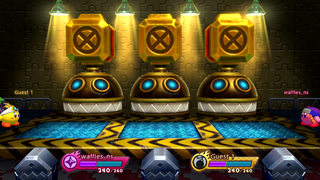
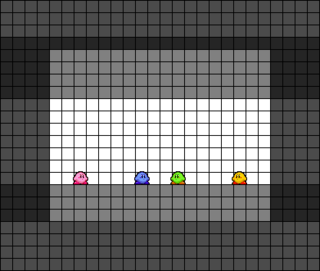
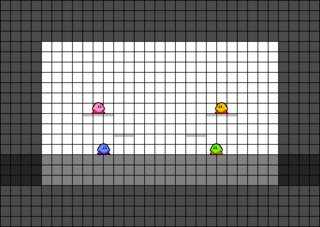
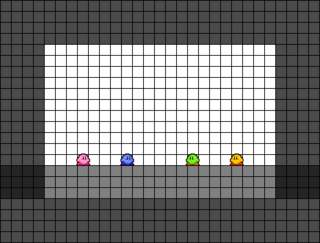
This page is dedicated to the selectable Stages in Kirby Fighters 2. Below is a paragraph describing how these measurements were obtained, followed by a key to help players understand the grid-based recreations pictured under each individual Stage. Below ''that'' is a table that has each Stage, their length, height, platform length, platform height, gaps between player spawns, and unlock condition listed (all of which you can sort the table by). | |||
== | ==Key== | ||
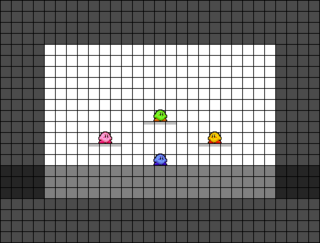
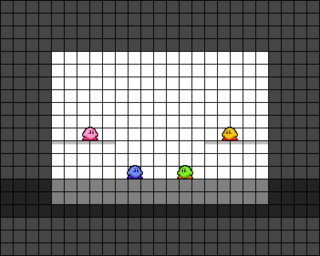
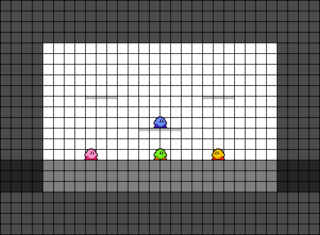
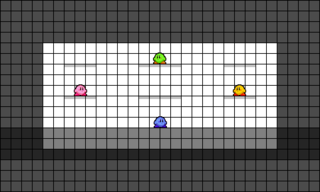
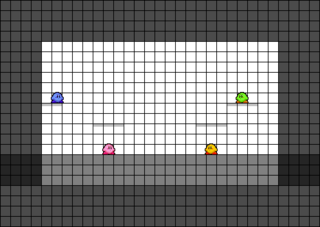
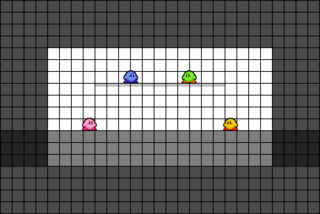
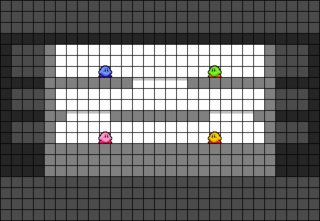
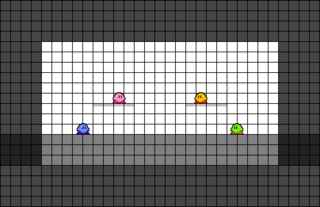
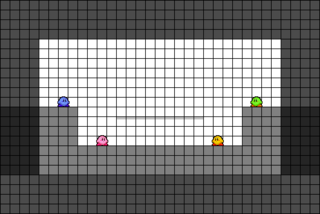
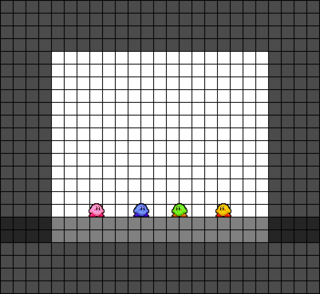
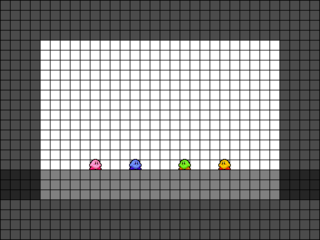
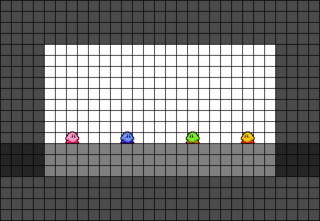
Each grid square in the below visualizations is accurate in size to the game, but the Kirbys are similarly sized for visual clarity. The below statistics for each stage were taken from the game themselves (big thanks to [https://twitter.com/firubiii firubii]!) | |||
*Kirby(pink and yellow): Sit in the two spawn points used in 1v1 matches. | |||
*Kirby( | *Kirby(blue and green): Blue sits in the third spawn point used in FFA matches (including 1v1v1s), and green sits in the fourth. Keep in mind who spawns where is decided at random. (verification TBD) | ||
* | *White/Light Gray: Invisible walls/ceilings. Projectiles can't bounce off of them, and you can't bonk your head on them from below by jumping. | ||
* | *Dark Gray/Black (thin): Semi-solid floors (platforms), meaning they can be platdropped through by pressing down when standing on one. | ||
* | *Dark Gray/Black (square): Solid floors/walls/ceilings. Projectiles *can* bounce off of their sides, and you *can* bonk your head on them from below if jumping normally. They only serve as walls or ceilings on Factory Tour(ceiling), Haldera Volcano and Castle Lololo(both), and Dedede Arena(walls). | ||
* | *For doubles spawns first team spawns to the left and right of pink kirby, and second team spawns to the left and right of yellow kirby | ||
* | *3v1 spawns may be added at a later date. | ||
==Stages (Individual)== | ==Stages (Individual)== | ||
{| class="wikitable" width="100%" | {| class="wikitable" width="100%" | ||
|+ Dimensions are measured in | |+ Dimensions are measured in Units. For platforms, height is how high up it is relative to the stage's lowest floor. | ||
! width="25%" | Images !! width=" | |+ Kirby's full jump ([A]) goes about 3 Units high, so he can reach platforms with height equal or lower than 3. | ||
|+ The existing 5 descriptions are still a work in progress. This notice will be gone when they aren't. | |||
! width="25%" | Images !! width="10%" | Length, Height !! width="15%" | Platform Length, Height !! Notes | |||
|- | |- | ||
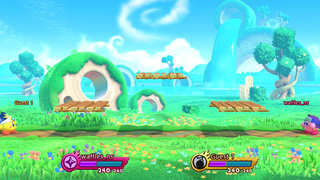
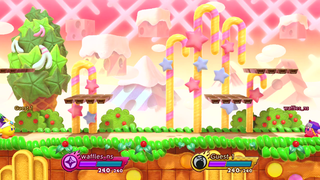
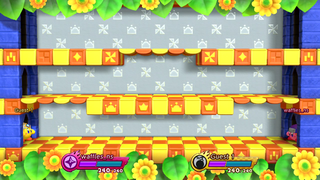
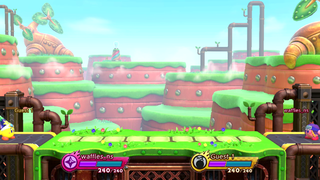
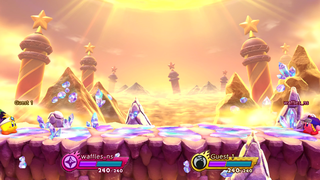
!Green Gardens[[File:KF2_Stage_GreenGardens.png|320px]] [[File: | !Green Gardens[[File:KF2_Stage_GreenGardens.png|320px]] [[File:GreenGreeting.png|320px]] | ||
| | | 21 long, 11 high | ||
| '''Sides:''' 3 | | '''Sides:''' 3 long, 2 high<br>'''Center:''' 3 long, 4 high | ||
| | | | ||
* Unlocked by | * Unlocked by reaching Fighters Rank 1. | ||
* Three-platform triangular layout, | * Three-platform triangular layout where the center is highest, similar to Smash's Battlefield stages. | ||
* Platforms are spaced 2 Units apart from each other, and the side platforms are 3 Units away from the invisible walls. | |||
* Players spawn on the centers of the side platforms, 9 Units apart. | |||
* Kirby can't reach the top platform from the floor with a full jump. | |||
|- | |- | ||
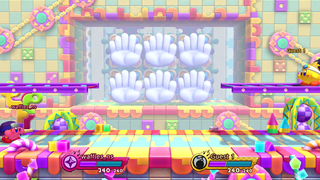
!Springy Hand Land[[File:KF2_Stage_SpringyHandLand.png|320px]] [[File: | !Springy Hand Land[[File:KF2_Stage_SpringyHandLand.png|320px]] [[File:BoyoyonHand.png|320px]] | ||
| 17 | | 17 long, 10 high | ||
| '''Sides:''' 5 | | '''Sides:''' 5 long, 3 high | ||
| | | | ||
* Unlocked by | * Unlocked by reaching Fighters Rank 1. | ||
* Two platforms extend from the invisible walls at the same elevation. | |||
* Platforms are spaced 7 Units apart. | |||
* Players spawn near the centers of the platforms, slightly closer to the center of the Stage, 10 Units apart. | |||
* Kirby can reach the platforms from the floor with a full jump. | |||
|- | |- | ||
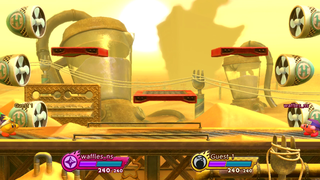
!Dried-up Sea[[File:KF2_Stage_DriedupSea.png|320px]] [[File: | !Dried-up Sea[[File:KF2_Stage_DriedupSea.png|320px]] [[File:GigantGround.png|320px]] | ||
| 22 | | 22 long, 11 high | ||
| '''Sides:''' 3 | | '''Sides:''' 3 long, 6 high<br>'''Center:''' 4 long, 3 high | ||
| | | | ||
* | * Unlocked by reaching Fighters Rank 1. | ||
* An inverse-triangle platform layout where the center is lowest, somewhat like Smash's Town and City stage's initial layout. | |||
* Platforms are spaced 2 Units apart from each other with a 3 Unit vertical gap, and the side platforms are 4 Units away from the invisible walls. | |||
* Players spawn below the ends of the side platforms, Units apart. If Yo-Yo were to Gazer Spiral(28B) when a match starts, he'll rise and stop on the platform. | |||
* Kirby can reach the center platform from the floor with a single jump. | |||
|- | |- | ||
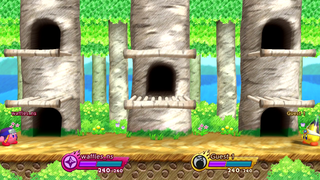
!Coo's Forest[[File:KF2_Stage_CoosForest.png|320px]] [[File: | !Coo's Forest[[File:KF2_Stage_CoosForest.png|320px]] [[File:ForestCoo.png|320px]] | ||
| | | 22 long, 8 high | ||
| '''Sides:''' 3 / | | '''Sides:''' 3 long, 3/6 high<br>'''Centers:''' 4 long, 3/6 high | ||
| | | | ||
* | * Unlocked by reaching Fighters Rank 25. | ||
* A three-layer layout with six platforms on that rest at two different elevations. | |||
* Platforms are spaced 4 Units apart are 2 Units from the invisible walls. The higher platforms are 3 Units above the lower ones, which are 3 Units above the floor. | |||
* Players spawn on the centers of the low side platforms. | |||
* Kirby can reach the lower three platforms from the floor with a full jump. | |||
|- | |- | ||
!Gourmet Go Go[[File:KF2_Stage_GourmetGoGo.png|320px]] [[File: | !Gourmet Go Go[[File:KF2_Stage_GourmetGoGo.png|320px]] [[File:GourmetRace.png|320px]] | ||
| | | 23 long, 11 high | ||
| '''Left:''' 2 | | '''Left:''' 2 long, 5 high<br>'''Others:''' 4 long, 3/5 high | ||
| | | | ||
* | * Unlocked by reaching Fighters Rank 3. | ||
* A unique three-layer layout where the leftmost platform is the only one 2 Units long. The higher platforms are 2 Units above the lower ones, which are 3 Units above the floor and are both 4 Units long. | |||
* The center platforms are spaced 7 Units apart, and the leftmost platform is 3 apart from the left center platform and stops at the left invisible wall. The rightmost platform is next to (and above) the right center platform and is 2 Units from the right invisible wall. | |||
* Players spawn below the centers of the center platforms 10 Units away. | |||
* Kirby can reach the lower platforms from the floor with a single jump. | |||
|- | |- | ||
!Butter Building[[File:KF2_Stage_ButterBuilding.png|320px]] [[File: | !Butter Building[[File:KF2_Stage_ButterBuilding.png|320px]] [[File:ButterBuilding.png|320px]] | ||
| 19 | | 19 long, 7 high | ||
| '''Center:''' 11 | | '''Center:''' 11 long, 4 high<br> | ||
| | | | ||
* | * Unlocked by reaching Fighters Rank 35. | ||
|- | |- | ||
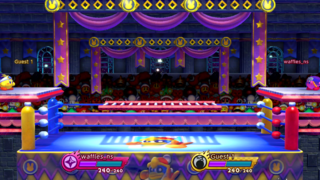
!Waddle Dee Train Tracks[[File:KF2_Stage_WaddleDeeTrainTracks.png|320px]] [[File: | !Waddle Dee Train Tracks[[File:KF2_Stage_WaddleDeeTrainTracks.png|320px]] [[File:RunawayTrain.png|320px]] | ||
| 21 | | 21 long, 11 high | ||
| '''Left:''' 3 | | '''Left:''' 3 long, 4 high<br>'''Right:''' 3 long, 2 high | ||
| | | | ||
* | * Unlocked by reaching Fighters Rank 23. | ||
|- | |- | ||
!Factory Tour[[File:KF2_Stage_FactoryTour.png|320px]] [[File: | !Factory Tour[[File:KF2_Stage_FactoryTour.png|320px]] [[File:Factory.png|320px]] | ||
| 18 | | 18 long, 7 high | ||
| '''No platforms'''<br> | | '''No platforms'''<br> | ||
| | | | ||
* | * Unlocked by reaching Fighters Rank 37. | ||
|- | |- | ||
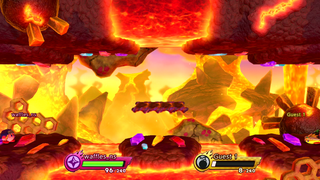
!Haldera Volcano[[File:KF2_Stage_HalderaVolcano.png|320px]] [[File: | !Haldera Volcano[[File:KF2_Stage_HalderaVolcano.png|320px]] [[File:Volcano.png|320px]] | ||
| | | 26 long, 6-8 high | ||
| '''Center:''' 4 | | '''Center:''' 4 long, 3 high<br> | ||
| | | | ||
* | * Unlocked by reaching Fighters Rank 7. | ||
|- | |- | ||
!Castle Lololo[[File:KF2_Stage_CastleLololo.png|320px]] [[File: | !Castle Lololo[[File:KF2_Stage_CastleLololo.png|320px]] [[File:CastleLololo.png|320px]] | ||
| 19 | | 19 long, 9 high | ||
| '''Left and Right:''' 4 | | '''Left and Right:''' 4 long, 3 high<br>'''Center:''' 5 long, 6 high | ||
| | | | ||
* | * Unlocked by reaching Fighters Rank 14. | ||
|- | |- | ||
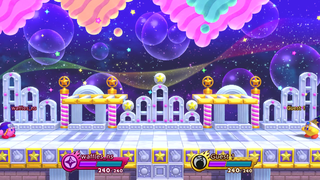
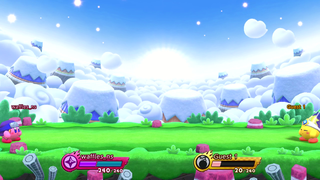
!Bubbly Clouds[[File:KF2_Stage_BubblyClouds.png|320px]] [[File: | !Bubbly Clouds[[File:KF2_Stage_BubblyClouds.png|320px]] [[File:BubblyClouds.png|320px]] | ||
| | | 23 long, 9 high | ||
| '''Sides:''' 4 | | '''Sides:''' 4 long, 3 high<br> | ||
| | | | ||
* | * Unlocked by reaching Fighters Rank 5. | ||
|- | |- | ||
!Dedede Arena[[File:KF2_Stage_DededeArena.png|320px]] [[File: | !Dedede Arena[[File:KF2_Stage_DededeArena.png|320px]] [[File:DededeRing.png|320px]] | ||
| | | 25 long, 11 high | ||
| '''Left and Right sides:''' | | '''Left and Right sides:''' 4 long, 4 high<br>'''Center:''' 9 long, 3 high | ||
| | | | ||
* | * Unlocked by reaching Fighters Rank 29. | ||
|- | |- | ||
!Dyna Blade's Nest[[File:KF2_Stage_DynaBladesNest.png|320px]] [[File: | !Dyna Blade's Nest[[File:KF2_Stage_DynaBladesNest.png|320px]] [[File:DynaBlade.png|320px]] | ||
| 17 | | 17 long, 13 high | ||
| '''None'''<br> | | '''None'''<br> | ||
* | | | ||
* Unlocked by reaching Fighters Rank 42. | |||
|- | |- | ||
!Gigavolt[[File:KF2_Stage_Gigavolt.png|320px]] [[File: | !Gigavolt[[File:KF2_Stage_Gigavolt.png|320px]] [[File:Gigavolt.png|320px]] | ||
| | | 24 long, 13 high | ||
| '''None:''' | | '''None:''' | ||
| | | | ||
* | * Unlocked by reaching Fighters Rank 40. | ||
|- | |- | ||
!Jambastion Entrance[[File:KF2_Stage_JambastionEntrance.png|320px]] [[File: | !Jambastion Entrance[[File:KF2_Stage_JambastionEntrance.png|320px]] [[File:Jambastion.png|320px]] | ||
| | | 23 long, 11 high | ||
| '''Left and Right:''' 4 | | '''Left and Right:''' 3 long, 4 high<br>'''Center:''' 2 long, 2 high | ||
| | | | ||
* | * Unlocked by reaching Fighters Rank 49. | ||
|- | |- | ||
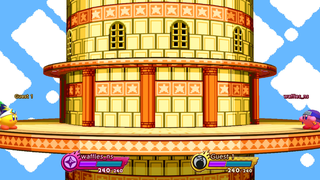
!The Empyrean[[File:KF2_Stage_TheEmpyrean.png|320px]] [[File: | !The Empyrean[[File:KF2_Stage_TheEmpyrean.png|320px]] [[File:DededeTower_DededeTower2_Summit_Hyperspace.png|320px]] | ||
| 21 | | 21 long, 11 high | ||
| '''None''' | | '''None''' | ||
| | | | ||
* | * Unlocked by reaching Fighters Rank 72. | ||
|- | |- | ||
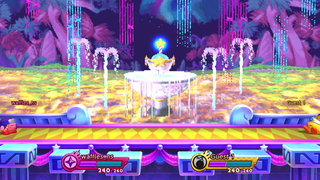
!Fountain of Dreams[[File:KF2_Stage_FountainofDreams.png|320px]] [[File: | !Fountain of Dreams[[File:KF2_Stage_FountainofDreams.png|320px]] [[File:RainbowResort.png|320px]] | ||
| 21 | | 21 long, 11 high | ||
| '''None''' | | '''None''' | ||
| | | | ||
* | * Unlocked by reaching Fighters Rank 81. | ||
|- | |- | ||
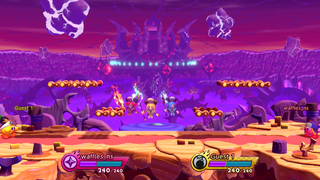
!Stage of Destined Rivals[[File:KF2_Stage_StageofDestinedRivals.png|320px]] [[File: | !Stage of Destined Rivals[[File:KF2_Stage_StageofDestinedRivals.png|320px]] [[File:DededeTower_DededeTower2_Summit_Hyperspace.png|320px]] | ||
| 21 | | 21 long, 11 high | ||
| '''None''' | | '''None''' | ||
| | | | ||
* | * Unlocked by completing Story Chapter 4. | ||
|- | |- | ||
!Stage of the Partners[[File:KF2_Stage_StageofthePartners.png|320px]] [[File: | !Stage of the Partners[[File:KF2_Stage_StageofthePartners.png|320px]] [[File:DededeTower_DededeTower2_Summit_Hyperspace.png|320px]] | ||
| 21 | | 21 long, 11 high | ||
| '''None''' | | '''None''' | ||
| | | | ||
* | * Unlocked by completing Story Chapter 5. | ||
|- | |- | ||
!Training[[File:KF2_Stage_Training.png|320px]] [[File: | !Training[[File:KF2_Stage_Training.png|320px]] [[File:Practice.png|320px]] | ||
| 19 | | 19 long, 11 high | ||
| '''None'''<br> | | '''None'''<br> | ||
| | | | ||
* | * Unlocked by reaching Fighters Rank 1. | ||
|} | |||
==Stages (Table)== | |||
All numbers are in Units. Green Gardens is 21 Units long and 11 tall, with platforms 3 Units long and 2 high(4 for the center platform). Kirby's full jump raises him ~3 Units, meaning he can jump to any platform that's 3 (or less) Units above the floor he's on. | |||
{| class="wikitable sortable" | |||
|- | |||
! Stage name !! Length !! Height !! Platform length !! Platform height !! Gap between player spawns !! Unlocked at Fighters Rank !! Total Floor | |||
|- | |||
| Green Gardens || 21 || 11 || 3 (all) || 2 (sides), 4 (center) || 9 || 1 || 30 | |||
|- | |||
| Springy Hand Land || 17 || 10 || 5 (both) || 3 (both) || 10 || 1 || 27 | |||
|- | |||
| Dried-up Sea || 22 || 11 || 3 (sides), 4 (center) || 6 (sides), 3 (center) || 12 || 1 || 32 | |||
|- | |||
| Coo's Forest || 22 || 8 || 3 (sides), 4 (centers) || 3 (lower), 6 (higher) || 14 || 25 || 42 | |||
|- | |||
| Gourmet Go Go || 23 || 11 || 2 (left), 4 (rest) || 5 (sides), 3 (center) || 10 || 3 || 37 | |||
|- | |||
| Butter Building || 19 || 7 || 11 || 4 || 11 || 35 || 30 | |||
|- | |||
| Waddle Dee Train Tracks || 21 || 11 || 3 (both) || 4 (left), 2 (right) || 10 || 23 || 27 | |||
|- | |||
| Factory Tour || 18 || 7 || 0 || 0 || 12 || 37 || 18 | |||
|- | |||
| Haldera Volcano || 26 || 6-8 || 4 || 3 || 13 || 7 || 22 | |||
|- | |||
| Castle Lololo || 19 || 9 || 4 (sides), 5 (center) || 3 (sides), 6 (center) || 9 || 14 || 57 | |||
|- | |||
| Bubbly Clouds || 23 || 9 || 4 (both) || 3 (both) || 7 || 5 || 31 | |||
|- | |||
| Dedede Arena || 25 || 11 || 4 (sides), 9 (center) || 4 (sides), 3 (center) || 10 || 29 || 34 | |||
|- | |||
| Dyna Blade's Nest || 17 || 13 || 0 || 0 || 9 || 42 || 17 | |||
|- | |||
| Gigavolt || 24 || 13 || 0 || 0 || 10 || 40 || 24 | |||
|- | |||
| Jambastion Entrance || 23 || 11 || 3 (sides), 2 (centers) || 4 (sides), 2 (centers) || 12 || 49 || 33 | |||
|- | |||
| The Empyrean || 21 || 11 || 0 || 0 || 17 || 72 || 21 | |||
|- | |||
| Fountain of Dreams || 21 || 11 || 0 || 0 || 19 || 81 || 21 | |||
|- | |||
| Stage of Destined Rivals || 21 || 11 || 0 || 0 || 17 || Beat Story Chapter 4 || 21 | |||
|- | |||
| Stage of the Partners || 21 || 11 || 0 || 0 || 17 || Beat Story Chapter 5 || 21 | |||
|- | |||
| Training || 19 || 11 || 0 || 0 || 11 || 1 || 19 | |||
|} | |} | ||
==Stage Size Chart== | |||
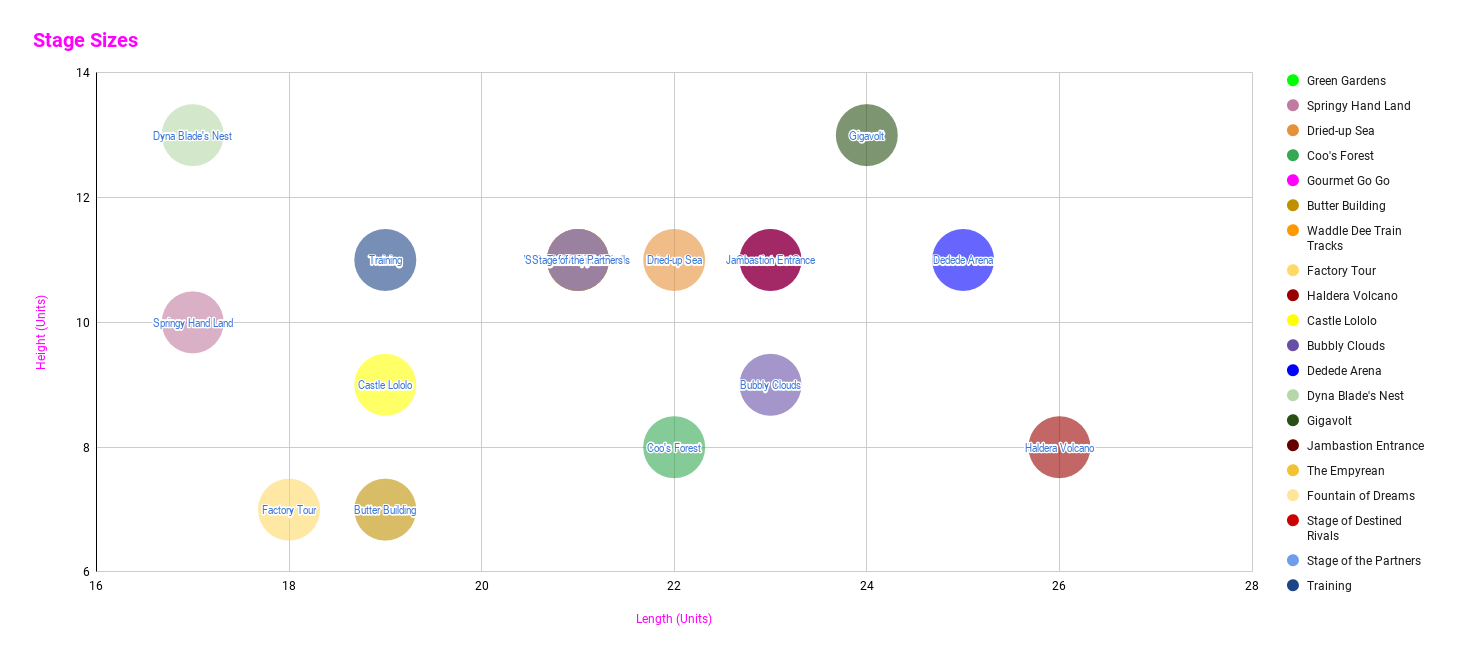
This is a chart that displays the overall sizes of the different stages compared to each other in a visual form. Stages that share the same size are on top of each other, so if you can't see where a stage is, it's being covered by another. This isn't accounting for platforms or any kind of walls within the stage, so keep that in mind. | |||
[[File:KF2 Stage Sizes Chart.png|left]] | |||
{{Navbox-KF2}} | {{Navbox-KF2}} | ||
Latest revision as of 12:57, 1 December 2020
Introduction
This page is dedicated to the selectable Stages in Kirby Fighters 2. Below is a paragraph describing how these measurements were obtained, followed by a key to help players understand the grid-based recreations pictured under each individual Stage. Below that is a table that has each Stage, their length, height, platform length, platform height, gaps between player spawns, and unlock condition listed (all of which you can sort the table by).
Key
Each grid square in the below visualizations is accurate in size to the game, but the Kirbys are similarly sized for visual clarity. The below statistics for each stage were taken from the game themselves (big thanks to firubii!)
- Kirby(pink and yellow): Sit in the two spawn points used in 1v1 matches.
- Kirby(blue and green): Blue sits in the third spawn point used in FFA matches (including 1v1v1s), and green sits in the fourth. Keep in mind who spawns where is decided at random. (verification TBD)
- White/Light Gray: Invisible walls/ceilings. Projectiles can't bounce off of them, and you can't bonk your head on them from below by jumping.
- Dark Gray/Black (thin): Semi-solid floors (platforms), meaning they can be platdropped through by pressing down when standing on one.
- Dark Gray/Black (square): Solid floors/walls/ceilings. Projectiles *can* bounce off of their sides, and you *can* bonk your head on them from below if jumping normally. They only serve as walls or ceilings on Factory Tour(ceiling), Haldera Volcano and Castle Lololo(both), and Dedede Arena(walls).
- For doubles spawns first team spawns to the left and right of pink kirby, and second team spawns to the left and right of yellow kirby
- 3v1 spawns may be added at a later date.
Stages (Individual)
Stages (Table)
All numbers are in Units. Green Gardens is 21 Units long and 11 tall, with platforms 3 Units long and 2 high(4 for the center platform). Kirby's full jump raises him ~3 Units, meaning he can jump to any platform that's 3 (or less) Units above the floor he's on.
| Stage name | Length | Height | Platform length | Platform height | Gap between player spawns | Unlocked at Fighters Rank | Total Floor |
|---|---|---|---|---|---|---|---|
| Green Gardens | 21 | 11 | 3 (all) | 2 (sides), 4 (center) | 9 | 1 | 30 |
| Springy Hand Land | 17 | 10 | 5 (both) | 3 (both) | 10 | 1 | 27 |
| Dried-up Sea | 22 | 11 | 3 (sides), 4 (center) | 6 (sides), 3 (center) | 12 | 1 | 32 |
| Coo's Forest | 22 | 8 | 3 (sides), 4 (centers) | 3 (lower), 6 (higher) | 14 | 25 | 42 |
| Gourmet Go Go | 23 | 11 | 2 (left), 4 (rest) | 5 (sides), 3 (center) | 10 | 3 | 37 |
| Butter Building | 19 | 7 | 11 | 4 | 11 | 35 | 30 |
| Waddle Dee Train Tracks | 21 | 11 | 3 (both) | 4 (left), 2 (right) | 10 | 23 | 27 |
| Factory Tour | 18 | 7 | 0 | 0 | 12 | 37 | 18 |
| Haldera Volcano | 26 | 6-8 | 4 | 3 | 13 | 7 | 22 |
| Castle Lololo | 19 | 9 | 4 (sides), 5 (center) | 3 (sides), 6 (center) | 9 | 14 | 57 |
| Bubbly Clouds | 23 | 9 | 4 (both) | 3 (both) | 7 | 5 | 31 |
| Dedede Arena | 25 | 11 | 4 (sides), 9 (center) | 4 (sides), 3 (center) | 10 | 29 | 34 |
| Dyna Blade's Nest | 17 | 13 | 0 | 0 | 9 | 42 | 17 |
| Gigavolt | 24 | 13 | 0 | 0 | 10 | 40 | 24 |
| Jambastion Entrance | 23 | 11 | 3 (sides), 2 (centers) | 4 (sides), 2 (centers) | 12 | 49 | 33 |
| The Empyrean | 21 | 11 | 0 | 0 | 17 | 72 | 21 |
| Fountain of Dreams | 21 | 11 | 0 | 0 | 19 | 81 | 21 |
| Stage of Destined Rivals | 21 | 11 | 0 | 0 | 17 | Beat Story Chapter 4 | 21 |
| Stage of the Partners | 21 | 11 | 0 | 0 | 17 | Beat Story Chapter 5 | 21 |
| Training | 19 | 11 | 0 | 0 | 11 | 1 | 19 |
Stage Size Chart
This is a chart that displays the overall sizes of the different stages compared to each other in a visual form. Stages that share the same size are on top of each other, so if you can't see where a stage is, it's being covered by another. This isn't accounting for platforms or any kind of walls within the stage, so keep that in mind.
