Akatsuki Blitzkampf/Marilyn Sue: Difference between revisions

From Mizuumi Wiki
Jump to navigation Jump to search
mNo edit summary
Line 416: Line 416:
   | description = Unga charge. Marilyn temporarily enters an autoguard state and palm rushes forward (looks like Sanshou but with her glowing blue).
   | description = Unga charge. Marilyn temporarily enters an autoguard state and palm rushes forward (looks like Sanshou but with her glowing blue).
::*The only move in the game with such a mechanic. No, Blitztank's super armor, Kanae's command counter stance and Wei's Level 3 super armor is a different deal, as well as all that stuff with invincible frames.
::*Taking hits while autoguarding counts as if they were blocked high, so you don't receive hitstun (and obviously no blockstun too), you receive guard damage, cheap damage, Marilyn can be KO'd by the latter as usual (her sprite hilariously continue to glow blue while she is down), she can be guard broken, thrown, and opponent can cancel his attacks against Marilyn's "armor" as if blocked too.
::*Taking hits while autoguarding counts as if they were blocked high, so you don't receive hitstun (and obviously no blockstun too), you receive guard damage, chip damage, Marilyn can be KO'd by the latter as usual (her sprite hilariously continue to glow blue while she is down), she can be guard broken, thrown, and opponent can cancel his attacks against Marilyn's "armor" as if blocked too.
::*Dies to all lows.  
::*214A is fast but the autoguard lasts very short, while 214C is slow but will plow almost through everything that is not a low. Since an autoguard state in all versions has lesser amount of frames than startup of the move, mind your timing for your autoguard to not go off sooner than opponent's move hits you before you hit him ([https://youtu.be/Veynubum6Y0 hello 25% damage buff from counter hit (yep, that was 2870+25%))].

Revision as of 14:17, 24 November 2021

Marilyn's official profile image

Background

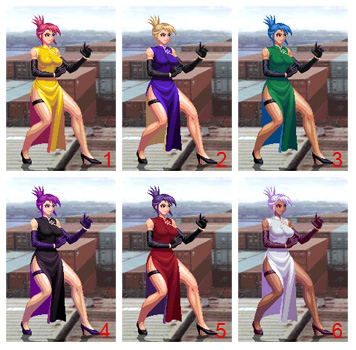
Marilyn's pre-made colors

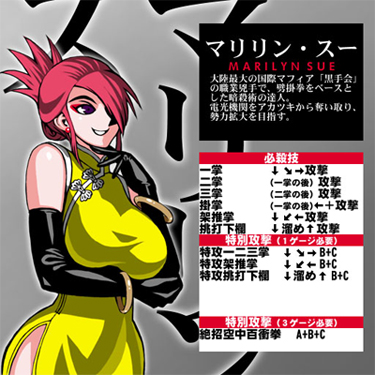
A professional assassin from mainland China's largest international mafia, the Black Hand. She is a master of assassination techniques based on Pī​guà​quán. She intends increase her influence by taking Akatsuki's Blitz Motor. (from character selection screen)

Read the translation of her arcade mode!

Introduction

Universally considered one of the very best characters in the game (and most likely being the best), Marilyn is a melee specialist who likes to beat others up close and personal utilizing her easy conversion, superior damage, speed, multi-hitting moves, untechable ground throw, mix-ups, cross-up and guessing game, as well as having an easy time as corner carry. Having said that, she feels comfortable in defence too, thanks to her, again, easy conversion, great reflector combos, great anti-airs, special move with an autoguard and access to a "flash kick" move.

However, due to a lack of projectiles and having mostly short ranged normals, she has a harder time against characters with better neutral and those who have good options for stopping\escaping her corner pressure. Also, since Mari's "flash kick" has no complete invul except in EX-version, her wakeup options against proper meaties are weak.

Marilyn is a rushdown type and needs to be very careful in neutral. She is very fun and has ton of options to choose from, and isn't really that hard to play once you learn her, but the latter can be a long process, so she can be considered an advanced\high skill character, especially if you want to play Mari the most optimal way. What's especially great is that most of Marilyn's follow-ups and combos are very consistent at any range while retaining high damage both with and without meter, even reflector ones. While she has some pretty hard ones, you can swap them with easy and almost optimal versions for the time being or for some situations when you want to be almost 100% sure in not dropping your follow-up or combo. Also, her strings and moves in overall are pretty universal in use, with all being useful one way or another, so everything you learn in midscreen follow-ups\combos will be familiar in the corner and in neutral game too.

  • Armor ratio = 1.025 (second lowest *default)
  • Forward speed = 6.0 dots/F (second fastest default)
  • Backwards speed = 5.0 dots/F (first fastest default)
  • Jump startup - 3F (first fastest default)
  • Backdash duration - 18F (second fastest)

*Not counting Wei's buffs or Anonym's post-ressurection armor increase


Pros

  • High follow-up\combo damage both with and without meter at any range
  • Almost anything can be consistently converted into follow-up\full combo with 214+B+C or Level 3 super enders almost at any range
  • Fast normals a lot of them being multi-hit
  • Great anti-airs, lots of low-profile moves, good pokes
  • Good pressure, mix-ups and guessing game, decent cross-up
  • Great reflector and air throw follow-ups\combos
  • The only character in the game who can wall jump, possesses move with an autoguard and can feint some of its attacks
  • The fastest jump startup not counting buffed Wei
  • The fastest movement speed in both directions not counting buffed Wei and Murakumo's run
  • Backdash has low profile and second fastest speed in the game, mid-air type of front dash allows to evade low attacks and ground throws
  • Can drag opponent fullscreen to the corner starting from inside her own one
  • Those legs and amazing chest ahead
  • Unga MariUnga.png

Cons

  • Second lowest armor ratio in the game
  • Short range on reflector auto-counter
  • Lacks projectile and most normals are very short, while longer ones and specials with good length are either slow+unsafe\give no conversion\are hard to convert from, thus her neutral can be on weaker side
  • Can't chain into ground low and ground overhead can be chained only after 5B, thus her non jump-in mixups are not that great
  • "Flash kick" has no full invincibility except in EX-version which limits its general use and leads to weak wakeup without meter
  • Killed her boss, will kill you too if it will help her to rise in power
  • Unga MariUnga.png


All damage values below were tested on Akatsuki with 1.000 armor ratio and full life on both sides (remember about "Health difference" and "Guts" systems)

Notes on Ausf. Achse

Universal Changes

The nerfs to reflector combos affect her more since she had the best reflector combos in the game very important to her defence, and many of them used an air throw which is now can't be comboed off on midscreen as well due to character-specific changes.

Character Changes

Her damage has been reduced overall, notably her level 3.

5C now causes a ground bounce on hit and can be chained into 2A or 2B. This means that her combos off it do less damage and she isn't effectively plus off it.

Her 2C has more recovery. You can still get combos off it but they're worse and harder. The same applies to j.2C but to a greater extent, it effectively can't be comboed off.

Her air throw launches the opponent farther away, so you can only combo off it in corner.

The third of the A and B rekka have more recovery, meaning you can't do 236XXX>236XXX in midscreen anymore. However, 236A is now -4, making it much better on block.


Complete Changelog

Universal Mechanics

Throws

Ground Throw
4/5/6+A+B
ABK-Mary-5AB.png
Damage Guard Startup Adv Hit Adv Block
2000~ N/A 5 KD N/A

Marilyn's grabs the opponent and pushes him forward with some secret chinese jedi\sith force push technique. Untechable.

Aerial Throw
j.4/5/6+A+B
ABK-Mary-jAB.png
Damage Guard Startup Adv Hit Adv Block
2000~ N/A 3 KD N/A

Marilyn gently throws her opponent out of the air. Techable, but can be followed-up into full combo at any position before they do.

Reflectors

Standing Reflector
4/5/6+B+C
ABK-Mary-5BC.png
Damage Guard Startup Adv Hit Adv Block
500~\625~ (counter hit) High/Low 7 KD +3

Uppercut, animation uses the second hit of her 2B. Leads to full combos at any range. Kinda on the shorter end.

Crouching Reflector
ABK-Mary-5BC.png
Don't ask me why those two are the same (MariUnga.png is the asnwer).
Damage Guard Startup Adv Hit Adv Block
400~\500~ (counter hit) High/Low 7 KD +3

Same as above.

Jumping Reflector
j.4/5/6+B+C
ABK-Mary-jBC.png
Don't look at her ass, look at her combos.
Damage Guard Startup Adv Hit Adv Block
500~\625~ (counter hit) ? 7 KD +2

Air knockdown, animation is the same as j.C. Leads to full combos at any range too. MariUnga.png

Normal Moves

5A
ABK-Mary-5A.png
ABK-Mary-2AA.png
Version Damage Guard Startup Adv Hit Adv Block
5A 450~ High/Low 4 +1 +1

Bitch slap. Very fast startup and recovery, safe on block, but very short and has even less reach than 2A. Cancellable into any special, but window for this is small and hitstun is only enough to confirm, out of specials, 236ABB>suitable-rekka-BnB or any raw EX\Level 3 except 214+B+C. Anyway, you'd better to confirm it into 5B chain with 236BBB>suitable-rekka-BnB follow-up. Can be used as occasional anti-mashing move, anti-air (if it's too late for 4B), as juggle in some combos and as setup for mind games on block (tick throw\2A or 214X into full combo to beat mash\2C low\5C overhead\jump with or without doing something\reflect\etc.). Can be used as link after landing j.A\B\C to continue comboing, but at range where you can do it, 2A will give you better combos, so don't bother. Chains into itself and 5B.

5AA 747~ High/Low 4 +1 +1

Knockdowns mid-air opponents if both hits land and you can combo afterwards. Seems to be the least useful of her moves.

5B
ABK-Mary-5B.png
Damage Guard Startup Adv Hit Adv Block
500~\871~ (1\2 hits) High/Low 7 +0 -2

Two-hit hand stabs, moves Marilyn forward a bit. Decent range, fast startup, fast recovery on whiff, very small - on block. Cancelable into any special on either of hits if they're landed or blocked. After landing any of the two (or both), has enough hitstun to be confirmed into 236BBB>suitable-rekka-BnB (super useful, fish for it in neutral) or 214A>214A (only for showing off) with 214+B+C or Level 3 super enders (the latter one if only close enough to the corner), or just into any raw EX\Level 3 (showing off again). Can be used as link after landing j.A\B\C to continue comboing (not optimal since you can use 2A or 2B instead), useful as a frametrap due to speed and safeness, and it's also your safest blockstrings ender. Knockdowns mid-air opponents if both hits land and you can combo afterwards. Chains into 5C overhead, and it's an only (unsafe) chain from which 5C can be done.

5C
ABK-Mary-5C.png
Who thought this would be a good idea? MariUnga.png
Damage Guard Startup Adv Hit Adv Block
600~\1045~\1339~ (1\2\3 hits) High 22 -2 -6

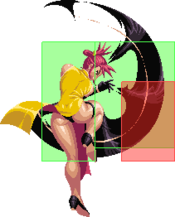
Three-hit pinwheel-like move, moves Marilyn forward by 1\3 of the current screen (which helps greatly on midscreen and in corner combos). Jam from GG has it (but not as an overhead thus not so useful, hehe). One of the easiest of overheads to combo from, you can just slap it as starter and then do any suitable BnB adding 650-800~ damage to the latter, you don't even need any links for that since you can chain it into 2A or 2B. Being multi-hit, it's can be hard to reflect, especially if you use it as okizeme and vary the number of hits that will land by differing spacing or timing, and it can throw people out of armor or reversals on the following hit(s) even if they ignored the first one(s). Unfortunately, you can chain it only after 5B, so given pretty clear telegraph of 5C, your ground mix-ups will not be that great. Most of the time people will expect you to do it as starter in the corner combos or chain it after 5B, so you don't want to become too predictable to not get reflected. Having said that, it works great on midscreen since it moves you forward a great deal and people may not expect it there. Knockdowns mid-air opponents and you can't combo afterwards. Chains into 2A (great for corner) or 2B (great for midscreen). OTG.

2A
ABK-Mary-2A.png
Damage Guard Startup Adv Hit Adv Block
350~\573~\746~ (1\2\3 hits) High/Low 4 +1 +1

Low-profile jab that looks like it hits low but doesn't (like the all 2As in this game), you will use it a lot more than 5A since it gives you better combos (because of 2B chain on midscreen\corner and 2AAA in the corner BnBs). Cancellable into any special the same as 5A, can be used as link just the same, frame data is identical. Range is decent, but be careful using it on midscreen in the beginning of the strings if you are farther than in the opponent's face, since it can push him too far away letting to react to 2B in 2A>2B string, or the same may happen with 5B after 2A>2B>5B - cancel into 236A (after 2A) or 236B (after any hit of 2B\5B) with rekka-BnB follow-up if you see it's about to happen. Chains into itself (great for corner) and 2B (great for midscreen and corner). OTG.

2B
ABK-Mary-2B.png
Damage Guard Startup Adv Hit Adv Block
400~\697~ (1\2 hits) High 7 -6 -8

Two upward hand stabs, moves Marilyn forward a bit more than 5B. Same as 5B, is cancelable into any special on either of hits if they're landed or blocked. After landing any of the two (or both), has enough hitstun to be confirmed just the same as 5B does, but it's less useful due to how move is animated. Compared to 5B, has the same startup, 6 more total frames, pretty much the same horizontal range, but it has much more recovery and is a lot more unsafe on block, which can be used as a frame trap due to special cancels, or you can do whiff frametrap due to its low recovery. Can be used as link after landing j.A\B\C to continue comboing. Decent anti-air if you use it when they are coming down, since hitbox is good and this move gives you low profile at the start. Be wary of using it too far on midscreen since the first or the second hit may miss or 5B in 2B>5B string may be reacted to due to pushback from 2B - cancel into 236B with rekka-BnB follow-up if you see it's about to happen. Knockdowns mid-air opponents if both hits land and you can combo afterwards. Chains into 5B, which is staple for your BnBs.

2C
ABK-Mary-2C.png
Damage Guard Startup Adv Hit Adv Block
1100~ Low 11 KD -4

Low-profile sweep. One of Marilyn's two lows and one of her best pokes. Fast, good guard damage, nice range and only -4 on block with strong pushback makes it very safe unless reflected. Safe from certain crouching reflectors at far distance. Can be used as a link after landing j.C to continue comboing (but other links will give you much better combos) or after blocked j.A\B\C for high\low mix-up, can be used as a part of ground blockstrings mixups too (though you cannot chain this out of anything, so it's not very great at that), good neutral tool. Causes knockdown, but can be followed-up with [2]8+C on midscreen if done close enough to the opponent or with 236A>A>A or [2]8+C (again) near corner with 214+B+C or Level 3 super enders on both ranges. Good frametrap due to low recovery. Good move to build meter on whiff, since you can easily spam it due to fast startup and recovery, Marilyn stays in place, you get low-profile and you may hit approaching opponent due to it being a strong low overall. Mind that hitbox of this move is low, so your opponent can avoid it even without jump, just with raising their feet with an attack, for example. OTG.

j.A
ABK-Mary-jA.png
Damage Guard Startup Adv Hit Adv Block
450~ High 4 -4 -4

Jumping punch. Very fast startup, not much range, hitbox is not high enough to hit most crouching characters (can hit only Kanae, Fritz, Wei and Blitztank). Good air-to-air\ground-to-air. You can cancel it into j.2C\j.2[C] on block or hit, or even preform one of them after whiff if you are high enough in mid-air. Chains into j.B.

j.B
ABK-Mary-jB.png
Damage Guard Startup Adv Hit Adv Block
600~\971~ (1\2 hits) High 5 VB VB

Jumping double kick, Marilyn's second best poke. Startup is only 1F slower than j.A but hurtbox is much bigger, so don't totally dismiss j.A in close range. Works as a decent cross-up thanks to hitbox on behind, but not really good in it (not like you have any other options). Nice range, lots of active frames due to multi-hit and nice pushback if blocked in mid-air makes this move great for jump-ins or poking. Two hits also make for some anti-parry shenanigans, as the hit box is weird and sometimes the second hit will whiff completely when the first one lands. You can cancel it into j.2C\j.2[C] on block or hit (first hit, second or both). Good move to build meter on whiff - it may give less meter than j.C, but it's a better air-to-air, better poke and let's you combo your opponent if you knockdown him with it in mid-air. As previously said, knockdowns mid-air opponents if both hits land and you can combo afterwards.

j.C
ABK-Mary-jC.png
Damage Guard Startup Adv Hit Adv Block
1350~ High 9 VB VB

Jumping downward arm swipe. Short range but fast startup, good hitbox and great damage. Adds around 1000~ damage to your BnBs if used as starter, this is your opener for the most damaging combos. Deals ton of guard damage if blocked in mid-air and good guard damage on the ground too. Causes decent pushback on block both on ground and in mid-air. You can't cancel it into j.2C\j.2[C], but j.C>2C link works as a great overhead>low mix-up nonetheless. Gives the most amount of meter out of air moves on whiff and hit, so if you're building meter, spam it instead of j.B if you feel it can be safe. Knockdowns mid-air opponents on hit and you can't combo afterwards.

Command Normals

高端脚 - Koutankyaku
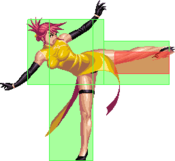
4B
ABK-Mary-4B.png
Damage Guard Startup Adv Hit Adv Block
1100~ High/Low 7 -2? -8?

An upwards kick. Mari's best anti-air, can hit grounded characters too if they are close enough, but won't hit most of them if they crouch. Good range, good damage, fast startup, very fast recovery on whiff, thus nice frame trap. Great guard damage if blocked in mid-air. Safe from certain reflector auto-counters if hits with the tip. If opponent is close enough, can be followed-up with Air Throw into full combo, though AT can be throw-teched, but it's always worth trying. Marilyn's best move for building meter on whiff since it's even faster to spam than 2C and Marilyn stays in place too, choose it instead of 2C if you're excepting jump-in or want a bit faster meter gain.

側端脚 - Sokutankyaku
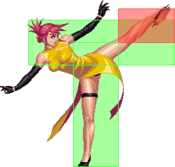
6B
ABK-Mary-6B.png
Damage Guard Startup Adv Hit Adv Block
1100~ High/Low 7 -2? -8?

Forwards thrust kick, Marilyn's third best poke. The same move as 4B, but done at different angle and moves Mari forward around the same distance as 5B does. Everything the same about 4B applies (except for an anti-air, AT and meter whiff building parts) + is used as juggle in the most damaging corner combos. Small guard damage if blocked on the ground and causes a bit of pushback. As a ground poke, 2C is better all around, but it is harder to simply avoid hitbox of 6B which can come in handy from time to time. Use sparingly.

俯衝後掃腿 - Fushou Kousoutai
j.2C
ABK-Mary-j2C.png
Version Damage Guard Startup Adv Hit Adv Block
j.2C 1400~ Low 10* KD -4

Marylin drops straight down out of the air and does her 2C but with more damage, so everything same about it applies. Pretty fast. Note that you don't have to be at max jumping height to do j.2C, you just need to be considered in mid-air state after jump. Marilyn's jump has only 3 frames of startup, and you can do this move really close to the ground which can help your guessing game offering an option of doing it at different heights. Nice anti-air bait if they think that you are trying to jump-in. You can try to bait something with it after whiffed j.A high enough in mid-air too, i.e. frame trap since you will have enough time to do j.2C.

  • Startup observation: 10-frame startup from the moment Marilyn lands.
j.2[C] - - - - -

Fushou Kousoutai Feint - j.2[C]: Marilyn drops straight down out of the air but does not do her 2C on land. Everything about j.2C applies except what is related to the 2C motion. Recovery after feint is very fast and then you're free to do anything you may do in neutral. Another part of your guessing game.

Special moves

一二三掌 - Yī​'èrsān Shou
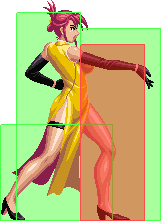
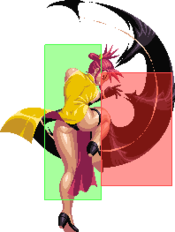
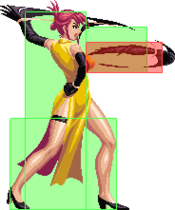
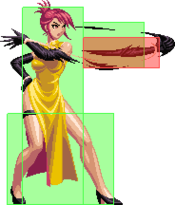
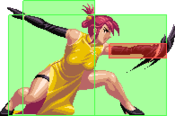
236X>X (or 4X)>X 4th picture depicts 4X option, not EX!
ABK-Mary-236X.png
ABK-Mary-236XX.png
ABK-Mary-236XXX.png
ABK-Mary-236X4X.png
Version Damage Guard Startup Adv Hit Adv Block
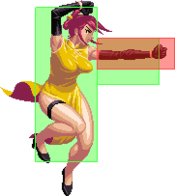
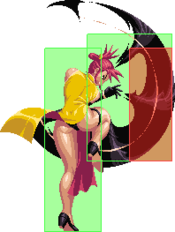
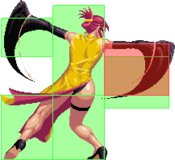
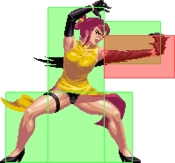
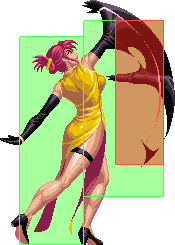
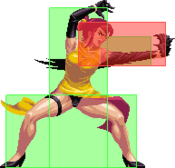
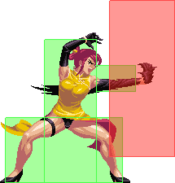
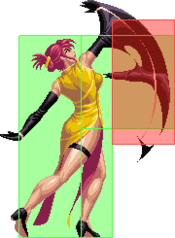
一掌 - Isshou 600~\700~\800~ (A\B\C) High/Low 9/13/17 -5 -9

The first hit of her "one, two, three" series, Marilyn's rekka. First hit of any version is OTG.

  • Note that you need only to press A, B, or C to do the second and third hits, no need to do the whole 236 again, and combination of hits may be any you like (i.e. 236B, then B, then B for example). You can hold forward direction as well while doing which is convenient.
  • A has the lowest damage, range and startup, while C has the highest. Recovery is the same between all versions.
  • 236CCC will not combo at all.
  • A note on 236A: using this raw on midscreen is a gimmick, but an interesting one, as it is fast and\or has a bit more range than your usual rekka-BnB starters (5A, 2A, 5B, 2B, jumping attacks), and will give the most possible damage to your rekka BnBs. Same applies to 236B that has even more range (compared to 2C or 6B pokes) and damage, but is noticeably slower (both than 236A and 2C\6B). 236C is simply too slow and thus too risky. Same applies to the corner: raw 236A or 236B into 4X launcher can lead to the full corner combo.
  • If blocked on first hit, all versions have a decent pushback, so they can be actually somewhat safe even while being -9. Second and third hits have noticeable more minus, so stop after the first one being blocked.
  • When full rekka is done against standing opponent (i.e. not in juggle state) you can immediately confirm into level 3 no matter the position (imo should be fixed). If in juggle state, then you need to be close to the corner.
二掌 - Nishou 445~\519~\797~ (A\B\C) High/Low 11/13/15 -9 -13

Second hit of the series.

  • In Marilyn's BnBs, depending on distance, you will need to change which version you use.
三掌 - Sanshou 736~\785~\1781~ (A\B\C) High/Low 11/13/23 KD -19/-19/-5?

Final hit of the series.

  • 236C used as final hit does not combo off anything, is noticeably slower, deals 3 hits instead of 1 with around ~1000 more of total damage, and inflicts lots of guard damage too. May be used for guard crush purposes in strings, as it is safe on block due to pushback and -5, and if they decide to push buttons after the first 2 hits of the rekka-series they'll may get punished for it. On hit, you can even full combo off it at any range, but all in all this move is way too risky unless your opponent is very passive.
掛掌 - Keshou 593~ High/Low 13 KD -13

... > 4X followup, can be used only after Isshou. Launcher.

  • You will do this move in combos near or in the corner, or you can do so after raw 236A\236B in the corner, and all versions are exactly the same.
EX 2836~ High/Low 7 KD -4/-21*

特攻一二三掌 - EX Yī​'èrsān Shou - 236+B+C: Autocombo super.

  • You will use this only for cancelling your unsafe stuff (namely 214X and [2]8+X) and for showing-off. Not enough invincibility frames to use it as reversal, small guard damage too. If you cancel 214X on hit with this, then you can combo into 236BBB with 214+B+C\Level 3 ender or, if from the corner, into 214B with 214+B+C ender.
  • *[1]
架推掌 - Kasuishou
214A/B/C/B+C
ABK-Mary-214X.png
Enter the gorilla. MariUnga.png
ABK-Mary-214BC.png
~ ~ ~ ~ ~

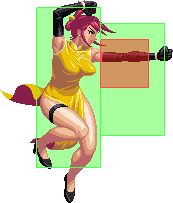
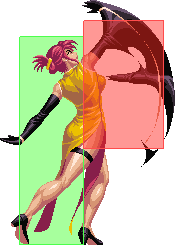
Unga charge. Marilyn temporarily enters an autoguard state and palm rushes forward (looks like Sanshou but with her glowing blue).

  • The only move in the game with such a mechanic. No, Blitztank's super armor, Kanae's command counter stance and Wei's Level 3 super armor is a different deal, as well as all that stuff with invincible frames.
  • Taking hits while autoguarding counts as if they were blocked high, so you don't receive hitstun (and obviously no blockstun too), you receive guard damage, chip damage, Marilyn can be KO'd by the latter as usual (her sprite hilariously continue to glow blue while she is down), she can be guard broken, thrown, and opponent can cancel his attacks against Marilyn's "armor" as if blocked too.
  • Dies to all lows.
  • 214A is fast but the autoguard lasts very short, while 214C is slow but will plow almost through everything that is not a low. Since an autoguard state in all versions has lesser amount of frames than startup of the move, mind your timing for your autoguard to not go off sooner than opponent's move hits you before you hit him (hello 25% damage buff from counter hit (yep, that was 2870+25%)).
  • Has good vertical hitbox thus can be used as anti-air, but not recommended due to horrible recovery on whiff\block and that it's still can be jumped over or parried. Still, it has reasonable pushback and deals ton of guard damage if blocked in mid-air.
  • Wallslams, any version can be followed up with 214A if you are in range and then with 214+B+C (with or without delay depending on your position) or Level 3 super enders (the latter if only close enough to the corner).
  • Very unsafe on block and whiff, but cancelling it on block with 236+B+C leaves you in -4 which is mostly safe. Don't throw it in neutral just because.
  • Being really unsafe, 214X actually works best in defence, as reaction and punishment tool, or when you are already in and doing pressure mindgames. While approaching, your best choice with using it is to bait some reaction with feint shenanigans (see move below; aslo you can use feinted version simply as a replacement for forward dash), or to punish opponent's unsafe stuff.
  • Since 214A is so fast, it can be used to punish reflected EX projectiles like Akatsuki's 236+B+C or you can punish gaps in blockstrings when you don't have blockstun.
  • In combos with 214A ender, input Level 3 only after you will clearly see that 214A has landed, otherwise you may do feinted version (since ABC input) and drop the combo. Similar situation is about 214A itself - don't hold it to not input feint if you don't want to, just press once.
  • Any version let's you confirm into Level 3 on hit without any follow-up (which imo should be fixed) depending on initial distance from which you've performed 214X. For example, 214A minimal range for that is very small, when 214B can confirm into Level 3 off at least round start range. However, you must press ABC immediately after hit, so you need to have clear read\punish, not to mention that Marilyn has a ton of other ways to confirm into her Level 3.
Version Damage Guard Startup Adv Hit Adv Block
A 1600~ High/Low 13 KD -20
  • 1~8f autoguard
B 1700~ High/Low 17 KD -20
  • 1~12f autoguard
C 1800~ High/Low 21 KD -20
  • 1~16f autoguard
EX 2456~ High/Low 15 KD -25

Your preferred super ender, think about multi-hit + more range + more autoguard 214X (well, more autoguard than A\B, ahem). Is used literally almost everywhere depending on delay amount or no delay at all, see "Combos" section. Fast, travels more than half of the current screen, has a lot of autoguard, good raw damage, but still dies to all lows. Each hit raises opponent higher, so if he is already high, not every hit will land or you can even cross-up yourself in the corner, thus you need proper delay. On the other hand, you may not worry about confirming it even if opponent is very close to the ground - almost always every hit will land.

  • 1~2f invincible, 1~14f autoguard
  • Holding the attack buttons (i.e. not directions) can delay the startup to 44f.
Feint ~ ~ ~ ~ ~

Marilyn cancels her palm strike just before she was about to deal damage, exactly after startup.

  • Another great part of your guessing game. If you remember how much of Marilyn's normals can be cancelled, how much chains there is, and that most of her multi-hitting moves can be cancelled on either of hits, then you can imagine how much you can do with that.
  • Mostly you will use it in blockstrings, but it's a great frame trap to bait things out in neutral too. When used in blockstrings, remember to switch between feint and non-feint, since opponent may try to mash out, and be flexible about which move you cancel and on which hit if it's a multi-hitting move. Also, you can use it as anti-air to ignore opponent's jump-in attacks with your autoguard while at the same not worrying about how unsafe non-feinted version is.
挑打下欄 - Chouda Karan
[2]8+A/B/C/B+C
ABK-Mary-(2)8A.png
"RISING TACO"
"RISING TACO"
- - - - -

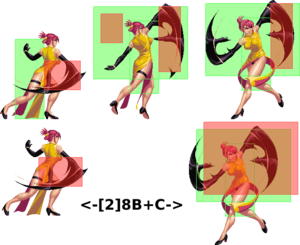
Marilyn makes a spin swinging her arms and launching herself in the air. That's her "flash swing kick".

  • This move has charged input to which you need get used to. Remember that you can buffer charge while another things are in effect, like move animations or even knockdown, for charging matters only how long you are holding down-button. Very good example is 2C\j.2C>[2]8+C follow-up - since you need to hold down anyway while doing 2C\j.2C, you will already charge [2]8+C enough while their animation is going on, and when animation of 2C\j.2C is done, you just need to stop holding down and need to press 8+C.
Version Damage Guard Startup Adv Hit Adv Block
A 1342~ High/Low 5 KD -23
  • A is fast, leaves you in place, hits 2 times, however your opponent needs to parry only one hit to knock you out of it. Hits behind you too. Very unsafe on block, but is pushes you back a fair bit on hit or block, so it's actually not that bad to use as a raw move. Can be followed-up with [2]8+B+C (every hit will land only if you were close enough), 214+B+C (only if delayed enough; a lot harder to time right and does less damage than first option) or Level 3 super on hit immediately after the first hit connects. Can be cancelled with 236+B+C on block immediately after the first hit connects to make it -4 and mostly safe. Has a lot less total frames than B and C versions, so whiffs are less punishing. Can be useful as wakeup option if opponent is close enough, can catch someone trying to get out of your corner pressure too.
B 1536~ High/Low 6 KD -36
  • B hits 3 times, has huge hitbox, hits high in the air (can hit on the ground too) and leaves Marilyn more than half of the current screen away. Can be followed-up and cancelled the same as A-version. Has noticeable recovery after landing on the ground unlike A and C versions. Does a lot of guard damage if all hits are blocked in mid-air. Can be useful as wakeup option or anti-air, can hit opponents on the ground too.
  • Due to air launch, you can move above grounded opponents who're attacking you, which can be both good and bad (mostly bad due to whiff recovery).
C 1731~ High/Low 7 KD -35
  • C hits 4 times, has huge hitbox, actually moves Marilyn forward a great deal before releasing hitbox and leaves her on about 1\3 of the current screen. Can be followed-up and cancelled almost the same as A and B versions. If used as a raw move, you may follow-up it the same as A and B versions, with the difference that every hit of [2]8+B+C follow-up will land no matter the initial distance. However, if used in combos, you may follow-up\cancel C-version either on first or second hit (better on the second of course), and you don't need to delay 214+B+C at all.
  • Due to how much forward Marilyn moves on startup and due to air launch, she may just move below mid-air opponent without hitting him or move above grounded opponent who attacks her, thus crossing him up, so be careful with using C-version in close range - in some situations it may help you to dodge stuff, in others it may leave you open for punish.
  • Does a lot of guard damage if all hits are blocked in mid-air. Is used in majority of Marilyn's BnBs as follow-up. Can be useful as wakeup option or anti-air, also great tool to punish stuff on distance due to how much of forward movement it has and that its hitbox will beat pretty much anything, be it either on the ground or in the air.
EX 3267~ High/Low 3 KD -57
  • Goes straight up. Madly fast (3 frames startup), completely invul (first 6 frames) and a lot of damage (but 500-700~ less than close reflector combo with 214+B+C ender). Fine wakeup or reversal tool if opponent is close enough, read your opponent or hold back+down to wait and see what he's up to, since it's a charged input - sad, but it's your only real reversal option, and despite fast startup, superflash can let your opponent react. You can follow-up non-ex [2]8+X with it as was said above. That's said, given how good Marilyn's close-ranged reflector combos are, in some situations you may want to just use reflector - on the other hand, if you use [2]8+B+C, then you don't need to care about high\low mix-ups or throws.

Super Move

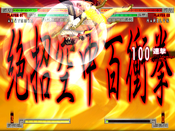
絶招空中百衝拳 - Zesshou Kuuchuu Hyakushouken
A+B+C
ABK-Mary-ABC.png
ABK-Mary-KONO.png
KONO KONO KONO KONO KONO KONO KONO KONO
Damage Guard Startup Adv Hit Adv Block
5703~ High/Low 7 KD -6

Marilyn's Level 3 super: a standing uppercut, 99 fists and a dragon kick. One of the easiest Levels 3 in the game to confirm. Maybe even the easiest.

  • Only 7 frames of startup and full invul on first 4 frames.
  • Comboes almost from any landed hit\string.
  • Has very little proration on top of being the third most damaging Level 3 in the game (but 1st is Fritz and 2nd is Kanae and both have very big scaling if comboed), and using something like the easiest corner BnB with j.C as starter you will get 8246 damage against 1.000 armor ratio characters if Health difference system is not involved (the best combo will give 8443). Yes, without counter hit. And if Health difference is involved...
  • Do not put this at the end of a blockstring and think it will work and don't try to use it as reversal, it will get beat out by almost anything. Well, actually you can try to do it against slower chars like Fritz or against close meaties, but be careful and man, it is so easy to reliably confirm it by other means anyway.
  • Keep in mind that it leaves your opponent behind you (thus can throw him out of the corner or in the corner depending on your position) and gives him a bit more than 1 bar of meter by itself not counting possible hits or combos before it. The best is to use it as sure kill or when your opponent already has max or almost max meter. However, even feeding of meter can become an advantage, if you think that your opponent will be more predictable with it than without it, since huge life swing made by Level 3 combo can make him nervous enough to carelessly throw out, for example, easily punishable metered reversal, and Mari has enough stuff to bait and punish things with.

General Strategy

Please see "Moves" section for elaborated information about usefulness of each of her moves. Know Marilyn's moveset very well since she has no useless moves (well maybe except 5AA).

Don't forget that Mari is the only character in the game who can wall jump. This is done by jumping to the wall at any height and then pressing forward (4 or 6), depending on which direction you are facing (i.e. press right when jumping to the left wall and left when jumping to the right wall). You can hold\press any other direction too, it will not mess with 4\6 input. Wall jump while Marilyn descends to the ground is also possible, but only after normal jump, nothing else. Maximum amount of travelling distance from wall jump is a bit more than half of the current screen. This is very useful property for your mobility and great tool to get out of the corner, you can dodge some nasty stuff like Soldat's\Adler's EX fireballs too, but your opponent may try to punish it, so be careful. You can combine it with j.2C\j.2[C] shenanigans too. Showcase. Also, Marilyn's wall jump has glitch which is hard to do, but it can push your opponent out of the corner and gives you some dirty opportunities (hey, that's unsporting), please see 5:30 in Marilyn Tutorial video.

Despite having great offence, against characters who can't force you to come in (non-zoners or the ones with easily reflectable projectiles) or\and if you have more current health than they do, you can freely rotate between rushdown and more defensive play, since Marilyn's easy conversion allows to make huge damage almost from anything (including reflectors), when one careful hit can lead to a combo with Level 3 ender which will pretty much delete opponent's healthbar, as well as she has great moves to build meter on whiff with. You don't really need to commit to unsafe stuff and trades.

Like many characters in the game, Marilyn has a taunt from which she can cancel (a lot sooner than her voice line ends), so you can try to use it a bait alongside flex. It's never optimal though, just a funny option. MariHoho.png

Ctrekoz's Marilyn online matches playlist. Back then, in the first 4 matches against Fritz, I didn't knew some of the tech that I learned while rewriting this page (most notably 2nd corner BnB), but it's still a good showcase of how Marilyn is played, and also lets you to look at Fritz's matchup.

Combos

Maybe you will find even more stuff, who knows?

Some (many?) combos listed here don't work in AA, refer to the bottom of this section and to "Notes on Ausf. Achse" above.


Counter hit damage in reflector combos is stated only because you will get CH off them really often, so those values are more indicative. Combos itself are legitimate both with and without CH, since the latter gives you only 25% damage buff to the move that provoked CH.

Midscreen

Leaves your opponent in the corner even if you started it in your own. Second and third hits in the first rekka must be done really fast (just mash), otherwise opponent may lose hitstun and react to any of them.
The essential parts of this combo is 236 rekkas, and you may use as starter literally any non-command normal except 2C. If you use jump attacks, remember to link them after landing. Due to speed, range and animation, 5B works really great as starter when you can just 236BBB after first, second or both hits without fear of dropping the combo, and although 2B may serve the same purpose, it's harder to do due to its animation. You can even not use any starter at all and catch them with raw rekkas (and it will give the most damage).
Mind your range and choose starters\chains appropriately, remember what was said about hitstun and pushback in "Moves" section.
Level 3 will confirm only if done close enough to the corner. If you feel that your second rekka will not leave you close enough to it for Level 3 confirm, then you can do so after the first rekka guaranteed.
Same deal as above, but first hit in the second rekka is replaced with B-only version. Hilariously deals just 23~\23~\20~ less damage. Is used when you think that you are too close to the corner for 236CBB to land.
Is used when you are close enough to the corner to juggle an opponent with 2A after the first rekka. Essentially, after the 236BBB you just do the second half of either corner BnB 1 (first combo) or BnB 2 (second combo). Same deal as with corner BnBs: the first does a bit less damage but is more consistent, while the second one does more but is harder to land. Anyway, either of those deals the most damage out of any other rekka BnBs. You can juggle them with 5A instead of 2A for even more damage, but it's very inconsistent due to how short that normal is.
If you see that using all hits in the first rekka will not juggle your opponent as needed, i.e. you will do it too close to the corner and wallslam will be too low to confirm 2A\5A off it, use 4+B after the first hit of rekka (as shown in Overhead starter combos below).
About all rekka-BnBs: sometimes you want to delay your second rekka a bit to not raise your opponent too high so you won't miss with 214+B+C.
  • Overhead starter - just use 5C or j.C (remember to link it) and then do any suitable rekka BnB
After 5C, don't use 2A, since 5B then will be too far to land the first hit and may be reacted to, use 2B>5B chain instead.
  • Low starter (only if close enough) - 2C\j.2C>[2]8+C - 2136~ (2C)\2431~ (j.2C) damage
2C\j.2C>[2]8+C (2 hits)>214+B+C\Level 3 - 3374~ (2C)\3663~ (j.2C)\6862~ (2C)\7127~ (j.2C) damage
Only two hits of [2]8+C will land even without supers.
  • Ground-to-air - just use j.A\B\C and then link it into suitable rekka BnB or do Low starter combo if j.2C was used
  • Close standing\crouching reflector - 1) Air Throw>[2]8+C - 2861~ damage (with counter hit, standing)
Air Throw>[2]8+C (2 hits)>214+B+C\Level 3 - 3944~\7388~ damage (with counter hit, standing)
2) Air Throw>2B (1 hit)>214A>214+B+C\Level 3 - 2684~\3911~\7245~ damage (with counter hit, standing)
Raw Air Throw combos without close reflector are the same. [2]8+C will often land only 2 hits instead of 3, I can't understand yet what causes it.
The last one deals less damage (a bit more if only 2 hits of [2]8+C will land in the first combo, which happens very often), throws opponent closer to the corner, but 2B link is hard. Use it if you were caught off guard and do not have enough time to charge "flash kick" or when you want to leave your opponent closer to the corner. 214+B+C in the last one may need or no need delay depending on the distance to the corner. Level 3 in the last one will confirm only if done close enough to the corner.
  • Far standing\crouching reflector - 1) 214C>214B>214+B+C - 2660~\3887~ damage (standing)
2) 214A>214A>214+B+C\Level 3 - 2465~\3697~\7158~ damage (standing)
To do the first combo, you must input 214C immediately after reflect, and Level 3 ender seems impossible(?) even with 214A instead of 214B due to how high opponent happens to be. You can't be too close to the opponent before doing reflect if you do not want 214C to miss.
The second combo is less restricting. The first 214A can be done closer and with more delay, but the second 214A will land only if you were close enough to the bottom of the screen or to the corner. 214+B+C always needs some delay because of reflector auto-attack juggle, and it can be hard to confirm properly. Level 3 will confirm only if done close enough to the corner.
The funny thing about those two combos is that in 1 the first part is inconsistent, while in 2 inconsistent one is the second part, so it's hard to recommend only one of them. Well, the first one deals more damage, but you cannot confirm Level 3 off it. Rotate judging by situation.
2) [2]8+C (1 hit)>[2]8+B+C\Level 3 3228~\6277~ damage (with counter hit)
3) 2C>[2]8+C - 2060~ damage (with counter hit)
2C>[2]8+C (2 hits)>214+B+C\Level 3 - 3300~\6794~ (with counter hit)
The first combo is very easy, corner carry and almost optimal in terms of damage. Highly recommended. If you were high in the air when doing the reflector, input 5B immediately, and if you were close to the ground, then delay it a bit for the second hit of 5B to land. Unlike rekka-BnBs, 236CBB will always work no matter how close it's done to the corner due to amount of juggle from 5B. If done from your own corner, delay 214+B+C for all hits to land. Level 3 will confirm only if done close enough to the corner.
[2]8+B+C ender in the second combo is very inconsistent since it often will land not each hit, and deals less damage than EX enders in the first and third group. Anyway, you will want to use this combo only if you want to safely confirm your air reflector into Level 3, because for the first combo you may be too far from the corner to do that, and the third group of combos is hard.
The third group of combos is the most damaging one, but is not corner carry and [2]8+C is hard to land, so you will use it only if you want the max damage and don't care about consistency.
4B>Air Throw>[2]8+C (2 hits)>214+B+C\Level 3 - 4238~\7665~ damage
Air Throw can be throw-teched.
214A will land only if you were close enough to the bottom of the screen or to the corner. 214+B+C may or not may need delay depending on how close you are to the corner and how close to the ground your opponent is after 214A follow-up. Level 3 will confirm only if done close enough to the corner.
For [2]8+A and [2]8+B starters - after the first hit and close range only, for [2]8+C - after the first hit from any range as long as [2]8+C hits the opponent. You can end with 214+B+C too, but it's a lot harder to time right and it deals less damage.

Corner

Very easy and consistent combo with almost optimal damage, perfect for more casual Marilyn players, high delay matches or when you don't want to risk dropping BnB 2. In 4+B->2A->2B part, wait for the opponent to fall a bit before doing 2A, otherwise only one hit of 2B will land. 5B will always land one hit. Also, in 4+B->2A->2B part you can use 5A instead of 2A, which will give 23~\22~\19~ more damage, but it's a harder link to do and not much worth it. Depending on the starter, 5A can add even more damage, but it's still not that much. Using 5A, seems like 5B can land both hits, which will add a lot of damage, but it's damn hard.
Similar to midscreen rekka BnBs, the core move in this combo is 236B>4+B, and before it you may put anything you like. The most optimal starters in terms of damage are 5C (you will do this very often) or j.C (more rare) into 2AAA and so on.
The most damaging corner combo, but is harder than the first. Still, this is the most optimal one in terms of damage, and ultimately you should aim to consistently land it. 5C, j.C and any other starters still apply. In 2A->6B you can do 5A instead of 2A, but it's a harder link in already hard enough combo.
  • Overhead starter - just use 5C or j.C (remember to link it) as starter and then do any desired BnB, with j.C+BnB 2 you can reach 3849~\5049~\8424~ damage or even a bit more with 5A juggle
2) 2C>[2]8+C - 2280~ damage
2C>[2]8+C (2 hits)>214+B+C\Level 3 - 3374~\6862~ damage
Situation here is very interesting. [2]8+C follow-up has longer reach and easier input, thus great consistency, it deals more damage without meter enders, but less with them due to 2-hits cancel. So, if you're planning to use meter, use rekka ender. If you're not planning to use meter, use [2]8+C. If you're planning to use meter, but want 100% consistency and don't mind a bit of a damage drop, use [2]8+C. Still, rekka ender is not really that hard to do, the bigger problem is that you need to be closer to the corner to land it than when using [2]8+C.
  • Ground-to-air - just use j.A\B\C and then link it into suitable corner BnB or do Low starter combo if j.2C was used
  • Close standing\crouching reflector - see "Air Throw starter" combo below
2) 214[A]>2A>6B>2A>2B>5B>214A>214+B+C\Level 3
3) 214[A]>5A>Air Throw>2B>5B>214A>214+B+C\Level 3
Moving forward in 1 is required to catch the opponent with 6B, but most importantly, with 2A and for 5B to land both hits.
2 and 3 are very hard and I didn't bothered enough to successfully perform them. I wonder how much my easier, 1 version, is different in terms of damage.
2) 5A->6B>2A>2B>5B->214A->214+B+C\Level 3 - 2402~\3634~\7102~ (with counter hit)
We have optimal combo 1 which is really inconsistent (Air Throw and 2B parts), and the only easy option which is close to optimal that I've found is 2 where we lose 300-350~ damage.
2A will land only if you were close enough to the corner before doing an Air Throw. Otherwise, remove 2A and use 2B, although it's a much harder link and gives less damage.
  • [2]8+X starter - same as the midscreen one


Ausf Achse Combos

This will only list combos that are different.

  • Rekka BnB (Your corner ~ half the stage) - 2A>2B>5B>236B~4+X>2A>236BBB>214+B+C\Level 3
Less damaging and corner carrying combo than the old BnB, but it's still pretty damn good.
  • Rekka BnB (Your corner ~ half the stage) - 2A>2B>5B>236BB>236+B+C>(214A>214+B+C)OR([2]8C>[2]8+B+C)
Meter rekka BnB. You could do this in vanilla but there was rarely a reason to.
  • Overhead starter (Outside corner) - 2A>236BBB>214+B+C\Level 3
Since 5C is now a ground bounce, it's combos aren't nearly as good.
  • Overhead starter (Corner) - 2A>6B>2A>2A>2B>5B>214A>214+B+C\Level 3
5C effectively just leads to a corner BnB post 236X~4+X.
  • Low starter (Corner) - 2C>[2]8B>214+B+C\Level 3
Her low starter combos were also hit hard. You can't combo off j.2C at all and your 2C options are worse and corner limited.
  • Air throw combos are the same, just limited to the corner.


Playlist of Marilyn's combos (except AA ones) and tech which is explained in this and previous sections

Playlist of Marilyn's combos and tech which I didn't explained (some of it is just showing-off) - sorry, don't have enough motivation anymore

Matchups

Frame Data

source
KD - Knockdown
VB - Variable
*UV - value(s) marked with "?" in the table is/are unverified
x~yF - a period from frame "x" till frame "y"

                       |     Frames      |  Frame Advantage  |
               Attack  | Total | Startup | On Hit | On Block | Notes
Throws and Reflectors  ---------------------------------------
            4/5/6+A+B  |  22   |    5    |   KD   |    --    |
          j.4/5/6+A+B  |  21   |    3    |   KD   |    --    |
                5+B+C  |  17   |    7    |   KD   |    +3    |
                c.B+C  |  17   |    7    |   KD   |    +3    |
                j.B+C  |  18   |    7    |   KD   |    +2    |
                  A+C  | 128   |   --    |   --   |    --    | cancellable after 32F
              Normals  ---------------------------------------
                   5A  |  14   |    4    |   +1   |    +1    |
                   5B  |  28   |    7    |   +0   |    -2    |
                   5C  |  55   |   22    |   -2   |    -6    |
                  c.A  |  14   |    4    |   +1   |    +1    |
                  c.B  |  34   |    7    |   -6   |    -8    |
                  c.C  |  30   |   11    |   KD   |    -4    |
                  j.A  |  19   |    4    |   -4   |    -4    |
                  j.B  |  23   |    5    |   VB   |    VB    |
                  j.C  |  30   |    9    |   VB   |    VB    |
              5A > 5A  |  14   |    4    |   +1   |    +1    |
            c.A > c.A  |  14   |    4    |   +1   |    +1    |
      Command Normals  ---------------------------------------
                   4B  |  24?  |    7    |   -2?  |    -8?   | *UV
                   6B  |  24?  |    7    |   -2?  |    -8?   | *UV
                 j.2C  |  VB   |   10*   |   KD   |    -4    | landing recovery 29F, *starts on 10th F upon landing
               j.2[C]  |  VB   |   --    |   --   |    --    | landing recover 12F? *UV
             Specials  ---------------------------------------
                236+A  |  33   |    9    |   -5   |    -9    |
                236+B  |  37   |   13    |   -5   |    -9    |
                236+C  |  41   |   17    |   -5   |    -9    |
              236 > A  |  39   |   11    |   -9   |   -13    |
              236 > B  |  41   |   13    |   -9   |   -13    |
              236 > C  |  43   |   15    |   -9   |   -13    |
        236 > ... > A  |  45   |   11    |   KD   |   -19    |
        236 > ... > B  |  47   |   13    |   KD   |   -19    |
        236 > ... > C  |  47?  |   23    |   KD   |    -5?   | *UV
        236 > 4+A/B/C  |  39   |   13    |   KD   |   -13    | 
                214+A  |  48   |   13    |   KD   |   -20    | 1~8F autoguard
                214+B  |  52   |   17    |   KD   |   -20    | 1~12F autoguard
                214+C  |  56   |   21    |   KD   |   -20    | 1~16F autoguard
              214+[A]  |  26?  |   --    |   --   |    --    | 1~8F autoguard, *UV
              214+[B]  |  28?  |   --    |   --   |    --    | 1~12F autoguard, *UV
              214+[C]  |  30?  |   --    |   --   |    --    | 1~16F autoguard, *UV
               [2]8+A  |  43   |    5    |   KD   |   -23*   | 1~4F invincible, *if 1 hit was blocked
               [2]8+B  |  62   |    6    |   KD   |   -36*   | 1~5F invincible, *if 2 hits were blocked
               [2]8+C  |  61   |    7    |   KD   |   -35*   | no invincibility?, *UV, *if 2 hits were blocked 
       EX and Level 3  ---------------------------------------
              236+B+C  |  35   |    7    |   KD   | -4 / -21 | 1~2F invincible, (-4) if first hits were blocked,
                                                               (-21) if autocombo was blocked
              214+B+C  |  63   |   15    |   KD   |   -25    | 1~2F invincible, 1~14F superarmor, see *1
             [2]8+B+C  |  79   |    3    |   KD   |   -57*   | 1~6F invincible, *if 3 hits were blocked
                A+B+C  |  28   |    7    |   KD   |    -6    | supeflash 40F, 1~4F invincible
       *1 By holding the attack buttons, you can delay the startup up to 44F (making the whole move 93F).

Trivia

Marilyn's Ending
  • Her fighting style as stated in her background information is based on 劈挂拳 (pī​guà​quán​) - Piguaquan "Chop-Hanging Fist". [2]

General
FAQ
Controls
Netplay
Menus
HUD
Glossary
Links
Characters
Akatsuki
Mycale
Sai
Kanae
Fritz
Marilyn Sue
Wei
Anonym
Elektrosoldat
Blitztank
Adler
Murakumo
Perfecti
Mechanics
System Specifics
Frametool
Reflector
Changelog