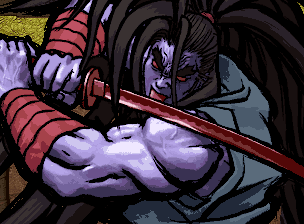
羅刹丸, Rasetsumaru
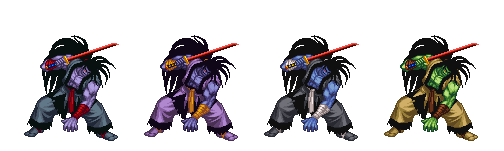
Colors
Introduction
Shadowmaru; the leader of B.L.O.O.D.M.O.S.E.S., and the enemy to b-ball players worldwide. Has 10 points in Dunk.
Rasetsu at first glance looks like a weird version of Haohmaru, but he plays completely different. The first thing you notice is that his 5AB is not amazing. The next things you see are that his WFT is ridiculously awesome and he can combo all his pokes into it. Because of this, he is extremely scary when raged. The only problem is that he has about eight seconds to make good on this. Outside of basic potatoes gameplay he's got a few oddball gimmicks and is stellar at bullying the opponent when they have no weapon. Disarming your opponent is Rasetsumaru's endgame, so sneaking that WFT in whenever you can is important.
| Strengths |
Weaknesses
|
- WFT is easily best in the game, and he rages super fast.
- Versatile and highly damaging combo/punish game.
- Shoulder is a great movement tool, gets you in quickly and is safe at far ranges.
- Still has Haoh's j.AB and j.C.
|
- Short rage period means you need to capitalize quickly.
- Relying on rage makes it more difficult to build the Issen gauge up.
- 5AB being slow means it's hard to punish at range or bait out the opponent.
- Pokes aren't that threatening unless they hit.
- Projectiles are not very useful.
|
Data
- Damage taken: 110%
- Rage duration: 8 seconds
- Amount to rage: 15
- Walk speed: 544
- Backwalk speed: 480
- Dash speed: 1600
- Jump duration: 44 frames
- Width: 24
- Throw range: 16
- Throw recovery: 46 frames
- Tier placing: C
Normals
Far Slashes
5A:
- Properties: Recoil cancel on block. Cancelable. Deflectable.
- Quick midheight slash. All-purpose poke.
|
5B:
- Properties: Recoil cancel on block. Cancelable. Deflectable.
- Slowish long ranged stab that combos into 623C at a surprisingly long range. Great punishment and combo starter, but be careful with how slow it is.
|
5AB:
- Properties: Recoil cancel on block. Deflectable.
- While it looks like Haohmaru's 5AB, don't be fooled, this move is completely different. It starts up much slower, which makes it much easier to evade, and it does less damage. It still hurts and it still has enormous range, but it's not quite as powerful of a zoning tool as Haoh's 5AB is. It's a strong move to round out Rasetsu's long range game, but you have to use it in a premeditated way.
- It still comes with a few noticeable upsides, chief among them being that whiffing doesn't drain your entire sword gauge. It recovers quicker than Haohmaru's 5AB, and is way safer on block/hit (can be punished on block at closer ranges all the same). The last few frames are cancelable, though this isn't terribly useful. You can cancel into Shoulder and try to keep working your way in that way.
|
2A:
- Properties: Recoil cancel on block. Cancelable. Deflectable.
- Starts up slower than 5A, recovers in about five million years, -17 on hit. Why would you ever use this instead of 2B. At least it's cancelable all throughout.
|
2B:
- Properties: Recoil cancel on block. Cancelable. Deflectable.
- Oddly, this move is better than 2A in every respect. Starts up the same, recovers faster, does more damage, safe on hit. Range is still pretty lame, but it combos into 623C and comes out faster than 5B.
|
2AB:
- Properties: Recoil cancel on block. Deflectable.
- Two-hit combo. If both connect, it knocks down. Kind of slowish on startup. The first hit slices upwards, but it's too slow with a really bad hitbox, so it's not much good as antiair. For that reason, this awkward attack is never seen except as a gimmick for an unexpected second hit after the first one whiffs.
- Damage is slightly less than 5AB, and almost the same as the 5B 623C 8BC combo.
- This is probably most useful for the recoil cancel.
|
Near Slashes
n.5A:
- Properties: Recoil cancel on block. Cancelable. Deflectable.
- Very quick hit with the hilt of the sword. A decent poke when 2C won't do, and combos into WFT for a tiny bit of extra damage.
|
n.5B:
- Properties: Recoil cancel on block. Cancelable. Deflectable.
- Fast sword slice, combos into 623C. Good punisher, but n.2B starts up faster for a teensy bit less damage, so you should use that instead.
|
n.5AB:
- Properties: Recoil cancel on block. Second hit cancelable. Deflectable.
- This is a Rasetsu's best punisher, because it starts up deceptively fast, does a lot of damage, and the second hit combos with 623C. If someone's left himself wide open close to you, do this.
|
n.2A:
- Properties: Recoil cancel on block. Cancelable. Deflectable.
- Just like n.5A, but lower and a bit faster on recovery. Handy spacing tool, but be careful of the deflects.
|
n.2B:
- Properties: Recoil cancel on block. Cancelable. Deflectable.
- Poke-speed slice with a billion active frames that combos into 623C. If he's open to be hit by it, you know what to do. Doubles as a meaty that leads to a combo on hit or recoil mindgames on block.
|
n.2AB:
- Properties: Recoil cancel on block. Deflectable.
- Same as 2AB.
|
Overheads
5BC:
- Properties: Hits high. Knockdown.
- Long ranged overhead attack that looks faster than it is. The tech jump is huge, so you avoid all kinds of attacks with this, but it also makes it more obvious on startup.
|
u.5BC:
- Properties: Hits high. Knockdown.
- Rasetsu practices his kung fu and does a floaty hop kick. This does really bad damage and is horrible if blocked right, but the startup is less obvious than 5BC's.
|
Kicks
5C:
- Properties:
- This kick is awesome antiair. It doesn't hurt much but it comes out reasonably fast and the hitbox is great, hitting surprisingly high up. Does not work so well on characters with strong downwards slices like Haohmaru, though.
|
6C:
- Properties: Hits low.
- Standing low kick that must be sparingly used. Range is so-so, doesn't knock down, isn't cancelable. It is, however, really fast and has no hitstop, so it's generally pretty safe to use. Do it when you need safe low hit poke to stop opponent advance.
|
2C:
- Properties: Hits low.
- One of the fastest pokes in the game. While it's easily hopped over, it recovers too fast for that to be hugely relevant. This is a great way of setting up a tick throw.
|
3C:
- Properties: Hits low. Knockdown.
- Low slide that goes a decent distance and knocks down. It's lousy on block, so try to hit from range. Combos with 2BC or 236C for a little more damage.
|
Jumping
j.A:
- Properties: Hits high. Deflectable.
- Mid-height slash that's intended for air to air, but just doesn't have the range for it. Stick to j.C.
|
j.B:
- Properties: Hits high. Deflectable.
- Another mid-height slash that hits about the same area as j.A, starts up slower than j.AB, and really has nothing redeemable about it. Use j.C or j.AB instead.
|
j.AB:
- Properties: Hits high. Deflectable.
- Like Haoh's j.AB, this is the king of jumpins. Horizontal range is lousy, but the vertical is huge.
- Since the damage is nuts and it's relatively safe to use, you can use this for pretty much any jumping situation you can think of.
|
j.C:
- Properties: Hits high.
- This kick is awesome. Active for a long time and has amazing horizontal range, making it great for air to air. Since it has no hitstop, it's also great for beating throw mash or command grabs on landing.
- If timed right its easy to deep hit with it. Be careful since your foot is hittable, though.
|
Dashing
66A:
- Properties:
- Dashing punch. Has deceptive range and no hitstop. Very useful, low-risk tick setup and counter to the 4D bunny hopper. Mix generously with throws.
|
66B:
- Properties: Hits high. Knockdown.
- Slowwww dashing overhead with good range. The actual hop portion is fast, but the startup on the ground is fairly obvious.
- There's a small cancelable window on the startup, before he leaves the ground, so you can fakeout into shoulder or something. Still not very useful.
|
66AB:
- Properties: Knockdown. Deflectable.
- Dashing upwards slash. This is great antiair that hits surprisingly high up. Since you can crossunder the opponent with it, it makes your dashes a lot scarier to challenge in general. Abuse liberally.
|
66C:
- Properties: Hits low. Knockdown.
- Sliding low kick. Comes out really fast, but is horrible on block. More obnoxious than anything else, it combos into 2BC and sets up more pressure.
|
Unarmed
u.5S:
- Properties:
- Quickly punches them in the face. Worse on recovery than u.66S and doesn't knockdown, so it doesn't have much use.
|
u.2S:
- Properties:
- Lower body punch. About as useful as u.5S, but sometimes you just want to punch someone in the nuts.
|
ju.S:
- Properties: Hit high.
- Punches straight out. Angle isn't great, but it starts fast and has a lot of active frames. j.C is probably a better choice overall.
|
u.66S:
- Properties: Knockdown!
- Same dashing punch as 66A, but now it knocks down! Even if blocked it's a decent tick setup.
|
Pursuits
Pursuit - 2BC
- Seriously, don't underestimate how much this kick hurts. Surprisingly fast and with a good range for a ground pursuit. This kick can be chained after almost any knockdown (even a back throw into the corner!) if you walk yourself close enough, or even after performing a quick micro-dash, depending on the spacing. Truly a tool for the masters.
|
Heavy Pursuit - 8BC
- This is the finisher for your shoulderram hit-confirms when the WFT is not available. Very appreciable damage here. Not to be left out of your repertoire.
|
System
Deflect - 216D:
- Average, ordinary deflect. Range is not too great, but it works.
|
Weapon Pickup - 5A:
- While this is pretty fast on its own, Rasetsumaru is one of the few characters that does not actually have to do this.
- Both 623A and 236A will automatically pick it up at the same time, with no delay or animation.
|
Taunt Disarm - Start Start Start:
- Puts the weapon down quickly and then stands around like a doofus for awhile. Not cancelable in any way.
- You can connect with a tornado (good luck) and do this before it kills for an unarmed win.
|
Specials
Senpuuretsuzan - 236S:
- Flying tornado projectile. Similar to Haohmaru's, but with a few distinct differences.
- The startup is slower, but the recovery is much quicker. This is to make it easier to follow up, but it limits the ranges you can use it at more.
- It rises into the air, rather than staying on the ground.
- In exchange for doing less damage, the opponent is in a full juggle state until they hit the ground. Timing the juggle will take some practice, of course.
- Decent projectile, but getting the opponent to do anything other than block or jump over it is hard.
|
Senpuuha - 236C:
- Wave of enormous chip damage. Pushes the opponent away, hits six times, knocks down. Comes out really slow and is punishable on block by anyone that has a fast long range move.
- It doesn't have much use outside of chipping them a lot of times. If they can't punish it effectively it's not the worst option ever, though. Naturally this becomes more appealing to use once you disarm them because whatever punishes they may have are much weaker.
- Is throw invincible on startup for no good reason. This is not exactly the best choice for anti-throw, but hey.
|
Nagi Yaiba - 623S:
- Strange little proximity DP. Once active, if it comes into contact with the opponent's body, it will switch over to an attack animation that is invincible. It has to contact their hittable boxes, NOT catch them hitting you. If you're right next to them, it will always activate. So this isn't useful for catching moves that hit far away from the opponent, making it inconsistent as an antiair.
- It is pretty good at catching pokes from about half a character distance away, though, so if you expect them to mash something out, go for it. It won't catch attacks that are very low, like a lot of 2Cs. Use 623C for that instead.
- Upper half of the body is invincible on startup only, it doesn't extend to the active period, so be careful about that.
- Considering the vulnerability during the startup phase, the low damage and the fact there is a second opening during recovery, this move doesn't see much play.
|
Gouha - 623C: (can use when unarmed)
- GOD SHOULDER. Rasetsumaru's entire gameflow is built around this one move, so you better get used to using it.
- Startup is very fast, and it's safe on block if you hit near the far range. There's a small amount of foot invulnerability in it, which will go over things like 2C mash. Combos from 5B or 2B or n.5AB, though will whiff if comboed from a 5B at long range.
- Like the tornado, it has full juggle until they hit the ground. You can combo into 8BC or 236CD from here for massive damage, making it pretty terrifying to get hit by. You can reset with n.2A, but the timing is pretty strict and, as resets go, it's pretty gimmicky.
- On backhit it put opponent in slow falling state, in short this means that you can't combo 236CD after it so use 8BC.
|
Shitatari - 214C:
- Self-cut that inflicts 30 damage on yourself and causes instant rage status. The animation is ridiculously slow, so most of the time it will just leave you wide open to taking a hit.
- This is sometimes good to use when you know you're going to lose a round, just follow it up immediately with suicide to retain the duration. It's also good for time over situations as the time running out will not interrupt the move at all, and since the round is decided at 0, the damage taken from the move will not influence the round decision. Mid-round it's probably not a good idea. You lose all momentum advantage due to how long it takes, even if you get a knockdown, and the damage it does is substantial. The main benefit here is having them afraid of WFT/shoulder.
- This move normally can't kill you. However there is a bug where, if your remaining health is at exactly 30, you "die" and lose the round. Any amount of health above or below 30 will leave you with at least 1 HP though.
|
Tenhadankuuretsuzan - 236CD - WFT:
- One of the best WFTs in the game. Jab-speed startup, invincible startup, decent range, combos from basically everything, and catches in a way that can't be exploded from. You can 2BC follow up after it in corner. It is, however, ridiculously punishable on whiff/block, and despite the attack looking like an uppercut, it is NOT an anti-air.
- Since this can be used to punish basically every ground attack you block, it makes attacking Rasetsu a very risky proposition. Get used to reacting to blockstun with this.
|
Combos
Normal
- Works at all but the furthest ranges, does about a throw's worth of damage. Really nice.
- Easy way of comboing into WFT. Landing random confirmable shoulder is always a good way to get this off.
- The second hit of n.5AB is cancelable, and combos right into 623C. This is his most damaging combo starter, so get to it.
- (5B or n.5B or 2B or n.2B) xx 623C ...
- Works even at the maximum range of the attacks, which makes all of these great tools. 5B hits really far, 2B is difficult to low profile, n.2B starts up almost instantly. Punish accordingly!
- (n.5B or n.2B) xx 623S dash xx 2BC
- Does more damage than the 623C 8BC followup, but can only be used at close range.
- Tornado has full juggle, so you can follow it up with all kinds of stuff.
- Simplest and least damaging followup. Forces knockdown.
- This does the most damage, though it's difficult to time.
- Doesn't hurt as much as 5AB, but sets you up for a reset mixup on landing. Works on all distances - preferable follow up.
- About the same damage as j.AB, forces knockdown.
- Everybody loves WFT combos.
- Timing is harder, but does more damage.
- Standard knockdown into followup. Does more damage than you would expect.
- Standard followup on a far catch (i.e. only works if the opponent is launched straight up rather than away).
- Fancy unarmed combo. Without 8BC/2BC you are free to get sword back.
Time slow
- The usual for when you can't wait for them to come down to get Issen'd.
- Sets up a non-explodable combo. Handy but you probably won't have much charge for it.
- Sets up a non-explodable Issen combo.
Backhit only
- Classic. You can do some more 66A reps but timing is very strict and at max range 236CD wont combo.
Strategies
General
- Rasetsu's core game is based around his rage meter. When not raged, he's a pretty okay zoner with poor antiair options, that can hitconfirm random pokes into good damage and knockdowns. With it, those random pokes become combos into WFT and he can punish more or less anything he blocks on the ground on reaction. For this reason he has trouble building up meter for the Issen gauge, but that doesn't really matter.
- 5B and 2B are the two pokes you will want to be throwing out constantly. Both of them combo into 623C, which in turn can combo into 8BC or 236CD. Learn this combo, learn the ranges, and fish for it any chance you get.
- 623C is pretty much godlike. If you throw it out at maximum range it gets Rasetsumaru in safely and is basically safe on block to all but the fastest attacks. It also goes over 2C spam. If you're near the corner and feeling gutsy, you can follow up a hit with n.2A to reset them for a throw mixup.
- His counter move, 623S, works a little strangely. It doesn't catch the weapons themselves, it catches their outstretched body, so they can walk into it and be hit. There's a small period of upper body invulnerability, but it doesn't last all the way until the catch period, so be careful. When it connects it switches to the attack, which is fully invincible on startup.
- When you hit someone with one of his 236S tornadoes, they are in a full juggle state until they land, so you can go into WFT, 623C, j.AB, whatever you like. j.AB will set up a reset on the ground, so you can go into a throw or 623S mixup.
- His WFT is pretty much the best in the game. Startup is jab speed and invincible, catches from far range, can't be rage exploded. Punish anything with it, catch any obvious approach with it. But most importantly, combo into it from 623C off of random pokes. However, its hitbox makes it poor antiair, so don't try to catch them carelessly.
Damage and defense
- Punishers:
- n.5AB xx 623C whatever - If you're close enough to do it, go for it.
- 5B xx 623C whatever - Solid range. Works at close range too.
- 2B xx 623C whatever - More often than not, this is your fastest option.
- n.2B xx 623C whatever - Sensing a pattern yet? This is basically jab speed startup, and can be used to punish things hardly anyone else can.
- 236CD - Huge range, jab speed startup. If you get an opportunity for this, don't hesitate to throw it out.
- Antiair:
- jump j.AB - Because of Rasetsu's quick jump and fast attacks, you can stuff a lot of things this way. There isn't much horizontal range, though, so you might get hit.
- 623S - Works against characters without strong downwards strikes.
- 66A - Not that useful unless you hit their landing recovery from behind, which is difficult at best. If you do this and aren't too far, you can convert into WFT.
- 66AB - Run behind their jump and smack them with the autocorrect. Hits high up, so it'll stuff nearly all jumps even from the front. Forces a knockdown, too. Probably better than 66A overall.
Frame Data
| Move
|
Damage
|
Startup
|
Active
|
Total
|
Cancel
|
Weapon
Clash
|
Hit
Adv.
|
Backhit
Adv.
|
Block
Adv.
|
Guard
|
Notes
|
| 5A |
6 |
8 |
2 |
27 |
1~3(3) / 8~23(16) |
6~7(2) / 10(1) |
-7 |
-7 |
-3 |
Mid |
Weak attack, Deflectable(weak)
|
| 5B |
11 |
15 |
6 |
39 |
15~20(6) |
12~14(3) |
-6 |
+2 |
-9 |
Mid |
Medium attack, Deflectable(med)
|
| 5AB |
28 |
25 |
2 |
63 |
1~8(8) / 58~63(6) |
20~24(4) / 27~30(4) |
-1 |
+9 |
-21 |
Mid |
Heavy attack, Deflectable(heavy)
|
| 2A |
6 |
11 |
1 |
39 |
1~6(6) / 11~39(29) |
- |
-17 |
-17 |
-3 |
Mid |
Weak attack, Deflectable(weak)
|
| 2B |
9 |
11 |
2 |
31 |
11~31(21) |
- |
-2 |
+6 |
-9 |
Mid |
Medium attack, Deflectable(med)
|
| 2AB |
18, 12 |
18 |
6 |
79 |
1~3(3) |
- |
-4 |
+6 |
-21 |
Mid |
Heavy attack, Deflectable(heavy)
|
| n.5A |
5 |
5 |
5 |
19 |
5~9(5) / 12~15(4) |
- |
-4 |
-4 |
-3 |
Mid |
Weak attack, Deflectable(weak)
|
| n.5B |
8 |
9 |
2 |
30 |
9~28(20) |
7~8(2) |
-3 |
+5 |
-9 |
Mid |
Medium attack, Deflectable(med)
|
| n.5AB |
21, 9 |
12 |
2 |
50 |
28~29(2) |
24~25(2) |
-3 |
-3 |
-21 |
Mid |
Heavy attack, Deflectable(heavy)
|
| n.2A |
5 |
5 |
7 |
17 |
5~11(7) / 14~17(4) |
- |
-2 |
-2 |
-3 |
Mid |
Weak attack, Deflectable(weak)
|
| n.2B |
7 |
5 |
14 |
25 |
5~18(14) |
- |
-2 |
+6 |
-9 |
Mid |
Medium attack, Deflectable(med)
|
| n.2AB |
18, 12 |
18 |
6 |
79 |
1~3(3) |
- |
-4 |
+6 |
-21 |
Mid |
Heavy attack, Deflectable(heavy)
|
| 5C |
5 |
9 |
3 |
35 |
1~2(2) |
- |
-1 |
+7 |
-14 |
Mid |
Medium attack
|
| 6C |
5 |
7 |
6 |
26 |
1~3(3) |
- |
-1 |
+7 |
-14 |
Low |
Medium attack
|
| 2C |
2 |
5 |
4 |
14 |
1~4(4) |
- |
+1 |
+1 |
-4 |
Low |
Weak attack
|
| 3C |
6 |
13 |
8 |
40 |
1~7(7) |
- |
KD |
KD |
-22 |
Low |
Knockdown attack
|
| j.A |
6 |
10 |
1 |
26 |
x |
- |
-- |
-- |
-- |
High |
Weak attack, Deflectable(weak)
|
| j.B |
9 |
14 |
3 |
38 |
x |
- |
-- |
-- |
-- |
High |
Medium attack, Deflectable(med)
|
| j.AB |
23 |
13 |
1 |
22 |
x |
- |
-- |
-- |
-- |
High |
Heavy attack, Deflectable(heavy)
|
| j.C |
4 |
10 |
9 |
31 |
x |
- |
-- |
-- |
-- |
High |
Heavy attack
|
| ju.C |
4 |
10 |
9 |
31 |
x |
- |
-- |
-- |
-- |
High |
Heavy attack
|
| 5BC |
16 |
20 |
4 |
41 |
x |
- |
KD |
KD |
-15 |
High |
Medium attack Knockdown attack
|
| u.5BC |
6 |
20 |
13 |
49 |
1~9(9) |
- |
KD |
KD |
-23 |
High |
Medium attack Knockdown attack
|
| 66A |
4 |
5 |
7 |
20 |
1~2(2) |
- |
+3 |
+11 |
-10 |
Mid |
Medium attack
|
| 66B |
12 |
23 |
3 |
59 |
13~14(2) |
- |
KD |
KD |
-31 |
High |
Medium attack Knockdown attack
|
| 66AB |
14 |
7 |
5 |
38 |
1~6(6) |
- |
KD |
KD |
-26 |
Mid |
Knockdown attack
|
| 66C |
6 |
7 |
13 |
38 |
1~3(3) |
- |
KD |
KD |
-26 |
Low |
Knockdown attack
|
| u.5S |
4 |
5 |
7 |
25 |
1~2(2) |
- |
-2 |
+6 |
-15 |
Mid |
Medium attack
|
| u.2S |
4 |
7 |
7 |
27 |
1~4(4) |
- |
-2 |
+6 |
-15 |
Mid |
Weak attack
|
| ju.S |
4 |
6 |
14 |
28 |
x |
- |
-- |
-- |
-- |
High |
Medium attack
|
| u.66S |
6 |
5 |
7 |
20 |
1~2(2) |
- |
KD |
KD |
-10 |
Mid |
Knockdown attack
|
| u.66C |
6 |
7 |
13 |
38 |
1~3(3) |
- |
KD |
KD |
-26 |
Low |
Knockdown attack
|
| 2BC |
8 |
7 |
6 |
26 |
1~6(6) |
- |
-- |
-- |
-- |
Mid |
|
| u.2BC |
8 |
7 |
5 |
26 |
1~6(6) |
- |
-- |
-- |
-- |
Mid |
|
| 8BC |
15 |
39 |
31 |
87 |
x |
- |
-- |
-- |
-- |
Mid |
|
| u.8BC |
10 |
41 |
8 |
84 |
x |
- |
-- |
-- |
-- |
Mid |
|
| Senpuuretsuzan - 236A |
4, 2 |
36 |
x |
59 |
x |
- |
KD |
KD |
-11 |
Mid |
|
| Senpuuretsuzan - 236B |
4, 2 |
41 |
x |
62 |
x |
- |
KD |
KD |
-9 |
Mid |
|
| Senpuuretsuzan - 236AB |
4, 2 |
46 |
x |
68 |
x |
- |
KD |
KD |
-9 |
Mid |
|
| Senpuuha - 236C |
5, 1x4, 12 |
29 |
x |
71 |
x |
- |
KD |
KD |
-19 |
Mid |
Weak attack Knockdown attack
1-20f throw invincible
|
| Nagi Yaiba - 623S |
18, 5 |
15 |
21 |
52 |
x |
- |
KD |
KD |
-21 |
Mid |
Knockdown attack
1-11f upper body invincible
|
| Gouha - 623C |
8 |
15 |
9 |
35 |
x |
- |
KD |
KD |
-14 |
Mid |
Knockdown attack
1-9f feet invincible
|
| Shitatari - 214C |
36 |
x |
x |
79 |
x |
- |
-- |
-- |
-- |
Mid |
Fixed damage
|
| Tenhadankuuretsuzan - 236CD |
30 |
5 |
1 |
62 |
x |
- |
KD |
KD |
-48 |
Mid |
1-4f fully invincible
5f below knees invincible
|

