|
|
| Line 6: |
Line 6: |
| Blue-haired Iaido master and poster boy for tuberculosis awareness. | | Blue-haired Iaido master and poster boy for tuberculosis awareness. |
|
| |
|
| Jokes aside, he is arguably one of the best characters in the game. He has quick and long reaching pokes, an instant overhead that can combo from a 2C, a fast dash, and hard-hitting punishers, Uyko specializes in fast mixups and harassing the enemy. His high damage taken means he can suffer for a mistake but he can run circles around most opponents if given the opportunity. | | Jokes aside, he is arguably one of the best characters in the game. He has quick and long reaching pokes, an instant overhead that can combo from a 2C, a fast dash, and hard-hitting punishers. Ukyo is just as good at fast harassment/mixups as he is at sitting on a lead. His high damage taken means he can suffer for a mistake but he will run circles around most opponents if given the opportunity. |
|
| |
|
| Though he has good jumping normals along with his Tsubame Gaeshi, he also has the second-longest jump time in the game.
| | {| |
| | |-style="text-align:left;" |
| | ! Strengths !! Weaknesses |
| | |- style="vertical-align:top;text-align:left" |
| | | style="width: 50%;"| |
| | * Stellar normals on the ground and in the air with long range, good damage, and quick startup. |
| | * Strong mixups and okizeme. |
| | * Great movement for both approaching and running away to turtle. |
| | * High damage off of punishes even from far away. |
| | * A hit with the ladies. |
| | * 214C. |
| | | style="width: 50%;"| |
| | * Super floaty jump. |
| | * Tsubame Gaeshi execution can be difficult under duress. |
| | * His specials/WFT outside of Tsubame Gaeshi are situational at best. |
| | * No admiring legion of fangirls to chase him around anymore. |
| | |- |
| | |} |
|
| |
|
| == Data == | | == Data == |
| Line 39: |
Line 56: |
| | width="" style="background:#f0f0f0;"| '''5AB:''' | | | width="" style="background:#f0f0f0;"| '''5AB:''' |
| :Properties: Deflectable. | | :Properties: Deflectable. |
| :One of Ukyo's main punishers. Has a zippy-quick 13-frame startup and does pretty hefty damage. However, it isn't recoil-cancelable, so you're going to get hurt if this gets blocked. | | :One of Ukyo's main punishers. Has a zippy-quick 13-frame startup, has huge range, and does pretty hefty damage. However, it has no recoil animation, so you're going to get hurt if this gets blocked. |
| :Note that there is a hurtbox that extends out before the attack actually connects, meaning if you try to trade with a projectile like a Hanzo slinky using this move you are going to get hit. | | :Note that there is a hurtbox that extends out before the attack actually connects, meaning if you try to trade with a projectile like a Hanzo slinky using this move you are going to get hit. |
|
| |
|
Revision as of 17:34, 18 June 2019
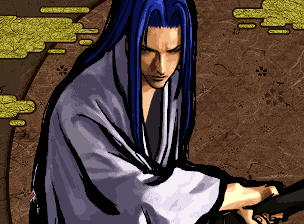
橘 右京, Tachibana Ukyo
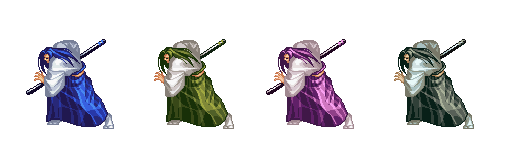
Colors
Introduction
Blue-haired Iaido master and poster boy for tuberculosis awareness.
Jokes aside, he is arguably one of the best characters in the game. He has quick and long reaching pokes, an instant overhead that can combo from a 2C, a fast dash, and hard-hitting punishers. Ukyo is just as good at fast harassment/mixups as he is at sitting on a lead. His high damage taken means he can suffer for a mistake but he will run circles around most opponents if given the opportunity.
| Strengths |
Weaknesses
|
- Stellar normals on the ground and in the air with long range, good damage, and quick startup.
- Strong mixups and okizeme.
- Great movement for both approaching and running away to turtle.
- High damage off of punishes even from far away.
- A hit with the ladies.
- 214C.
|
- Super floaty jump.
- Tsubame Gaeshi execution can be difficult under duress.
- His specials/WFT outside of Tsubame Gaeshi are situational at best.
- No admiring legion of fangirls to chase him around anymore.
|
Data
- Damage taken: 120%
- Rage duration: 20 seconds
- Amount to rage: 45
- Walk speed: 544
- Backwalk speed: 384
- Dash speed: 1792
- Jump duration: 59 frames
- Width: 16
- Throw range: 12
Normals
Far Slashes
5A:
- Properties: Recoil cancel on block. Cancelable. Deflectable.
- Worse 5B. Half the damage, 1f slower startup. Not worth using.
|
5B:
- Properties: Recoil cancel on block. Cancelable. Deflectable.
- Ukyo's main poke. Quick poke with 8-frame start up. It is recoil-cancellable, so you can cancel it to 214C to lessen the recovery, or if you think your opponent is going to counter-poke, cancel into 236A (this is unsafe on block so only do this as a read).
|
5AB:
- Properties: Deflectable.
- One of Ukyo's main punishers. Has a zippy-quick 13-frame startup, has huge range, and does pretty hefty damage. However, it has no recoil animation, so you're going to get hurt if this gets blocked.
- Note that there is a hurtbox that extends out before the attack actually connects, meaning if you try to trade with a projectile like a Hanzo slinky using this move you are going to get hit.
|
2A:
- Properties: Recoil cancel on block. Deflectable.
- Basically 5B while crouching, which naturally means it's another mainstay poke. Super quick on startup and recovery, and is great at keeping foes away despite its range being somewhat short compared to his other slashes. Not too unsafe on block, either.
|
2B:
- Properties: Recoil cancel on block. Deflectable.
- Funny little sitting anti-air that starts above Ukyo's head before hitting in front of him. Requiring your foe be away from you limits this move to possibly being used for preemptively sniping jumps from midrange. Still covers a good distance so it can be an alternative to 5B at specific spacings. Less range overall but covers multiple angles in that situation. Tsubame is more catch-all for anti-airing.
|
2AB:
- Properties: Deflectable.
- Another main punisher, is 1 frame faster than 5AB but does 2 points less damage. The hitbox of this move is very low to the ground so it can punish some moves such as Kazuki's WFT if you aren't confident with 5AB punish (you have to press it immediately after the block).
- Pretty plus on backhit and leaves you closer to the opponent than other options. Link a Tsubame after for swag.
|
Near Slashes
n.5A:
- Properties: Cancelable. Deflectable.
- Mostly just used in scrambles. No recoil animation.
|
n.5B:
- Properties: Recoil cancel on block. Cancelable. Deflectable.
- Fairly quick slash that can combo into his 236S or WFT for a knockdown. Only really useful as a punish starter if you aren't confident n.5AB will hit them in time or really want to land the WFT.
|
n.5AB:
- Properties: Recoil cancel on block. Deflectable.
- Basically a two-hitting version of 5AB. This naturally means you'll only want to use it when it's a guaranteed punish. It can recoil cancel or cancel during the first seven frames of its animation (before the actual attack comes out), but you really don't want to bank on either of those.
|
n.2A:
- Properties: Cancelable. Deflectable.
- Another scramble tool. Just like n.5A, it has no recoil animation.
|
n.2B:
- Properties: Cancelable. Deflectable.
- Basically n.2A with slower recovery. Ukyo's got better options at this range, and you really don't want to misjudge your spacing and have a 2B come out instead.
|
n.2AB:
- Properties: Recoil cancel on block. Cancelable. Deflectable.
- Really awkward attack in general. Multi-hit horizontal swipe upwards but not an anti-air due to bad reach. Does more damage than n.5AB but starts up 2 frames slower. You're probably okay not really bothering with this one.
|
Overheads
5BC:
- Properties: Hits high. Knockdown.
- Weird hopping overhead that goes backwards. The hitbox goes backwards through the animation like with Mina so it can possibly hit rollers. Not used much thanks to Tsubame Gaeshi just being that much better.
|
u.5BC:
- Properties: Hits high. Knockdown.
- Another weird overhead, now with Ukyo sticking his foot out. Doesn't go backwards and knocks the opponent quite a ways, but there are always better options to avoid lows and open your foe up, even when disarmed.
|
Kicks
5C:
- Surprisingly okay keepout move if you really don't want to be deflected I guess. Active for a few frames and sticks out a decent distance. He's got better kicks but this isn't bad to have.
|
6C:
- Properties: Hits low. Knockdown.
- Sliding knock down kick which is safe if you space it properly. Can add a 2BC if you are close enough after. A good use of this is to use this when your opponent is running at you. Very strong option when disarmed.
|
2C:
- Properties: Hits low.
- This fucking kick. 6-frame startup, neutral on block (this is really rare in SSVSP) and +5 on hit. Hits low, and can link into a Tsubame Gaeshi, which hits high, comes out in 4~5 frames, and knocks down, letting you chase them with more 2C oki.
- This is his main way of mixing up at close range. It recovers fast enough to let you throw off their timing with 2C 2C Tsubame, 2C -pause- Tsubame, 2C 66B crossup, or just run up and throw them afterwards.
|
3C:
- Properties: Hits low. Knockdown.
- Shares most of its frames with 6C, meaning it's really active. Doesn't move forward. Can't space to make it safer but it can dissuade approaches pretty okay like 5C.
|
Jumping
j.A:
- Properties: Hits high.
- Jumping n.2A/n.2B. Just use his other jumping slashes if you really need to meet the opponent in the air.
|
j.B:
- Properties: Hits high.
- Its hitbox allows it to cross up or instant overhead, but Ukyo jumps so slowly that against a good opponent the former will be blocked, and the latter will be punished on hit or block.
- The primary time to use j.B is in time slow, being a very quick and effective instant overhead. It also becomes a 50/50 when paired with his 2C, both of which can be easily hitconfirmed into Issen.
|
j.8AB:
- Properties: Hits high.
- A somewhat specialized air-to-air thanks to only being usable from a neutral jump. Can snipe opponents that otherwise lack a strong horizontal attack while in the air.
|
j.7/9AB:
- Properties: Hits high.
- General air-to-air button that covers horizontally in front if you don't want to commit to a Tsubame. Ukyo doesn't jump much, but this is a strong button regardless.
|
j.C:
- Properties: Hits high.
- Hits twice, really active, covers slightly below in front of him. Not too bad but as usual be cautious when jumping as Ukyo. Might mess with throw mashers when landing with it.
|
Dashing
66A:
- Properties: Recoil cancel on block. Deflectable.
- Low damage, okay reach, but horrendous frames on block and awkward recoil cancel window means you do not want to use this.
|
66B:
- Properties: Knockdown.
- Ukyo dashes to the other side of the opponent and does a slash that will knock down on hit. Fast irritating mixup combined with 66C and 66CD, particularly as surprise oki.
- Very unsafe, but since he runs right past the opponent it can avoid a lot of anti-dash moves. It will always whiff if your opponent is in the corner and can possibly whiff if you do it too close because of how far he runs. If you space this wrong and don't go behind them he'll still slice behind him and you will get punished. TL;DR be careful.
|
66AB:
- Properties: Knockdown.
- Ukyo rolls to the ground and slashes at the opponent's knees. Another awesome punisher, for those times when 5AB won't reach and when chasing backdashes. It's super fast and does good damage for its speed, and you can tack on a 2BC if you're close enough afterwards. It can also go under a surprising amount of stuff with its low hitbox. Deflects not catching this move makes it great for punishing long range moves with strong recoil cancels even if you're in range for 5AB. Ukyo's fast dash is just the icing on the cake.
|
66C:
- Properties: Knockdown
- Basically running 6C. Can surprise opponents from a good distance away and combo into 2BC. An important threat from Ukyo's good kit of dashing normals.
|
Unarmed
u.5S:
- Dinky little slap. Frames aren't awful but Ukyo's kicks are pretty good so you don't need this much.
|
u.2S:
- Crouching version of the above. His kicks are better.
|
ju.S:
- Properties: Hits high.
- Jumping slap. Ukyo's moonjumping and j.C means this doesn't see use.
|
u.66S:
- Properties: Knockdown.
- Dash slap that knocks down. Safer up close than 66C but not a low.
|
System
Deflect - 216D:
- Standard deflect. Use like you would other deflects (recoil cancels, baiting pokes, etc).
|
Weapon Pickup - 5A:
- Surprisingly fast weapon pickup. Cancelling throw animation into weapon pickup leaves you plus enough to do all sorts of fun stuff.
|
Taunt Disarm - Start Start Start:
- Just kinda sticks his sword in the ground. Not terribly slow.
|
Specials
Tsubame Gaeshi - j.1236S:
- One of Ukyo's most important moves in general. A/B Tsubame are basically interchangeable, but you'll want to use B Tsubame for its better damage in most situations. All versions have very great hitboxes that more or less cannot be contested, on top of their fast startup. Doing this from the ground (tiger knee'ing/TK) is input as 12369S, and you want to learn how to do this if you want to play Ukyo well. Can also be TK'd with neutral/back jumps for specialized purposes.
- All versions hit overhead. A/B both have a blazing fast 3-frame startup and are fast enough to combo off of 2C when TK'd. Despite the quick bounce backwards looking safe, both versions are very unsafe on block. Small characters can also occasionally crouch right under it, such as Rera, so it's a riskier proposition against them. These are a very strong option to buffer after blocking an attack. Especially bad jumpins.
- AB Tsubame is slower (10f startup) but hits numerous times for great amount of damage and has an even larger hitbox than the others. It leaves him more open to punishment if blocked or whiffed, as he starts coughing after he lands from it, so only use it when you're absolutely certain it will hit.
- Outside of anti-airing, air-to-airing, punishing, and comboing into it, Tsubame Gaeshi becomes very dangerous during time slow. If he's meditated enough, he'll have enough time to land a full AB Tsubame, land, and juggle into Issen for ludicrous damage. This is very dangerous, especially if he baits a whiff before activating time slow.
|
Hiken Sasameyuki - 214S:
- Ukyo tosses up an apple before slicing repeatedly in front of him. Has good range, but is only really useful as a chip tool. AB version has throw invuln on startup in case you want to look cool on a throw read.
|
'Hi'ken Sasameyuki - 214C: (can be used unarmed)
- Just in case you wanted to throw an apple. Not very committal. Style points. If you don't throw at least five apples in a row you're a coward.
|
Zanzou Fumikomi Giri - 236S:
- Pseudo-rekka that has Ukyo send afterimages to slice you. All versions are very unsafe and are pretty easy to punish once you get used to the different audio cues for each one. Heavier versions go farther and add another slash to the sequence. Can theoretically be used as a gimmicky whiff punish from a back roll or long distance chip tool, but really it's best to use it for punishes where you want the knockdown, or a 236A recoil cancel off of 5B if you're feeling lucky.
|
Tsubame Rokuren - 236CD - WFT:
- Bad WFT compare to other characters. It starts up slow and has no invulnerable frames. Ukyo doesn't want to rage anyways, considering the strength of his meditation and time slow, but if can be comboed into off of n.5B if you really must. It is a high, though far too slow to actually open anyone up with.
|
Combos
Normal
- ... xx 236AB 2BC
- ... xx 214A
- ... xx 236CD
- 236A 8BC
- (236B or 236AB) 2BC
- 2C is low, firebird is high. Have fun blocking!
- 66AB 2BC
- 66C 2BC
- 6C 2BC
- 3C 2BC
Weapon pickup throw combos
- u.4/6CD A weapon pickup ...
- ... 5AB
- ... 236CD
- ... 214CD
- lol
Time slow
- 50/50 with instant overhead j.B and 2C. Both lead to Issen. 2C is harder to explode on reaction but hoping they won't is risky.
- This one hurts a lot. Primarily used if you bait a big enough whiff while popping time slow. Use Tsubame before landing (don't tiger knee it), wait a little while for them to fall just around head height before using Issen. Lots of meditation and a full sword gauge for the Tsubame Gaeshi will lead to this easily shaving off ~75% of a lifebar.
Strategies
Poking and Punishing
Ukyo is mainly played as a poking character. He can harass the opponent with long reaching normals (far 5B, far 2A). Multiple characters have a hard time contesting his normals so they need to start taking risks to get in. Risks he can often punish.
His punish game is exceptionally good: Far reaching 13-frame 5AB, and if it is too far, you can do the 4-frame 66AB. Buffering a TK Tsubame Gaeshi during hitstun/blockstun can also work up close if you don't want them to rage explode or if nothing else is fast enough. This also leads to 2C oki on hit.
Hit and Run
His poking and punishing game is complemented by Ukyo's quick dashing and backdash speed. Quick dashing allows 66AB for punish, 66B for cross up, 66C for low, and 66CD for grab. Good normals that cover important angles means he can also happily sit on a lead and down/back at a distance and hit them for trying to get in.
2C TSUBAME GAESHI
Once he scores a single knockdown, he can start running his 2C firebird oki, which may as well be unblockable for how fast it is. If you're feeling fancy, you can go for 2C 2C firebird to throw off their block timing. However, don't abuse this if your opponent is good at fuzzy guarding or has a decent invulnerable move. Also the hitbox doesn't hit close to the ground so it can be ducked. Especially if the Tsubame is poorly timed.
Matchups
Some characters have dangerous counters to Ukyo's mixup. Watch out for:
Rasetsumaru: A reversal super will go clean through anything you try on wakeup, and he rages really fast. His rage doesn't last very long though and his super is mega unsafe.
Jubei: If you get too predictable, a good Jubei player can buffer a high counter off of a blocked 2C and catch a followup Tsubame Gaeshi. A reversal 623 will beat your 2C.
Yoshitora: His AB uppercut takes a while to get out but is invincible until the first active frame. If your 2C is early enough you can actually recover before his uppercut's first active frame, then block and punish.
Haohmaru: Similar to Yoshitora in that a well-timed 2C meaty can whiff and recover in time for you to block and punish if he does 623S on his wakeup. 623AB is really fast so it might blow you up for a poorly timed one but has no invincibility.
Frame Data
| Move
|
Damage
|
Startup
|
Active
|
Total
|
Cancel
|
Weapon
Clash
|
Hit
Adv.
|
Backhit
Adv.
|
Block
Adv.
|
Guard
|
Notes
|
| 5A |
6 |
9 |
2 |
25 |
1~2(2) / 9~14(6) |
8(1) |
-6 |
-6 |
-12 |
Mid |
Weak attack, Deflectable(weak)
|
| 5B |
12 |
8 |
2 |
34 |
11~15(5) |
7(1) |
-8 |
+0 |
-18 |
Mid |
Medium attack, Deflectable(med)
|
| 5AB |
31 |
13 |
2 |
52 |
x |
- |
-2 |
+8 |
-34 |
Mid |
Heavy attack, Deflectable(heavy)
|
| 2A |
5 |
5 |
2 |
20 |
1(1) / 7~11(5) |
- |
-5 |
-5 |
-6 |
Mid |
Weak attack, Deflectable(weak)
|
| 2B |
11 |
8 |
3 |
40 |
1~4(4) |
- |
-9 |
-1 |
-18 |
Mid |
Medium attack, Deflectable(med)
|
| 2AB |
29 |
12 |
1 |
49 |
1~6(6) |
- |
+0 |
+10 |
-32 |
Mid |
Heavy attack, Deflectable(heavy)
|
| n.5A |
5 |
5 |
3 |
16 |
1~4(4) / 5~13(9) |
- |
-1 |
-1 |
-6 |
Mid |
Weak attack, Deflectable(weak)
|
| n.5B |
8 |
8 |
1 |
40 |
8~11(4) |
6~7(2) |
-14 |
-6 |
-18 |
Mid |
Medium attack, Deflectable(med)
|
| n.5AB |
5, 23 |
12 |
2 |
63 |
1~7(7) |
9~11(3) / 14(1) / 19(1) |
-6 |
+4 |
-26 |
Mid |
Weak attack, Deflectable(heavy)
|
| n.2A |
4 |
5 |
5 |
16 |
1~2(2) / 5~12(8) |
- |
-1 |
-1 |
-6 |
Mid |
Weak attack, Deflectable(weak)
|
| n.2B |
6 |
6 |
6 |
23 |
6~15(10) |
- |
+1 |
+9 |
-12 |
Mid |
Medium attack, Deflectable(med)
|
| n.2AB |
5, 25 |
14 |
3 |
62 |
1~5(5) |
- |
-2 |
+8 |
-21 |
Mid |
Weak attack, Deflectable(heavy)
|
| 5C |
5 |
8 |
4 |
35 |
1~4(4) |
- |
-9 |
-1 |
-22 |
Mid |
Medium attack
|
| 6C |
7 |
5 |
11 |
34 |
1~2(2) |
- |
KD |
KD |
-24 |
Low |
Knockdown attack
|
| 2C |
2 |
6 |
4 |
11 |
x |
- |
+5 |
+5 |
+0 |
Low |
Weak attack
|
| 3C |
6 |
5 |
10 |
28 |
x |
- |
KD |
KD |
-24 |
Mid |
Knockdown attack
5-14f throw invincible
|
| j.A |
5 |
7 |
16 |
30 |
1~3(3) |
- |
-- |
-- |
-- |
High |
Weak attack, Deflectable(weak)
|
| j.B |
9 |
5 |
4 |
29 |
1~2(2) |
- |
-- |
-- |
-- |
High |
Medium attack, Deflectable(med)
|
| j8.AB |
26 |
10 |
3 |
33 |
1~5(5) |
- |
-- |
-- |
-- |
High |
Heavy attack, Deflectable(heavy)
|
| j7/9.AB |
25 |
12 |
5 |
27 |
1~5(5) |
- |
-- |
-- |
-- |
High |
Heavy attack, Deflectable(heavy)
|
| j.C |
3, 3 |
5 |
5 |
30 |
x |
- |
-- |
-- |
-- |
High |
Heavy attack
|
| ju.C |
3, 3 |
5 |
5 |
30 |
x |
- |
-- |
-- |
-- |
High |
Heavy attack
|
| 5BC |
16 |
20 |
2 |
45 |
x |
- |
KD |
KD |
-19 |
High |
Medium attack Knockdown attack
|
| u.5BC |
6 |
31 |
9 |
44 |
x |
- |
KD |
KD |
-19 |
High |
Medium attack Knockdown attack
|
| 66A |
5 |
11 |
8 |
33 |
1~3(3) |
- |
-4 |
+4 |
-26 |
Mid |
Medium attack, Deflectable(heavy)
|
| 66B |
12 |
22 |
1 |
66 |
x |
- |
KD |
KD |
-39 |
Mid |
Knockdown attack
|
| 66AB |
15 |
4 |
2 |
38 |
1~2(2) |
- |
KD |
KD |
-29 |
Mid |
Knockdown attack
1-13f throw invincible
|
| 66C |
4 |
6 |
12 |
32 |
1~3(3) |
- |
KD |
KD |
-21 |
Low |
Knockdown attack
1-17f throw invincible
|
| u.5S |
4 |
5 |
1 |
18 |
1(1) |
- |
-3 |
-3 |
-8 |
Mid |
Weak attack
|
| u.2S |
4 |
6 |
1 |
20 |
x |
- |
-4 |
-4 |
-9 |
Mid |
Weak attack
|
| ju.S |
4 |
9 |
8 |
25 |
x |
- |
-- |
-- |
-- |
High |
Medium attack
|
| u.66S |
4 |
6 |
1 |
24 |
1~2(2) |
- |
KD |
KD |
-13 |
Mid |
Knockdown attack
1-14f throw invincible
|
| u.66C |
4 |
6 |
12 |
32 |
1~3(3) |
- |
KD |
KD |
-21 |
Low |
Knockdown attack
1-17f throw invincible
|
| 2BC |
6 |
21 |
7 |
68 |
x |
- |
-- |
-- |
-- |
Mid |
|
| u.2BC |
8 |
7 |
24 |
35 |
x |
- |
-- |
-- |
-- |
Mid |
|
| 8BC |
13 |
40 |
38 |
101 |
x |
- |
-- |
-- |
-- |
Mid |
|
| u.8BC |
8 |
25 |
18 |
79 |
x |
- |
-- |
-- |
-- |
Mid |
|
| Tsubame Gaeshi - j.1236A |
18 |
3 |
6 |
x |
x |
- |
KD |
KD |
-41 |
High |
Medium attack Knockdown attack
16f landing recovery
|
| Tsubame Gaeshi - j.1236B |
21 |
3 |
6 |
x |
x |
- |
KD |
KD |
-48 |
High |
Medium attack Knockdown attack
23f landing recovery
|
| Tsubame Gaeshi - j.1236AB |
2x6, 24 |
10 |
7 |
x |
x |
- |
?? |
?? |
-75 |
High |
Medium attack Knockdown attack
45f landing recovery
|
| 'Hi'ken Sasameyuki - 214C |
x |
x |
x |
17 |
x |
- |
-- |
-- |
-- |
Mid |
|
| Hiken Sasameyuki - 214A |
5x5 |
19 |
2 |
61 |
x |
- |
-4 |
-4 |
-17 |
Mid |
Medium attack
|
| Hiken Sasameyuki - 214B |
6x8 |
18 |
2 |
76 |
x |
- |
-5 |
-5 |
-17 |
Mid |
Medium attack
|
| Hiken Sasameyuki - 214AB |
7x11 |
22 |
2 |
102 |
x |
- |
-12 |
-12 |
-25 |
Mid |
Medium attack
1-12f throw invincible
|
| Zanzou Fumikomi Giri - 236A |
16 |
15 |
2 |
x |
x |
- |
KD |
KD |
-27 |
Mid |
Knockdown attack
|
| Zanzou Fumikomi Giri - 236B |
5, 18 |
15 |
2 |
x |
x |
- |
KD |
KD |
-36 |
Mid |
Medium attack Knockdown attack
|
| Zanzou Fumikomi Giri - 236AB |
5, 5, 10 |
15 |
2 |
x |
x |
- |
KD |
KD |
-34 |
Mid |
Heavy attack Knockdown attack
|
| Tsubame Rokuren - 236CD |
30 |
19 |
29 |
69 |
x |
- |
KD |
KD |
-59 |
High |
Medium attack
14-47f above ground
22f landing recovery
|

