|
|
| Line 2: |
Line 2: |
| |name = Tsunade | | |name = Tsunade |
| |image = SCON4 Tsunade Portrait.png | | |image = SCON4 Tsunade Portrait.png |
| |size = 300 | | |size = 350px |
| |health = 220 | | |health = 220 |
| |guard = 1760 | | |guard = 1760 |
Revision as of 07:23, 2 September 2023
| Tsunade
|

|
| Health:
|
220
|
| Guard Gauge:
|
1760
|
| Backdash Type:
|
Normal
|
Summary
Tsunade reflects her status as one of the strongest characters in the Naruto canon with high damage, guard breaks and attacks which literally send the victim flying across the screen. Primarily a close-range brawler, Tsunade utilizes mix-ups stemming from her feints, unblockable charge attacks, and grabs. In addition, her medical ninjutsu supplies Tsunade with some unique mechanics- certain A attacks cause the confusion status effect while holding the button and her 2X is her Mitotic Regeneration Jutsu, a once-a-round HP recovery. If you like punching holes through your enemies, the Godaime might be the character for you.
Notes
- Hyuuga Cancels: Tsunade is able to cancel the startup or charge of some of her attacks back into a neutral state by pressing
 during them.
- Confusion: Some of Tsunade's moves can scramble the opponent's inputs, inverting either buttons or directions.
String List
| String #
|
Inputs
|
Notes
|
 01 01
|

|
 Cancellable at () Cancellable at ()- For all, can

- For 02-03, can

- For 02-03, can hold the fourth input to change the move's effect.
- For 04-05, can
- For 04-05, can hold the third input to change the move's effect.
- On holdable attacks:
- Can still , even while holding the button.
- If partially charged, the move inflicts Confusion.
- If fully charged, the move inflicts Confusion and is unblockable.
|
| 02
|
|
| 03
|
|
| 04
|
|
| 05
|
|
| 06
|

|
|
| 07
|
|
- Can
- Can hold the second input to change the move's effect.
- Can still , even while holding the button.
- If partially charged, the move inflicts Confusion.
- If fully charged, the move inflicts Confusion and is unblockable.
|
| 08
|
|
| 09
|

|
|
| 10
|
|
- Can
- Can hold the third input to change the move's effect.
- Can still , even while holding the button.
- If partially charged, the move inflicts Confusion.
- If fully charged, the move inflicts Confusion and is unblockable.
|
| 11
|
|
| 12
|
|
- Cancellable at ()
- For all, can
- For 13-14, can
- For 13-14, can hold the fifth input to change the move's effect.
- For 15-16, can
- For 15-16, can hold the fourth input to change the move's effect.
- On holdable attacks:
- Can still , even while holding the button.
- If partially charged, the move inflicts Confusion.
- If fully charged, the move inflicts Confusion and is unblockable.
|
| 13
|
|
| 14
|
|
| 15
|
|
| 16
|
|
| 17
|
|
- Can
- Can hold the third input to change the move's effect.
- Can still , even while holding the button.
- If partially charged, the move inflicts Confusion.
- If fully charged, the move inflicts Confusion and is unblockable.
|
| 18
|
|
| 19
|
|
- Can
- Can hold the third input to change the move's effect.
- Can still , even while holding the button.
- If partially charged, the move inflicts Confusion.
- If fully charged, the move inflicts Confusion and is unblockable.
|
| 20
|
|
| 21
|
|
- Can
- Can hold the first input to change the move's effect.
- Can still , even while holding the button.
- If partially charged, the move inflicts Confusion.
- If fully charged, the move inflicts Confusion and is unblockable.
|
| 22
|
|
| 23
|

|
|
| 24
|
|
- Can
- Can hold the second input to change the move's effect.
- Can still , even while holding the button.
- If partially charged, the move inflicts Confusion.
- If fully charged, the move inflicts Confusion and is unblockable.
|
| 25
|
|
Weak Attacks
5B
|
|
| Damage
|
Hit Level
|
Startup
|
Active Frames
|
Recovery
|
Guard Damage
|
Blockstun
|
Advantage on Hit
|
Advantage on Block
|
| -
|
-
|
-
|
-
|
-
|
-
|
-
|
-
|
-
|
- Primary Jab.
- Can go into () on whiff.
|
|
Toggle Hitboxes Toggle Hitboxes
|
6B
|
|
| Damage
|
Hit Level
|
Startup
|
Active Frames
|
Recovery
|
Guard Damage
|
Blockstun
|
Advantage on Hit
|
Advantage on Block
|
| -
|
-
|
-
|
-
|
-
|
-
|
-
|
-
|
-
|
|
|
|
Toggle Hitboxes Toggle Hitboxes
|
2B
|
|
| Damage
|
Hit Level
|
Startup
|
Active Frames
|
Recovery
|
Guard Damage
|
Blockstun
|
Advantage on Hit
|
Advantage on Block
|
| -
|
-
|
-
|
-
|
-
|
-
|
-
|
-
|
-
|
|
|
|
Toggle Hitboxes Toggle Hitboxes
|
4B
|
|
| Damage
|
Hit Level
|
Startup
|
Active Frames
|
Recovery
|
Guard Damage
|
Blockstun
|
Advantage on Hit
|
Advantage on Block
|
| -
|
-
|
-
|
-
|
-
|
-
|
-
|
-
|
-
|
|
|
|
Toggle Hitboxes Toggle Hitboxes
|
8B
|
|
| Damage
|
Hit Level
|
Startup
|
Active Frames
|
Recovery
|
Guard Damage
|
Blockstun
|
Advantage on Hit
|
Advantage on Block
|
| -
|
-
|
-
|
-
|
-
|
-
|
-
|
-
|
-
|
|
|
|
Toggle Hitboxes Toggle Hitboxes
|
Running B
|
|
| Damage
|
Hit Level
|
Startup
|
Active Frames
|
Recovery
|
Guard Damage
|
Blockstun
|
Advantage on Hit
|
Advantage on Block
|
| -
|
-
|
-
|
-
|
-
|
-
|
-
|
-
|
-
|
|
|
|
Toggle Hitboxes Toggle Hitboxes
|
j.B
|
|
| Damage
|
Hit Level
|
Startup
|
Active Frames
|
Recovery
|
Guard Damage
|
Blockstun
|
Advantage on Hit
|
Advantage on Block
|
| -
|
-
|
-
|
-
|
-
|
-
|
-
|
-
|
-
|
|
|
|
Toggle Hitboxes Toggle Hitboxes
|
Strong Attacks
5A
|
|
| Damage
|
Hit Level
|
Startup
|
Active Frames
|
Recovery
|
Guard Damage
|
Blockstun
|
Advantage on Hit
|
Advantage on Block
|
| -
|
-
|
-
|
-
|
-
|
-
|
-
|
-
|
-
|
|
|
|
Toggle Hitboxes Toggle Hitboxes
|
6A
|
|
| Damage
|
Hit Level
|
Startup
|
Active Frames
|
Recovery
|
Guard Damage
|
Blockstun
|
Advantage on Hit
|
Advantage on Block
|
| -
|
-
|
-
|
-
|
-
|
-
|
-
|
-
|
-
|
|
|
|
Toggle Hitboxes Toggle Hitboxes
|
2A
|
|
| Damage
|
Hit Level
|
Startup
|
Active Frames
|
Recovery
|
Guard Damage
|
Blockstun
|
Advantage on Hit
|
Advantage on Block
|
| -
|
-
|
-
|
-
|
-
|
-
|
-
|
-
|
-
|
|
|
|
Toggle Hitboxes Toggle Hitboxes
|
4A
|
|
| Damage
|
Hit Level
|
Startup
|
Active Frames
|
Recovery
|
Guard Damage
|
Blockstun
|
Advantage on Hit
|
Advantage on Block
|
| -
|
-
|
-
|
-
|
-
|
-
|
-
|
-
|
-
|
|
|
|
Toggle Hitboxes Toggle Hitboxes
|
8A
|
|
| Damage
|
Hit Level
|
Startup
|
Active Frames
|
Recovery
|
Guard Damage
|
Blockstun
|
Advantage on Hit
|
Advantage on Block
|
| -
|
-
|
-
|
-
|
-
|
-
|
-
|
-
|
-
|
|
|
|
Toggle Hitboxes Toggle Hitboxes
|
Running A
|
|
| Damage
|
Hit Level
|
Startup
|
Active Frames
|
Recovery
|
Guard Damage
|
Blockstun
|
Advantage on Hit
|
Advantage on Block
|
| -
|
-
|
-
|
-
|
-
|
-
|
-
|
-
|
-
|
|
|
|
Toggle Hitboxes Toggle Hitboxes
|
j.A
|
|
| Damage
|
Hit Level
|
Startup
|
Active Frames
|
Recovery
|
Guard Damage
|
Blockstun
|
Advantage on Hit
|
Advantage on Block
|
| -
|
-
|
-
|
-
|
-
|
-
|
-
|
-
|
-
|
|
|
|
Toggle Hitboxes Toggle Hitboxes
|
Throws
5Y
|
|
| Damage
|
Hit Level
|
Startup
|
Active Frames
|
Recovery
|
Guard Damage
|
Blockstun
|
Advantage on Hit
|
Advantage on Block
|
| 20
|
-
|
1
|
1
|
48
|
-
|
-
|
-
|
-
|
|
|
|
2Y
|
|
| Damage
|
Hit Level
|
Startup
|
Active Frames
|
Recovery
|
Guard Damage
|
Blockstun
|
Advantage on Hit
|
Advantage on Block
|
| -
|
-
|
-
|
-
|
-
|
-
|
-
|
-
|
-
|
|
|
|
j.Y
|
|
| Damage
|
Hit Level
|
Startup
|
Active Frames
|
Recovery
|
Guard Damage
|
Blockstun
|
Advantage on Hit
|
Advantage on Block
|
| -
|
-
|
-
|
-
|
-
|
-
|
-
|
-
|
-
|
|
|
|
Special
5X
|
|
| Damage
|
Hit Level
|
Startup
|
Active Frames
|
Recovery
|
Guard Damage
|
Blockstun
|
Advantage on Hit
|
Advantage on Block
|
| -
|
-
|
-
|
-
|
-
|
-
|
-
|
-
|
-
|
|
|
|
Toggle Hitboxes Toggle Hitboxes
|
2X
|
|
| Damage
|
Hit Level
|
Startup
|
Active Frames
|
Recovery
|
Guard Damage
|
Blockstun
|
Advantage on Hit
|
Advantage on Block
|
| -
|
-
|
-
|
-
|
-
|
-
|
-
|
-
|
-
|
|
|
|
Toggle Hitboxes Toggle Hitboxes
|
Strategy
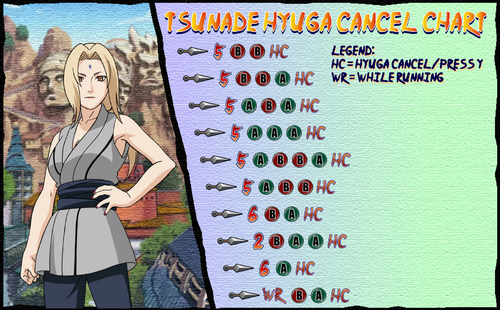
A diagram of Lady Tsunade's Hyuuga cancels
Tsunade can feint or "Hyuuga-cancel" () certain attacks during startup. A attacks which can be feinted can also be charged to inflict Tsunade's confusion status effect with their second level charges being unblockable, creating a threatening mixup between straight forward attacks, grabs, and unblockable attacks. A single charge (1C) swaps the victims directional inputs (both left/right and up/down) and two charges (2C) swaps button presses (A/B and Y/X).
Her 5BBBB string is one of the strongest in the game and is close to a true blockstring, depending on the speed of the opponent's 4B. The 5BB is likely Tsunade's best feint as well due to its placement at the start of the string where the defender may not have good options aside from blocking.
Tsunade's big punch ending the 5ABAA string is an auto-shield break, making it a high-reward mix-up which can be used occasionally to break down an overly defensive opponent. However, it can be avoided and punished on reaction.
- 2BAAB sends the victim flying allowing Tsunade to meterlessly link combos, including to 2A. Tsunade may also predict and punish substitution using the 2BAA Hyuuga-cancel.
- 6BB is a short punish which launches the opponent.
- 6BAA is another short string with multiple applications as a block string or punish.
- The first A can be charged, cancelled, or continued to the last A for Tsunade's finger-flick capture-state, resulting in a hard knockdown.
- The 8B hit-grab deals a high amount of unnscaled, unsubbable damage and is a good combo finisher. Used on an opponent below KnJ chakra, it results in a hard knockdown.
- Tsunade can 5X directly following 2Y with proper timing.
- 2X can be used to recover from life deficits that may otherwise be difficult to overcome. Tsunade can find time to 2X after launching the opponent or when she has enough distance to keep her safe from having the startup interrupted.
Colors
Navigation
| General
|
|
|
|
| Characters
|
|
|
|
| Archived Information
|
|


